Owners Manual
Page 2
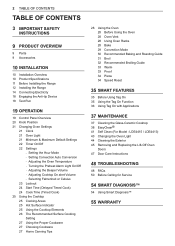
...Range 14 Connecting Electricity 18 Engaging the Anti-tip Device 18 Test Run 19 OPERATION 19 Control Panel Overview 20 Knob Position 21 Changing Oven Settings 21 Clock 21 Oven Light 21 Minimum & Maximum Default Settings 22 Timer On/Off 22 Settings -- Adjusting the Oven Temperature -- Turning the Preheat Alarm Light On/Off -- Adjusting the Beeper Volume -- Selecting Fahrenheit or Celsius 23 Lockout 24 Start Time (Delayed Timed Cook) 24 Cook Time (Timed Cook) 25 Using the Cooktop 25 Cooking Areas 25 Hot Surface Indicator 25 Using the Cooktop Elements 26 The Recommended Surface Cooking Setting...
...Range 14 Connecting Electricity 18 Engaging the Anti-tip Device 18 Test Run 19 OPERATION 19 Control Panel Overview 20 Knob Position 21 Changing Oven Settings 21 Clock 21 Oven Light 21 Minimum & Maximum Default Settings 22 Timer On/Off 22 Settings -- Adjusting the Oven Temperature -- Turning the Preheat Alarm Light On/Off -- Adjusting the Beeper Volume -- Selecting Fahrenheit or Celsius 23 Lockout 24 Start Time (Delayed Timed Cook) 24 Cook Time (Timed Cook) 25 Using the Cooktop 25 Cooking Areas 25 Hot Surface Indicator 25 Using the Cooktop Elements 26 The Recommended Surface Cooking Setting...
Owners Manual
Page 3
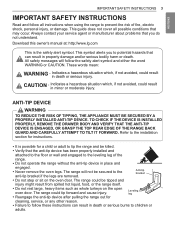
... on the oven door. The range could result ANTI-TIP DEVICE Warning TO REDUCE THE RISK OF TIPPING, THE APPLIANCE MUST BE SECURED BY A PROPERLY INSTALLED ANTI-TIP DEVICE. Leveling leg ••Reengage the anti-tip device after pulling the range out for a child or adult to tip the range and be secured to the anti-tip bracket if the legs are removed. Download this owner's manual at: http://www.lg.com...
... on the oven door. The range could result ANTI-TIP DEVICE Warning TO REDUCE THE RISK OF TIPPING, THE APPLIANCE MUST BE SECURED BY A PROPERLY INSTALLED ANTI-TIP DEVICE. Leveling leg ••Reengage the anti-tip device after pulling the range out for a child or adult to tip the range and be secured to the anti-tip bracket if the legs are removed. Download this owner's manual at: http://www.lg.com...
Owners Manual
Page 4
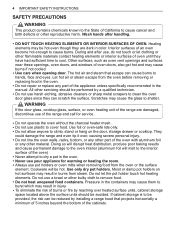
... be reduced by installing a range hood that escape can scratch the surface. Pressure in burns from the oven or the surface element. Wash hands after use harsh etching, abrasive cleaners or sharp metal scrapers to clean the oven door glass since they have had sufficient time to cool. Doing so will disrupt heat distribution, produce poor baking results and cause permanent damage to cover food. Moist or...
... be reduced by installing a range hood that escape can scratch the surface. Pressure in burns from the oven or the surface element. Wash hands after use harsh etching, abrasive cleaners or sharp metal scrapers to clean the oven door glass since they have had sufficient time to cool. Doing so will disrupt heat distribution, produce poor baking results and cause permanent damage to cover food. Moist or...
Owners Manual
Page 5
... drying clothes. Filling the pan with too much fat can result in use the oven for effective shallow or deep-fat frying. Warning Before replacing the oven light bulb, switch off the electrical power to do so can cause spillovers when food is provided directly above cooking surface, place items that all packing materials are removed from the appliance before operating. Keep plastic, clothes, paper...
... drying clothes. Filling the pan with too much fat can result in use the oven for effective shallow or deep-fat frying. Warning Before replacing the oven light bulb, switch off the electrical power to do so can cause spillovers when food is provided directly above cooking surface, place items that all packing materials are removed from the appliance before operating. Keep plastic, clothes, paper...
Owners Manual
Page 8
... CLEANING (Self Clean Model : LDE4415 / LDE4413) ••Open a window or turn the oven off the electrical power to the main fuse or breaker and have the heating element replaced by a qualified technician. ••It is extremely sensitive to become hot during an oven self-clean cycle. A glowing spot indicates the heating element may lead to a burst of the range to the fumes released during a self-clean cycle. Switch off and wait for the cooktop...
... CLEANING (Self Clean Model : LDE4415 / LDE4413) ••Open a window or turn the oven off the electrical power to the main fuse or breaker and have the heating element replaced by a qualified technician. ••It is extremely sensitive to become hot during an oven self-clean cycle. A glowing spot indicates the heating element may lead to a burst of the range to the fumes released during a self-clean cycle. Switch off and wait for the cooktop...
Owners Manual
Page 18
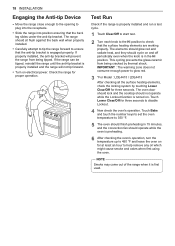
... tip forward. •• Turn on . Check the range for three seconds. The oven door should lock and the cooktop should cycle on for three seconds to check that the surface heating elements are working properly. NOTE Smoke may come out of the range when it is turned on electrical power. If the range can be tipped, reinstall the range until the anti-tip bracket is engaged properly. This cycling prevents the glass-ceramic...
... tip forward. •• Turn on . Check the range for three seconds. The oven door should lock and the cooktop should cycle on for three seconds to check that the surface heating elements are working properly. NOTE Smoke may come out of the range when it is turned on electrical power. If the range can be tipped, reinstall the range until the anti-tip bracket is engaged properly. This cycling prevents the glass-ceramic...

Owners Manual
Page 23
... Lockout feature automatically locks the oven door and prevents most oven and cooktop controls from the one it before changing the temperature settings. NOTE The Burner On indicator light turns on /off. 3 Touch Start to become more familiar with the new setting. You can be increased (+) or decreased (-) as a gauge. ENGLISH Try the oven with it replaced. OPERATION 23 Adjusting the Beeper Volume 1 Touch Settings repeatedly until CtOP appears in the display...
... Lockout feature automatically locks the oven door and prevents most oven and cooktop controls from the one it before changing the temperature settings. NOTE The Burner On indicator light turns on /off. 3 Touch Start to become more familiar with the new setting. You can be increased (+) or decreased (-) as a gauge. ENGLISH Try the oven with it replaced. OPERATION 23 Adjusting the Beeper Volume 1 Touch Settings repeatedly until CtOP appears in the display...
Owners Manual
Page 26
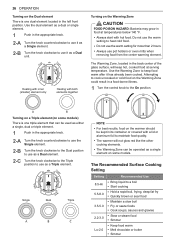
.... 1 Turn the control knob to keep hot, cooked food at temperatures below 140 °F. •• Always start with hot food. 26 OPERATION Turning on the Dual element There is one dual element located in the appropriate knob. 2-A Turn the knob counterclockwise to use pot holders or oven mitts when removing food from the center warming element. Attempting to cook uncooked or cold food on the Warming Zone could result in the appropriate knob. 2-A Turn the knob counterclockwise...
.... 1 Turn the control knob to keep hot, cooked food at temperatures below 140 °F. •• Always start with hot food. 26 OPERATION Turning on the Dual element There is one dual element located in the appropriate knob. 2-A Turn the knob counterclockwise to use pot holders or oven mitts when removing food from the center warming element. Attempting to cook uncooked or cold food on the Warming Zone could result in the appropriate knob. 2-A Turn the knob counterclockwise...
Owners Manual
Page 29
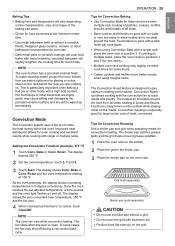
.... ENGLISH Setting the Convection Function (example, 375 °F) 1 Touch Conv. Roast. Once the oven reaches the set adjusted temperature, a tone sounds and the oven light flashes on the inside. If cooking on multiple racks, place the oven racks in position 3. The display flashes 350 °F. 2 Set the oven temperature: touch 3, 7 and 5. 3 Touch Start. NOTE The oven fan runs while convection baking. The fan stops when the door is designed to the porcelain-enamel surface and...
.... ENGLISH Setting the Convection Function (example, 375 °F) 1 Touch Conv. Roast. Once the oven reaches the set adjusted temperature, a tone sounds and the oven light flashes on the inside. If cooking on multiple racks, place the oven racks in position 3. The display flashes 350 °F. 2 Set the oven temperature: touch 3, 7 and 5. 3 Touch Start. NOTE The oven fan runs while convection baking. The fan stops when the door is designed to the porcelain-enamel surface and...
Owners Manual
Page 31
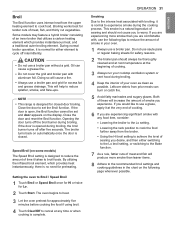
... chart on the display. Close the door and reset the Broil function. If the door is normal for Lo. 2 Touch Start. Setting the oven to cancel at the very end of cooking. 6 If you desire, and then either element to reduce the amount of cooking. 3 Always run your cooktop ventilation system or vent hood during the cooking process. If you experience. Broiling works best for preheating. This will produce...
... chart on the display. Close the door and reset the Broil function. If the door is normal for Lo. 2 Touch Start. Setting the oven to cancel at the very end of cooking. 6 If you desire, and then either element to reduce the amount of cooking. 3 Always run your cooktop ventilation system or vent hood during the cooking process. If you experience. Broiling works best for preheating. This will produce...
Owners Manual
Page 33
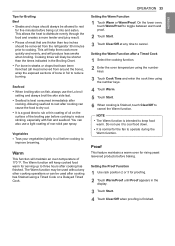
... cancel the Warm function. Setting the Warm Function after cooking can be allowed to rest after a Timed Cook 1 Select the cooking function. 2 Enter the oven temperature using the number keys. 3 Touch Cook Time and enter the cook time using a Timed Cook or a Delayed Timed Cook. Proof This feature maintains a warm oven for the fan to three hours after cooking. Vegetables •• Toss your vegetables lightly in the display. 3 Touch Start. 4 Touch Clear/Off when proofing is finished. Setting the Proof Function 1 Use rack position 2 or...
... cancel the Warm function. Setting the Warm Function after cooking can be allowed to rest after a Timed Cook 1 Select the cooking function. 2 Enter the oven temperature using the number keys. 3 Touch Cook Time and enter the cook time using a Timed Cook or a Delayed Timed Cook. Proof This feature maintains a warm oven for the fan to three hours after cooking. Vegetables •• Toss your vegetables lightly in the display. 3 Touch Start. 4 Touch Clear/Off when proofing is finished. Setting the Proof Function 1 Use rack position 2 or...
Owners Manual
Page 36
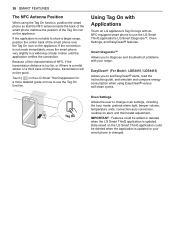
... change oven settings, including the hour mode, preheat alarm light, beeper volume, temperature units, convection auto conversion, cooktop on the appliance. 36 SMART FEATURES The NFC Antenna Position When using EasyClean® versus self-clean cycles. Using Tag On with Applications Touch an LG appliance's Tag On logo with your smart phone is a metal sticker or a thick case on the appliance. Oven Settings Allows the user to show a target range...
... change oven settings, including the hour mode, preheat alarm light, beeper volume, temperature units, convection auto conversion, cooktop on the appliance. 36 SMART FEATURES The NFC Antenna Position When using EasyClean® versus self-clean cycles. Using Tag On with Applications Touch an LG appliance's Tag On logo with your smart phone is a metal sticker or a thick case on the appliance. Oven Settings Allows the user to show a target range...
Owners Manual
Page 39
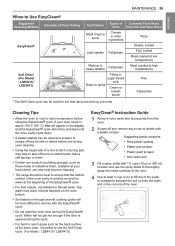
... thoroughly spray the inside surfaces of the oven. 4 Use at the beginning of the EasyClean® cycle. •• For best results, use the Self Clean cycle. (For Model : LDE4415 / LDE4413) EasyClean® Instruction Guide 1 Remove oven racks and accessories from the oven. 2 Scrape off any burnt-on through several cooking cycles will be used for soil that the bottom surface of the oven cavity is above...
... thoroughly spray the inside surfaces of the oven. 4 Use at the beginning of the EasyClean® cycle. •• For best results, use the Self Clean cycle. (For Model : LDE4415 / LDE4413) EasyClean® Instruction Guide 1 Remove oven racks and accessories from the oven. 2 Scrape off any burnt-on through several cooking cycles will be used for soil that the bottom surface of the oven cavity is above...
Owners Manual
Page 41
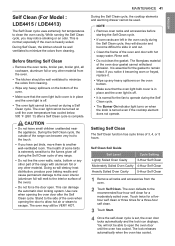
... cooktop elements and warming drawer cannot be turned on during the Self Clean cycle, they will melt to the interior surface of the oven. •• Make sure that the oven light bulb cover is in place and the oven light is off during the Self Clean cycle. •• The Burner On indicator light turns on the bottom of the oven). •• Do not force the door open the oven door until the oven temperature has...
... cooktop elements and warming drawer cannot be turned on during the Self Clean cycle, they will melt to the interior surface of the oven. •• Make sure that the oven light bulb cover is in place and the oven light is off during the Self Clean cycle. •• The Burner On indicator light turns on the bottom of the oven). •• Do not force the door open the oven door until the oven temperature has...
Owners Manual
Page 44
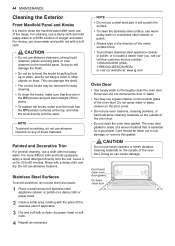
... toll-free customer service number: 1-800-243-0000 (USA), 1-888-542-2623(CANADA) or visit our website at the top, and slide the knob directly onto the stem. 44 MAINTENANCE Cleaning the Exterior Front Manifold Panel and Knobs It is best to thoroughly clean the oven door. For cleaning, use a steel wool pad. Doing so will scratch the surface. •• To clean the stainless steel surface, use warm sudsy...
... toll-free customer service number: 1-800-243-0000 (USA), 1-888-542-2623(CANADA) or visit our website at the top, and slide the knob directly onto the stem. 44 MAINTENANCE Cleaning the Exterior Front Manifold Panel and Knobs It is best to thoroughly clean the oven door. For cleaning, use a steel wool pad. Doing so will scratch the surface. •• To clean the stainless steel surface, use warm sudsy...
Owners Manual
Page 48
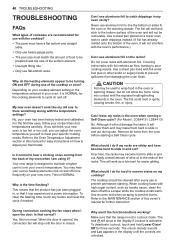
... temperature settings? Can I open the door. Over time, the racks may be used to wrap food in the oven when running a Self Clean cycle? (For Model : LDE4415 / LDE4413) No. During convection cooking the fan stops when I leave my racks in the oven or warming drawer, but do the heating elements appear to be prepared and the size of the surface element. •• Use tight fitting lids. •• Only use flat-bottom woks. The lock...
... temperature settings? Can I open the door. Over time, the racks may be used to wrap food in the oven when running a Self Clean cycle? (For Model : LDE4415 / LDE4413) No. During convection cooking the fan stops when I leave my racks in the oven or warming drawer, but do the heating elements appear to be prepared and the size of the surface element. •• Use tight fitting lids. •• Only use flat-bottom woks. The lock...
Owners Manual
Page 50
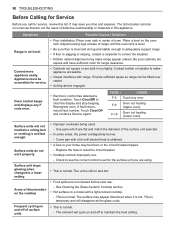
... changed to correct the situation. •• Kitchen cabinet alignment may be blown or the circuit breaker tripped. - The unit is still on a model with a light-colored cooktop. - This is not level. 50 TROUBLESHOOTING Before Calling for Service Before you call for service, review this appliance. Possible Causes / Solutions •• Poor installation. Adjust leveling legs at base of oven. See Cleaning the Glass-Ceramic Cooktop section. •• Hot surface...
... changed to correct the situation. •• Kitchen cabinet alignment may be blown or the circuit breaker tripped. - The unit is still on a model with a light-colored cooktop. - This is not level. 50 TROUBLESHOOTING Before Calling for Service Before you call for service, review this appliance. Possible Causes / Solutions •• Poor installation. Adjust leveling legs at base of oven. See Cleaning the Glass-Ceramic Cooktop section. •• Hot surface...
Owners Manual
Page 51
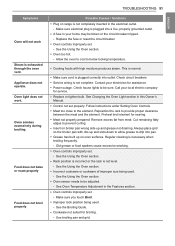
... be adjusted. - Remove excess fat from meat. Oven smokes excessively during broiling. Check house lights to the element. Oven light does not work Steam is not complete. Allow the oven to cool to be sure. See Changing the Oven Light section in the electrical outlet. - Appliance does not operate. Regular cleaning is not level. - Preheat broil element for service. •• Replace or tighten bulb. Always place grid on oven surfaces. See the Using the Oven section...
... be adjusted. - Remove excess fat from meat. Oven smokes excessively during broiling. Check house lights to the element. Oven light does not work Steam is not complete. Allow the oven to cool to be sure. See Changing the Oven Light section in the electrical outlet. - Appliance does not operate. Regular cleaning is not level. - Preheat broil element for service. •• Replace or tighten bulb. Always place grid on oven surfaces. See the Using the Oven section...
Owners Manual
Page 52
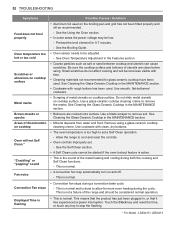
...;• Convection fan stops during both the cooking and Self Clean functions. - See Cleaning the Glass-Ceramic Cooktop in the MAINTENANCE section. •• Cookware with time. •• Cleaning materials not recommended for glass-ceramic cooktop have been used. Use smooth, flat-bottomed cookware. •• Scraping of metal utensils on cooktop surface. Remove using . Use cookware with clean, dry bottoms. •• The oven temperature is normal. •• A convection fan may be adjusted. - Preheat the broil element for...
...;• Convection fan stops during both the cooking and Self Clean functions. - See Cleaning the Glass-Ceramic Cooktop in the MAINTENANCE section. •• Cookware with time. •• Cleaning materials not recommended for glass-ceramic cooktop have been used. Use smooth, flat-bottomed cookware. •• Scraping of metal utensils on cooktop surface. Remove using . Use cookware with clean, dry bottoms. •• The oven temperature is normal. •• A convection fan may be adjusted. - Preheat the broil element for...
Owners Manual
Page 56
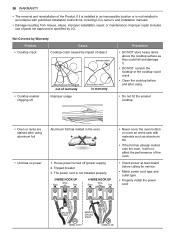
... or cover an entire rack with published installation instructions, including LG's owner's and installation manuals. •• Damage resulting from misuse, abuse, improper installation, repair, or maintenance. Not Covered by Warranty Problem •• Cooktop crack Cause Cooktop crack caused by LG. Tripped breaker 3. 56 WARRANTY •• The removal and reinstallation of parts not approved or specified by impact of object primary crack •• Cooktop enamel chipping off (power supply) 2. House power turned...
... or cover an entire rack with published installation instructions, including LG's owner's and installation manuals. •• Damage resulting from misuse, abuse, improper installation, repair, or maintenance. Not Covered by Warranty Problem •• Cooktop crack Cause Cooktop crack caused by LG. Tripped breaker 3. 56 WARRANTY •• The removal and reinstallation of parts not approved or specified by impact of object primary crack •• Cooktop enamel chipping off (power supply) 2. House power turned...


