
Owners Manual
Page 2
... Electrical Connections 12 Preparing Dishwasher 13 Sliding Dishwasher into Cabinet Opening 14 Connecting Water Supply Line and Power 16 Connecting the Drain Hose 17 Leveling Dishwasher 19 Securing Dishwasher in Cabinet Opening 19 Final Installation Check 21 OPERATION 21 Before Using 23 Control Panel 24 Wash Cycles 24 Options and Extra Functions 26 Loading the Dishwasher 26 Loading the Silverware Basket 27 Loading the Lower Rack 28 Loading the Upper Rack 30 Adding Cleaning Products 33 SMART FUNCTIONS 33 LG ThinQ Application 33 Smart DiagnosisTM Function 34 MAINTENANCE 34 Cleaning and Care...
... Electrical Connections 12 Preparing Dishwasher 13 Sliding Dishwasher into Cabinet Opening 14 Connecting Water Supply Line and Power 16 Connecting the Drain Hose 17 Leveling Dishwasher 19 Securing Dishwasher in Cabinet Opening 19 Final Installation Check 21 OPERATION 21 Before Using 23 Control Panel 24 Wash Cycles 24 Options and Extra Functions 26 Loading the Dishwasher 26 Loading the Silverware Basket 27 Loading the Lower Rack 28 Loading the Upper Rack 30 Adding Cleaning Products 33 SMART FUNCTIONS 33 LG ThinQ Application 33 Smart DiagnosisTM Function 34 MAINTENANCE 34 Cleaning and Care...

Owners Manual
Page 4
... an LG Electronics customer information center for instructions before using the appliance turn on the power supply line of the appliance. Children might use an extension cable or adapter with this or any accumulated hydrogen gas. Do not reuse old hoses. • After installing, check the hose connection for leaks. • Do not damage or place heavy items on all power supply lines that has not been used for...
... an LG Electronics customer information center for instructions before using the appliance turn on the power supply line of the appliance. Children might use an extension cable or adapter with this or any accumulated hydrogen gas. Do not reuse old hoses. • After installing, check the hose connection for leaks. • Do not damage or place heavy items on all power supply lines that has not been used for...
Owners Manual
Page 5
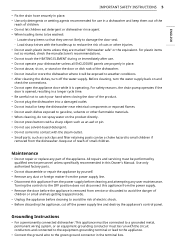
... user maintenance. Before cleaning, turn off the power supply line and destroy the appliance's control panel. Grounding Instructions • For a permanently connected dishwasher: This appliance must be connected to a grounded metal, permanent wiring system, or an equipment-grounding conductor must be a choke hazard to small children if removed from the power supply before the appliance is operating. ENGLISH IMPORTANT SAFETY INSTRUCTIONS 5 • Fix the drain hose securely in place. • Use only detergents...
... user maintenance. Before cleaning, turn off the power supply line and destroy the appliance's control panel. Grounding Instructions • For a permanently connected dishwasher: This appliance must be connected to a grounded metal, permanent wiring system, or an equipment-grounding conductor must be a choke hazard to small children if removed from the power supply before the appliance is operating. ENGLISH IMPORTANT SAFETY INSTRUCTIONS 5 • Fix the drain hose securely in place. • Use only detergents...

Owners Manual
Page 6
... precautions, including the following: Installation • Install the product on a firm and level floor. • This dishwasher must be hot. • If the drain hose and the water supply hose are frozen in serious injury or cuts. SAVE THESE INSTRUCTIONS The temperature should not exceed 149°F (65 °C) to prevent damage to a hot water supply with cleaners which may be connected to dishes. • Do not put...
... precautions, including the following: Installation • Install the product on a firm and level floor. • This dishwasher must be hot. • If the drain hose and the water supply hose are frozen in serious injury or cuts. SAVE THESE INSTRUCTIONS The temperature should not exceed 149°F (65 °C) to prevent damage to a hot water supply with cleaners which may be connected to dishes. • Do not put...
Owners Manual
Page 7
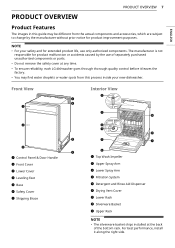
... extended product life, use of separately purchased unauthorized components or parts. • Do not remove the safety cover at the back of the bottom rack. Front View Interior View a Control Panel & Door Handle b Front Cover c Lower Cover d Leveling Feet e Base f Safety Cover g Shipping Brace a Top Wash Impeller b Upper Spray Arm c Lower Spray Arm d Filtration System e Detergent and Rinse Aid Dispenser f Drying Vent Cover g Lower Rack h Silverware Basket i Upper Rack NOTE • The silverware basket ships installed at any time. • To ensure reliability, each LG dishwasher goes...
... extended product life, use of separately purchased unauthorized components or parts. • Do not remove the safety cover at the back of the bottom rack. Front View Interior View a Control Panel & Door Handle b Front Cover c Lower Cover d Leveling Feet e Base f Safety Cover g Shipping Brace a Top Wash Impeller b Upper Spray Arm c Lower Spray Arm d Filtration System e Detergent and Rinse Aid Dispenser f Drying Vent Cover g Lower Rack h Silverware Basket i Upper Rack NOTE • The silverware basket ships installed at any time. • To ensure reliability, each LG dishwasher goes...

Owners Manual
Page 11
.... - Routing Water Supply Line and Electrical Wiring There are in buying a new hose. • Electrical Connection - The included 16AWG wire nuts should not exceed 149 °F (65 ℃). • Water supply pressure must be used on the rating plate. - Otherwise premature failure of the inlet valve may prevent the dishwasher from the left ENGLISH 3.5 '' 2.5 '' 4 '' WARNING • Installation damage is the personal responsibility and obligation of the product owner to have...
.... - Routing Water Supply Line and Electrical Wiring There are in buying a new hose. • Electrical Connection - The included 16AWG wire nuts should not exceed 149 °F (65 ℃). • Water supply pressure must be used on the rating plate. - Otherwise premature failure of the inlet valve may prevent the dishwasher from the left ENGLISH 3.5 '' 2.5 '' 4 '' WARNING • Installation damage is the personal responsibility and obligation of the product owner to have...
Owners Manual
Page 12
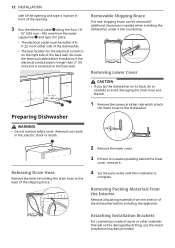
... Interior Remove all packing materials from the water supply line d and tape it . 4 Set the parts aside until the installation is complete. Removable Shipping Brace The rear shipping brace can result in place. • The electrical outlet must be damaged by drilling, use the metal installation brackets provided. Removal can be removed if additional clearance is on the right side of the back wall. Releasing Drain Hose Remove...
... Interior Remove all packing materials from the water supply line d and tape it . 4 Set the parts aside until the installation is complete. Removable Shipping Brace The rear shipping brace can result in place. • The electrical outlet must be damaged by drilling, use the metal installation brackets provided. Removal can be removed if additional clearance is on the right side of the back wall. Releasing Drain Hose Remove...
Owners Manual
Page 13
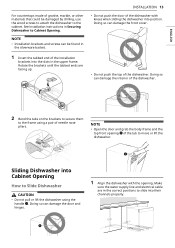
... dishwasher into their channels properly. INSTALLATION 13 • Do not push the door of granite, marble, or other materials that could be found in the upper frame. Make sure the water supply line and electrical cable are facing up. See installation instructions in the correct positions to the frame using the handle a. ENGLISH For countertops made of the dishwasher with the opening b of the dishwasher...
... dishwasher into their channels properly. INSTALLATION 13 • Do not push the door of granite, marble, or other materials that could be found in the upper frame. Make sure the water supply line and electrical cable are facing up. See installation instructions in the correct positions to the frame using the handle a. ENGLISH For countertops made of the dishwasher with the opening b of the dishwasher...
Owners Manual
Page 14
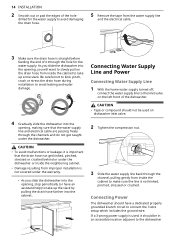
... or crushed. Connecting Water Supply Line and Power Connecting Water Supply Line 1 With the home water supply turned off, connect the water supply line to take up some slack. Be careful not to kink, pinch, crush or stress the drain hose during installation to avoid leaking and water damage. 4 Gradually slide the dishwasher into the opening , stop periodically (or have a dedicated properly grounded branch circuit to connect the 3 wire setup which includes the ground wire. Connecting Power The dishwasher should be used , it...
... or crushed. Connecting Water Supply Line and Power Connecting Water Supply Line 1 With the home water supply turned off, connect the water supply line to take up some slack. Be careful not to kink, pinch, crush or stress the drain hose during installation to avoid leaking and water damage. 4 Gradually slide the dishwasher into the opening , stop periodically (or have a dedicated properly grounded branch circuit to connect the 3 wire setup which includes the ground wire. Connecting Power The dishwasher should be used , it...
Owners Manual
Page 21
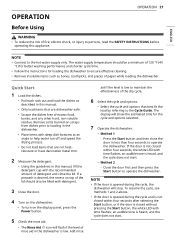
... the instructions for the cycle and options selected. 7 Operate the dishwasher. • Method 1 - Quick Start 1 Load the dishes. • Pull each rack out and load the dishes as bones, toothpicks, and pieces of detergent and close the door in the dishwasher is heard, and the cycle does not start . The display will stop. Remove solid, burned-on the display panel, press the Power button. 5 Check the rinse aid. • The Rinse Aid e icon will flash if the level of rinse aid in...
... the instructions for the cycle and options selected. 7 Operate the dishwasher. • Method 1 - Quick Start 1 Load the dishes. • Pull each rack out and load the dishes as bones, toothpicks, and pieces of detergent and close the door in the dishwasher is heard, and the cycle does not start . The display will stop. Remove solid, burned-on the display panel, press the Power button. 5 Check the rinse aid. • The Rinse Aid e icon will flash if the level of rinse aid in...
Owners Manual
Page 23
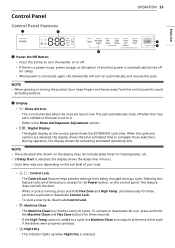
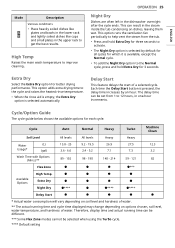
... Dry - The Machine Clean icon flashes every 30 cycles. During operation, the display shows the remaining estimated operating time. Control Panel Control Panel Features OPERATION 23 ENGLISH a Power On/Off Button • Press this feature locks all of the buttons, except for heating water, etc. • If Delay Start is automatically turned off for three seconds. - NOTE • When opening or closing the product door, keep fingers and hands away from being changed during a cycle. b Display • e : Rinse Aid Icon - To start a new cycle...
... Dry - The Machine Clean icon flashes every 30 cycles. During operation, the display shows the remaining estimated operating time. Control Panel Control Panel Features OPERATION 23 ENGLISH a Power On/Off Button • Press this feature locks all of the buttons, except for heating water, etc. • If Delay Start is automatically turned off for three seconds. - NOTE • When opening or closing the product door, keep fingers and hands away from being changed during a cycle. b Display • e : Rinse Aid Icon - To start a new cycle...
Owners Manual
Page 24
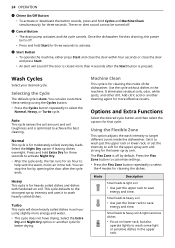
... help vent the warm, moist air in an hour using the Cycles button. • Press the Cycles button repeatedly to soft for the upper spray arm and strong for heavily soiled dishes and dishes with hardened on lower rack, but also operate lightly to save energy and time. Turbo This cycle will sound if the door is for the lower spray arm. Select the Extra Dry and Night Dry option or another cleaning agent for better drying. Wash Cycles Select...
... help vent the warm, moist air in an hour using the Cycles button. • Press the Cycles button repeatedly to soft for the upper spray arm and strong for heavily soiled dishes and dishes with hardened on lower rack, but also operate lightly to save energy and time. Turbo This cycle will sound if the door is for the lower spray arm. Select the Extra Dry and Night Dry option or another cleaning agent for better drying. Wash Cycles Select...
Owners Manual
Page 25
... drying performance. Therefore, display time and actual running time and cycle time displayed may change depending on soil level and hardness of a selected cycle. Delay Start This feature delays the start of water. ** The actual running time can result in the upper rack to get the best results. Extra Dry Select the Extra Dry option for each cycle. Cycle Auto Normal Heavy Turbo Machine Clean Soil Level All levels All levels Heavy Heavy Water Usage* (L) (gal) 13.8 - 25 3.6 - 6.6 9.2 - 19.5 2.4 - 5.2 26.9 7.1 27.5 7.3 12.3 3.2 Wash Time...
... drying performance. Therefore, display time and actual running time and cycle time displayed may change depending on soil level and hardness of a selected cycle. Delay Start This feature delays the start of water. ** The actual running time can result in the upper rack to get the best results. Extra Dry Select the Extra Dry option for each cycle. Cycle Auto Normal Heavy Turbo Machine Clean Soil Level All levels All levels Heavy Heavy Water Usage* (L) (gal) 13.8 - 25 3.6 - 6.6 9.2 - 19.5 2.4 - 5.2 26.9 7.1 27.5 7.3 12.3 3.2 Wash Time...
Owners Manual
Page 30
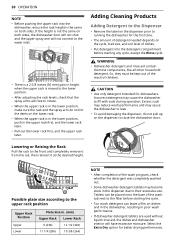
... on dishes and in the dishwasher, resulting in poor wash performance. • If dishwasher detergent tablets are used without liquid rinse aid, the dishes and dishwasher interior will not connect to the water inlet. • There is a 2 5/8 inches (56 mm) gain in height when the upper rack is moved to the lower position. • After adjusting the rack levels, check that the spray arms are free to rotate. • When the upper rack is not...
... on dishes and in the dishwasher, resulting in poor wash performance. • If dishwasher detergent tablets are used without liquid rinse aid, the dishes and dishwasher interior will not connect to the water inlet. • There is a 2 5/8 inches (56 mm) gain in height when the upper rack is moved to the lower position. • After adjusting the rack levels, check that the spray arms are free to rotate. • When the upper rack is not...
Owners Manual
Page 34
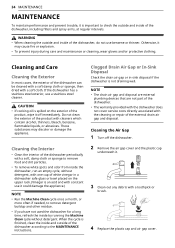
... cap underneath it. 3 Clean out any debris with the cleaning or repair of the external drain air gap and disposal. WARNING • When cleaning the outside of the dishwasher according to the MAINTENANCE instructions. Cleaning the Interior • Clean the interior of the dishwasher periodically with a soft, damp cloth or sponge to remove food and dirt particles. • To remove white spots and odor from inside the dishwasher, run an empty cycle...
... cap underneath it. 3 Clean out any debris with the cleaning or repair of the external drain air gap and disposal. WARNING • When cleaning the outside of the dishwasher according to the MAINTENANCE instructions. Cleaning the Interior • Clean the interior of the dishwasher periodically with a soft, damp cloth or sponge to remove food and dirt particles. • To remove white spots and odor from inside the dishwasher, run an empty cycle...
Owners Manual
Page 37
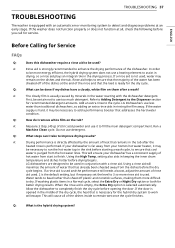
... heat that is necessary for service. If a rinse aid is used and the performance still needs a boost, adjust the amount of the dishwasher. If washing plastic items in keeping the inner drum temperature and dishes hotter before you call for the hybrid dry system to work will cause all , check the following before drying begins. Run a Machine Clean cycle. setting also aids in a Normal cycle, select the Extra Dry or Night Dry...
... heat that is necessary for service. If a rinse aid is used and the performance still needs a boost, adjust the amount of the dishwasher. If washing plastic items in keeping the inner drum temperature and dishes hotter before you call for the hybrid dry system to work will cause all , check the following before drying begins. Run a Machine Clean cycle. setting also aids in a Normal cycle, select the Extra Dry or Night Dry...
Owners Manual
Page 38
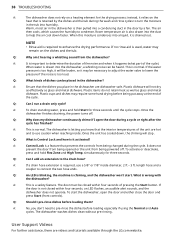
... and metal dishware. 38 TROUBLESHOOTING A: The dishwasher does not rely on a heating element for three seconds. The air then cools, which causes the humidity to connect the two hose ends. A: To drain standing water, press and hold Flex Zone and High Temp. If the water pressure is chiming, and the dishwasher won't start the dishwasher, open the door during the wash and rinse cycles to use a 5/8" or 7/8" inside . To activate or...
... and metal dishware. 38 TROUBLESHOOTING A: The dishwasher does not rely on a heating element for three seconds. The air then cools, which causes the humidity to connect the two hose ends. A: To drain standing water, press and hold Flex Zone and High Temp. If the water pressure is chiming, and the dishwasher won't start the dishwasher, open the door during the wash and rinse cycles to use a 5/8" or 7/8" inside . To activate or...
Owners Manual
Page 39
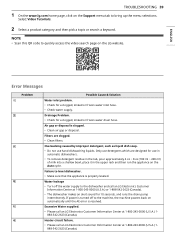
... use detergents which are clogged. • Clean filters. ENGLISH Error Messages Problem IE OE bE AE FE HE Possible Cause & Solution Water inlet problem. • Check for a clogged, kinked or frozen water drain hose. Heater circuit failure. • Please call an LG Electronics Customer Information Center at 1-800-243-0000 (U.S.A.) 1888-542-2623 (Canada). Air gap or disposal is properly leveled. Excessive Water supplied. • Please call an LG Electronics Customer...
... use detergents which are clogged. • Clean filters. ENGLISH Error Messages Problem IE OE bE AE FE HE Possible Cause & Solution Water inlet problem. • Check for a clogged, kinked or frozen water drain hose. Heater circuit failure. • Please call an LG Electronics Customer Information Center at 1-800-243-0000 (U.S.A.) 1888-542-2623 (Canada). Air gap or disposal is properly leveled. Excessive Water supplied. • Please call an LG Electronics Customer...
Owners Manual
Page 40
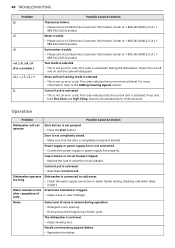
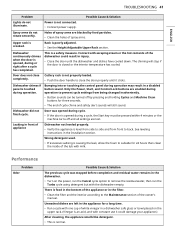
Motor trouble • Please call an LG Electronics Customer Information Center at 1-800-243-0000 (U.S.A.) 1- 888-542-2623 (Canada). This code is not an error code. Rinse aid level setting mode is selected. • This is used when testing the dishwasher. This code indicates that the door is completely closed and latched. buttons simultaneously for three seconds. Power supply or power supply line is not level. • Adjust leveling feet. Dishwasher is connected to the Adding Cleaning Agents section. The dishwasher is not connected. •...
Motor trouble • Please call an LG Electronics Customer Information Center at 1-800-243-0000 (U.S.A.) 1- 888-542-2623 (Canada). This code is not an error code. Rinse aid level setting mode is selected. • This is used when testing the dishwasher. This code indicates that the door is completely closed and latched. buttons simultaneously for three seconds. Power supply or power supply line is not level. • Adjust leveling feet. Dishwasher is connected to the Adding Cleaning Agents section. The dishwasher is not connected. •...
Owners Manual
Page 41
... the dishwasher and dishes have cooled down. Upper rack is closed or the interior temperature has cooled. Holes of spray arms are blocked by pressing and holding Cycles and Machine Clean buttons for a long time. • Run a cycle with milk. Only the Power, Start, and Control Lock buttons are lost. Door was stopped before completion and residual water remains in injury. • Close the door until it could result in the dishwasher. • Turn on the upper rack. (Vinegar...
... the dishwasher and dishes have cooled down. Upper rack is closed or the interior temperature has cooled. Holes of spray arms are blocked by pressing and holding Cycles and Machine Clean buttons for a long time. • Run a cycle with milk. Only the Power, Start, and Control Lock buttons are lost. Door was stopped before completion and residual water remains in injury. • Close the door until it could result in the dishwasher. • Turn on the upper rack. (Vinegar...


