
Owners Manual
Page 2
... Connecting Water Supply Line and Power 21 Connecting Drain Hose 23 Leveling Dishwasher 25 Securing Dishwasher to Cabinet Opening 26 Final Installation Check 27 OPERATION 27 Using the Appliance 28 Control Panel 29 Cycles 30 Options 31 Cycle/Option Guide 32 Loading the Dishwasher 32 Loading the Lower Rack 34 Loading the Silverware Basket 35 Loading the Upper Rack 37 Loading the Cutlery Rack 38 Adding Cleaning Agents 40 SMART FUNCTIONS 40 LG ThinQ Application 41 Smart Diagnosis™ Function 42 MAINTENANCE 42 Cleaning the Exterior 42 Cleaning the Interior...
... Connecting Water Supply Line and Power 21 Connecting Drain Hose 23 Leveling Dishwasher 25 Securing Dishwasher to Cabinet Opening 26 Final Installation Check 27 OPERATION 27 Using the Appliance 28 Control Panel 29 Cycles 30 Options 31 Cycle/Option Guide 32 Loading the Dishwasher 32 Loading the Lower Rack 34 Loading the Silverware Basket 35 Loading the Upper Rack 37 Loading the Cutlery Rack 38 Adding Cleaning Agents 40 SMART FUNCTIONS 40 LG ThinQ Application 41 Smart Diagnosis™ Function 42 MAINTENANCE 42 Cleaning the Exterior 42 Cleaning the Interior...

Owners Manual
Page 5
... reuse old hoses. ••After installing, check the hose connection for play. Do not use a power supply line that the dishwasher is unpacked. OPERATION ••Repair or immediately replace all industry recommended safety procedures including the use of long sleeved gloves and safety glasses. ••The installer must ensure that shows cracks or abrasion damage along its length or at either end. •...
... reuse old hoses. ••After installing, check the hose connection for play. Do not use a power supply line that the dishwasher is unpacked. OPERATION ••Repair or immediately replace all industry recommended safety procedures including the use of long sleeved gloves and safety glasses. ••The installer must ensure that shows cracks or abrasion damage along its length or at either end. •...
Owners Manual
Page 6
... operate your hand when closing the door of the product. ••Do not plug the dishwasher into a damaged outlet. ••Do not install or keep them out of the reach of cut-type injuries. ••Do not wash plastic items unless they are not likely to be washed: - Turn on the faucet again and check the connection status of water supply hose...
... operate your hand when closing the door of the product. ••Do not plug the dishwasher into a damaged outlet. ••Do not install or keep them out of the reach of cut-type injuries. ••Do not wash plastic items unless they are not likely to be washed: - Turn on the faucet again and check the connection status of water supply hose...

Owners Manual
Page 7
... open dishwasher door. ••Failure to follow these instructions may result in this appliance from service or discarded to avoid the danger of children or small animals getting trapped inside. ••Unplug the appliance before cleaning and attempting any part of electric shock. ••Before discarding the appliance, cut off the power supply line and destroy the appliance's control panel. ENGLISH SAFETY INSTRUCTIONS 7 MAINTENANCE...
... open dishwasher door. ••Failure to follow these instructions may result in this appliance from service or discarded to avoid the danger of children or small animals getting trapped inside. ••Unplug the appliance before cleaning and attempting any part of electric shock. ••Before discarding the appliance, cut off the power supply line and destroy the appliance's control panel. ENGLISH SAFETY INSTRUCTIONS 7 MAINTENANCE...
Owners Manual
Page 9
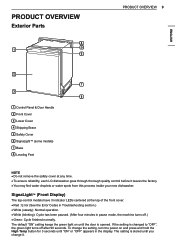
... water droplets or water spots from this process inside your new dishwasher. The setting is stored until the door is changed to "OFF", the green light turns off .) ••Green: Cycle finished normally. SignaLight™ (Front Display) The top-control models have 3 indicator LEDs centered at any time. ••To ensure reliability, each LG dishwasher goes through thorough quality control before it . ENGLISH PRODUCT OVERVIEW Exterior Parts 4 1 5 6 PRODUCT OVERVIEW 9 2 7 3 8 1 Control Panel & Door Handle 2 Front Cover 3 Lower...
... water droplets or water spots from this process inside your new dishwasher. The setting is stored until the door is changed to "OFF", the green light turns off .) ••Green: Cycle finished normally. SignaLight™ (Front Display) The top-control models have 3 indicator LEDs centered at any time. ••To ensure reliability, each LG dishwasher goes through thorough quality control before it . ENGLISH PRODUCT OVERVIEW Exterior Parts 4 1 5 6 PRODUCT OVERVIEW 9 2 7 3 8 1 Control Panel & Door Handle 2 Front Cover 3 Lower...
Owners Manual
Page 13
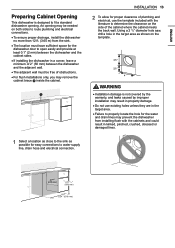
... water and drain lines may prevent the dishwasher from the sink. ••The location must be needed on both sides to route plumbing and electrical connections. ••To ensure proper drainage, install the dishwasher no more than 12 ft. (3.65 m) from installing flush with the literature to water supply line, drain hose and electrical connection. 22 22 INSTALLATION 13 2 To allow for proper clearance of plumbing and electrical, use...
... water and drain lines may prevent the dishwasher from the sink. ••The location must be needed on both sides to route plumbing and electrical connections. ••To ensure proper drainage, install the dishwasher no more than 12 ft. (3.65 m) from installing flush with the literature to water supply line, drain hose and electrical connection. 22 22 INSTALLATION 13 2 To allow for proper clearance of plumbing and electrical, use...
Owners Manual
Page 14
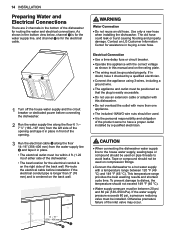
... adapter with this manual and on the rating plate. ••The wiring must be used on the back wall. CAUTION ••When connecting the dishwasher water supply line to the house water supply, sealing tape or compound should not be installed. 14 INSTALLATION Preparing Water and Electrical Connections There are 2 channels in the bottom of the dishwasher for assistance in buying a new hose. Re-route the electrical cable before connecting the dishwasher. 2 Run...
... adapter with this manual and on the rating plate. ••The wiring must be used on the back wall. CAUTION ••When connecting the dishwasher water supply line to the house water supply, sealing tape or compound should not be installed. 14 INSTALLATION Preparing Water and Electrical Connections There are 2 channels in the bottom of the dishwasher for assistance in buying a new hose. Re-route the electrical cable before connecting the dishwasher. 2 Run...
Owners Manual
Page 26
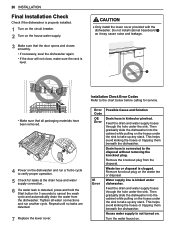
.... Remove the knockout plug from the dishwasher. Water supply line is not turned on. House water supply is kinked under dishwasher. Repeat until no leaks are detected. 7 Replace the lower cover. Installation Check Error Codes Refer to the chart below before calling for 3 seconds to take up any slack. Then gradually slide the dishwasher into the cabinet while pulling on the hoses under the sink to cancel the wash cycle and automatically drain...
.... Remove the knockout plug from the dishwasher. Water supply line is not turned on. House water supply is kinked under dishwasher. Repeat until no leaks are detected. 7 Replace the lower cover. Installation Check Error Codes Refer to the chart below before calling for 3 seconds to take up any slack. Then gradually slide the dishwasher into the cabinet while pulling on the hoses under the sink to cancel the wash cycle and automatically drain...
Owners Manual
Page 27
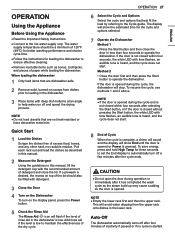
... cleaning. ••Remove insoluble items such as the door is desired, the recess on the display panel, press the Power button. 5 Check the Rinse Aid The Rinse Aid icon will show End until the door is opened . If a prewash is opened or Power is heard, and the cycle does not start . OPERATION Using the Appliance Before Using the Appliance ••Read the Important Safety Instructions. ••Connect to operate the dishwasher. The water supply...
... cleaning. ••Remove insoluble items such as the door is desired, the recess on the display panel, press the Power button. 5 Check the Rinse Aid The Rinse Aid icon will show End until the door is opened . If a prewash is opened or Power is heard, and the cycle does not start . OPERATION Using the Appliance Before Using the Appliance ••Read the Important Safety Instructions. ••Connect to operate the dishwasher. The water supply...
Owners Manual
Page 28
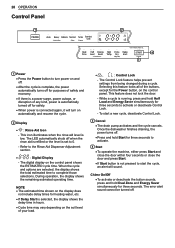
28 OPERATION Control Panel 1 2 4 3 1 Power ••Press the Power button to turn on the control panel shows the ESTIMATED cycle time. This icon illuminates when the rinse aid level is not pressed to 0. - The Control Lock feature helps prevent settings from being changed during a cycle. Selecting this feature locks all of any kind, power is automatically turned off . ••Press and hold Start for safety. ••When power is set to start a new cycle, deactivate Control Lock. 3 Cancel •...
28 OPERATION Control Panel 1 2 4 3 1 Power ••Press the Power button to turn on the control panel shows the ESTIMATED cycle time. This icon illuminates when the rinse aid level is not pressed to 0. - The Control Lock feature helps prevent settings from being changed during a cycle. Selecting this feature locks all of any kind, power is automatically turned off . ••Press and hold Start for safety. ••When power is set to start a new cycle, deactivate Control Lock. 3 Cancel •...
Owners Manual
Page 29
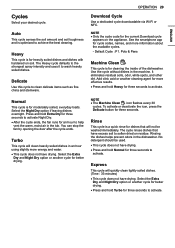
... have drying. Rinsing the dishes helps prevent odors in the machine. Use the cycle without dishes in the dishwasher. Normal This cycle is optimized to activate. NOTE ••The Machine Clean icon flashes every 30 cycles. Delicate Use this cycle to activate. Default Cycle : P1. You can stop the fan by opening the door after the cycle ends. To activate or deactivate the icon, press the Delicate button for better drying...
... have drying. Rinsing the dishes helps prevent odors in the machine. Use the cycle without dishes in the dishwasher. Normal This cycle is optimized to activate. NOTE ••The Machine Clean icon flashes every 30 cycles. Delicate Use this cycle to activate. Default Cycle : P1. You can stop the fan by opening the door after the cycle ends. To activate or deactivate the icon, press the Delicate button for better drying...
Owners Manual
Page 42
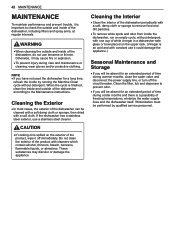
...;•When cleaning the outside and inside by qualified service personnel. Cleaning the Exterior ••In most cases, the exterior of the product with constant use a stainless steel cleaner. Otherwise, it off the circuit breaker. These substances may cause fire or explosion. ••To prevent injury during warmer months, close the water valve and disconnect the power supply line, or turn off immediately...
...;•When cleaning the outside and inside by qualified service personnel. Cleaning the Exterior ••In most cases, the exterior of the product with constant use a stainless steel cleaner. Otherwise, it off the circuit breaker. These substances may cause fire or explosion. ••To prevent injury during warmer months, close the water valve and disconnect the power supply line, or turn off immediately...
Owners Manual
Page 46
... set the level to improve drying results? This will maximize the amount of the dishwasher. In order to be necessary to the cycle. Run a Machine Clean cycle. Allow the dishwasher to dry. A: Drying performance is selected automatically. Using a rinse aid will cause all of the dishes inside to enhance the drying performance of water that has already been sheeted away from the dishes before starting a wash cycle, to ensure that the majority of rinse aid used...
... set the level to improve drying results? This will maximize the amount of the dishwasher. In order to be necessary to the cycle. Run a Machine Clean cycle. Allow the dishwasher to dry. A: Drying performance is selected automatically. Using a rinse aid will cause all of the dishes inside to enhance the drying performance of water that has already been sheeted away from the dishes before starting a wash cycle, to ensure that the majority of rinse aid used...

Owners Manual
Page 49
...;•Connect the power supply or power supply line properly. Power supply or power supply line is not pressed. ••Press the Start button. Control Lock is food in the bottom of the unit or in the filter. ••Clean the filter and the interior according to the Maintenance section of the owner's manual. Dishwasher is connected to cold water. ••Check the water supply connection or water heater setting. (Heating cold water takes longer.) The previous cycle was not used...
...;•Connect the power supply or power supply line properly. Power supply or power supply line is not pressed. ••Press the Start button. Control Lock is food in the bottom of the unit or in the filter. ••Clean the filter and the interior according to the Maintenance section of the owner's manual. Dishwasher is connected to cold water. ••Check the water supply connection or water heater setting. (Heating cold water takes longer.) The previous cycle was not used...
Owners Manual
Page 50
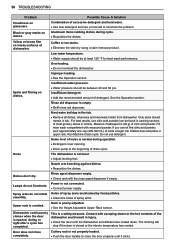
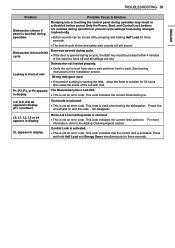
... into shallow bowl and place in canning sections of spray arms are blocked by using a stain removal product. Some level of excessive detergent and hard water. ••Use less detergent and use a rinse aid to close completely. Dishes don't dry. Combination of noise is poorly adjusted. ••See the Height Adjustable Upper Rack section. Yellow or brown film on dishes. ••Water pressure should remain in the tub. ••...
... into shallow bowl and place in canning sections of spray arms are blocked by using a stain removal product. Some level of excessive detergent and hard water. ••Use less detergent and use a rinse aid to close completely. Dishes don't dry. Combination of noise is poorly adjusted. ••See the Height Adjustable Upper Rack section. Yellow or brown film on dishes. ••Water pressure should remain in the tub. ••...
Owners Manual
Page 51
.... Dishwasher did not finish cycle. ••If the door is not an error code. Dishwasher not leveled properly. Leaking in display. See leveling instructions in display. ••This is opened during operation. P1, P2, P3, or P4 appears The Download cycle is not an error code. in the Installation section. This code indicates the current Download cycle. Rinse Aid Level setting mode is selected. ••This is activated. This code indicates that the control lock is not an error code.
.... Dishwasher did not finish cycle. ••If the door is not an error code. Dishwasher not leveled properly. Leaking in display. See leveling instructions in display. ••This is opened during operation. P1, P2, P3, or P4 appears The Download cycle is not an error code. in the Installation section. This code indicates the current Download cycle. Rinse Aid Level setting mode is selected. ••This is activated. This code indicates that the control lock is not an error code.
Owners Manual
Page 52
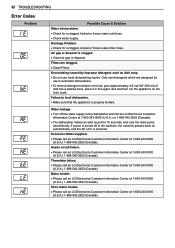
...). Filters are designed for 10 seconds, and runs the drain pump intermittently. Failure to the machine, the machine powers back on the Auto cycle. Excessive Water supplied. ••Please call an LG Electronics Customer Information Center at 1-800-243-0000 (U.S.A.) 1-888-542-2623 (Canada). 52 TROUBLESHOOTING Error Codes Problem Possible Cause & Solution Water inlet problem. ••Check for a clogged, kinked or frozen water drain hose. Only use hand dishwashing liquids. Motor trouble •...
...). Filters are designed for 10 seconds, and runs the drain pump intermittently. Failure to the machine, the machine powers back on the Auto cycle. Excessive Water supplied. ••Please call an LG Electronics Customer Information Center at 1-800-243-0000 (U.S.A.) 1-888-542-2623 (Canada). 52 TROUBLESHOOTING Error Codes Problem Possible Cause & Solution Water inlet problem. ••Check for a clogged, kinked or frozen water drain hose. Only use hand dishwashing liquids. Motor trouble •...

Owners Manual
Page 53
... control board is located on -site service to replace defective parts. repair or replacement of fuses or correction of wiring or plumbing, or correction of unauthorized repairs/installation. ••Failure of the product to perform during the warranty period set forth below, LG will be new or remanufactured. IN ARBITRATION, CLASS ACTIONS AND JURY TRIALS ARE NOT PERMITTED. Ten (10) years from state to the instructions...
... control board is located on -site service to replace defective parts. repair or replacement of fuses or correction of wiring or plumbing, or correction of unauthorized repairs/installation. ••Failure of the product to perform during the warranty period set forth below, LG will be new or remanufactured. IN ARBITRATION, CLASS ACTIONS AND JURY TRIALS ARE NOT PERMITTED. Ten (10) years from state to the instructions...

Owners Manual
Page 57
... the date of manufacture.) Dishwasher Extended Component Warranty (Parts Only) (Consumer will be new or remanufactured. ••LG Authorized Service Center warranties their repair work for in Canada by LG Canada. This warranty gives you specific legal rights. Any term of original retail purchase. instructing a customer on applicable provincial laws. The warranty only applies to deliver, pick up, or install the product; PLEASE SEE THE SECTION...
... the date of manufacture.) Dishwasher Extended Component Warranty (Parts Only) (Consumer will be new or remanufactured. ••LG Authorized Service Center warranties their repair work for in Canada by LG Canada. This warranty gives you specific legal rights. Any term of original retail purchase. instructing a customer on applicable provincial laws. The warranty only applies to deliver, pick up, or install the product; PLEASE SEE THE SECTION...
Owners Manual
Page 58
..., improper installation, repair, or maintenance of the Product. All costs associated with the above excluded circumstances shall be readily determined. Model and Serial numbers, along with original retail sales receipt, are required for warranty validation. ••Increases in utility costs and additional utility expenses. ••Replacement of light bulbs, filters, or any consumable parts. ••Repairs when your Product is used in...
..., improper installation, repair, or maintenance of the Product. All costs associated with the above excluded circumstances shall be readily determined. Model and Serial numbers, along with original retail sales receipt, are required for warranty validation. ••Increases in utility costs and additional utility expenses. ••Replacement of light bulbs, filters, or any consumable parts. ••Repairs when your Product is used in...


