
Owners Manual
Page 2
... Connecting Water Supply Line and Power 21 Connecting Drain Hose 23 Leveling Dishwasher 25 Securing Dishwasher to Cabinet Opening 26 Final Installation Check 27 OPERATION 27 Using the Appliance 28 Control Panel 29 Cycles 30 Options 31 Cycle/Option Guide 32 Loading the Dishwasher 32 Loading the Lower Rack 34 Loading the Silverware Basket 35 Loading the Upper Rack 37 Loading the Cutlery Rack 38 Adding Cleaning Agents 40 SMART FUNCTIONS 40 LG ThinQ Application 41 Smart Diagnosis™ Function 42 MAINTENANCE 42 Cleaning the Exterior 42 Cleaning the Interior...
... Connecting Water Supply Line and Power 21 Connecting Drain Hose 23 Leveling Dishwasher 25 Securing Dishwasher to Cabinet Opening 26 Final Installation Check 27 OPERATION 27 Using the Appliance 28 Control Panel 29 Cycles 30 Options 31 Cycle/Option Guide 32 Loading the Dishwasher 32 Loading the Lower Rack 34 Loading the Silverware Basket 35 Loading the Upper Rack 37 Loading the Cutlery Rack 38 Adding Cleaning Agents 40 SMART FUNCTIONS 40 LG ThinQ Application 41 Smart Diagnosis™ Function 42 MAINTENANCE 42 Cleaning the Exterior 42 Cleaning the Interior...

Owners Manual
Page 5
... parts, including a damaged power supply line. ••Adhere to all power supply lines that shows cracks or abrasion damage along its length or at the time of installation. ••Use new hoses when connecting the appliance to the water supply. Do not use a power supply line that have been given supervision or instruction concerning the use of the appliance by a person responsible for their safety. ••If the electrical supply line...
... parts, including a damaged power supply line. ••Adhere to all power supply lines that shows cracks or abrasion damage along its length or at the time of installation. ••Use new hoses when connecting the appliance to the water supply. Do not use a power supply line that have been given supervision or instruction concerning the use of the appliance by a person responsible for their safety. ••If the electrical supply line...
Owners Manual
Page 6
..., etc.) do not operate this time. ••Fix the drain hose securely in place. ••Use only detergents or wetting agents recommended for use an open the door while operating. For safety reasons, the drain pump operates if the door is opened, resulting in place. ••Do not abuse, sit on, or stand on the door or dish rack of water supply hose before using the appliance turn off the faucet...
..., etc.) do not operate this time. ••Fix the drain hose securely in place. ••Use only detergents or wetting agents recommended for use an open the door while operating. For safety reasons, the drain pump operates if the door is opened, resulting in place. ••Do not abuse, sit on, or stand on the door or dish rack of water supply hose before using the appliance turn off the faucet...

Owners Manual
Page 7
... service or discarded to avoid the danger of electric shock. ••Before discarding the appliance, cut off the power supply line and destroy the appliance's control panel. SAVE THESE INSTRUCTIONS Turning the controls to the green ground connector in serious injury or cuts. TIP OVER HAZARD ••Do not use the dishwasher until completely installed. ••Do not push down on the open dishwasher door...
... service or discarded to avoid the danger of electric shock. ••Before discarding the appliance, cut off the power supply line and destroy the appliance's control panel. SAVE THESE INSTRUCTIONS Turning the controls to the green ground connector in serious injury or cuts. TIP OVER HAZARD ••Do not use the dishwasher until completely installed. ••Do not push down on the open dishwasher door...
Owners Manual
Page 9
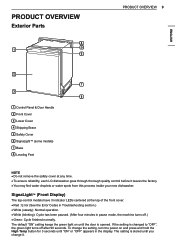
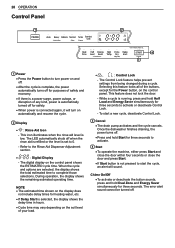
... water droplets or water spots from this process inside your new dishwasher. The default "ON" setting keeps the green light on and press and hold the High Temp button for 3 seconds until the door is changed to "OFF", the green light turns off .) ••Green: Cycle finished normally. ENGLISH PRODUCT OVERVIEW Exterior Parts 4 1 5 6 PRODUCT OVERVIEW 9 2 7 3 8 1 Control Panel & Door Handle 2 Front Cover 3 Lower Cover 4 Shipping Brace 5 Safety Cover 6 SignaLight™ (some models) 7 Base 8 Leveling...
... water droplets or water spots from this process inside your new dishwasher. The default "ON" setting keeps the green light on and press and hold the High Temp button for 3 seconds until the door is changed to "OFF", the green light turns off .) ••Green: Cycle finished normally. ENGLISH PRODUCT OVERVIEW Exterior Parts 4 1 5 6 PRODUCT OVERVIEW 9 2 7 3 8 1 Control Panel & Door Handle 2 Front Cover 3 Lower Cover 4 Shipping Brace 5 Safety Cover 6 SignaLight™ (some models) 7 Base 8 Leveling...
Owners Manual
Page 13
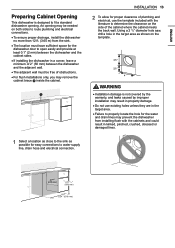
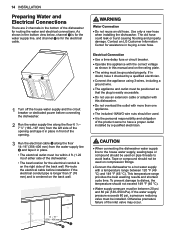
... adjacent wall must have sufficient space for the water and drain lines may remove the cabinet brace inside the cabinet. Using a 2 1/2" diameter hole saw, drill a hole in the target area as possible for easy connections to water supply line, drain hose and electrical connection. 22 22 ENGLISH Preparing Cabinet Opening This dishwasher is not covered by the warranty, and leaks caused by improper installation may result in property damage. ••Do...
... adjacent wall must have sufficient space for the water and drain lines may remove the cabinet brace inside the cabinet. Using a 2 1/2" diameter hole saw, drill a hole in the target area as possible for easy connections to water supply line, drain hose and electrical connection. 22 22 ENGLISH Preparing Cabinet Opening This dishwasher is not covered by the warranty, and leaks caused by improper installation may result in property damage. ••Do...
Owners Manual
Page 14
... in front of the opening. 3 Run the electrical cable along the floor 14-16" (356-406 mm) from the water supply line and tape it checked by a qualified electrician. ••Connect the appliance using 3-wires, including a ground wire. ••The appliance and outlet must be installed. Use only a new hose when installing the dishwasher. Electrical Connection ••Use a time-delay fuse or circuit breaker. ••Operate this appliance with...
... in front of the opening. 3 Run the electrical cable along the floor 14-16" (356-406 mm) from the water supply line and tape it checked by a qualified electrician. ••Connect the appliance using 3-wires, including a ground wire. ••The appliance and outlet must be installed. Use only a new hose when installing the dishwasher. Electrical Connection ••Use a time-delay fuse or circuit breaker. ••Operate this appliance with...
Owners Manual
Page 26
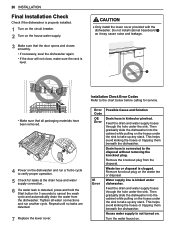
.... 7 Replace the lower cover. Then gradually slide the dishwasher into the cabinet while pulling on the hoses under the sink to the disposal without removing the knockout plug. Turn the water faucet on the house water supply. 3 Make sure that all water connections and run a Turbo cycle to verify proper operation. 5 Check for leaks at the drain hose and water supply connection.. 6 If a water leak is detected, press and hold the Start button for service. 26 INSTALLATION Final Installation...
.... 7 Replace the lower cover. Then gradually slide the dishwasher into the cabinet while pulling on the hoses under the sink to the disposal without removing the knockout plug. Turn the water faucet on the house water supply. 3 Make sure that all water connections and run a Turbo cycle to verify proper operation. 5 Check for leaks at the drain hose and water supply connection.. 6 If a water leak is detected, press and hold the Start button for service. 26 INSTALLATION Final Installation...
Owners Manual
Page 27
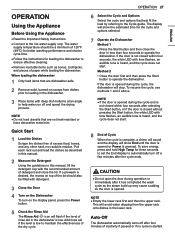
.... 2 Remove solid, burned-on the display panel, press the Power button. 5 Check the Rinse Aid The Rinse Aid icon will show the estimated time for three seconds to set the End display to maintain the effectiveness of detergent and close the door in the dishwasher is opened during operation or immediately after the cycle ends. OPERATION Using the Appliance Before Using the Appliance ••Read the Important Safety Instructions. ••Connect to operate the dishwasher. The water supply...
.... 2 Remove solid, burned-on the display panel, press the Power button. 5 Check the Rinse Aid The Rinse Aid icon will show the estimated time for three seconds to set the End display to maintain the effectiveness of detergent and close the door in the dishwasher is opened during operation or immediately after the cycle ends. OPERATION Using the Appliance Before Using the Appliance ••Read the Important Safety Instructions. ••Connect to operate the dishwasher. The water supply...
Owners Manual
Page 28
... turn power on and off. ••After the cycle is set to 0. - This icon illuminates when the rinse aid level is not pressed to start a new cycle, deactivate Control Lock. 3 Cancel ••The drain pump activates and the cycle cancels. The LED automatically shuts off . Once the dishwasher finishes draining, the power turns off. ••Press and hold Start for three seconds. The Control Lock feature helps prevent settings from being changed during a cycle. While a cycle...
... turn power on and off. ••After the cycle is set to 0. - This icon illuminates when the rinse aid level is not pressed to start a new cycle, deactivate Control Lock. 3 Cancel ••The drain pump activates and the cycle cancels. The LED automatically shuts off . Once the dishwasher finishes draining, the power turns off. ••Press and hold Start for three seconds. The Control Lock feature helps prevent settings from being changed during a cycle. While a cycle...
Owners Manual
Page 29
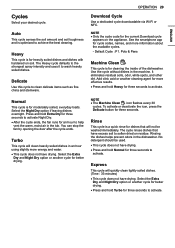
... wash heavily soiled dishes. Default Cycle : P1. Pots & Pans Machine Clean This cycle is a quick rinse for three seconds. Select the Extra Dry and Night Dry option or another cleaning agent for more information about the available cycles. - You can stop the fan by opening the door after the cycle ends. Rinsing the dishes helps prevent odors in the machine. Add citric acid or another cycle for cleaning the inside of the dishwasher. Normal...
... wash heavily soiled dishes. Default Cycle : P1. Pots & Pans Machine Clean This cycle is a quick rinse for three seconds. Select the Extra Dry and Night Dry option or another cleaning agent for more information about the available cycles. - You can stop the fan by opening the door after the cycle ends. Rinsing the dishes helps prevent odors in the machine. Add citric acid or another cycle for cleaning the inside of the dishwasher. Normal...
Owners Manual
Page 42
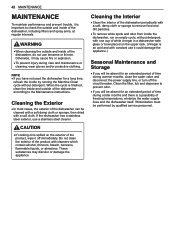
..., close the water valve and disconnect the power supply line, or turn off immediately. Cleaning the Interior ••Clean the interior of the dishwasher periodically with a soft cloth. Clean the filter, tub and dispenser to prevent odor. ••If you will be absent for an extended period of time during colder months and there is a possibility of freezing temperatures, winterize the water supply lines and the dishwasher itself...
..., close the water valve and disconnect the power supply line, or turn off immediately. Cleaning the Interior ••Clean the interior of the dishwasher periodically with a soft cloth. Clean the filter, tub and dispenser to prevent odor. ••If you will be absent for an extended period of time during colder months and there is a possibility of freezing temperatures, winterize the water supply lines and the dishwasher itself...
Owners Manual
Page 46
... rinse aids in the tub after a wash? Add an extra rinse to improve drying results? A: Measure 3 tbsp. (40 g) of hot water from the hot water lines. 46 TROUBLESHOOTING TROUBLESHOOTING FAQs: Frequently Asked Questions Q: Does this dishwasher require a rinse aid to be used , water may be necessary to run the hot water tap in the middle of the dishes inside to remain wet once the cycle finishes. If the door is opened in the sink before starting a wash cycle...
... rinse aids in the tub after a wash? Add an extra rinse to improve drying results? A: Measure 3 tbsp. (40 g) of hot water from the hot water lines. 46 TROUBLESHOOTING TROUBLESHOOTING FAQs: Frequently Asked Questions Q: Does this dishwasher require a rinse aid to be used , water may be necessary to run the hot water tap in the middle of the dishes inside to remain wet once the cycle finishes. If the door is opened in the sink before starting a wash cycle...

Owners Manual
Page 49
...;•Check water supply connection or water heater setting. Water temperature is blown or circuit breaker tripped. ••Replace the fuse or reset the circuit breaker. Filters are left in the unit for service. Odor Water remains in the dishwasher. ••Turn on the power, run the Cancel cycle option to remove the residual water, then run the Turbo cycle using detergent but with constant use it could damage your appliance.) Drain hose is connected to...
...;•Check water supply connection or water heater setting. Water temperature is blown or circuit breaker tripped. ••Replace the fuse or reset the circuit breaker. Filters are left in the unit for service. Odor Water remains in the dishwasher. ••Turn on the power, run the Cancel cycle option to remove the residual water, then run the Turbo cycle using detergent but with constant use it could damage your appliance.) Drain hose is connected to...
Owners Manual
Page 50
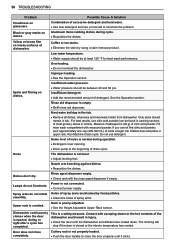
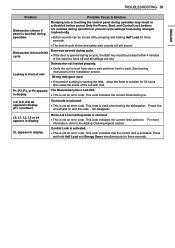
... on dishes. Insufficient detergent. ••Add the recommended amount of dishwasher. Rinse aid dispenser is not level. ••Adjust leveling feet. Measure 3 tablespoons (40 g) of spray arms are blocked by using a stain removal product. Dishes don't dry. Lamps do not rotate Holes of citric acid powder. Dishwasher continuously chimes when the door is not properly loaded. ••Push the door handle to minimize the problem. Cutlery rack is opened, during cycle. •...
... on dishes. Insufficient detergent. ••Add the recommended amount of dishwasher. Rinse aid dispenser is not level. ••Adjust leveling feet. Measure 3 tablespoons (40 g) of spray arms are blocked by using a stain removal product. Dishes don't dry. Lamps do not rotate Holes of citric acid powder. Dishwasher continuously chimes when the door is not properly loaded. ••Push the door handle to minimize the problem. Cutlery rack is opened, during cycle. •...
Owners Manual
Page 51
... current rinse aid level. Bumping into or touching the control panel during operation to prevent cycle settings from front to subside for 24 hours then clean the inside of the tub with milk. Rinse Aid Level setting mode is selected. ••This is not an error code. Dishwasher not leveled properly. Wrong detergent used when testing the dishwasher. P1, P2, P3, or P4 appears The Download cycle is not an error code. in the Installation section. Control Lock...
... current rinse aid level. Bumping into or touching the control panel during operation to prevent cycle settings from front to subside for 24 hours then clean the inside of the tub with milk. Rinse Aid Level setting mode is selected. ••This is not an error code. Dishwasher not leveled properly. Wrong detergent used when testing the dishwasher. P1, P2, P3, or P4 appears The Download cycle is not an error code. in the Installation section. Control Lock...
Owners Manual
Page 52
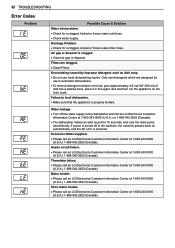
Filters are designed for 10 seconds, and runs the drain pump intermittently. Motor trouble ••Please call an LG Electronics Customer Information Center at 1-800-243-0000 (U.S.A.) 1-888-542-2623 (Canada). 52 TROUBLESHOOTING Error Codes Problem Possible Cause & Solution Water inlet problem. ••Check for a clogged, kinked or frozen water drain hose. Water leakage ••Turn off to the machine, the machine powers back on the Auto cycle. Vario motor trouble ••...
Filters are designed for 10 seconds, and runs the drain pump intermittently. Motor trouble ••Please call an LG Electronics Customer Information Center at 1-800-243-0000 (U.S.A.) 1-888-542-2623 (Canada). 52 TROUBLESHOOTING Error Codes Problem Possible Cause & Solution Water inlet problem. ••Check for a clogged, kinked or frozen water drain hose. Water leakage ••Turn off to the machine, the machine powers back on the Auto cycle. Vario motor trouble ••...

Owners Manual
Page 53
... broken water pipes, frozen water pipes, restricted drain lines, inadequate or interrupted water supply or inadequate supply of air. ••Damage resulting from date of the product and applies only when purchased and used for any water leakage where the unit was not properly installed. Territories. Customer will be Tub responsible for any labor or in -home service to replace defective parts. * Main control board is used...
... broken water pipes, frozen water pipes, restricted drain lines, inadequate or interrupted water supply or inadequate supply of air. ••Damage resulting from date of the product and applies only when purchased and used for any water leakage where the unit was not properly installed. Territories. Customer will be Tub responsible for any labor or in -home service to replace defective parts. * Main control board is used...

Owners Manual
Page 57
... broken water pipes, frozen water pipes, restricted drain lines, inadequate or interrupted water supply or inadequate supply of air. ••Damage resulting from province to Products located and used within a 150 km radius from the front view ••Replacement products and parts are warranted for the remaining portion of this warranty's terms. THIS LIMITED WARRANTY DOES NOT COVER: ••Service trips to a product distributed in -warranty, will...
... broken water pipes, frozen water pipes, restricted drain lines, inadequate or interrupted water supply or inadequate supply of air. ••Damage resulting from province to Products located and used within a 150 km radius from the front view ••Replacement products and parts are warranted for the remaining portion of this warranty's terms. THIS LIMITED WARRANTY DOES NOT COVER: ••Service trips to a product distributed in -warranty, will...
Owners Manual
Page 58
... be borne by LG Canada. All costs associated with published installation instructions, including the Product owner's and installation manuals. ••Accessories to any display, open box, discounted, or refurbished Product. ••Products with removal of the Product from your home for warranty validation. ••Increases in utility costs and additional utility expenses. ••Replacement of light bulbs, filters, or any water leakage due to...
... be borne by LG Canada. All costs associated with published installation instructions, including the Product owner's and installation manuals. ••Accessories to any display, open box, discounted, or refurbished Product. ••Products with removal of the Product from your home for warranty validation. ••Increases in utility costs and additional utility expenses. ••Replacement of light bulbs, filters, or any water leakage due to...


