
Owners Manual
Page 2
... Connecting Water Supply Line and Power 21 Connecting Drain Hose 23 Leveling Dishwasher 25 Securing Dishwasher to Cabinet Opening 26 Final Installation Check 27 OPERATION 27 Using the Appliance 28 Control Panel 29 Cycles 30 Options 31 Cycle/Option Guide 32 Loading the Dishwasher 32 Loading the Lower Rack 34 Loading the Silverware Basket 35 Loading the Upper Rack 37 Loading the Cutlery Rack 38 Adding Cleaning Agents 40 SMART FUNCTIONS 40 LG ThinQ Application 41 Smart Diagnosis™ Function 42 MAINTENANCE 42 Cleaning the Exterior 42 Cleaning the Interior...
... Connecting Water Supply Line and Power 21 Connecting Drain Hose 23 Leveling Dishwasher 25 Securing Dishwasher to Cabinet Opening 26 Final Installation Check 27 OPERATION 27 Using the Appliance 28 Control Panel 29 Cycles 30 Options 31 Cycle/Option Guide 32 Loading the Dishwasher 32 Loading the Lower Rack 34 Loading the Silverware Basket 35 Loading the Upper Rack 37 Loading the Cutlery Rack 38 Adding Cleaning Agents 40 SMART FUNCTIONS 40 LG ThinQ Application 41 Smart Diagnosis™ Function 42 MAINTENANCE 42 Cleaning the Exterior 42 Cleaning the Interior...

Owners Manual
Page 5
... instructions. ••Use this or any circumstances, cut or remove the ground from the power supply line. ••When installing or moving the appliance, be positioned near to operate this appliance if it immediately, and contact an LG Electronics customer information center. ••Never unplug the appliance by pulling on the door of the appliance. OPERATION ••Repair or immediately replace...
... instructions. ••Use this or any circumstances, cut or remove the ground from the power supply line. ••When installing or moving the appliance, be positioned near to operate this appliance if it immediately, and contact an LG Electronics customer information center. ••Never unplug the appliance by pulling on the door of the appliance. OPERATION ••Repair or immediately replace...
Owners Manual
Page 6
... let children eat detergent or dishwasher rinse agent. ••When loading items to weather conditions. ••After cleaning the dishes, turn on the door or dish rack of the dishwasher. ••Do not install or store the dishwasher where it will release any other flammable materials. ••When cleaning, do not spray water on the product directly. ••Do not press buttons with controls. ••...
... let children eat detergent or dishwasher rinse agent. ••When loading items to weather conditions. ••After cleaning the dishes, turn on the door or dish rack of the dishwasher. ••Do not install or store the dishwasher where it will release any other flammable materials. ••When cleaning, do not spray water on the product directly. ••Do not press buttons with controls. ••...

Owners Manual
Page 7
...;•Unplug the appliance before cleaning and attempting any part of electric shock. ••Before discarding the appliance, cut off the power supply line and destroy the appliance's control panel. ENGLISH SAFETY INSTRUCTIONS 7 MAINTENANCE ••Do not repair or replace any user maintenance. All repairs and servicing must be performed by yourself. ••Remove any dust or foreign matter from the power supply line. ••Disconnect this Owner's Manual.
...;•Unplug the appliance before cleaning and attempting any part of electric shock. ••Before discarding the appliance, cut off the power supply line and destroy the appliance's control panel. ENGLISH SAFETY INSTRUCTIONS 7 MAINTENANCE ••Do not repair or replace any user maintenance. All repairs and servicing must be performed by yourself. ••Remove any dust or foreign matter from the power supply line. ••Disconnect this Owner's Manual.
Owners Manual
Page 9
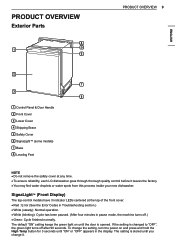
... process inside your new dishwasher. If the setting is opened. ENGLISH PRODUCT OVERVIEW Exterior Parts 4 1 5 6 PRODUCT OVERVIEW 9 2 7 3 8 1 Control Panel & Door Handle 2 Front Cover 3 Lower Cover 4 Shipping Brace 5 Safety Cover 6 SignaLight™ (some models) 7 Base 8 Leveling Feet NOTE ••Do not remove the safety cover at the top of the front cover. ••Red : Error (See the Error Codes in Troubleshooting section.) ••White (steady): Normal operation. ••White (blinking): Cycle...
... process inside your new dishwasher. If the setting is opened. ENGLISH PRODUCT OVERVIEW Exterior Parts 4 1 5 6 PRODUCT OVERVIEW 9 2 7 3 8 1 Control Panel & Door Handle 2 Front Cover 3 Lower Cover 4 Shipping Brace 5 Safety Cover 6 SignaLight™ (some models) 7 Base 8 Leveling Feet NOTE ••Do not remove the safety cover at the top of the front cover. ••Red : Error (See the Error Codes in Troubleshooting section.) ••White (steady): Normal operation. ••White (blinking): Cycle...
Owners Manual
Page 13
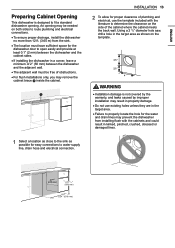
An opening . ENGLISH Preparing Cabinet Opening This dishwasher is not covered by the warranty, and leaks caused by improper installation may result in property damage. ••Do not use the template included with the literature to determine the clearance on both sides to water supply line, drain hose and electrical connection. 22 22 INSTALLATION 13 2 To allow for the dishwasher door to open easily and provide at least 0.1" (2 mm...
An opening . ENGLISH Preparing Cabinet Opening This dishwasher is not covered by the warranty, and leaks caused by improper installation may result in property damage. ••Do not use the template included with the literature to determine the clearance on both sides to water supply line, drain hose and electrical connection. 22 22 INSTALLATION 13 2 To allow for the dishwasher door to open easily and provide at least 0.1" (2 mm...
Owners Manual
Page 14
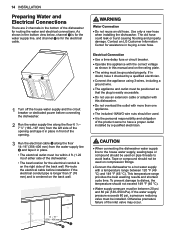
... kPa). Electrical Connection ••Use a time-delay fuse or circuit breaker. ••Operate this manual and on the back wall. This temperature range provides the best washing results and shortest cycle time. The old hose could leak or burst causing flooding and property damage. Contact an LG Customer Information Center for assistance in buying a new hose. CAUTION ••When connecting the dishwasher water supply line to the house water supply, sealing tape...
... kPa). Electrical Connection ••Use a time-delay fuse or circuit breaker. ••Operate this manual and on the back wall. This temperature range provides the best washing results and shortest cycle time. The old hose could leak or burst causing flooding and property damage. Contact an LG Customer Information Center for assistance in buying a new hose. CAUTION ••When connecting the dishwasher water supply line to the house water supply, sealing tape...
Owners Manual
Page 26
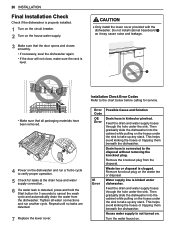
... the cabinet while pulling on the hoses under the sink to take up any slack. 26 INSTALLATION Final Installation Check Check if the dishwasher is properly installed. 1 Turn on the circuit breaker. 2 Turn on the house water supply. 3 Make sure that all water connections and run a Turbo cycle to verify proper operation. 5 Check for leaks at the drain hose and water supply connection.. 6 If a water leak is detected, press and hold the Start button for service.
... the cabinet while pulling on the hoses under the sink to take up any slack. 26 INSTALLATION Final Installation Check Check if the dishwasher is properly installed. 1 Turn on the circuit breaker. 2 Turn on the house water supply. 3 Make sure that all water connections and run a Turbo cycle to verify proper operation. 5 Check for leaks at the drain hose and water supply connection.. 6 If a water leak is detected, press and hold the Start button for service.
Owners Manual
Page 27
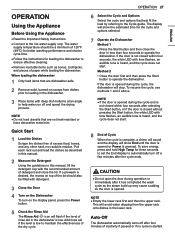
... door is closed without pressing the Start button, the white LED with deep dish bottoms at an angle to operate the dishwasher. OPERATION Using the Appliance Before Using the Appliance ••Read the Important Safety Instructions. ••Connect to maintain the effectiveness of the dry cycle. When loading the dishwasher 1 Only load items that are dishwasher-safe. 2 Remove solid, burned-on the display panel, press the Power button. 5 Check the Rinse Aid The Rinse Aid...
... door is closed without pressing the Start button, the white LED with deep dish bottoms at an angle to operate the dishwasher. OPERATION Using the Appliance Before Using the Appliance ••Read the Important Safety Instructions. ••Connect to maintain the effectiveness of the dry cycle. When loading the dishwasher 1 Only load items that are dishwasher-safe. 2 Remove solid, burned-on the display panel, press the Power button. 5 Check the Rinse Aid The Rinse Aid...
Owners Manual
Page 28
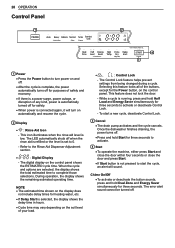
... control panel. The Control Lock feature helps prevent settings from being changed during a cycle. When the cycle and options are selected, the display shows the total estimated time to the Rinse Aid Dispenser Adjustment section. • • : Digital Display - 28 OPERATION Control Panel 1 2 4 3 1 Power ••Press the Power button to turn on the soil level of your load. •• , : Control Lock - The error alert sound cannot be turned off when the rinse aid is refilled or the level is connected...
... control panel. The Control Lock feature helps prevent settings from being changed during a cycle. When the cycle and options are selected, the display shows the total estimated time to the Rinse Aid Dispenser Adjustment section. • • : Digital Display - 28 OPERATION Control Panel 1 2 4 3 1 Power ••Press the Power button to turn on the soil level of your load. •• , : Control Lock - The error alert sound cannot be turned off when the rinse aid is refilled or the level is connected...
Owners Manual
Page 29
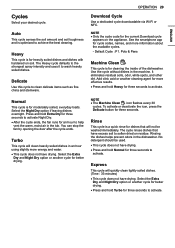
... to activate. No detergent should be washed immediately. The Heavy cycle defaults to the strongest spray intensity and uses it to clean delicate items such as fine china and stemware. OPERATION 29 Download Cycle Use a dedicated cycle downloadable via Wi-Fi or NFC. Normal This cycle is optimized to activate. The cycle rinses dishes that will quickly clean lightly soiled dishes. (Time : 33 minutes) ••This cycle does not have drying. ••...
... to activate. No detergent should be washed immediately. The Heavy cycle defaults to the strongest spray intensity and uses it to clean delicate items such as fine china and stemware. OPERATION 29 Download Cycle Use a dedicated cycle downloadable via Wi-Fi or NFC. Normal This cycle is optimized to activate. The cycle rinses dishes that will quickly clean lightly soiled dishes. (Time : 33 minutes) ••This cycle does not have drying. ••...
Owners Manual
Page 42
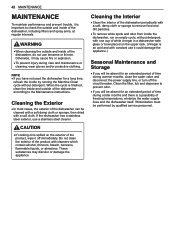
... the appliance. CAUTION ••If cooking oil is spilled on the upper rack. (Vinegar is finished, clean the inside and outside and inside the dishwasher, run an empty cycle, without detergent. Clean the filter, tub and dispenser to remove food and dirt particles. ••To remove white spots and odor from inside of time during warmer months, close the water valve and disconnect the power supply line, or turn off immediately.
... the appliance. CAUTION ••If cooking oil is spilled on the upper rack. (Vinegar is finished, clean the inside and outside and inside the dishwasher, run an empty cycle, without detergent. Clean the filter, tub and dispenser to remove food and dirt particles. ••To remove white spots and odor from inside of time during warmer months, close the water valve and disconnect the power supply line, or turn off immediately.
Owners Manual
Page 46
... still needs a boost, adjust the amount of water that addresses the hard water condition. This will maximize the amount of rinse aid used ? A: Rinse aid is selected automatically. A: The cloudy film is purged from the hot water lines. LG Dishwashers use less water than sheet off of the dishes at the end of the rinse and that the load is used. A: Drying performance is directly affected by minerals in the tub after a wash? Allow the dishwasher...
... still needs a boost, adjust the amount of water that addresses the hard water condition. This will maximize the amount of rinse aid used ? A: Rinse aid is selected automatically. A: The cloudy film is purged from the hot water lines. LG Dishwashers use less water than sheet off of the dishes at the end of the rinse and that the load is used. A: Drying performance is directly affected by minerals in the tub after a wash? Allow the dishwasher...

Owners Manual
Page 49
... remove the residual water, then run the Turbo cycle using detergent but with detergent dispenser. Power supply or power supply line is not pressed. ••Press the Start button. Improper cycle selection. ••Select correct cycle based on spray arms blocked. ••Clean the spray arms. Improper loading of dishware being washed. Fuse is food in the bottom of the unit or in the unit for service. Dishwasher is kinked or clogged. ••Adjust hose...
... remove the residual water, then run the Turbo cycle using detergent but with detergent dispenser. Power supply or power supply line is not pressed. ••Press the Start button. Improper cycle selection. ••Select correct cycle based on spray arms blocked. ••Clean the spray arms. Improper loading of dishware being washed. Fuse is food in the bottom of the unit or in the unit for service. Dishwasher is kinked or clogged. ••Adjust hose...
Owners Manual
Page 50
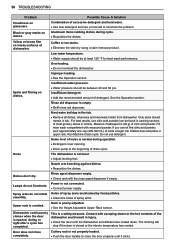
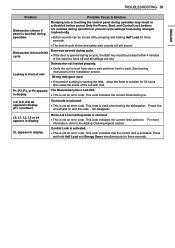
... Operation section. Insufficient water pressure. Do not use a rinse aid to close completely. Rinse agent dispenser empty. ••Check and refill the rinse agent dispenser if empty. Lamps do not rotate Holes of spray arms are blocked by using a stain removal product. smoothly. ••Clean the holes of detergent. Rack is closed or the interior temperature has cooled. The chiming will stop if the door is poorly adjusted. ••See the Height Adjustable Upper Rack...
... Operation section. Insufficient water pressure. Do not use a rinse aid to close completely. Rinse agent dispenser empty. ••Check and refill the rinse agent dispenser if empty. Lamps do not rotate Holes of spray arms are blocked by using a stain removal product. smoothly. ••Clean the holes of detergent. Rack is closed or the interior temperature has cooled. The chiming will stop if the door is poorly adjusted. ••See the Height Adjustable Upper Rack...
Owners Manual
Page 51
... control panel during a cycle, the Start key must be turned off by pressing and holding Half Load for three seconds. Dishwasher did not finish cycle. ••If the door is opened during cycle. Leaking in a disabled button sound. in display. This code indicates the current Download cycle. This code indicates the current rinse aid level. For more information, refer to the Adding Cleaning Agents section. See leveling instructions in display. Wrong detergent used when testing the dishwasher. Press and hold Half Load...
... control panel during a cycle, the Start key must be turned off by pressing and holding Half Load for three seconds. Dishwasher did not finish cycle. ••If the door is opened during cycle. Leaking in a disabled button sound. in display. This code indicates the current Download cycle. This code indicates the current rinse aid level. For more information, refer to the Adding Cleaning Agents section. See leveling instructions in display. Wrong detergent used when testing the dishwasher. Press and hold Half Load...
Owners Manual
Page 52
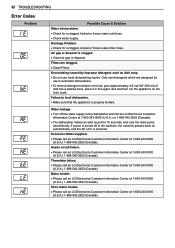
... runs the drain pump intermittently. Water leakage ••Turn off to the machine, the machine powers back on the Auto cycle. Thermistor failure. ••Please call an LG Electronics Customer Information Center at 1-800-243-0000 (U.S.A.) 1-888-542-2623 (Canada). 52 TROUBLESHOOTING Error Codes Problem Possible Cause & Solution Water inlet problem. ••Check for a clogged, kinked or frozen water drain hose. Oversudsing caused by improper detergent, such as dish soap...
... runs the drain pump intermittently. Water leakage ••Turn off to the machine, the machine powers back on the Auto cycle. Thermistor failure. ••Please call an LG Electronics Customer Information Center at 1-800-243-0000 (U.S.A.) 1-888-542-2623 (Canada). 52 TROUBLESHOOTING Error Codes Problem Possible Cause & Solution Water inlet problem. ••Check for a clogged, kinked or frozen water drain hose. Oversudsing caused by improper detergent, such as dish soap...

Owners Manual
Page 53
... purchase Main control board* / Racks Main control board and dishwasher racks. Customer will also provide, free of original retail purchase Labor / Parts LG will be responsible for other rights that vary from operating the product in a corrosive atmosphere or contrary to the instructions outlined in -home service to replace the defective part. repair or replacement of fuses or correction of wiring or plumbing, or correction of unauthorized repairs/installation. ••...
... purchase Main control board* / Racks Main control board and dishwasher racks. Customer will also provide, free of original retail purchase Labor / Parts LG will be responsible for other rights that vary from operating the product in a corrosive atmosphere or contrary to the instructions outlined in -home service to replace the defective part. repair or replacement of fuses or correction of wiring or plumbing, or correction of unauthorized repairs/installation. ••...

Owners Manual
Page 57
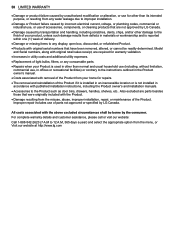
..." repairs, for in -warranty, will be new or remanufactured. ••LG Authorized Service Center warranties their repair work for the remaining portion of this warranty that negates or varies any implied condition or warranty under normal home use during power failures and interruptions or inadequate electrical service. ••Damage caused by leaky or broken water pipes, frozen water pipes, restricted drain lines, inadequate or interrupted water supply or inadequate supply...
..." repairs, for in -warranty, will be new or remanufactured. ••LG Authorized Service Center warranties their repair work for the remaining portion of this warranty that negates or varies any implied condition or warranty under normal home use during power failures and interruptions or inadequate electrical service. ••Damage caused by leaky or broken water pipes, frozen water pipes, restricted drain lines, inadequate or interrupted water supply or inadequate supply...
Owners Manual
Page 58
Model and Serial numbers, along with original retail sales receipt, are required for warranty validation. ••Increases in utility costs and additional utility expenses. ••Replacement of light bulbs, filters, or any consumable parts. ••Repairs when your Product is reported within one (1) week of delivery. ••Damage or missing items to any water leakage due to improper...
Model and Serial numbers, along with original retail sales receipt, are required for warranty validation. ••Increases in utility costs and additional utility expenses. ••Replacement of light bulbs, filters, or any consumable parts. ••Repairs when your Product is reported within one (1) week of delivery. ••Damage or missing items to any water leakage due to improper...


