
Owner's Manual (English)
Page 4
... and others is , tell you to potential hazards that can result in death, fire, or electrical shock. The dishwasher MUST be used before installation has been completed in accordance with the instructions in the installation manual. Connect the ground wire to green ground connector in terminal box. Always read and obey all safety messages...
... and others is , tell you to potential hazards that can result in death, fire, or electrical shock. The dishwasher MUST be used before installation has been completed in accordance with the instructions in the installation manual. Connect the ground wire to green ground connector in terminal box. Always read and obey all safety messages...

Owner's Manual (English)
Page 6
... shock. This will imply it will be exposed to the equipment-grounding terminal or lead on the appliance. Installation Instructions The dishwasher is designed for the customer to a grounded metal, permanent wiring system or an equipment-grounding conductor must be... by experienced service persons. For a permanently connected dishwasher: This appliance must be connected to set up the dishwasher as a portable appliance. NOTE Detailed installation instructions are hard-wired. Do not install or store the dishwasher where it is acceptable for standard household current (...
... shock. This will imply it will be exposed to the equipment-grounding terminal or lead on the appliance. Installation Instructions The dishwasher is designed for the customer to a grounded metal, permanent wiring system or an equipment-grounding conductor must be... by experienced service persons. For a permanently connected dishwasher: This appliance must be connected to set up the dishwasher as a portable appliance. NOTE Detailed installation instructions are hard-wired. Do not install or store the dishwasher where it is acceptable for standard household current (...

Owner's Manual (English)
Page 20
... Clean the arm. Spots and filming on door and tank Extremely hard water Follow instructions of spray arms is blown out. Too much detergent used . Detergent cover opening. Reposition your dishwasher. Black or gray marks on pages 12 and 13. Replace fuse and repair circuit...Check water pressure is bent or clogged. Check and refill the rinse agent if empty. Connect power supply properly. Extremly hard water Install home water softener or use and tub cleaning. Combination of dishes. Dishes don't dry The lamps don't illuminate Spray arms don't...
... Clean the arm. Spots and filming on door and tank Extremely hard water Follow instructions of spray arms is blown out. Too much detergent used . Detergent cover opening. Reposition your dishwasher. Black or gray marks on pages 12 and 13. Replace fuse and repair circuit...Check water pressure is bent or clogged. Check and refill the rinse agent if empty. Connect power supply properly. Extremly hard water Install home water softener or use and tub cleaning. Combination of dishes. Dishes don't dry The lamps don't illuminate Spray arms don't...

Owner's Manual (English)
Page 22
... implied warranty lasts, so the above exclusion or limitation may not apply to locate your home to deliver, pick up, and/or install the product, instruct, or replace house fuses or correct wiring, or correction of unauthorized repairs. �Damages or operating problems that vary from misuse, ...-243-0000 (24 hours a day, 365 days per year) and select the appropriate option from the Date of the product. Dishwasher Rack: 5 Years from the menu. USA Your LG Dishwasher will be new or factory remanufactured. THIS LIMITED WARRANTY DOES NOT APPLY TO: �Service trips to your nearest...
... implied warranty lasts, so the above exclusion or limitation may not apply to locate your home to deliver, pick up, and/or install the product, instruct, or replace house fuses or correct wiring, or correction of unauthorized repairs. �Damages or operating problems that vary from misuse, ...-243-0000 (24 hours a day, 365 days per year) and select the appropriate option from the Date of the product. Dishwasher Rack: 5 Years from the menu. USA Your LG Dishwasher will be new or factory remanufactured. THIS LIMITED WARRANTY DOES NOT APPLY TO: �Service trips to your nearest...
User Guide
Page 3
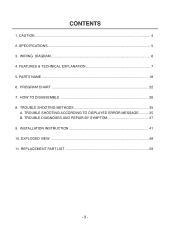
TROUBLE SHOOTING METHODS 35 A. FEATURES & TECHNICAL EXPLANATION 7 5. PROGRAM CHART ...22 7. INSTALLATION INSTRUCTION 41 10. CAUTION...4 2. TROUBLE SHOOTING ACCORDING TO DISPLAYED ERROR MESSAGE...........35 B. EXPLODED VIEW ...48 11. REPLACEMENT PART LIST 59 -3- PARTS NAME ...18 6. TROUBLE DIAGNOSES AND REPAIR BY SYMPTOM 37 9. WIRING DIAGRAM...6 4. SPECIFICATIONS ...5 3. CONTENTS 1. HOW TO DISASSEMBLE 26 8.
TROUBLE SHOOTING METHODS 35 A. FEATURES & TECHNICAL EXPLANATION 7 5. PROGRAM CHART ...22 7. INSTALLATION INSTRUCTION 41 10. CAUTION...4 2. TROUBLE SHOOTING ACCORDING TO DISPLAYED ERROR MESSAGE...........35 B. EXPLODED VIEW ...48 11. REPLACEMENT PART LIST 59 -3- PARTS NAME ...18 6. TROUBLE DIAGNOSES AND REPAIR BY SYMPTOM 37 9. WIRING DIAGRAM...6 4. SPECIFICATIONS ...5 3. CONTENTS 1. HOW TO DISASSEMBLE 26 8.
User Guide
Page 35
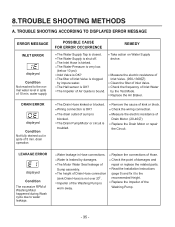
... drain outlet of Inlet Valve. Check the wiring connection. Water is bound. Impeller of Air Guide is leaked by the Test Mode. Read the Installation Instructions (page 9) and fix it to water leakage. The Impeller of the Washing Pump is not over 20 . REMEDY Take action on Water Supply ...Washing Motor happened during Wash cycle due to the recommended Height. The Water Supply is OK? The Hall sensor is shut off. DRAIN ERROR displayed Condition Not fully drained out in Hose connections. Replace the Impeller of 5 min. The Drain Pump/Motor or circuit is closed. Remove the...
... drain outlet of Inlet Valve. Check the wiring connection. Water is bound. Impeller of Air Guide is leaked by the Test Mode. Read the Installation Instructions (page 9) and fix it to water leakage. The Impeller of the Washing Pump is not over 20 . REMEDY Take action on Water Supply ...Washing Motor happened during Wash cycle due to the recommended Height. The Water Supply is OK? The Hall sensor is shut off. DRAIN ERROR displayed Condition Not fully drained out in Hose connections. Replace the Impeller of 5 min. The Drain Pump/Motor or circuit is closed. Remove the...
User Guide
Page 41
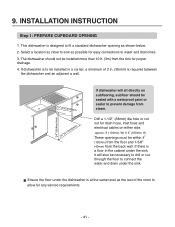
INSTALLATION INSTRUCTION Step 1: PREPARE CUPBOARD OPENING 1. approx. 4 (100mm, W) X 4 (100mm, H) These openings must be sealed with a waterproof paint or sealer to be installed in a corner, a minimum of the room to fit a standard dishwasher opening as shown below. 2. This dishwasher is to prevent damage from steam. If dishwasher will also be installed... or cut out for easy connections to connect the water and drain under the dishwasher is required between the dishwasher and an adjacent a wall. The dishwasher should be within 4 (100mm) from the floor and 1-5/8 (40mm) from ...
INSTALLATION INSTRUCTION Step 1: PREPARE CUPBOARD OPENING 1. approx. 4 (100mm, W) X 4 (100mm, H) These openings must be sealed with a waterproof paint or sealer to be installed in a corner, a minimum of the room to fit a standard dishwasher opening as shown below. 2. This dishwasher is to prevent damage from steam. If dishwasher will also be installed... or cut out for easy connections to connect the water and drain under the dishwasher is required between the dishwasher and an adjacent a wall. The dishwasher should be within 4 (100mm) from the floor and 1-5/8 (40mm) from ...

User Guide
Page 44
Slide the dishwasher into the cupboard opening carefully. Follow the instruction as shown below. 2. Make sure that the drain hose inside the cabinet is not kinked. 4. Remove the Lower Cover and orient dishwasher as in Figure B. - 44 - Before sliding the dishwasher into the cabinet opening , make all necessary height adjustments using the legs. 3. Step 5: INSTALL THE DISHWASHER IN CUPBOARD 1.
Slide the dishwasher into the cupboard opening carefully. Follow the instruction as shown below. 2. Make sure that the drain hose inside the cabinet is not kinked. 4. Remove the Lower Cover and orient dishwasher as in Figure B. - 44 - Before sliding the dishwasher into the cabinet opening , make all necessary height adjustments using the legs. 3. Step 5: INSTALL THE DISHWASHER IN CUPBOARD 1.


