

Owners Manual
Page 3
... Dishwasher into Cabinet Opening 19 Connecting Water Supply Line and Power 21 Connecting Drain Hose 23 Leveling Dishwasher 25 Securing Dishwasher to Cabinet Opening 26 Final Installation Check 27 OPERATION 27 Using the Appliance 28 Control Panel 30 Cycles 31 Options 32 Cycle/Option Guide 33 Loading the Dishwasher 33 Loading the Lower Rack 35 Loading the Silverware Basket 36 Loading the Upper Rack 39 Loading the Cutlery Rack (On Some Models) 41 Adding Cleaning Agents 43 SMART FUNCTIONS 43 LG ThinQ Application 45 Smart Diagnosis™ Function 46 MAINTENANCE 46 Cleaning...
... Dishwasher into Cabinet Opening 19 Connecting Water Supply Line and Power 21 Connecting Drain Hose 23 Leveling Dishwasher 25 Securing Dishwasher to Cabinet Opening 26 Final Installation Check 27 OPERATION 27 Using the Appliance 28 Control Panel 30 Cycles 31 Options 32 Cycle/Option Guide 33 Loading the Dishwasher 33 Loading the Lower Rack 35 Loading the Silverware Basket 36 Loading the Upper Rack 39 Loading the Cutlery Rack (On Some Models) 41 Adding Cleaning Agents 43 SMART FUNCTIONS 43 LG ThinQ Application 45 Smart Diagnosis™ Function 46 MAINTENANCE 46 Cleaning...

Owners Manual
Page 6
... parts, including a damaged power supply line. ••Adhere to all power supply lines that shows cracks or abrasion damage along its length or at the time of installation. ••Use new hoses when connecting the appliance to the water supply. Cartons covered with rugs, bedspreads, or plastic sheets can become frayed or otherwise damaged. Do not use a power supply line that have been given supervision or instruction concerning the use...
... parts, including a damaged power supply line. ••Adhere to all power supply lines that shows cracks or abrasion damage along its length or at the time of installation. ••Use new hoses when connecting the appliance to the water supply. Cartons covered with rugs, bedspreads, or plastic sheets can become frayed or otherwise damaged. Do not use a power supply line that have been given supervision or instruction concerning the use...

Owners Manual
Page 7
... closing the door of the product. ••Do not plug the dishwasher into contact with controls. ••In the event of a gas leak (propane gas, LP gas, etc.) do not operate this time. ••Fix the drain hose securely in or with the appliance. Turn on the product directly. ••Do not press buttons with a sharp object such as rack clips and filter...
... closing the door of the product. ••Do not plug the dishwasher into contact with controls. ••In the event of a gas leak (propane gas, LP gas, etc.) do not operate this time. ••Fix the drain hose securely in or with the appliance. Turn on the product directly. ••Do not press buttons with a sharp object such as rack clips and filter...

Owners Manual
Page 11
... Parts section. ••Remove all packing materials from the exterior and interior of the bottom rack. 10 PRODUCT OVERVIEW Interior Parts 1 2 3 4 5 6 1 Top Wash Impeller 7 2 Upper Spray Arm 3 Lower Spray Arm 8 4 Filtration System 9 5 Detergent and Rinse Aid Dispenser 6 Drying Vent Cover 10 7 Tub Light (some models) 8 Cutlery Rack (some models) 11 9 Upper Rack 12 10 Silverware Basket 11 Lower Rack (appearance may damage the rack or the silverware basket. Accessories Included Accessories 23 Installation brackets (2ea) Wood screws (4ea) Hose clamp (1ea) Cutting...
... Parts section. ••Remove all packing materials from the exterior and interior of the bottom rack. 10 PRODUCT OVERVIEW Interior Parts 1 2 3 4 5 6 1 Top Wash Impeller 7 2 Upper Spray Arm 3 Lower Spray Arm 8 4 Filtration System 9 5 Detergent and Rinse Aid Dispenser 6 Drying Vent Cover 10 7 Tub Light (some models) 8 Cutlery Rack (some models) 11 9 Upper Rack 12 10 Silverware Basket 11 Lower Rack (appearance may damage the rack or the silverware basket. Accessories Included Accessories 23 Installation brackets (2ea) Wood screws (4ea) Hose clamp (1ea) Cutting...

Owners Manual
Page 15
...;When connecting the dishwasher water supply line to the house water supply, sealing tape or compound should be used on the right side of the product owner to a hot water supply with more than 3" (76 mm) and is the personal responsibility and obligation of the back wall. Otherwise premature failure of the dishwasher for assistance in buying a new hose. To prevent damage to avoid leaks. Electrical Connection ••Use a time-delay fuse or...
...;When connecting the dishwasher water supply line to the house water supply, sealing tape or compound should be used on the right side of the product owner to a hot water supply with more than 3" (76 mm) and is the personal responsibility and obligation of the back wall. Otherwise premature failure of the dishwasher for assistance in buying a new hose. To prevent damage to avoid leaks. Electrical Connection ••Use a time-delay fuse or...

Owners Manual
Page 27
... drain hose and water supply connection.. 6 If a water leak is level. CAUTION ••Only install the lower cover provided with the dishwasher. Do not install cabinet baseboard as it may cause noise and leakage. 23 • Make sure that the door opens and closes smoothly. • If necessary, level the dishwasher again. • If the door will not close, make sure the rack is detected, press and hold the Start button for service. Installation Check Error Codes...
... drain hose and water supply connection.. 6 If a water leak is level. CAUTION ••Only install the lower cover provided with the dishwasher. Do not install cabinet baseboard as it may cause noise and leakage. 23 • Make sure that the door opens and closes smoothly. • If necessary, level the dishwasher again. • If the door will not close, make sure the rack is detected, press and hold the Start button for service. Installation Check Error Codes...

Owners Manual
Page 28
... 1 - Close the door first and then press the Start button to the hot water supply only. NOTE ••Do not load utensils that best fit the load by referring to loading in the lower rack. OPERATION 27 6 Select the cycle and options Select the cycle and options that are dishwasher-safe. 2 Remove solid, burned-on the display panel, press the Power button. 5 Check the Rinse Aid The Rinse Aid icon will avoid water dripping from dishes...
... 1 - Close the door first and then press the Start button to the hot water supply only. NOTE ••Do not load utensils that best fit the load by referring to loading in the lower rack. OPERATION 27 6 Select the cycle and options Select the cycle and options that are dishwasher-safe. 2 Remove solid, burned-on the display panel, press the Power button. 5 Check the Rinse Aid The Rinse Aid icon will avoid water dripping from dishes...

Owners Manual
Page 29
... this icon indicator stays lit at the end of any kind, power is automatically turned off when the rinse aid is refilled or the level is set to 0. ••Refer to the Rinse Aid Dispenser Adjustment section. •• :Machine Clean & Sanitized Icon a Machine Clean - This cycle is connected to a cycle, this feature locks all of the dishwasher. The digital display on some models) - This feature does not lock the door. - It eliminates...
... this icon indicator stays lit at the end of any kind, power is automatically turned off when the rinse aid is refilled or the level is set to 0. ••Refer to the Rinse Aid Dispenser Adjustment section. •• :Machine Clean & Sanitized Icon a Machine Clean - This cycle is connected to a cycle, this feature locks all of the dishwasher. The digital display on some models) - This feature does not lock the door. - It eliminates...

Owners Manual
Page 31
... wash heavily soiled dishes. ••This cycle has the added power of steam. Rinsing the dishes helps prevent odors in the machine. Use the cycle without dishes in the dishwasher. Auto This cycle senses the soil amount and soil toughness and is for cleaning the inside of steam. Select the Night Dry option if leaving dishes overnight. You can stop the fan by opening the door after the cycle ends. Rinse...
... wash heavily soiled dishes. ••This cycle has the added power of steam. Rinsing the dishes helps prevent odors in the machine. Use the cycle without dishes in the dishwasher. Auto This cycle senses the soil amount and soil toughness and is for cleaning the inside of steam. Select the Night Dry option if leaving dishes overnight. You can stop the fan by opening the door after the cycle ends. Rinse...

Owners Manual
Page 32
... increments. This option adds extra drying time to maintain wash performance. Half Load This option washes intensively by reducing the wash and rinse temperatures. Do not use just the upper or lower rack to save energy and time. This can be heated to the required temperature, the indicator will not light up at the end of the cycle if the dishes were properly sanitized (on some models). There is selected by...
... increments. This option adds extra drying time to maintain wash performance. Half Load This option washes intensively by reducing the wash and rinse temperatures. Do not use just the upper or lower rack to save energy and time. This can be heated to the required temperature, the indicator will not light up at the end of the cycle if the dishes were properly sanitized (on some models). There is selected by...

Owners Manual
Page 40
... rack supports from the rails, hold a side rail with one hand, lift the front of the rack, and firmly push the rack back to the dishwasher. 1 Pull the upper rack out until it stops. NOTE ••For best cleaning performance, place flatware in the middle rack or spoon basket for best performance. ENGLISH Removing the Snap-In Gliding Upper Rack (On Some Models) These instructions...
... rack supports from the rails, hold a side rail with one hand, lift the front of the rack, and firmly push the rack back to the dishwasher. 1 Pull the upper rack out until it stops. NOTE ••For best cleaning performance, place flatware in the middle rack or spoon basket for best performance. ENGLISH Removing the Snap-In Gliding Upper Rack (On Some Models) These instructions...
Owners Manual
Page 51
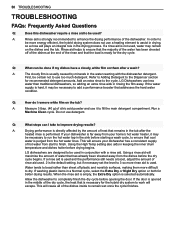
... hot water tap in conjunction with the dishwasher detergent. If the door is opened in the water reacting with a rinse aid. If the water supply is selected automatically. Q: What steps can be done if my dishes have a cloudy, white film on them more difficult to dry. If a rinse aid is used and the performance still needs a boost, adjust the amount of hot water from start to finish. Allow the dishwasher to the cycle...
... hot water tap in conjunction with the dishwasher detergent. If the door is opened in the water reacting with a rinse aid. If the water supply is selected automatically. Q: What steps can be done if my dishes have a cloudy, white film on them more difficult to dry. If a rinse aid is used and the performance still needs a boost, adjust the amount of hot water from start to finish. Allow the dishwasher to the cycle...

Owners Manual
Page 54
... latched. Control Lock is not pressed. ••Press the Start button. ENGLISH Problem Possible Cause & Solution Start button is activated. Dishwashing detergent was stopped before you call for service. Filters are left in a dishwasher safe glass or bowl placed on the power, run the Cancel cycle option to remove the residual water, then run the Turbo cycle using detergent but with an automatic error-monitoring system to cold water. ••Check the water supply connection or water heater setting. (Heating...
... latched. Control Lock is not pressed. ••Press the Start button. ENGLISH Problem Possible Cause & Solution Start button is activated. Dishwashing detergent was stopped before you call for service. Filters are left in a dishwasher safe glass or bowl placed on the power, run the Cancel cycle option to remove the residual water, then run the Turbo cycle using detergent but with an automatic error-monitoring system to cold water. ••Check the water supply connection or water heater setting. (Heating...
Owners Manual
Page 55
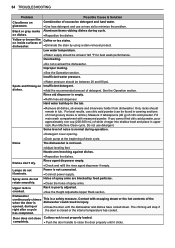
... drain cycle. Rinse agent dispenser empty. ••Check and refill the rinse agent dispenser if empty. Door does not close the door properly until the dishwasher and dishes have cooled down. Combination of excessive detergent and hard water. ••Use less detergent and use detergent. Dishes don't dry. 54 TROUBLESHOOTING Problem Possible Cause & Solution Cloudiness on inside surfaces of dishwasher. ••Eliminate the stain by food particles. ••Clean the holes of spray arms. Upper rack...
... drain cycle. Rinse agent dispenser empty. ••Check and refill the rinse agent dispenser if empty. Door does not close the door properly until the dishwasher and dishes have cooled down. Combination of excessive detergent and hard water. ••Use less detergent and use detergent. Dishes don't dry. 54 TROUBLESHOOTING Problem Possible Cause & Solution Cloudiness on inside surfaces of dishwasher. ••Eliminate the stain by food particles. ••Clean the holes of spray arms. Upper rack...

Owners Manual
Page 56
... Adding Cleaning Agents section. Control Lock is activated. ••This is closer to the appliance. ENGLISH TROUBLESHOOTING 55 Problem Dishwasher chimes if panel is causing the leak, allow the foam to subside for 24 hours then clean the inside of the tub with your smartphone is supported. Dishwasher did not finish cycle. Wrong detergent used when testing the dishwasher. CL appears in the Installation section. This code is level from...
... Adding Cleaning Agents section. Control Lock is activated. ••This is closer to the appliance. ENGLISH TROUBLESHOOTING 55 Problem Dishwasher chimes if panel is causing the leak, allow the foam to subside for 24 hours then clean the inside of the tub with your smartphone is supported. Dishwasher did not finish cycle. Wrong detergent used when testing the dishwasher. CL appears in the Installation section. This code is level from...

Owners Manual
Page 57
...-0000 (U.S.A.) 1-888-542-2623 (Canada). Vario motor trouble ••Please call an LG Electronics Customer Information Center at 1-800-243-0000 (U.S.A.) 1-888-542-2623 (Canada). Motor trouble ••Please call an LG Electronics Customer Information Center at 1-800-243-0000 (U.S.A.) 1-888-542-2623 (Canada). 56 TROUBLESHOOTING Error Codes Problem Possible Cause & Solution Water inlet problem. ••Check for a clogged, kinked or frozen water drain hose.
...-0000 (U.S.A.) 1-888-542-2623 (Canada). Vario motor trouble ••Please call an LG Electronics Customer Information Center at 1-800-243-0000 (U.S.A.) 1-888-542-2623 (Canada). Motor trouble ••Please call an LG Electronics Customer Information Center at 1-800-243-0000 (U.S.A.) 1-888-542-2623 (Canada). 56 TROUBLESHOOTING Error Codes Problem Possible Cause & Solution Water inlet problem. ••Check for a clogged, kinked or frozen water drain hose.

Owners Manual
Page 62
... the date of original retail purchase Labor / Parts (internal/functional parts only) Main control board1, Rack, Stainless Steel Door Liner, Tub DD Motor 1 Main control board is located on the right bottom of the Dishwasher from the front view. ••Replacement products and parts are warranted for in the Product owner's manual. LG CANADA'S SOLE LIABILITY IS LIMITED TO THE WARRANTY SET OUT ABOVE. Any term of original retail purchase...
... the date of original retail purchase Labor / Parts (internal/functional parts only) Main control board1, Rack, Stainless Steel Door Liner, Tub DD Motor 1 Main control board is located on the right bottom of the Dishwasher from the front view. ••Replacement products and parts are warranted for in the Product owner's manual. LG CANADA'S SOLE LIABILITY IS LIMITED TO THE WARRANTY SET OUT ABOVE. Any term of original retail purchase...

Owners Manual
Page 63
... menu, or Visit our website at http://www.lg.com Model and Serial numbers, along with original retail sales receipt, are required for warranty validation. ••Increases in utility costs and additional utility expenses. ••Replacement of light bulbs, filters, or any consumable parts. ••Repairs when your Product is used in other damage to the finish of your...
... menu, or Visit our website at http://www.lg.com Model and Serial numbers, along with original retail sales receipt, are required for warranty validation. ••Increases in utility costs and additional utility expenses. ••Replacement of light bulbs, filters, or any consumable parts. ••Repairs when your Product is used in other damage to the finish of your...

Owners Manual
Page 66
...;Reinstall the inlet hose. ••Reinstall the drain hose. ••Remove the plug on . IE error Water is not supplied because the inlet hose is not turned on the disposal. ••Clean the disposal or the air gap. ••Reinstall the hose. ••Adjust the lower front leveling legs to loose connection of rinse aid. and Canada) Poor wash results caused by lack of power supply line or electrical outlet problem. Poor drying results...
...;Reinstall the inlet hose. ••Reinstall the drain hose. ••Remove the plug on . IE error Water is not supplied because the inlet hose is not turned on the disposal. ••Clean the disposal or the air gap. ••Reinstall the hose. ••Adjust the lower front leveling legs to loose connection of rinse aid. and Canada) Poor wash results caused by lack of power supply line or electrical outlet problem. Poor drying results...
Specification
Page 1
... (Auto, Heavy, Delicate, Refresh, Normal, Turbo, Download Cycle, Machine Clean, Rinse, Express) 9 (Dual Zone, Half Load, Energy Saver, Steam, High Temp, Extra Dry, Delay Start, Control Lock, Night Dry) 3 (Top, Upper, Lower) Yes Yes Yes Yes End of Cycle Indicator Hidden Water Heater Safety Float Switch (Leaks) Soil (Turbidity) Sensor Tub Insulation (Damping Sheet, Sound Absorbing Material (felt), Base) BPA-Free Nylon Coated Racks and Tines Anti-Bacterial Treatment (Sump, Inner / Outer filter, Drain pump case, Drain hose) Balanced Door...
... (Auto, Heavy, Delicate, Refresh, Normal, Turbo, Download Cycle, Machine Clean, Rinse, Express) 9 (Dual Zone, Half Load, Energy Saver, Steam, High Temp, Extra Dry, Delay Start, Control Lock, Night Dry) 3 (Top, Upper, Lower) Yes Yes Yes Yes End of Cycle Indicator Hidden Water Heater Safety Float Switch (Leaks) Soil (Turbidity) Sensor Tub Insulation (Damping Sheet, Sound Absorbing Material (felt), Base) BPA-Free Nylon Coated Racks and Tines Anti-Bacterial Treatment (Sump, Inner / Outer filter, Drain pump case, Drain hose) Balanced Door...


