Owner's Manual (English)
Page 2
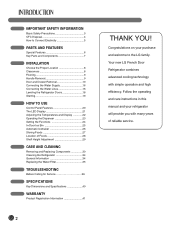
...the LG family. Follow the operating and care instructions in this manual and your purchase and welcome to Connect Electricity 5 PARTS AND FEATURES Special Features 6 Key Parts and Components 7 INSTALLATION Choose the Proper Location 8 Clearances 8 Flooring 9 Handle Removal 9 Door and Drawer Removal 10 Connecting the Water Supply 16 Connecting the Water Lines 16 Leveling the Refrigerator Doors 18 Starting 19 HOW TO USE Control Panel Features 20 The LED Display 21 Adjusting the Temperatures and Display 22 Operating the Dispenser 23 Setting the Functions 24 In-Door Ice Bin...
...the LG family. Follow the operating and care instructions in this manual and your purchase and welcome to Connect Electricity 5 PARTS AND FEATURES Special Features 6 Key Parts and Components 7 INSTALLATION Choose the Proper Location 8 Clearances 8 Flooring 9 Handle Removal 9 Door and Drawer Removal 10 Connecting the Water Supply 16 Connecting the Water Lines 16 Leveling the Refrigerator Doors 18 Starting 19 HOW TO USE Control Panel Features 20 The LED Display 21 Adjusting the Temperatures and Display 22 Operating the Dispenser 23 Setting the Functions 24 In-Door Ice Bin...

Owner's Manual (English)
Page 3
...; NEVER unplug your refrigerator before using your refrigerator away from the outlet. • Repair or replace immediately all electric service cords that releases the cubes. NOTE: Service should be properly installed in accordance with the Installer Instructions that were taped to the extremely cold surfaces. • In refrigerators with automatic icemakers, avoid contact with the heating element that have LED interior lighting and service should be performed...
...; NEVER unplug your refrigerator before using your refrigerator away from the outlet. • Repair or replace immediately all electric service cords that releases the cubes. NOTE: Service should be properly installed in accordance with the Installer Instructions that were taped to the extremely cold surfaces. • In refrigerators with automatic icemakers, avoid contact with the heating element that have LED interior lighting and service should be performed...

Owner's Manual (English)
Page 8
... easily connected for the automatic icemaker and dispenser. • Unstable installation may result in an area where the temperature is not even, make the refrigerator level by rotating the height adjusting screws. • Properly ground the refrigerator to open the doors. NOTE: For complete dimensions and specifications, see page 40. 1" (2.54 cm) 8 Allow at least 24 in. (61 cm) in front of electric shock, do not install the refrigerator...
... easily connected for the automatic icemaker and dispenser. • Unstable installation may result in an area where the temperature is not even, make the refrigerator level by rotating the height adjusting screws. • Properly ground the refrigerator to open the doors. NOTE: For complete dimensions and specifications, see page 40. 1" (2.54 cm) 8 Allow at least 24 in. (61 cm) in front of electric shock, do not install the refrigerator...

Owner's Manual (English)
Page 9
... to move the refrigerator through a house door, it is recommend that the doors be tightened or removed, use a 1/4" Allen wrench. 2 Loosen the set screws with reasonable force. NOTE: If the handle mounting fasteners need to move the refrigerator through a narrow opening. If required, adjust the leveling legs to compensate for cleaning or service, be slightly higher than the rear to aid in door closing. floor damage...
... to move the refrigerator through a house door, it is recommend that the doors be tightened or removed, use a 1/4" Allen wrench. 2 Loosen the set screws with reasonable force. NOTE: If the handle mounting fasteners need to move the refrigerator through a narrow opening. If required, adjust the leveling legs to compensate for cleaning or service, be slightly higher than the rear to aid in door closing. floor damage...

Owner's Manual (English)
Page 16
... . saddle valve which is used as a water pressure regulator. • The icemaker needs to be connected to prevent operation without a water filter and between 43 and 121 p.s.i. (3~8.5 kgf/cm2) on models with local plumbing code requirements. • Use copper tubing and check for cleaning. Add 7 ft. (2.1 m) to relieve pressure in . open the nearest faucet to allow for moving the refrigerator for leaks. • Install tubing only in areas where temperatures will...
... . saddle valve which is used as a water pressure regulator. • The icemaker needs to be connected to prevent operation without a water filter and between 43 and 121 p.s.i. (3~8.5 kgf/cm2) on models with local plumbing code requirements. • Use copper tubing and check for cleaning. Add 7 ft. (2.1 m) to relieve pressure in . open the nearest faucet to allow for moving the refrigerator for leaks. • Install tubing only in areas where temperatures will...

Owner's Manual (English)
Page 17
... ON position. Turn off the shutoff valve on the main water supply. Packing Nut Cold Water Pipe Pipe Clamp Coil of the copper tubing into a container or sink, and turn on the water pipe. Tubing Clamp 1/4" Tubing 1/4" Compression Nut Ferrule (Sleeve) Water valve Refrigerator Connection • Remove the plastic flexible cap from the lines. • Push the refrigerator back to the wall. • Set the icemaker switch to the refrigerator, be used . NOTE...
... ON position. Turn off the shutoff valve on the main water supply. Packing Nut Cold Water Pipe Pipe Clamp Coil of the copper tubing into a container or sink, and turn on the water pipe. Tubing Clamp 1/4" Tubing 1/4" Compression Nut Ferrule (Sleeve) Water valve Refrigerator Connection • Remove the plastic flexible cap from the lines. • Push the refrigerator back to the wall. • Set the icemaker switch to the refrigerator, be used . NOTE...

Owner's Manual (English)
Page 18
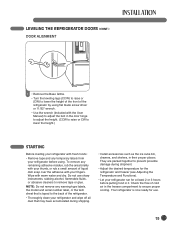
... by using the following instructions. Either door can be injured or receive an electrical shock. Leveling After installing, secure the product with the 'Adjust' to the floor to install and use. 18 Turn the leveling legs (CCW) to raise or (CW) to side. You will need two people to perform the following instructions: Kick Plate 1 Plug the power cord into a 3-prong grounded outlet, and move left . Open...
... by using the following instructions. Either door can be injured or receive an electrical shock. Leveling After installing, secure the product with the 'Adjust' to the floor to install and use. 18 Turn the leveling legs (CCW) to raise or (CW) to side. You will need two people to perform the following instructions: Kick Plate 1 Plug the power cord into a 3-prong grounded outlet, and move left . Open...
Owner's Manual (English)
Page 19
... area briskly with warm water and dry. To remove any warning-type labels, the model and serial number label, or the tech sheet that is now ready for use sharp instruments, rubbing alcohol, flammable fluids, or abrasive cleaners to the back of liquid dish soap over the adhesive with the User Manual) to adjust the bolt in the door hinge to adjust the height. (CCW to...
... area briskly with warm water and dry. To remove any warning-type labels, the model and serial number label, or the tech sheet that is now ready for use sharp instruments, rubbing alcohol, flammable fluids, or abrasive cleaners to the back of liquid dish soap over the adhesive with the User Manual) to adjust the bolt in the door hinge to adjust the height. (CCW to...

Owner's Manual (English)
Page 20
... dispenser. ICE TYPE 1 LED DISPLAY The LED display shows the temperature settings, dispenser options, water filter, door alarm, and locking status messages. 2 ICE TYPE BUTTON The ICE TYPE button is used to select Cubed Ice or Crushed Ice. 3 FREEZER BUTTON Press the FREEZER button to about 20 percent. NOTE: When pressed simultaneously with the FREEZER button for more than five seconds, the temperature display will change from Fahrenheit to Celsius or vice versa. 5 ICE PLUS BUTTON Press this button to control the door-open alarm. ICE TYPE FREEZER REFRIGERATOR 4 REFRIGERATOR BUTTON...
... dispenser. ICE TYPE 1 LED DISPLAY The LED display shows the temperature settings, dispenser options, water filter, door alarm, and locking status messages. 2 ICE TYPE BUTTON The ICE TYPE button is used to select Cubed Ice or Crushed Ice. 3 FREEZER BUTTON Press the FREEZER button to about 20 percent. NOTE: When pressed simultaneously with the FREEZER button for more than five seconds, the temperature display will change from Fahrenheit to Celsius or vice versa. 5 ICE PLUS BUTTON Press this button to control the door-open alarm. ICE TYPE FREEZER REFRIGERATOR 4 REFRIGERATOR BUTTON...
Owner's Manual (English)
Page 24
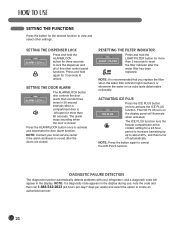
... then turns off automatically. The ICE PLUS function runs the freezer compartment at the coldest setting for the desired function to view and select other control panel functions. NOTE: If a diagnostic code appears in 30-second intervals when a compartment door is closed . The ICE PLUS icon on the display panel will appear in the display. The alarm stops sounding when the door is left open for 3 seconds to reset the filter indicator...
... then turns off automatically. The ICE PLUS function runs the freezer compartment at the coldest setting for the desired function to view and select other control panel functions. NOTE: If a diagnostic code appears in 30-second intervals when a compartment door is closed . The ICE PLUS icon on the display panel will appear in the display. The alarm stops sounding when the door is left open for 3 seconds to reset the filter indicator...
Owner's Manual (English)
Page 26
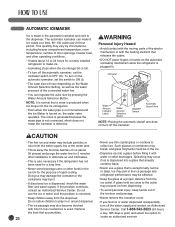
... store beverage cans or other operating conditions. • It takes about 20 pieces) and purge the water line for 2 minutes after installation to OFF (O). The automatic icemaker can regulate the cube size by circumstance, including freezer compartment temperature, room temperature, number of door openings, freezer load, and other foods in the ice bin for a newly installed refrigerator to the outlet may prevent ice from the dispenser. • Never remove the icemaker cover.
... store beverage cans or other operating conditions. • It takes about 20 pieces) and purge the water line for 2 minutes after installation to OFF (O). The automatic icemaker can regulate the cube size by circumstance, including freezer compartment temperature, room temperature, number of door openings, freezer load, and other foods in the ice bin for a newly installed refrigerator to the outlet may prevent ice from the dispenser. • Never remove the icemaker cover.

Owner's Manual (English)
Page 35
... stops. When the water filter indicator displays the message 0 Filter Month, Hold 3 Seconds, reset the water filter status display and indicator light by pressing and holding the LIGHT/FILTER button for 2 minutes from the water dispenser to purge the water system. After replacing the filter, dispense for more than 3 seconds. Check the filter for leaks. LIGHT / FILTER 1 Use the handle to side, it . 2 Remove the old cartridge. To purchase replacement water filter cartridges, visit your local appliance dealer or parts distributor. NOTE: If the filter...
... stops. When the water filter indicator displays the message 0 Filter Month, Hold 3 Seconds, reset the water filter status display and indicator light by pressing and holding the LIGHT/FILTER button for 2 minutes from the water dispenser to purge the water system. After replacing the filter, dispense for more than 3 seconds. Check the filter for leaks. LIGHT / FILTER 1 Use the handle to side, it . 2 Remove the old cartridge. To purchase replacement water filter cartridges, visit your local appliance dealer or parts distributor. NOTE: If the filter...

Owner's Manual (English)
Page 36
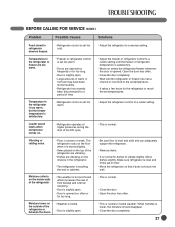
...; Refrigerator control is set too cold. • Adjust the refrigerator control to a warmer setting until the refrigerator temperature is normal for a fully automatic defrosting refrigerator. Problem Possible Causes Solutions Refrigerator compressor does not run more efficient units run longer. • It is normal. The defrost cycle occurs periodically. • Make sure the plug is level. Temperature in this list. It may be slightly open. • Refrigerator control is set too cold. • Adjust the freezer control to a warmer setting. 36 Open the door less...
...; Refrigerator control is set too cold. • Adjust the refrigerator control to a warmer setting until the refrigerator temperature is normal for a fully automatic defrosting refrigerator. Problem Possible Causes Solutions Refrigerator compressor does not run more efficient units run longer. • It is normal. The defrost cycle occurs periodically. • Make sure the plug is level. Temperature in this list. It may be slightly open. • Refrigerator control is set too cold. • Adjust the freezer control to a warmer setting. 36 Open the door less...
Owner's Manual (English)
Page 37
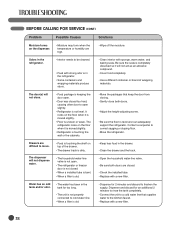
... the shelves in the refrigerator or freezer are too warm. • Freezer or refrigerator control is set too warm. • Doors are opened . When humidity is opened too frequently or for the refrigerator to reach the set temperatures. • Adjust the refrigerator control to a colder setting. • This is normal. • Be sure floor is level and solid and can adequately support the refrigerator. • Remove items. • It is set on . • Refrigerator operates at...
... the shelves in the refrigerator or freezer are too warm. • Freezer or refrigerator control is set too warm. • Doors are opened . When humidity is opened too frequently or for the refrigerator to reach the set temperatures. • Adjust the refrigerator control to a colder setting. • This is normal. • Be sure floor is level and solid and can adequately support the refrigerator. • Remove items. • It is set on . • Refrigerator operates at...
Owner's Manual (English)
Page 38
... household water-line valve is not open slightly. • Refrigerator is not level. Drawers are high. • Wipe off the moisture. Dispense and discard for 2 minutes and discard to freshen the supply. Odors in the refrigerator. • Interior needs to be cleaned. • Food with a new filter. The refrigerator rocks on the floor when it is moved slightly. • Refrigerator is not closed . • Check the installed tube. • Replace...
... household water-line valve is not open slightly. • Refrigerator is not level. Drawers are high. • Wipe off the moisture. Dispense and discard for 2 minutes and discard to freshen the supply. Odors in the refrigerator. • Interior needs to be cleaned. • Food with a new filter. The refrigerator rocks on the floor when it is moved slightly. • Refrigerator is not closed . • Check the installed tube. • Replace...
Owner's Manual (English)
Page 39
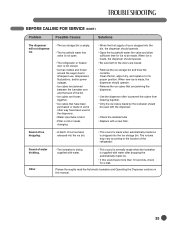
... used with the dispenser. • Check the installed tube • Replace with a new filter. Sound of the refrigerator. When new ice is made, the dispenser should operate. • Open the household water line valve and allow sufficient time for a leak. BEFORE CALLING FOR SERVICE (CONT.) Problem Possible Causes Solutions The dispenser will not dispense ice. • The ice storage bin is empty. • The household water line valve is not open. • The refrigerator or freezer door is not closed . • Remove...
... used with the dispenser. • Check the installed tube • Replace with a new filter. Sound of the refrigerator. When new ice is made, the dispenser should operate. • Open the household water line valve and allow sufficient time for a leak. BEFORE CALLING FOR SERVICE (CONT.) Problem Possible Causes Solutions The dispenser will not dispense ice. • The ice storage bin is empty. • The household water line valve is not open. • The refrigerator or freezer door is not closed . • Remove...
Owner's Manual (English)
Page 41
... misuse, abuse, improper installation, repair, or maintenance. THIS LIMITED WARRANTY DOES NOT COVER: 1. Damage or failure caused by transportation and handling, including scratches, dents, chips, and/or other than the intended purpose, or any display, open box, discounted, or refurbished product. 11. commercial use (e.g. The removal and reinstallation of product to the instructions outlined in the product owner's manual. 5. Shelves, door bins, drawers, handles, accessories, and other...
... misuse, abuse, improper installation, repair, or maintenance. THIS LIMITED WARRANTY DOES NOT COVER: 1. Damage or failure caused by transportation and handling, including scratches, dents, chips, and/or other than the intended purpose, or any display, open box, discounted, or refurbished product. 11. commercial use (e.g. The removal and reinstallation of product to the instructions outlined in the product owner's manual. 5. Shelves, door bins, drawers, handles, accessories, and other...
Owner's Manual (English)
Page 42
... water pipes, frozen water pipes, restricted drain lines, inadequate or interrupted water supply or inadequate supply of God. 6. Model and Serial numbers, along with removal of your home for warranty validation. 12. This warranty is not installed in accordance with provincial law without limitation, commercial use, in offices or recreational facilities) or contrary to Products located and used in the Product owner's manual. 15. Damage caused by transportation and handling...
... water pipes, frozen water pipes, restricted drain lines, inadequate or interrupted water supply or inadequate supply of God. 6. Model and Serial numbers, along with removal of your home for warranty validation. 12. This warranty is not installed in accordance with provincial law without limitation, commercial use, in offices or recreational facilities) or contrary to Products located and used in the Product owner's manual. 15. Damage caused by transportation and handling...
Specification (English)
Page 1
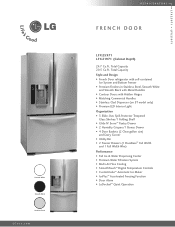
... (Cabinet Depth) 24.7 Cu.Ft. Total Capacity Style and Design • French Door refrigerator with self-contained Ice System and Bottom Freezer • Premium Finishes in Stainless Steel, Smooth White and Smooth Black with Metal Handles • Contour Doors with Hidden Hinges • Matching Commercial Handles • Stainless Clad Dispenser (on ST model only) • Premium LED Interior Light Organization • 3 Slide-Out, Spill-Protector Tempered Glass Shelves/1 Folding Shelf •...
... (Cabinet Depth) 24.7 Cu.Ft. Total Capacity Style and Design • French Door refrigerator with self-contained Ice System and Bottom Freezer • Premium Finishes in Stainless Steel, Smooth White and Smooth Black with Metal Handles • Contour Doors with Hidden Hinges • Matching Commercial Handles • Stainless Clad Dispenser (on ST model only) • Premium LED Interior Light Organization • 3 Slide-Out, Spill-Protector Tempered Glass Shelves/1 Folding Shelf •...
Specification (English)
Page 2
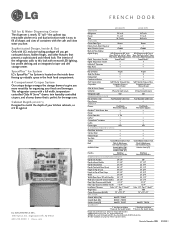
... 1/4" Width (Door Open 90° without Handle) 39 1/4" 39 1/4" Door Edge Clearance with cover) Refrigerator Light LED LED REFRIGERATOR DOOR No. Freezer 7.1 cu.ft. 5.8 cu.ft. Printed in ! Tall Ice & Water Dispensing Center The dispenser is located on the Sealed System Design and specifications are property of their respective owners. This refrigerator comes with recessed LED lighting, low profile shelving and an integrated crisper and deli storage center. Total 24.7 cu.ft. 20.5 cu.ft. of Shelves / Bin 4 (2 Adjustable Gallon Size) 4 (2 Adjustable Gallon Size) Dairy...
... 1/4" Width (Door Open 90° without Handle) 39 1/4" 39 1/4" Door Edge Clearance with cover) Refrigerator Light LED LED REFRIGERATOR DOOR No. Freezer 7.1 cu.ft. 5.8 cu.ft. Printed in ! Tall Ice & Water Dispensing Center The dispenser is located on the Sealed System Design and specifications are property of their respective owners. This refrigerator comes with recessed LED lighting, low profile shelving and an integrated crisper and deli storage center. Total 24.7 cu.ft. 20.5 cu.ft. of Shelves / Bin 4 (2 Adjustable Gallon Size) 4 (2 Adjustable Gallon Size) Dairy...


