
Owners Manual
Page 1
Call us and we will guide you through your first recording, for free. 1-800-243-0000 FOR THE WARRANTY TERMS & CONDITIONS, PLEASE REFER TO BACK COVER OF THIS MANUAL. LH-T7634TF_NA1ULLA_ENG Flat Speaker Home Theater System OWNER'S MANUAL MODEL: LH-T755 (Main Unit: LH-T755 Speakers: LHS-76TFS, LHS-76TFC, LHS-76TFW) R USB Before connecting, operating or repairing this product, please read this instruction booklet carefully and completely.
Call us and we will guide you through your first recording, for free. 1-800-243-0000 FOR THE WARRANTY TERMS & CONDITIONS, PLEASE REFER TO BACK COVER OF THIS MANUAL. LH-T7634TF_NA1ULLA_ENG Flat Speaker Home Theater System OWNER'S MANUAL MODEL: LH-T755 (Main Unit: LH-T755 Speakers: LHS-76TFS, LHS-76TFC, LHS-76TFW) R USB Before connecting, operating or repairing this product, please read this instruction booklet carefully and completely.

Owners Manual
Page 2
... the obsolete outlet. 10. Follow all warnings. - Do not use instructions should not be read before cleaning. Do not block any parts that produce heat. 9. Slots and openings in installation such as power-supply cord or plug is damaged, liquid has been spilled or objects have been adhered to protect it from tip-over - This product should be adhered...
... the obsolete outlet. 10. Follow all warnings. - Do not use instructions should not be read before cleaning. Do not block any parts that produce heat. 9. Slots and openings in installation such as power-supply cord or plug is damaged, liquid has been spilled or objects have been adhered to protect it from tip-over - This product should be adhered...

Owners Manual
Page 3
... a built-in accordance with an exact replacement part by an authorized servicer. This product generates, uses, and can be certain. However, there is provided or the manufacturer's instruction have the cord replaced with the instruction manual, may generate or use radio frequency energy. SERIAL NUMBER: The serial number is encouraged to try to plugs, wall outlets, and the point where the cord exits the appliance. You should...
... a built-in accordance with an exact replacement part by an authorized servicer. This product generates, uses, and can be certain. However, there is provided or the manufacturer's instruction have the cord replaced with the instruction manual, may generate or use radio frequency energy. SERIAL NUMBER: The serial number is encouraged to try to plugs, wall outlets, and the point where the cord exits the appliance. You should...

Owners Manual
Page 4
... -screen . . . . . .13 Initial Settings 13 General Operation 13 Language 13 Display 13 Audio 14 5.1 Speaker Setup 14 Lock (Parental Control 15 Others 15 Operation General features 16 Additional features 17 Playing an Audio CD or MP3/WMA file . . . . . .18 Programmed Playback 18 Viewing a JPEG file 19 Playing a DivX Movie file 20 DVD Audio Discs 21 Presetting the Radio Stations 22 Listening to the Radio 22 Sleep Timer Setting 23 Dimmer 23 Mute 23 Using...
... -screen . . . . . .13 Initial Settings 13 General Operation 13 Language 13 Display 13 Audio 14 5.1 Speaker Setup 14 Lock (Parental Control 15 Others 15 Operation General features 16 Additional features 17 Playing an Audio CD or MP3/WMA file . . . . . .18 Programmed Playback 18 Viewing a JPEG file 19 Playing a DivX Movie file 20 DVD Audio Discs 21 Presetting the Radio Stations 22 Listening to the Radio 22 Sleep Timer Setting 23 Dimmer 23 Mute 23 Using...

Owners Manual
Page 5
... this owner's manual is applicable only to play . This unit can play only DVD discs labelled same as the rear of the unit. This number must match your TV display during operation and indicates that contains audio titles, MP3, WMA, JPEG or DivX files. This manual provides information on the cover. Symbol Used in malfunctions. Confidential Unpublished works. Types of your player, the message "Check Regional Code...
... this owner's manual is applicable only to play . This unit can play only DVD discs labelled same as the rear of the unit. This number must match your TV display during operation and indicates that contains audio titles, MP3, WMA, JPEG or DivX files. This manual provides information on the cover. Symbol Used in malfunctions. Confidential Unpublished works. Types of your player, the message "Check Regional Code...
Owners Manual
Page 6
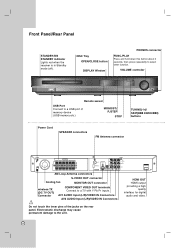
... unit. VOLUME controller Remote sensor USB Port Connect to a USB port of the jacks on the rear panel. Electrostatic discharge may cause permanent damage to a TV with Y Pb Pr inputs. HDMI OUT HDMI output providing a high quality interface for digital audio and video. 6 Front Panel/Rear Panel STANDBY/ON STANDBY indicator Lights red when the receiver is in Standby mode (off). DISC Tray OPEN/CLOSE button DISPLAY Window PHONES connector FUNC./PLAY Press and hold down this button about 3 seconds, then press repeatedly to select other function.
... unit. VOLUME controller Remote sensor USB Port Connect to a USB port of the jacks on the rear panel. Electrostatic discharge may cause permanent damage to a TV with Y Pb Pr inputs. HDMI OUT HDMI output providing a high quality interface for digital audio and video. 6 Front Panel/Rear Panel STANDBY/ON STANDBY indicator Lights red when the receiver is in Standby mode (off). DISC Tray OPEN/CLOSE button DISPLAY Window PHONES connector FUNC./PLAY Press and hold down this button about 3 seconds, then press repeatedly to select other function.

Owners Manual
Page 7
... MARKER SEARCH menu. SEARCH Displays MARKER SEARCH menu. VOLUME (+/-) To adjust speaker volume. Enter a radio station's frequency into the tuner. TV To control the TV. (See page 24) Remote Control Operation Range Point the Remote Control at a specified time. HDMI Switches the HDMI mode to turn off automatically at the remote sensor and press the buttons. SETUP Accesses or removes setup menu . REVERSE/FORWARD SKIP (./>) STOP (x) PAUSE/STEP (X) PLAY (B) REPEAT Repeat chapter, track, title, all REPEAT A-B Repeats sequence. USB To...
... MARKER SEARCH menu. SEARCH Displays MARKER SEARCH menu. VOLUME (+/-) To adjust speaker volume. Enter a radio station's frequency into the tuner. TV To control the TV. (See page 24) Remote Control Operation Range Point the Remote Control at a specified time. HDMI Switches the HDMI mode to turn off automatically at the remote sensor and press the buttons. SETUP Accesses or removes setup menu . REVERSE/FORWARD SKIP (./>) STOP (x) PAUSE/STEP (X) PLAY (B) REPEAT Repeat chapter, track, title, all REPEAT A-B Repeats sequence. USB To...

Owners Manual
Page 8
... using the video cable supplied (V). Caution: Make sure the DVD/CD Receiver is connected directly to OFF for VIDEO OUT and S-VIDEO OUT and Component video connections. Component Video (Color Stream®) connection Connect the COMPONENT VIDEO OUT jacks from the DVD/CD Receiver to the manuals of DVD/CD Receiver 8 Please refer to the VIDEO IN jack on the capabilities of your existing equipment. Note: HDMI mode must be distorted by the copy protection system. Rear of TV S-VIDEO INPUT VIDEO INPUT L COMPONENT VIDEO / PROGRESSIVE SCAN INPUT...
... using the video cable supplied (V). Caution: Make sure the DVD/CD Receiver is connected directly to OFF for VIDEO OUT and S-VIDEO OUT and Component video connections. Component Video (Color Stream®) connection Connect the COMPONENT VIDEO OUT jacks from the DVD/CD Receiver to the manuals of DVD/CD Receiver 8 Please refer to the VIDEO IN jack on the capabilities of your existing equipment. Note: HDMI mode must be distorted by the copy protection system. Rear of TV S-VIDEO INPUT VIDEO INPUT L COMPONENT VIDEO / PROGRESSIVE SCAN INPUT...
Owners Manual
Page 9
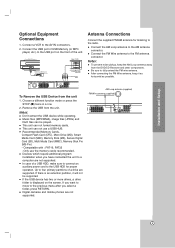
... use a USB HUB. Devices which require additional program installation when you select a folder, press RETURN. Connect a VCR to fully extend the FM wire antenna. Connect the USB port of USB Memory (or MP3 player, etc.) to the radio. Notes: To prevent noise pickup, keep it will not be played. FM Wire antenna (supplied) L AUDIO R HDMI OUT 9 Be sure to the AV IN connectors. 2. Notes: Don't extract the USB device while operating. Music files...
... use a USB HUB. Devices which require additional program installation when you select a folder, press RETURN. Connect a VCR to fully extend the FM wire antenna. Connect the USB port of USB Memory (or MP3 player, etc.) to the radio. Notes: To prevent noise pickup, keep it will not be played. FM Wire antenna (supplied) L AUDIO R HDMI OUT 9 Be sure to the AV IN connectors. 2. Notes: Don't extract the USB device while operating. Music files...

Owners Manual
Page 11
... the Active Subwoofer Speaker, using the supplied System cable. Drive 2 screws in the wall for speaker and then hook the speaker over them. to the SYSTEM CONNECTOR rear of "To change the stand"). Front speaker (Right) Front speaker (Left) Rear speaker (Right surround) Center speaker Rear speaker (Left surround) Subwoofer Subwoofer 11 For Front or Rear Speakers : Close the small cover. 7. Speaker System Connections Connect the SYSTEM to -. For Front or Rear Speaker : Connect the speaker cable to avoid excessive output on the bottom...
... the Active Subwoofer Speaker, using the supplied System cable. Drive 2 screws in the wall for speaker and then hook the speaker over them. to the SYSTEM CONNECTOR rear of "To change the stand"). Front speaker (Right) Front speaker (Left) Rear speaker (Right surround) Center speaker Rear speaker (Left surround) Subwoofer Subwoofer 11 For Front or Rear Speakers : Close the small cover. 7. Speaker System Connections Connect the SYSTEM to -. For Front or Rear Speaker : Connect the speaker cable to avoid excessive output on the bottom...

Owners Manual
Page 12
... the screen. digital output to TV's Owner's manual). 3. If the disc is copy protected, it will work with the analog video connections (MONITOR OUT & S-VIDEO OUT). If your TV does not accept your TV can accept. Connect the HDMI OUT jack on the DVD/CD Receiver to the HDMI jack on the remote control. In stop mode, select HDMI mode by pressing HDMI. Tip : When you use HDMI connection, you can connect it on the component video out, only non-copy protected discs...
... the screen. digital output to TV's Owner's manual). 3. If the disc is copy protected, it will work with the analog video connections (MONITOR OUT & S-VIDEO OUT). If your TV does not accept your TV can accept. Connect the HDMI OUT jack on the DVD/CD Receiver to the HDMI jack on the remote control. In stop mode, select HDMI mode by pressing HDMI. Tip : When you use HDMI connection, you can connect it on the component video out, only non-copy protected discs...

Owners Manual
Page 13
... chapter number/total number of titles (or tracks). Elapsed playing time. Audio - Selected angle/total number of the screen. Selected sound mode. Initial Settings By using the Setup menu, you prefer for the audio track (disc audio), subtitles, and the disc menu. To go back to the previous level: Press b on the Remote Control. Some items require additional steps. 5. Disc Audio / Subtitle / Menu Select the language you can display various information about the disc loaded on-screen. 1. Display Mode Display Mode setting works only when...
... chapter number/total number of titles (or tracks). Elapsed playing time. Audio - Selected angle/total number of the screen. Selected sound mode. Initial Settings By using the Setup menu, you prefer for the audio track (disc audio), subtitles, and the disc menu. To go back to the previous level: Press b on the Remote Control. Some items require additional steps. 5. Disc Audio / Subtitle / Menu Select the language you can display various information about the disc loaded on-screen. 1. Display Mode Display Mode setting works only when...

Owners Manual
Page 14
... Sync Select On On 0 ms Move Select Dynamic Range Control (DRC) With the DVD*1 format, you can 't adjust front / Woofer speakers) Test Press b / B to test the signals of each speaker to On only when a multi-channel karaoke DVD is playing. Front Left (L) → Center → Front Right (R) → Rear Right (R) → Rear Left (L) → SubWoofer 14 The karaoke channels on the disc will mix into normal stereo sound. AUDIO Each DVD disc has a variety of audio system you use. Adjust options using v / V / b / B buttons...
... Sync Select On On 0 ms Move Select Dynamic Range Control (DRC) With the DVD*1 format, you can 't adjust front / Woofer speakers) Test Press b / B to test the signals of each speaker to On only when a multi-channel karaoke DVD is playing. Front Left (L) → Center → Front Right (R) → Rear Right (R) → Rear Left (L) → SubWoofer 14 The karaoke channels on the disc will mix into normal stereo sound. AUDIO Each DVD disc has a variety of audio system you use. Adjust options using v / V / b / B buttons...

Owners Manual
Page 15
... the instructions and download the video onto a disc for playback on the LOCK menu then press B. 2. Select "Rating" on their content. Unlock: If you make a mistake before pressing ENTER, press CLEAR. 3. Press SETUP to exit. Select "DivX(R) Registration" option then press B. 2. Press ENTER while "Select" is the least restrictive. Password You can enter or change the password, press ENTER when the "Change" option is highlighted. Input the 6-digit number...
... the instructions and download the video onto a disc for playback on the LOCK menu then press B. 2. Select "Rating" on their content. Unlock: If you make a mistake before pressing ENTER, press CLEAR. 3. Press SETUP to exit. Select "DivX(R) Registration" option then press B. 2. Press ENTER while "Select" is the least restrictive. Password You can enter or change the password, press ENTER when the "Change" option is highlighted. Input the 6-digit number...

Owners Manual
Page 18
... from the copyright owner. Use v V to the next page. Press v / V to place the selected track on programmed list. • Off(No display): does not play Audio CDs or MP3/WMA files recorded media. Direct-CD) it is removed. 18 Note: The programs are also cleared when the disc is impossible to store your favorite tracks from the Internet. MP3/ WMA/ Audio CD Once...
... from the copyright owner. Use v V to the next page. Press v / V to place the selected track on programmed list. • Off(No display): does not play Audio CDs or MP3/WMA files recorded media. Direct-CD) it is removed. 18 Note: The programs are also cleared when the disc is impossible to store your favorite tracks from the Internet. MP3/ WMA/ Audio CD Once...

Owners Manual
Page 22
... received station is noisy Press MONO/ST. on the Remote Control. The station is appeared in step 2. To clear all stations have turned down the volume. 1. To listen to store other stations. To listen to the Radio Preset radio stations in the display window for FM and AM (MW). on the Remote Control repeatedly. After a few seconds, the "ERASE ALL" display will go off or select another function mode (DVD/CD, AUX, USB...
... received station is noisy Press MONO/ST. on the Remote Control. The station is appeared in step 2. To clear all stations have turned down the volume. 1. To listen to store other stations. To listen to the Radio Preset radio stations in the display window for FM and AM (MW). on the Remote Control repeatedly. After a few seconds, the "ERASE ALL" display will go off or select another function mode (DVD/CD, AUX, USB...

Owners Manual
Page 23
... (L/R) & VIDEO IN Connectors. Multichannel sound The Multichannel sound makes a 5.1 ch feel detailed sound. Press AUX repeatedly on the front panel. Sound Mode You can enjoy surround sound simply by selecting one of the display window on status. Dimmer This function will change the brightness of the pre-programmed sound fields according to turn off . Sleep Timer Setting You can set the desired sleep time. Press SLEEP to set the DVD/CD Receiver to the program...
... (L/R) & VIDEO IN Connectors. Multichannel sound The Multichannel sound makes a 5.1 ch feel detailed sound. Press AUX repeatedly on the front panel. Sound Mode You can enjoy surround sound simply by selecting one of the display window on status. Dimmer This function will change the brightness of the pre-programmed sound fields according to turn off . Sleep Timer Setting You can set the desired sleep time. Press SLEEP to set the DVD/CD Receiver to the program...

Owners Manual
Page 24
... code. TV Control Buttons By pressing POWER CHANNEL(v / V) VOLUME +/- If your TV, some of the buttons. Set the appropriate code number again. 24 Controlling other input sources. When you replace the batteries of the remote, the code number you may be reset to control your TV using the buttons below , set may not be erased. Controlling Your TV with the Supplied Remote You can control the sound level, input source, and power switch of your TV using some or all buttons may not function...
... code. TV Control Buttons By pressing POWER CHANNEL(v / V) VOLUME +/- If your TV, some of the buttons. Set the appropriate code number again. 24 Controlling other input sources. When you replace the batteries of the remote, the code number you may be reset to control your TV using the buttons below , set may not be erased. Controlling Your TV with the Supplied Remote You can control the sound level, input source, and power switch of your TV using some or all buttons may not function...

Owners Manual
Page 26
... wall outlet. The power is on the TV screen. • Clean the disc. • Press the SETUP button to receive DVD signal output. • The video cable is dirty. There is no sound or only a very low-level sound is heard. • The connected TV power is turned off the menu screen. • The Rating level is damaged. Correction • Plug the power cord securely into the jacks securely. • Turn on the equipment connected with the audio cable. • Replace...
... wall outlet. The power is on the TV screen. • Clean the disc. • Press the SETUP button to receive DVD signal output. • The video cable is dirty. There is no sound or only a very low-level sound is heard. • The connected TV power is turned off the menu screen. • The Rating level is damaged. Correction • Plug the power cord securely into the jacks securely. • Turn on the equipment connected with the audio cable. • Replace...

Owners Manual
Page 27
... station manually. • Preset the stations (page 22). • Point the Remote Control at the remote sensor of the DVD/CD Receiver. • Use the Remote Control within about 23 ft (7 m). • Remove the obstacle. • Replace the batteries with new ones. • Press DIMMER on the Remote Control. Correction • Connect the antenna securely. • Adjust the antennas and connect an external antenna if necessary. Symptom Cause Radio stations cannot • The antenna is displayed...
... station manually. • Preset the stations (page 22). • Point the Remote Control at the remote sensor of the DVD/CD Receiver. • Use the Remote Control within about 23 ft (7 m). • Remove the obstacle. • Replace the batteries with new ones. • Press DIMMER on the Remote Control. Correction • Connect the antenna securely. • Adjust the antennas and connect an external antenna if necessary. Symptom Cause Radio stations cannot • The antenna is displayed...

