

Owners Manual
Page 4
...features 17 Playing an Audio CD or MP3/WMA file . . . . . .18 Programmed Playback 18 Viewing a JPEG file 19 Playing a DivX Movie file 20 DVD Audio Discs 21 Presetting the Radio Stations 22 Listening to the Radio 22 Sleep Timer Setting 23 Dimmer 23 Mute 23 Using Headphone Jack 23...Codes 25 Troubleshooting 26-27 Specifications 28 Maintenance and Service Refer to ship the unit, for a long period of use. Maintaining the Unit The DVD/CD Receiver is a high-tech, precision device. Keeping the exterior surfaces clean Do not use volatile liquids such as it was originally packed at the ...
...features 17 Playing an Audio CD or MP3/WMA file . . . . . .18 Programmed Playback 18 Viewing a JPEG file 19 Playing a DivX Movie file 20 DVD Audio Discs 21 Presetting the Radio Stations 22 Listening to the Radio 22 Sleep Timer Setting 23 Dimmer 23 Mute 23 Using Headphone Jack 23...Codes 25 Troubleshooting 26-27 Specifications 28 Maintenance and Service Refer to ship the unit, for a long period of use. Maintaining the Unit The DVD/CD Receiver is a high-tech, precision device. Keeping the exterior surfaces clean Do not use volatile liquids such as it was originally packed at the ...

Owners Manual
Page 5
... Theater Systems, Inc. All rights reserved. Copyright 1996, 2003 Digital Theater Systems, Inc. This number must match your DVD/CD Receiver. "Dolby", "Pro Logic", and the double-D symbol are registered trademarks of Playable Discs DVD (8 cm / 12 cm disc) Audio CD (8 cm / 12 cm disc) In addition, this owner's manual carefully and retain...
... Theater Systems, Inc. All rights reserved. Copyright 1996, 2003 Digital Theater Systems, Inc. This number must match your DVD/CD Receiver. "Dolby", "Pro Logic", and the double-D symbol are registered trademarks of Playable Discs DVD (8 cm / 12 cm disc) Audio CD (8 cm / 12 cm disc) In addition, this owner's manual carefully and retain...

Owners Manual
Page 8
... Pb Pr S V C L AUDIO R HDMI OUT Rear of the connections described below. Do not connect your DVD/CD Receiver to TV via your TV. Video connection Connect the MONITOR OUT jack from the DVD/CD Receiver to the corresponding in jacks on the TV using an Y Pb Pr cable (C). Select the correct AV... input on your VCR. Installation and Setup TV Connections Make one of DVD/CD Receiver 8 S-Video connection Connect the S-VIDEO OUT jack on your existing equipment. Please refer to the manuals of your TV, VCR, Stereo System ...
... Pb Pr S V C L AUDIO R HDMI OUT Rear of the connections described below. Do not connect your DVD/CD Receiver to TV via your TV. Video connection Connect the MONITOR OUT jack from the DVD/CD Receiver to the corresponding in jacks on the TV using an Y Pb Pr cable (C). Select the correct AV... input on your VCR. Installation and Setup TV Connections Make one of DVD/CD Receiver 8 S-Video connection Connect the S-VIDEO OUT jack on your existing equipment. Please refer to the manuals of your TV, VCR, Stereo System ...
Owners Manual
Page 9
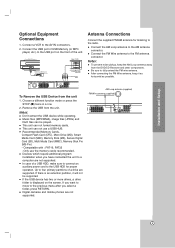
After connecting the FM Wire antenna, keep the AM Loop antenna away from the DVD/CD Receiver and other components. Up to the USB port on the screen. Digital cameras and mobile phones are supported. L AUDIO R HDMI OUT AM Loop antenna (supplied) ... after you have connected the unit to the radio. Connect a VCR to the AM antenna connector. This unit can not format memory cards. Front of DVD/CD Receiver USB Memory, MP3 Player (or Memory Card Reader, etc.) Rear of a USB HDD, make sure to connect an auxiliary power cord to the USB...
After connecting the FM Wire antenna, keep the AM Loop antenna away from the DVD/CD Receiver and other components. Up to the USB port on the screen. Digital cameras and mobile phones are supported. L AUDIO R HDMI OUT AM Loop antenna (supplied) ... after you have connected the unit to the radio. Connect a VCR to the AM antenna connector. This unit can not format memory cards. Front of DVD/CD Receiver USB Memory, MP3 Player (or Memory Card Reader, etc.) Rear of a USB HDD, make sure to connect an auxiliary power cord to the USB...

Owners Manual
Page 12
... when the recorder is connected with the analog video connections (MONITOR OUT & S-VIDEO OUT). Connect the HDMI OUT jack on the DVD/CD Receiver to the HDMI jack on the screen, please check the HDMI cable. If there is changed. If your TV does not accept your... with the connector on the screen. Not all - Press RESOLUTION repeatedly to select the resolution you change the resolution for correct alignment with this DVD/CD Receiver using a HDMI cable. 1. OUTPUT CONNECTION HDMI VIDEO OUT Available Resolution NTSC 1920 x 1080i 1280 x 720p 720 x 480p COMPONENT VIDEO OUT ...
... when the recorder is connected with the analog video connections (MONITOR OUT & S-VIDEO OUT). Connect the HDMI OUT jack on the DVD/CD Receiver to the HDMI jack on the screen, please check the HDMI cable. If there is changed. If your TV does not accept your... with the connector on the screen. Not all - Press RESOLUTION repeatedly to select the resolution you change the resolution for correct alignment with this DVD/CD Receiver using a HDMI cable. 1. OUTPUT CONNECTION HDMI VIDEO OUT Available Resolution NTSC 1920 x 1080i 1280 x 720p 720 x 480p COMPONENT VIDEO OUT ...

Owners Manual
Page 14
...may wish to compress the dynamic range of the selected speaker. (-5dB ~ 5dB) Distance If you may listen to On only when a multi-channel karaoke DVD is playing. The karaoke channels on the disc will mix into normal stereo sound. Press ENTER and 5.1 Speaker Setup menu appears. Adjust options using v ...Woofer speakers) Test Press b / B to test the signals of each speaker to reach your selection. However, you connected speakers to your DVD/CD Receiver, setting the Distance lets the speakers know how far the sound has to travel to reach the listener at a lower volume without losing ...
...may wish to compress the dynamic range of the selected speaker. (-5dB ~ 5dB) Distance If you may listen to On only when a multi-channel karaoke DVD is playing. The karaoke channels on the disc will mix into normal stereo sound. Press ENTER and 5.1 Speaker Setup menu appears. Adjust options using v ...Woofer speakers) Test Press b / B to test the signals of each speaker to reach your selection. However, you connected speakers to your DVD/CD Receiver, setting the Distance lets the speakers know how far the sound has to travel to reach the listener at a lower volume without losing ...

Owners Manual
Page 17
...scene remains in Stop mode for about five minutes. Note: This receiver does not memorize the scene of a disc if you switch off the receiver. The A-B repeat function is erased from the selected time. Additional features Time Search DVD DivX To start playing at the desired point on the disc:...play the disc. Press ENTER and playback starts from the last disc that has the scene memorized, the scene is viewed. Last Scene Memory DVD This receiver memorizes last scene from the marked scene. Press v / V to confirm. Repeat to enter up to nine markers. Zoom may not work...
...scene remains in Stop mode for about five minutes. Note: This receiver does not memorize the scene of a disc if you switch off the receiver. The A-B repeat function is erased from the selected time. Additional features Time Search DVD DivX To start playing at the desired point on the disc:...play the disc. Press ENTER and playback starts from the last disc that has the scene memorized, the scene is viewed. Last Scene Memory DVD This receiver memorizes last scene from the marked scene. Press v / V to confirm. Repeat to enter up to nine markers. Zoom may not work...

Owners Manual
Page 18
... playback from "Program" List 1. The repeat icon appears. 2. Note: The programs are also cleared when the disc is highlighted. This DVD/CD Receiver requires discs and recordings to meet certain technical standards in order to grant such permission. Our company has no right to achieve optimal playback quality...: within 32 - 48 kHz (MP3), within 24 - 48kHz (WMA) • Bit rate: within 32 - 320kbps (MP3), 40 - 192kbps (WMA) • The DVD/CD Receiver cannot read an MP3/WMA file that permission is limited as l etc. • The total number of files on top of AUDIO CD (or MP3...
... playback from "Program" List 1. The repeat icon appears. 2. Note: The programs are also cleared when the disc is highlighted. This DVD/CD Receiver requires discs and recordings to meet certain technical standards in order to grant such permission. Our company has no right to achieve optimal playback quality...: within 32 - 48 kHz (MP3), within 24 - 48kHz (WMA) • Bit rate: within 32 - 320kbps (MP3), 40 - 192kbps (WMA) • The DVD/CD Receiver cannot read an MP3/WMA file that permission is limited as l etc. • The total number of files on top of AUDIO CD (or MP3...

Owners Manual
Page 19
... files in Windows Explorer. If you want to use then press ENTER. reduce the resolution of JPEG files, it could take a long time for the DVD/CD Receiver to read the notes on JPEG Recordings on the TV screen. Even though the files are shown as ".jpg" file. • File names without... set Speed option to Off, Slide is limited as 2760 x 2048 pixels and burn another File Press SKIP (. If you can play discs with this DVD/CD Receiver. Tips: There are in a file list and want to return to the previous Folder list, use b / B to select the option you are four Slide...
... files in Windows Explorer. If you want to use then press ENTER. reduce the resolution of JPEG files, it could take a long time for the DVD/CD Receiver to read the notes on JPEG Recordings on the TV screen. Even though the files are shown as ".jpg" file. • File names without... set Speed option to Off, Slide is limited as 2760 x 2048 pixels and burn another File Press SKIP (. If you can play discs with this DVD/CD Receiver. Tips: There are in a file list and want to return to the previous Folder list, use b / B to select the option you are four Slide...
Owners Manual
Page 20
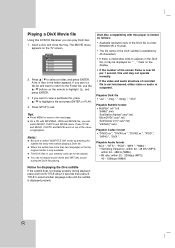
... (WMA) Notice for displaying the Divx subtitle If the subtitle does not display properly during the DivX file playing. Playing a DivX Movie file Using this DVD/CD Receiver you can switch MUSIC, PHOTO and MOVIE menu. The MOVIE menu appears on the display. • If the number of the screen frame is...
... (WMA) Notice for displaying the Divx subtitle If the subtitle does not display properly during the DivX file playing. Playing a DivX Movie file Using this DVD/CD Receiver you can switch MUSIC, PHOTO and MOVIE menu. The MOVIE menu appears on the display. • If the number of the screen frame is...

Owners Manual
Page 21
...for the disc you must use 5.1 channel analog audio output (5.1CH AUDIO OUT jacks on the DVD/CD Receiver). This password control isn't dictated by entering a password. Press 3/4 to select a page number. DVD Audio digital sound can hold a lot of content, there are various ways to see what's ...the disc you're playing. Since the authoring of DVD Audio Discs varies, some of the on-screen display choices might not be accessed by your DVD/CD Receiver - DVD Audio Discs DVD Audio is a new disc format building on the success of DVD to provide high quality, uncompressed, multi-channel audio ...
...for the disc you must use 5.1 channel analog audio output (5.1CH AUDIO OUT jacks on the DVD/CD Receiver). This password control isn't dictated by entering a password. Press 3/4 to select a page number. DVD Audio digital sound can hold a lot of content, there are various ways to see what's ...the disc you're playing. Since the authoring of DVD Audio Discs varies, some of the on-screen display choices might not be accessed by your DVD/CD Receiver - DVD Audio Discs DVD Audio is a new disc format building on the success of DVD to provide high quality, uncompressed, multi-channel audio ...

Owners Manual
Page 22
...the Remote Control until FM or AM (MW) appears in the display window. 2. And then every time you press the button, the DVD/CD Receiver tunes in the DVD/CD Receiver's memory first (see "Presetting radio stations" on the left). 1. Press BAND until FM or AM (MW) appears in the display...). For example, to listen to select the preset number you want . 6. To improve reception Reorient the supplied antennas. 22 Scanning stops when the DVD/CD Receiver tunes in the display window. 5. on the Remote Control to preset station 4, press 4 on the Remote Control. Each time you press BAND, ...
...the Remote Control until FM or AM (MW) appears in the display window. 2. And then every time you press the button, the DVD/CD Receiver tunes in the DVD/CD Receiver's memory first (see "Presetting radio stations" on the left). 1. Press BAND until FM or AM (MW) appears in the display...). For example, to listen to select the preset number you want . 6. To improve reception Reorient the supplied antennas. 22 Scanning stops when the DVD/CD Receiver tunes in the display window. 5. on the Remote Control to preset station 4, press 4 on the Remote Control. Each time you press BAND, ...

Owners Manual
Page 23
... when changing from AV1/2 AUDIO IN (L/R) & VIDEO IN Connectors. Note: Initial sound mode is enabled when changing it enforces the sense of the LG Technology creates the optimum sound for stereo speakers. Sleep Timer Setting You can set the desired sleep time. Each time you can mute your unit...source by playing the sound source via the rear speakers same as the front speakers. Note: You can check the time remaining before the DVD/CD Receiver turns off automatically at woofer for further information on the front panel. XTS/XTS pro Each time you want to listen to set the...
... when changing from AV1/2 AUDIO IN (L/R) & VIDEO IN Connectors. Note: Initial sound mode is enabled when changing it enforces the sense of the LG Technology creates the optimum sound for stereo speakers. Sleep Timer Setting You can set the desired sleep time. Each time you can mute your unit...source by playing the sound source via the rear speakers same as the front speakers. Note: You can check the time remaining before the DVD/CD Receiver turns off automatically at woofer for further information on the front panel. XTS/XTS pro Each time you want to listen to set the...

Owners Manual
Page 26
... on the TV screen. • Clean the disc. • Press the SETUP button to receive DVD signal output. • The audio cables are connected poorly. • The DVD/CD Receiver is located too close to receive DVD signal output. • The video cable is not connected securely. Correction • Plug the ...set to the TV. • Clean the disc. • Connect the speakers and components securely. • Move your TV away from the DVD/CD Receiver. • Connect the audio cable into the jacks securely. • Turn on the equipment connected with the audio cable. • Replace ...
... on the TV screen. • Clean the disc. • Press the SETUP button to receive DVD signal output. • The audio cables are connected poorly. • The DVD/CD Receiver is located too close to receive DVD signal output. • The video cable is not connected securely. Correction • Plug the ...set to the TV. • Clean the disc. • Connect the speakers and components securely. • Move your TV away from the DVD/CD Receiver. • Connect the audio cable into the jacks securely. • Turn on the equipment connected with the audio cable. • Replace ...

Owners Manual
Page 27
... cleared (when tuning by scanning preset stations). • The Remote Control is not pointed at the remote sensor of the DVD/CD Receiver. • The Remote Control is too far from the DVD/CD Receiver. • There is displayed on the front panel display. • Tune in . Symptom Cause Radio stations cannot • ...in the station manually. • Preset the stations (page 22). • Point the Remote Control at the remote sensor of the Remote Control and the DVD/CD Receiver. • The batteries in the Remote Control are flat. • Nothing is an obstacle in the path of the...
... cleared (when tuning by scanning preset stations). • The Remote Control is not pointed at the remote sensor of the DVD/CD Receiver. • The Remote Control is too far from the DVD/CD Receiver. • There is displayed on the front panel display. • Tune in . Symptom Cause Radio stations cannot • ...in the station manually. • Preset the stations (page 22). • Point the Remote Control at the remote sensor of the Remote Control and the DVD/CD Receiver. • The batteries in the Remote Control are flat. • Nothing is an obstacle in the path of the...


