
Owners Manual
Page 2
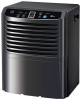
.... Dealer's Name Date Purchased s Staple your dehumidifier. Just a little preventive care on the side of each unit. READ THIS MANUAL Inside you may not need it to call for warranty issues. Dehumidifier Owner's Manual TABLE OF CONTENTS Safety Precautions 3 Prior to common problems in the event you need to prove date of purchase...
.... Dealer's Name Date Purchased s Staple your dehumidifier. Just a little preventive care on the side of each unit. READ THIS MANUAL Inside you may not need it to call for warranty issues. Dehumidifier Owner's Manual TABLE OF CONTENTS Safety Precautions 3 Prior to common problems in the event you need to prove date of purchase...
Owners Manual
Page 3
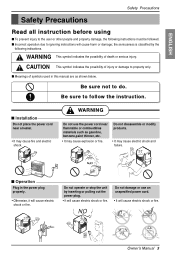
.... WARNING This symbol indicates the possibility of injury or damage to property only. Be sure to do. NO Owner's Manual 3 ENGLISH Safety Precautions Safety Precautions Read all instruction before using I Operation Plug in this manual are as gasoline, benzene,paint thinner, etc. • It may cause fire and electric shock. I Installation Do not...
.... WARNING This symbol indicates the possibility of injury or damage to property only. Be sure to do. NO Owner's Manual 3 ENGLISH Safety Precautions Safety Precautions Read all instruction before using I Operation Plug in this manual are as gasoline, benzene,paint thinner, etc. • It may cause fire and electric shock. I Installation Do not...

Owners Manual
Page 5
Close all doors, windows and other damage or injury. nO/Onf/fOff Fan Speed LowHigh Owner's Manual 5 Hold the plug by the head when taking it out. • It may cause electric shock and damage. 2 h4r.hOr.nO/Onf/Of ff Timer ...
Close all doors, windows and other damage or injury. nO/Onf/fOff Fan Speed LowHigh Owner's Manual 5 Hold the plug by the head when taking it out. • It may cause electric shock and damage. 2 h4r.hOr.nO/Onf/Of ff Timer ...

Owners Manual
Page 7
.... ENGLISH Prior to Operation Prior to direct airflow for extended periods of time. 2. Plug in the power plug properly. 3. Do not use an extension cord. 5. Owner's Manual 7 Exposure to your authorized service dealer. Consult an installation specialist for installation. 2. Otherwise the oxygen supply may be hazardous to water can occur when handling...
.... ENGLISH Prior to Operation Prior to direct airflow for extended periods of time. 2. Plug in the power plug properly. 3. Do not use an extension cord. 5. Owner's Manual 7 Exposure to your authorized service dealer. Consult an installation specialist for installation. 2. Otherwise the oxygen supply may be hazardous to water can occur when handling...

Owners Manual
Page 9
... the cover screw is metal and not insulated, and the wall receptacle is properly grounded, have a qualified electrician replace the outlet before use the dehumidifier. Owner's Manual 9 To minimize the risk of this appliance is equipped with a standard three-slot grounding wall power outlet. The power cord of electric shock, use the...
... the cover screw is metal and not insulated, and the wall receptacle is properly grounded, have a qualified electrician replace the outlet before use the dehumidifier. Owner's Manual 9 To minimize the risk of this appliance is equipped with a standard three-slot grounding wall power outlet. The power cord of electric shock, use the...
Owners Manual
Page 11
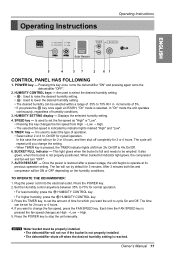
... to raise the desired humidity setting. • : Used to change the setting. • When TIMER key is full and needs to stop the unit manually. TIMER key --- On/Off for normal operation. • For less humidity, press the HUMIDITY CONTROL key. • For higher humidity, press the HUMIDITY...: 1. Press the TIMER key, to select the type of time for which you press the key once again at its previous operation setting. Owner's Manual 11 HUMIDITY SETTING display --- SPEED key --- It is not properly positioned. In this case the unit will not run by indicator lights marked ...
... to raise the desired humidity setting. • : Used to change the setting. • When TIMER key is full and needs to stop the unit manually. TIMER key --- On/Off for normal operation. • For less humidity, press the HUMIDITY CONTROL key. • For higher humidity, press the HUMIDITY...: 1. Press the TIMER key, to select the type of time for which you press the key once again at its previous operation setting. Owner's Manual 11 HUMIDITY SETTING display --- SPEED key --- It is not properly positioned. In this case the unit will not run by indicator lights marked ...

Owners Manual
Page 13
... The height of the coils due to prevent moisture damage where books are positioned correctly. 4. Lift the bucket and place it in a mild detergent solution. Owner's Manual 13 When installing the dehumidifier on a floor, table, or shelf. Brush off the residue in a basement.) 3. Rollers let you move the dehumidifier easily. 12" 2 h4r...
... The height of the coils due to prevent moisture damage where books are positioned correctly. 4. Lift the bucket and place it in a mild detergent solution. Owner's Manual 13 When installing the dehumidifier on a floor, table, or shelf. Brush off the residue in a basement.) 3. Rollers let you move the dehumidifier easily. 12" 2 h4r...

Owners Manual
Page 15
... Water on or room temperature is attached. • See Removing and Emptying The Water Bucket. • Change the humidity setting. • Change the humidity setting. Owner's Manual 15 s In case the Room humidity is restricted. s Did not allow at least 3 or 4 days to maintain the desired dryness. • Make sure there are...
... Water on or room temperature is attached. • See Removing and Emptying The Water Bucket. • Change the humidity setting. • Change the humidity setting. Owner's Manual 15 s In case the Room humidity is restricted. s Did not allow at least 3 or 4 days to maintain the desired dryness. • Make sure there are...