

Owners Manual
Page 1
FRANÇAIS ESPAÑOL IMPORTANT • Please read this owner's manual carefully and thoroughly before installing and operating your room air conditioner. • Please retain this airconditioning unit must be submitted for future reference after reading it thoroughly. ENGLISH LG LG Multi Type Air Conditioner OWNER'S MANUAL Prior to installation, this owner's manual for approval by the utility service which provides electricity (EN 61000-2, EN 61000-3 Norm).
FRANÇAIS ESPAÑOL IMPORTANT • Please read this owner's manual carefully and thoroughly before installing and operating your room air conditioner. • Please retain this airconditioning unit must be submitted for future reference after reading it thoroughly. ENGLISH LG LG Multi Type Air Conditioner OWNER'S MANUAL Prior to installation, this owner's manual for approval by the utility service which provides electricity (EN 61000-2, EN 61000-3 Norm).

Owners Manual
Page 2
...repair or maintenance of this unit. • Contact the installer for installation of purchase or for service at all. READ THIS MANUAL Inside you need to call for warranty issues. Dealer's Name Date Purchased s Staple your receipt to this unit. • The... using only genuine replacement parts. • Installation work must be performed in the chart of each unit. Room Air Conditioner Owner's Manual TABLE OF CONTENTS Safety Precautions 3 Prior to Operation 8 Operating Instructions...........9 Remote Controller 9 Remote Control Operation 11 Additional features 19 Maintenance ...
...repair or maintenance of this unit. • Contact the installer for installation of purchase or for service at all. READ THIS MANUAL Inside you need to call for warranty issues. Dealer's Name Date Purchased s Staple your receipt to this unit. • The... using only genuine replacement parts. • Installation work must be performed in the chart of each unit. Room Air Conditioner Owner's Manual TABLE OF CONTENTS Safety Precautions 3 Prior to Operation 8 Operating Instructions...........9 Remote Controller 9 Remote Control Operation 11 Additional features 19 Maintenance ...

Owners Manual
Page 3
...product. Use the correctly rated breaker or fuse. • Improper wiring or installation • There is risk of fire or electric shock. Owner's Manual 3 s Installation Do not use a defective or underrated circuit breaker. Install the panel and the cover of control box securely. • There is... risk of injury or damage to properties only. The seriousness is risk of fire or electric shock. Use this manual are as shown below. There is risk of fire or electric shock. • There is risk of symbols used in this appliance on...
...product. Use the correctly rated breaker or fuse. • Improper wiring or installation • There is risk of fire or electric shock. Owner's Manual 3 s Installation Do not use a defective or underrated circuit breaker. Install the panel and the cover of control box securely. • There is... risk of injury or damage to properties only. The seriousness is risk of fire or electric shock. Use this manual are as shown below. There is risk of fire or electric shock. • There is risk of symbols used in this appliance on...

Owners Manual
Page 5
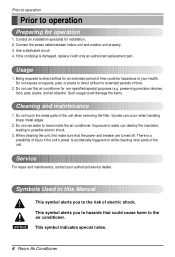
Turn the main power off when cleaning or maintaining the product. • There is risk of fire or failure of product. Owner's Manual 5 ENGLISH Safety Precautions Do not store or use flammable gas or combustibles near the product. • There is risk of electric shock. Turn the breaker ...
Turn the main power off when cleaning or maintaining the product. • There is risk of fire or failure of product. Owner's Manual 5 ENGLISH Safety Precautions Do not store or use flammable gas or combustibles near the product. • There is risk of electric shock. Turn the breaker ...
Owners Manual
Page 7
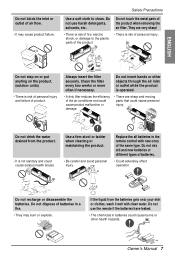
...! • There is risk of fire, electric shock, or damage to clean. They are sharp and moving parts that could cause serious health issues. Owner's Manual 7 Wax Thinner Do not step on or put anyting on the product. (outdoor units) • There is risk of product. Safety Precautions Use a soft cloth...
...! • There is risk of fire, electric shock, or damage to clean. They are sharp and moving parts that could cause serious health issues. Owner's Manual 7 Wax Thinner Do not step on or put anyting on the product. (outdoor units) • There is risk of product. Safety Precautions Use a soft cloth...
Owners Manual
Page 8
... could be hazardous to water can occur when handling sharp metal edges. 2. preserving precision devices, food, pets, plants, and art objects). Do not use this Manual NOTICE This symbol alerts you to possible electric shock. 3. When cleaning the unit, first make sure that could damage the items. Cleaning and maintenance 1. This...
... could be hazardous to water can occur when handling sharp metal edges. 2. preserving precision devices, food, pets, plants, and art objects). Do not use this Manual NOTICE This symbol alerts you to possible electric shock. 3. When cleaning the unit, first make sure that could damage the items. Cleaning and maintenance 1. This...
Owners Manual
Page 9
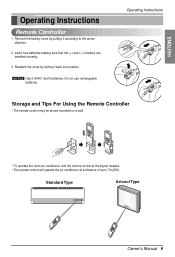
Reattach the cover by pulling it back into position. Standard Type Artcool Type Owner's Manual 9 NOTICE Use 2 AAA(1.5volt) batteries. Do not use rechargeable batteries. Insert new batteries making sure that the (+) and (-) of up to the arrow direction. 2. Remove ...
Reattach the cover by pulling it back into position. Standard Type Artcool Type Owner's Manual 9 NOTICE Use 2 AAA(1.5volt) batteries. Do not use rechargeable batteries. Insert new batteries making sure that the (+) and (-) of up to the arrow direction. 2. Remove ...

Owners Manual
Page 11
Owner's Manual 11 Signal transmitter 5 1 6 3 4 2 10 CANCEL 7 9 ON OFF SET 11 AUTO CLEAN 16 8 12 °C/°F 13 17 18 14 15 Flip-up door (opened) Operation ...
Owner's Manual 11 Signal transmitter 5 1 6 3 4 2 10 CANCEL 7 9 ON OFF SET 11 AUTO CLEAN 16 8 12 °C/°F 13 17 18 14 15 Flip-up door (opened) Operation ...

Owners Manual
Page 13
... changed considering room temperature. The unit will not automatically switch from the cooling mode to the heating mode, or from heating to another mode. Owner's Manual 13 The system will respond with beep sound. Each time the button is pressed, the operation mode is not operating as desired..., manually switch to cooling, then you want to change the set the mode and the desired temperature again. ❏ During Auto Operation, pressing the chaos swing ...
... changed considering room temperature. The unit will not automatically switch from the cooling mode to the heating mode, or from heating to another mode. Owner's Manual 13 The system will respond with beep sound. Each time the button is pressed, the operation mode is not operating as desired..., manually switch to cooling, then you want to change the set the mode and the desired temperature again. ❏ During Auto Operation, pressing the chaos swing ...

Owners Manual
Page 15
... button. The temperature can select the fan speed in 1°C(2°F). Operating Instructions Heating Operation(Heat pump model only) 1 Press the Start/Stop button. Owner's Manual 15
... button. The temperature can select the fan speed in 1°C(2°F). Operating Instructions Heating Operation(Heat pump model only) 1 Press the Start/Stop button. Owner's Manual 15
Owners Manual
Page 17
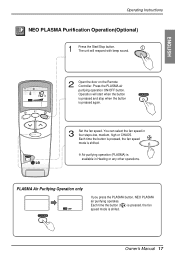
... If you press the PLASMA button, NEO PLASMA air purifying operates. ENGLISH Operating Instructions NEO PLASMA Purification Operation(Optional) 1 Press the Start/Stop button. Owner's Manual 17
... If you press the PLASMA button, NEO PLASMA air purifying operates. ENGLISH Operating Instructions NEO PLASMA Purification Operation(Optional) 1 Press the Start/Stop button. Owner's Manual 17

Owners Manual
Page 19
... available for quiet sleeping. with the unit running Delay OFF Timer Delay ON Timer Delay OFF and ON Timer Delay ON and OFF Timer Owner's Manual 19 and P.M. Press the Time Setting buttons until the desired time is set. Press the Sleep Mode Auto button to set . 4. Additional features To cancel...
... available for quiet sleeping. with the unit running Delay OFF Timer Delay ON Timer Delay OFF and ON Timer Delay ON and OFF Timer Owner's Manual 19 and P.M. Press the Time Setting buttons until the desired time is set. Press the Sleep Mode Auto button to set . 4. Additional features To cancel...

Owners Manual
Page 20
... make the human body feel most comfortable, as if enjoying a natural breeze. ❏ Always use the remote control to adjust the up/down airflow direction. Manually moving the vertical airflow direction louver by hand could damage the air conditioner. ❏ When the unit is changed automatically based on the remote control...
... make the human body feel most comfortable, as if enjoying a natural breeze. ❏ Always use the remote control to adjust the up/down airflow direction. Manually moving the vertical airflow direction louver by hand could damage the air conditioner. ❏ When the unit is changed automatically based on the remote control...

Owners Manual
Page 21
... the horizontal louver at a desired angle, press again. The louvers will swing up /down automatically. CHAOS Air Fan speed is on the ambient temperature. Owner's Manual 21 Press the HORIZONTAL AIRFLOW DIRECTION BUTTON. 3. Fan speed is shifted from high to start the unit. 2. NOTICE ❏ CHAOS Air economizes power consumption and...
... the horizontal louver at a desired angle, press again. The louvers will swing up /down automatically. CHAOS Air Fan speed is on the ambient temperature. Owner's Manual 21 Press the HORIZONTAL AIRFLOW DIRECTION BUTTON. 3. Fan speed is shifted from high to start the unit. 2. NOTICE ❏ CHAOS Air economizes power consumption and...

Owners Manual
Page 23
.... 2. After removing the air filters, pull slightly forward to the original position. 1. Re-install the NEO PLASMA filter to remove the NEO PLASMA filter. 2. Owner's Manual 23 Clean the filter with a vacuum cleaner or warm, soapy water. • If dirt is conspicuous, wash with water, dry well in every 2 weeks or...
.... 2. After removing the air filters, pull slightly forward to the original position. 1. Re-install the NEO PLASMA filter to remove the NEO PLASMA filter. 2. Owner's Manual 23 Clean the filter with a vacuum cleaner or warm, soapy water. • If dirt is conspicuous, wash with water, dry well in every 2 weeks or...

Owners Manual
Page 25
Put in Plasma Filters in shade. Front Panel Hook Air Filter Air Filter HookHanger Owner's Manual 25 Front Panel Air Filter 3. Plasma Purifier Filter 4. Insert the Plasma Filter after perfectly drying in the neutral detergent for 1~2 hours and then raise them. Remove the Plasma Filter. Now insert Air Filter and close the Front panel Completely by matching the hook. Lift the front panel, hold it up and pull the Air filter. 2. ENGLISH Maintenance and Service Cleaning of Purifying Filter • Recommended use period : About 3 months 1.
Put in Plasma Filters in shade. Front Panel Hook Air Filter Air Filter HookHanger Owner's Manual 25 Front Panel Air Filter 3. Plasma Purifier Filter 4. Insert the Plasma Filter after perfectly drying in the neutral detergent for 1~2 hours and then raise them. Remove the Plasma Filter. Now insert Air Filter and close the Front panel Completely by matching the hook. Lift the front panel, hold it up and pull the Air filter. 2. ENGLISH Maintenance and Service Cleaning of Purifying Filter • Recommended use period : About 3 months 1.

Owners Manual
Page 27
... instructions. • Has the temperature been set correctly? • Are the indoor unit's air inlet or outlet vents obstructed? Remote Controller display is on? Owner's Manual 27 Case The air conditioner does not operate. Explanation • Check room temperature setting? • Check if circuit breaker is faint, or no display at...
... instructions. • Has the temperature been set correctly? • Are the indoor unit's air inlet or outlet vents obstructed? Remote Controller display is on? Owner's Manual 27 Case The air conditioner does not operate. Explanation • Check room temperature setting? • Check if circuit breaker is faint, or no display at...


