
User Manual
Page 1
website: http://www.lg.ca MICROWAVE OVEN OWNER'S MANUAL PLEASE READ THIS OWNER'S MANUAL THOROUGHLY BEFORE OPERATING. LMV1681SW LMV1681SB LMV1681SS P/NO.:MFL37074003 Printed in China
website: http://www.lg.ca MICROWAVE OVEN OWNER'S MANUAL PLEASE READ THIS OWNER'S MANUAL THOROUGHLY BEFORE OPERATING. LMV1681SW LMV1681SB LMV1681SS P/NO.:MFL37074003 Printed in China
User Manual
Page 2
... 3 Important Safety Instructions 3 Precautions To Avoid Possible Exposure To Excessive Microwave Energy 4 INFORMATION 5 Location of Model Number 5 Oven Specifications 5 Electrical Rating 5 Electrical Requirements 5 Grounding Instructions 5 Microwave Oven Features 6 Oven Control Panel 7 OPERATION 9 LEARN ABOUT YOUR MICROWAVE OVEN......9 Clock 9 Kitchen Timer 9 Light Timer 9 FAN Hi/Low...(Optional) Replacement 20 Cooktop/Night Light Replacement 21 Oven Light Replacement 21 QUESTIONS AND ANSWERS 21 MICROWAVE UTENSIL GUIDE 22 BEFORE CALLING FOR SERVICE 23 WARRANTY 25 - 2 -
... 3 Important Safety Instructions 3 Precautions To Avoid Possible Exposure To Excessive Microwave Energy 4 INFORMATION 5 Location of Model Number 5 Oven Specifications 5 Electrical Rating 5 Electrical Requirements 5 Grounding Instructions 5 Microwave Oven Features 6 Oven Control Panel 7 OPERATION 9 LEARN ABOUT YOUR MICROWAVE OVEN......9 Clock 9 Kitchen Timer 9 Light Timer 9 FAN Hi/Low...(Optional) Replacement 20 Cooktop/Night Light Replacement 21 Oven Light Replacement 21 QUESTIONS AND ANSWERS 21 MICROWAVE UTENSIL GUIDE 22 BEFORE CALLING FOR SERVICE 23 WARRANTY 25 - 2 -
User Manual
Page 3
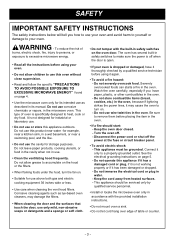
... or if it has been damaged or dropped. - Do not severely overcook food. Watch the oven carefully, especially if you how to excessive microwave energy. • Read all the instructions before using your oven. Keep the oven door closed. - To reduce the risk of burns, electric...the cavity for use or store this oven without close supervision. • Read and follow the specific "PRECAUTIONS TO AVOID POSSIBLE EXPOSURE TO EXCESSIVE MICROWAVE ENERGY" found on . - Disconnect the power cord or shut off . - SAFETY IMPORTANT SAFETY INSTRUCTIONS The safety instructions below will tell you...
... or if it has been damaged or dropped. - Do not severely overcook food. Watch the oven carefully, especially if you how to excessive microwave energy. • Read all the instructions before using your oven. Keep the oven door closed. - To reduce the risk of burns, electric...the cavity for use or store this oven without close supervision. • Read and follow the specific "PRECAUTIONS TO AVOID POSSIBLE EXPOSURE TO EXCESSIVE MICROWAVE ENERGY" found on . - Disconnect the power cord or shut off . - SAFETY IMPORTANT SAFETY INSTRUCTIONS The safety instructions below will tell you...
User Manual
Page 4
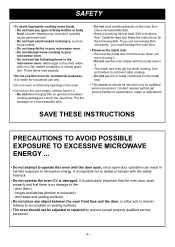
... openings in the oven. • Do not run the oven empty, without food in it . - It is important not to accumulate on a microwavable dish. - Do not allow soil or cleaner residue to defeat or tamper with the metal rack in it . - Do not cook anything directly on... personnel. - 4 - Carefully read and follow the instructions for examination, repair or adjustment. SAVE THESE INSTRUCTIONS PRECAUTIONS TO AVOID POSSIBLE EXPOSURE TO EXCESSIVE MICROWAVE ENERGY ... • Do not attempt to touch the oven floor. Do not heat any object between the oven front face and the door, or...
... openings in the oven. • Do not run the oven empty, without food in it . - It is important not to accumulate on a microwavable dish. - Do not allow soil or cleaner residue to defeat or tamper with the metal rack in it . - Do not cook anything directly on... personnel. - 4 - Carefully read and follow the instructions for examination, repair or adjustment. SAVE THESE INSTRUCTIONS PRECAUTIONS TO AVOID POSSIBLE EXPOSURE TO EXCESSIVE MICROWAVE ENERGY ... • Do not attempt to touch the oven floor. Do not heat any object between the oven front face and the door, or...

User Manual
Page 5
... designed for this appliance fits under the cabinet, it is necessary to operate on the appliance. ELECTRICAL RATING * Electrical Rating of your microwave oven. The marked rating of this owner's manual. It is properly installed and grounded. LOCATION OF MODEL NUMBER To request service information ...or replacement parts, LG Electronics CANADA will tell you wonder whether the appliance is designed to use an extension cord, use all the fine features of the...
... designed for this appliance fits under the cabinet, it is necessary to operate on the appliance. ELECTRICAL RATING * Electrical Rating of your microwave oven. The marked rating of this owner's manual. It is properly installed and grounded. LOCATION OF MODEL NUMBER To request service information ...or replacement parts, LG Electronics CANADA will tell you wonder whether the appliance is designed to use an extension cord, use all the fine features of the...
User Manual
Page 6
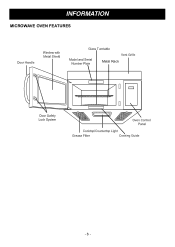
INFORMATION MICROWAVE OVEN FEATURES Metal Rack - 6 -
INFORMATION MICROWAVE OVEN FEATURES Metal Rack - 6 -

User Manual
Page 8
... to 99 minutes 99 seconds. 22. TURNTABLE ON/OFF: Touch this pad to keep hot, cooked foods safety warm in your microwave oven. The oven's sensor will appear in your microwave oven for sound, clock, display speed and defrost weight. 16. INFORMATION 1. NUMBER: Touch number pads to cook depending on or off...
... to 99 minutes 99 seconds. 22. TURNTABLE ON/OFF: Touch this pad to keep hot, cooked foods safety warm in your microwave oven. The oven's sensor will appear in your microwave oven for sound, clock, display speed and defrost weight. 16. INFORMATION 1. NUMBER: Touch number pads to cook depending on or off...

User Manual
Page 9
... reset that time to turn on 2:00 AM, turn off the LIGHT, repeat steps 2 to 6. 3. Touch STOP/CLEAR. Please read this information before use your microwave oven. LIGHT TIMER You can use . Touch CLOCK. (Press once for AM, twice for PM.) 5. Example: To count 3 minutes. 1. Touch LIGHT TIMER again. (Press once... seconds. Enter the time you will hear seven beeps and End will display. When the time is over, you want the LIGHT to operate your microwave oven as a timer. Example: To set the LIGHT to turn on at any time you want to cancel the LIGHT TIMER in operation, you ...
... reset that time to turn on 2:00 AM, turn off the LIGHT, repeat steps 2 to 6. 3. Touch STOP/CLEAR. Please read this information before use your microwave oven. LIGHT TIMER You can use . Touch CLOCK. (Press once for AM, twice for PM.) 5. Example: To count 3 minutes. 1. Touch LIGHT TIMER again. (Press once... seconds. Enter the time you will hear seven beeps and End will display. When the time is over, you want the LIGHT to operate your microwave oven as a timer. Example: To set the LIGHT to turn on at any time you want to cancel the LIGHT TIMER in operation, you ...

User Manual
Page 10
... WARM. • Pastry items (pies, turnovers, etc.) should be uncovered during and after cooking. • Do not run the empty without food in your microwave oven for up to turn the fan off. Touch and hold START/ENTER more than 4 seconds. LOCKED will disappear and you are programming the cooking...the oven display. • You can become hot to cool the oven. Touch HOLD WARM. 3. NOTE: If the temperature gets too hot around the microwave oven, the fan in the vent hood will appear in the display window with two beeps. HELP The HELP pad display feature information and helpful...
... WARM. • Pastry items (pies, turnovers, etc.) should be uncovered during and after cooking. • Do not run the empty without food in your microwave oven for up to turn the fan off. Touch and hold START/ENTER more than 4 seconds. LOCKED will disappear and you are programming the cooking...the oven display. • You can become hot to cool the oven. Touch HOLD WARM. 3. NOTE: If the temperature gets too hot around the microwave oven, the fan in the vent hood will appear in the display window with two beeps. HELP The HELP pad display feature information and helpful...
User Manual
Page 11
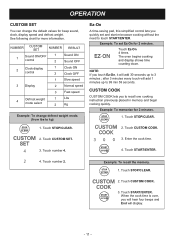
... 3 Display 2 Normal speed 3 Fast speed 4 Defrost weight mode select 1 Lbs 2 Kg Example: To change the default values for more information. Example: To set and start microwave cooking without the need to 3 minutes ; The oven begins cooking and display shows time counting down. Touch CUSTOM COOK. 2. Touch Ez-On 4 times. Touch number...
... 3 Display 2 Normal speed 3 Fast speed 4 Defrost weight mode select 1 Lbs 2 Kg Example: To change the default values for more information. Example: To set and start microwave cooking without the need to 3 minutes ; The oven begins cooking and display shows time counting down. Touch CUSTOM COOK. 2. Touch Ez-On 4 times. Touch number...
User Manual
Page 13
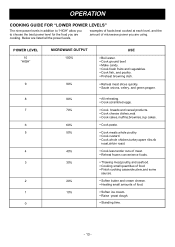
POWER LEVEL 10 "HIGH" 9 8 7 6 5 4 3 2 1 0 MICROWAVE OUTPUT 100% 90% 80% 70% 60% 50% 40% 30% 20% 10% USE • Boil water. • Cook ground beef. • Make candy. • Cook fresh .... • Cooking small quantities of food. • Finish cooking casserole,stew,and some sauces. • Soften butter and cream cheese. • Heating small amounts of microwave power you are using. OPERATION COOKING GUIDE FOR "LOWER POWER LEVELS" The nine power levels in addition to "HIGH" allow you to choose the best...
POWER LEVEL 10 "HIGH" 9 8 7 6 5 4 3 2 1 0 MICROWAVE OUTPUT 100% 90% 80% 70% 60% 50% 40% 30% 20% 10% USE • Boil water. • Cook ground beef. • Make candy. • Cook fresh .... • Cooking small quantities of food. • Finish cooking casserole,stew,and some sauces. • Soften butter and cream cheese. • Heating small amounts of microwave power you are using. OPERATION COOKING GUIDE FOR "LOWER POWER LEVELS" The nine power levels in addition to "HIGH" allow you to choose the best...

User Manual
Page 14
...oven. Do not open the door to stir, turn or rearrange the food. - 14 - Never use microwavable containers and cover them with the sensor system should be covered loosely with microwavable plastic wrap, waxed paper or a lid. Beads of the container. Always use tight-sealing plastic covers. ...the remaining cooking time will tell the oven how much longer to overcook. 3. When the internal sensor detects a certain amount of the microwave oven are dry before placing food in the display window. Be sure the outside of your favorite foods without selecting cooking times and power...
...oven. Do not open the door to stir, turn or rearrange the food. - 14 - Never use microwavable containers and cover them with the sensor system should be covered loosely with microwavable plastic wrap, waxed paper or a lid. Beads of the container. Always use tight-sealing plastic covers. ...the remaining cooking time will tell the oven how much longer to overcook. 3. When the internal sensor detects a certain amount of the microwave oven are dry before placing food in the display window. Be sure the outside of your favorite foods without selecting cooking times and power...
User Manual
Page 15
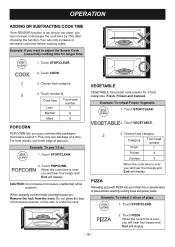
You can increase or decrease the cook time by 10% after choosing the function. Touch POPCORN. CAUTION: Do not leave microwave unattended while popcorn. Example: To reheat Frozen Vegetable. 1. Choose food category. Touch STOP/CLEAR. - 15 - 2. Example: To pop 3.5 oz. 1. Cook time ... the cook time is over , you will hear four beeps and End will display. Example: If you pop commercially packaged microwave popcorn. Pop only one or several slices of microwave popcorn on the rack or under the rack. Touch STOP/CLEAR. 2. Touch COOK. 3. When the cook time is over...
You can increase or decrease the cook time by 10% after choosing the function. Touch POPCORN. CAUTION: Do not leave microwave unattended while popcorn. Example: To reheat Frozen Vegetable. 1. Choose food category. Touch STOP/CLEAR. - 15 - 2. Example: To pop 3.5 oz. 1. Cook time ... the cook time is over , you will hear four beeps and End will display. Example: If you pop commercially packaged microwave popcorn. Pop only one or several slices of microwave popcorn on the rack or under the rack. Touch STOP/CLEAR. 2. Touch COOK. 3. When the cook time is over...
User Manual
Page 17
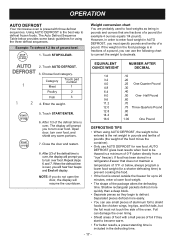
... pounds and ounces that does not maintain a temperature of 5°F or below provides some basic guidelines for example 4 ounces equals 1/4 pound). OPERATION AUTO DEFROST Your microwave oven is preset with small pieces of the defrost time is over, the display will prompt you to defrost. Choose food category. Touch AUTO DEFROST...
... pounds and ounces that does not maintain a temperature of 5°F or below provides some basic guidelines for example 4 ounces equals 1/4 pound). OPERATION AUTO DEFROST Your microwave oven is preset with small pieces of the defrost time is over, the display will prompt you to defrost. Choose food category. Touch AUTO DEFROST...

User Manual
Page 18
... and rearrange. Cover warm areas with aluminum foil. Cover warm areas with aluminum foil. - 18 - Place on a microwavable roasting rack. Place on a microwavable roasting rack. Separate and rearrange. with fork. Sausage, bulk MEAT Remove thawed portions with aluminum foil. Place in doughnut ...AT BEEP SPECIAL INSTRUCTIONS Meat of irregular shape and large, fatty cuts of a defrost sequence. Place in a microwavable baking dish. Place on a microwavable roasting rack. Separate and rearrange. Cover warm areas with foil at the beginning of meat should have the narrow...
... and rearrange. Cover warm areas with aluminum foil. Cover warm areas with aluminum foil. - 18 - Place on a microwavable roasting rack. Place on a microwavable roasting rack. Separate and rearrange. with fork. Sausage, bulk MEAT Remove thawed portions with aluminum foil. Place in doughnut ...AT BEEP SPECIAL INSTRUCTIONS Meat of irregular shape and large, fatty cuts of a defrost sequence. Place in a microwavable baking dish. Place on a microwavable roasting rack. Separate and rearrange. Cover warm areas with foil at the beginning of meat should have the narrow...

User Manual
Page 19
... SPECIAL INSTRUCTIONS Place in a microwavable baking dish. Place in a microwavable baking dish. Place in a microwavable baking dish. Place in a microwavable baking dish. Place on a microwavable roasting rack. do not let foil touch sides of microwave . SPECIAL INSTRUCTIONS Place chicken ...weight is partially defrosted. Separate and rearrange. Finish defrosting by immersing in a microwavable baking dish. Cover warm areas with aluminum foil. Rearrange. Place on a microwavable roasting rack. Carefully separate fillets under cold water. Place in cold water. ...
... SPECIAL INSTRUCTIONS Place in a microwavable baking dish. Place in a microwavable baking dish. Place in a microwavable baking dish. Place in a microwavable baking dish. Place on a microwavable roasting rack. do not let foil touch sides of microwave . SPECIAL INSTRUCTIONS Place chicken ...weight is partially defrosted. Separate and rearrange. Finish defrosting by immersing in a microwavable baking dish. Cover warm areas with aluminum foil. Rearrange. Place on a microwavable roasting rack. Carefully separate fillets under cold water. Place in cold water. ...

User Manual
Page 20
... rest at the main power supply and set the clock. 5. Remove old filter. 2. Turn the power back on chrome, metal and aluminum surfaces. Wipe the microwave oven inside and outside. Then rinse and wipe dry. Clean your oven is vented inside, the charcoal filter should be cleaned. The charcoal filter cannot...
... rest at the main power supply and set the clock. 5. Remove old filter. 2. Turn the power back on chrome, metal and aluminum surfaces. Wipe the microwave oven inside and outside. Then rinse and wipe dry. Clean your oven is vented inside, the charcoal filter should be cleaned. The charcoal filter cannot...

User Manual
Page 21
...at the main power supply. OVEN LIGHT REPLACEMENT 1. Remove the vent cover mounting screws. (2 middle screws) 3. A. A. I thought that I hear when my microwave oven is 3/4 inch deep and filled with a 30 or 40 watt appliance bulb. 6. "Standing time" means that food should not happen. Replace the mounting ...will conduct the heat to touch walls or door. A. A. Steam is normal and does not affect the operation of your microwave oven. Can I microwave food in my microwave oven? Tip the cover forward, then lift out to finish, saves energy and frees the oven for other rack can ...
...at the main power supply. OVEN LIGHT REPLACEMENT 1. Remove the vent cover mounting screws. (2 middle screws) 3. A. A. I thought that I hear when my microwave oven is 3/4 inch deep and filled with a 30 or 40 watt appliance bulb. 6. "Standing time" means that food should not happen. Replace the mounting ...will conduct the heat to touch walls or door. A. A. Steam is normal and does not affect the operation of your microwave oven. Can I microwave food in my microwave oven? Tip the cover forward, then lift out to finish, saves energy and frees the oven for other rack can ...
User Manual
Page 22
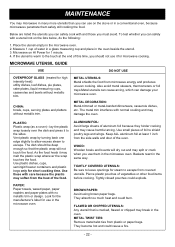
...the dish and press it may split or crack when you use on the stove or in a conventional oven, because microwaves penetrate them in the microwave oven. Vent plastic wrap by turning back one edge slightly to allow excess steam to shield poultry legs and wings. Use..., pie plates, cake plates, liquid measuring cups, casseroles and bowls without metallic trim. Look for the manufacturer's label for use it for microwave cooking. BROWN PAPER: Avoid using brown paper bags. Place the utensil empty in the oven beside the utensil. 3. The metal trim interferes with...
...the dish and press it may split or crack when you use on the stove or in a conventional oven, because microwaves penetrate them in the microwave oven. Vent plastic wrap by turning back one edge slightly to allow excess steam to shield poultry legs and wings. Use..., pie plates, cake plates, liquid measuring cups, casseroles and bowls without metallic trim. Look for the manufacturer's label for use it for microwave cooking. BROWN PAPER: Avoid using brown paper bags. Place the utensil empty in the oven beside the utensil. 3. The metal trim interferes with...

User Manual
Page 23
... overcooked: • check recipe to be sure all directions (amount, time, & power levels) were correctly followed. • be sure microwave oven is on 4 supports. If arcing (sparks) occur: • be sure microwavable dishes were used. • be sure wire twist ties weren't used ) is firmly closed . • check that timer wasn't started...
... overcooked: • check recipe to be sure all directions (amount, time, & power levels) were correctly followed. • be sure microwave oven is on 4 supports. If arcing (sparks) occur: • be sure microwavable dishes were used. • be sure wire twist ties weren't used ) is firmly closed . • check that timer wasn't started...


