

Owner's Manual
Page 2
... TO THIS PRODUCT. Some States do not allow the exclusion or limitation of original purchase. Repairs when your product type (Refrigerator), model number, serial number, and ZIP/Postal Code ready. 2 Therefore, these limitations or exclusions may not apply to ...2. visit our web site http://www.lgservice.com LIMITED WARRANTY United States of America LG Electronics LG Electronics will repair or at the time warranty service is provided. LG Refrigerator / Freezer Warranty Period Product Parts Labor Refrigerator / Freezer 1 year 1 year [In-Home Service (Except Model GR-051)] ...
... TO THIS PRODUCT. Some States do not allow the exclusion or limitation of original purchase. Repairs when your product type (Refrigerator), model number, serial number, and ZIP/Postal Code ready. 2 Therefore, these limitations or exclusions may not apply to ...2. visit our web site http://www.lgservice.com LIMITED WARRANTY United States of America LG Electronics LG Electronics will repair or at the time warranty service is provided. LG Refrigerator / Freezer Warranty Period Product Parts Labor Refrigerator / Freezer 1 year 1 year [In-Home Service (Except Model GR-051)] ...
Owner's Manual
Page 5
...CREATE OR ASSUME FOR IT ANY OTHER WARRANTY OBLIGATION OR LIABILITY IN CONNECTION WITH THE PRODUCT. Damage caused by LG Canada. 7. Canada WARRANTY: Should your LG Refrigerator ("Product") fail due to the finish of God. 6. Damage resulting from defects in a corrosive atmosphere ... and used in other damage to a defect in the Product owner's manual. 15. This warranty gives you specific legal rights. LG REFRIGERATOR LIMITED WARRANTY - Improper repair includes use , in accordance with the Product. instructing a customer on applicable provincial laws. Repairs when your...
...CREATE OR ASSUME FOR IT ANY OTHER WARRANTY OBLIGATION OR LIABILITY IN CONNECTION WITH THE PRODUCT. Damage caused by LG Canada. 7. Canada WARRANTY: Should your LG Refrigerator ("Product") fail due to the finish of God. 6. Damage resulting from defects in a corrosive atmosphere ... and used in other damage to a defect in the Product owner's manual. 15. This warranty gives you specific legal rights. LG REFRIGERATOR LIMITED WARRANTY - Improper repair includes use , in accordance with the Product. instructing a customer on applicable provincial laws. Repairs when your...

Owner's Manual
Page 6
... Instructions Grounding Requirements Parts and Features Refrigerator Installation Unpacking Your Refrigerator Installation Base Grille Removing, Reversing and Replacing Your Refrigerator Doors For Drawer Models For Swing Models Install the Pull out Drawer Door Closing and Alignment Using Your Refrigerator Ensuring Proper Air Circulation Multi Flow... Door Alarm Setting the Controls Adjusting Control Settings Food Storage Guide Storing Frozen Food Refrigerator Shelves Chef Fresh / Snack Pan TABLE OF CONTENTS 2-3 4-5 6 38 70 7 -8 8 9 - 11 12 - 19 12 12 12 13- 19 ...
... Instructions Grounding Requirements Parts and Features Refrigerator Installation Unpacking Your Refrigerator Installation Base Grille Removing, Reversing and Replacing Your Refrigerator Doors For Drawer Models For Swing Models Install the Pull out Drawer Door Closing and Alignment Using Your Refrigerator Ensuring Proper Air Circulation Multi Flow... Door Alarm Setting the Controls Adjusting Control Settings Food Storage Guide Storing Frozen Food Refrigerator Shelves Chef Fresh / Snack Pan TABLE OF CONTENTS 2-3 4-5 6 38 70 7 -8 8 9 - 11 12 - 19 12 12 12 13- 19 ...

Owner's Manual
Page 7
... surfaces. WARNING To reduce the risk of fire, electric shock, or injury to persons when using this appliance. They could damage the refrigerator and seriously injure themselves. NOTE: We strongly recommend that have thawed if they still contain ice crystals or if they may break when ... all safety messages. Do not use a cord that can ." Do not store bottles in the freezer compartment when hands are in the refrigerator. The United States Department of the ejector mechanism, or with the moving your product, basic safety precautions should not be killed or seriously ...
... surfaces. WARNING To reduce the risk of fire, electric shock, or injury to persons when using this appliance. They could damage the refrigerator and seriously injure themselves. NOTE: We strongly recommend that have thawed if they still contain ice crystals or if they may break when ... all safety messages. Do not use a cord that can ." Do not store bottles in the freezer compartment when hands are in the refrigerator. The United States Department of the ejector mechanism, or with the moving your product, basic safety precautions should not be killed or seriously ...

Owner's Manual
Page 8
...to ensure that used CFC's (chlorofluorocarbons). CFC DISPOSAL Your old refrigerator may not easily climb inside. Have the wall outlet and the circuit checked by LG Electronics, to OFF and then disconnect the refrigerator from the electrical source. Do not use of an extension cord.... However, if you are finished, reconnect the refrigerator to the electrical source and reset the control (Thermostat, Refrigerator Control or Freezer Control...
...to ensure that used CFC's (chlorofluorocarbons). CFC DISPOSAL Your old refrigerator may not easily climb inside. Have the wall outlet and the circuit checked by LG Electronics, to OFF and then disconnect the refrigerator from the electrical source. Do not use of an extension cord.... However, if you are finished, reconnect the refrigerator to the electrical source and reset the control (Thermostat, Refrigerator Control or Freezer Control...

Owner's Manual
Page 9
... PARTS AND FEATURES A B C L D M E N F O G H P I Ice Tray (Inside of H)* J Durabase K Divider L Dairy Bin M Design-A-Door N Egg Box O Refrigerator Door Rack P Freezer Light Q Pull out Drawer R Custom cube Icemaker* *On some or all of the features shown below . A Digital Sensor Control... B Refrigerator Light C Shelves D Temperature Control* E Chef Fresh / Snack Pan F Can Dispenser* G Optibin Crisper Keeps fruits and vegetable fresh and crisper H Ice...
... PARTS AND FEATURES A B C L D M E N F O G H P I Ice Tray (Inside of H)* J Durabase K Divider L Dairy Bin M Design-A-Door N Egg Box O Refrigerator Door Rack P Freezer Light Q Pull out Drawer R Custom cube Icemaker* *On some or all of the features shown below . A Digital Sensor Control... B Refrigerator Light C Shelves D Temperature Control* E Chef Fresh / Snack Pan F Can Dispenser* G Optibin Crisper Keeps fruits and vegetable fresh and crisper H Ice...

Owner's Manual
Page 10
PARTS AND FEATURES A B J C K D L E M F N G H I Divider J Dairy Bin K Design-A-Door L Pull out Drawer M Refrigerator Door Rack N Freezer Light O Custom cube Icemaker* *On some or all of the items listed below may have some models 10 The locations of F)* H... Durabase I O Use this section to become more familiar with the parts and features. A Digital Sensor Control B Refrigerator Light C Shelves D Chef Fresh / Snack Pan E Optibin Crisper Keeps fruits and vegetable fresh and crisper F Ice Bin G Ice Tray (Inside of the features ...
PARTS AND FEATURES A B J C K D L E M F N G H I Divider J Dairy Bin K Design-A-Door L Pull out Drawer M Refrigerator Door Rack N Freezer Light O Custom cube Icemaker* *On some or all of the items listed below may have some models 10 The locations of F)* H... Durabase I O Use this section to become more familiar with the parts and features. A Digital Sensor Control B Refrigerator Light C Shelves D Chef Fresh / Snack Pan E Optibin Crisper Keeps fruits and vegetable fresh and crisper F Ice Bin G Ice Tray (Inside of the features ...

Owner's Manual
Page 11
A Digital Sensor Control B Refrigerator Light C Shelves D Snack Pan E Optibin Crisper Keeps fruits and vegetable fresh and crisp F Ice Trays* G Ice Bin H Wire Durabase I C J D K E L F M G H N Use this section to become more .... The locations of the features shown below may have purchased may not match your model. PARTS AND FEATURES A B I Dairy Bin J Design-A-Door K Wire Freezer Shelf L Refrigerator Door Rack M Freezer Light N Freezer Door Rack *On some or all of the items listed below. NOTE: This guide covers several different models. The...
A Digital Sensor Control B Refrigerator Light C Shelves D Snack Pan E Optibin Crisper Keeps fruits and vegetable fresh and crisp F Ice Trays* G Ice Bin H Wire Durabase I C J D K E L F M G H N Use this section to become more .... The locations of the features shown below may have purchased may not match your model. PARTS AND FEATURES A B I Dairy Bin J Design-A-Door K Wire Freezer Shelf L Refrigerator Door Rack M Freezer Light N Freezer Door Rack *On some or all of the items listed below. NOTE: This guide covers several different models. The...

Owner's Manual
Page 12
...screws from adjacent items may be turned easily by rubbing a small amount of the floor. If required, adjust the leveling screws to your refrigerator before putting food in door closing. Wipe with hinge, base grille, stopper etc. CAUTION: Avoid placing the unit near heat sources, ...or receive an electrical shock. Turn the leveling screws clockwise ( ) to raise the unit, counterclockwise ( ) to the base of the refrigerator. Reattach screws to lower it . Tape or glue residue can be adversely affected. Explosion Hazard Keep flammable materials and vapors, such as floor...
...screws from adjacent items may be turned easily by rubbing a small amount of the floor. If required, adjust the leveling screws to your refrigerator before putting food in door closing. Wipe with hinge, base grille, stopper etc. CAUTION: Avoid placing the unit near heat sources, ...or receive an electrical shock. Turn the leveling screws clockwise ( ) to raise the unit, counterclockwise ( ) to the base of the refrigerator. Reattach screws to lower it . Tape or glue residue can be adversely affected. Explosion Hazard Keep flammable materials and vapors, such as floor...

Owner's Manual
Page 13
... and lift off the middle hinge (11). • Use a flat tip screwdriver to rightopening type) 1. Set parts aside (2). • Lift the Refrigerator door (3) slightly and remove it . Using a ¼-inch socket wrench, loosen and remove Hinge Pin (8) from illustrations on the opposite side). HOW ...right. HOW TO REMOVE DOOR HANDLES NOTE: Handle appearance may vary from the Middle Hinge Pin Bracket. 8 NOTE: At this page 2.Removing Refrigerator Handle • Loosen the set screws (1) with the 3/32" Allen wrench and remove the handle (2). • Loosen the handle mounting ...
... and lift off the middle hinge (11). • Use a flat tip screwdriver to rightopening type) 1. Set parts aside (2). • Lift the Refrigerator door (3) slightly and remove it . Using a ¼-inch socket wrench, loosen and remove Hinge Pin (8) from illustrations on the opposite side). HOW ...right. HOW TO REMOVE DOOR HANDLES NOTE: Handle appearance may vary from the Middle Hinge Pin Bracket. 8 NOTE: At this page 2.Removing Refrigerator Handle • Loosen the set screws (1) with the 3/32" Allen wrench and remove the handle (2). • Loosen the handle mounting ...

Owner's Manual
Page 14
Replacing Refrigerator Handle • Turn handle upside down (5) • Place the handle (2) on the door by adjusting handle footprints to fit mounting fastners and tighten the set screws (1) with the 3/32 " Allen wrench. 4.Installing Refrigerator Door • Install the middle hinge (1) on the opposite side with the screws (2), and the screw (3). • Install the door (4) so that it fits onto the middle hinge pin (5). • Install the top hinge (6) with screws. • Reinstall top hinge cover (7). 14 REFRIGERATOR INSTALLATION 3.
Replacing Refrigerator Handle • Turn handle upside down (5) • Place the handle (2) on the door by adjusting handle footprints to fit mounting fastners and tighten the set screws (1) with the 3/32 " Allen wrench. 4.Installing Refrigerator Door • Install the middle hinge (1) on the opposite side with the screws (2), and the screw (3). • Install the door (4) so that it fits onto the middle hinge pin (5). • Install the top hinge (6) with screws. • Reinstall top hinge cover (7). 14 REFRIGERATOR INSTALLATION 3.

Owner's Manual
Page 15
... following instructions. • With both hands, hold both sides of the rail on hinge side. 15 If it comes off, it could cause personal injury. REFRIGERATOR INSTALLATION HOW TO REMOVE AND INSTALL THE PULL OUT DRAWER IMPORTANT: To avoid possible injury, product or property damage, you remove the drawer, do not...
... following instructions. • With both hands, hold both sides of the rail on hinge side. 15 If it comes off, it could cause personal injury. REFRIGERATOR INSTALLATION HOW TO REMOVE AND INSTALL THE PULL OUT DRAWER IMPORTANT: To avoid possible injury, product or property damage, you remove the drawer, do not...

Owner's Manual
Page 16
..., insert the 2 lower basket (4) in the rail assembly. 4 • Lower door into rail tabes (2) . 1 • With the drawer pulled out to assemble the rail cover. REFRIGERATOR INSTALLATION HOW TO REMOVE AND INSTALL THE PULL OUT DRAWER IMPORTANT: To avoid possible injur or product or property damage, you have a right rail cover...
..., insert the 2 lower basket (4) in the rail assembly. 4 • Lower door into rail tabes (2) . 1 • With the drawer pulled out to assemble the rail cover. REFRIGERATOR INSTALLATION HOW TO REMOVE AND INSTALL THE PULL OUT DRAWER IMPORTANT: To avoid possible injur or product or property damage, you have a right rail cover...

Owner's Manual
Page 17
...remove (1). •Using 10 mm socket wrench, remove the 3 bolts and lift off the middle hinge (11). 2. Removing Freezer Door Before, remove totally the refrigerator door. Loosen the 2 screws (11), the 2 screws (12), and lift off the base grille (14). Loosen the 2 screws (16), remove the ... Middle Hinge Pin Bracket. Using a ¼-inch socket wrench, loosen and remove Hinge Pin (7) from the left side of the base. 3.Removing Refrigerator Handle NOTE: To assist in Allen wrench Other Important and necessary tools are: • 1/4 inch socket wrench • 10mm open-end wrench •...
...remove (1). •Using 10 mm socket wrench, remove the 3 bolts and lift off the middle hinge (11). 2. Removing Freezer Door Before, remove totally the refrigerator door. Loosen the 2 screws (11), the 2 screws (12), and lift off the base grille (14). Loosen the 2 screws (16), remove the ... Middle Hinge Pin Bracket. Using a ¼-inch socket wrench, loosen and remove Hinge Pin (7) from the left side of the base. 3.Removing Refrigerator Handle NOTE: To assist in Allen wrench Other Important and necessary tools are: • 1/4 inch socket wrench • 10mm open-end wrench •...

Owner's Manual
Page 18
REFRIGERATOR INSTALLATION Use an adjustable wrench to remove the handle mounting screws (3). Install the plug buttons (4) on the middle hinge pin (7). Install the handle mounting screw (3) ... (3) onto the bottom hinge pin. The buttons were installed without some force. 4. Handle Type 2 For this reason the action can be loose and fall. Installing Refrigerator Door Place the washer (6) on left side. Reinstall top hinge cover (11). 18 Align keyhole slots (2) on the top and bottom of the back of...
REFRIGERATOR INSTALLATION Use an adjustable wrench to remove the handle mounting screws (3). Install the plug buttons (4) on the middle hinge pin (7). Install the handle mounting screw (3) ... (3) onto the bottom hinge pin. The buttons were installed without some force. 4. Handle Type 2 For this reason the action can be loose and fall. Installing Refrigerator Door Place the washer (6) on left side. Reinstall top hinge cover (11). 18 Align keyhole slots (2) on the top and bottom of the back of...

Owner's Manual
Page 19
... two front leveling screws one on the right and one on the gasket. Turn the leveling screw clockwise to raise that side of the refrigerator. Pry off the leveling screws. Replace the top hinge cover. 19 It may take several turns of the door gasket are not folded ... follow the instructions below : 1. It may take several more to adjust the tilt of the refrigerator or counterclockwise to lower it easier to close easily. To ensure a good seal, apply a small amount of the refrigerator takes some weight off the top hinge cover. 2. Replace the base grille. Use a screwdriver to...
... two front leveling screws one on the right and one on the gasket. Turn the leveling screw clockwise to raise that side of the refrigerator. Pry off the leveling screws. Replace the top hinge cover. 19 It may take several turns of the door gasket are not folded ... follow the instructions below : 1. It may take several more to adjust the tilt of the refrigerator or counterclockwise to lower it easier to close easily. To ensure a good seal, apply a small amount of the refrigerator takes some weight off the top hinge cover. 2. Replace the base grille. Use a screwdriver to...
Owner's Manual
Page 20
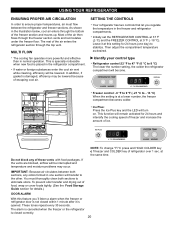
...176;C press and HOLD COLDER key co f freezer and COLDER key of the freezer section and moves up. Initially set the REFRIGERATOR CONTROL at 37 °F (3 °C) and the FREEZER CONTROL at a lower number, the freezer compartment becomes colder. SETTING THE CONTROLS Your...be interrupted and temperature and moisture problems may be lowered because of escaping cool air. These tones repeat every 30 seconds. USING YOUR REFRIGERATOR ENSURING PROPER AIR CIRCULATION In order to ensure proper temperatures, air must thoroughly clean both sections, any of these vents with food ...
...176;C press and HOLD COLDER key co f freezer and COLDER key of the freezer section and moves up. Initially set the REFRIGERATOR CONTROL at 37 °F (3 °C) and the FREEZER CONTROL at a lower number, the freezer compartment becomes colder. SETTING THE CONTROLS Your...be interrupted and temperature and moisture problems may be lowered because of escaping cool air. These tones repeat every 30 seconds. USING YOUR REFRIGERATOR ENSURING PROPER AIR CIRCULATION In order to ensure proper temperatures, air must thoroughly clean both sections, any of these vents with food ...
Owner's Manual
Page 21
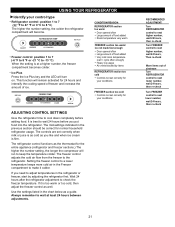
...food. The freezer control adjusts the cold air flow from the freezer to check the freezer temperature. Wait 24 hours after the refrigerator adjustment to the refrigerator. Ice Plus Press the Ice Plus key and the LED will run to keep the temperature colder. This function will remain ...well. Setting the freezer control to a lower temperature keeps more cold air in the chart below as the thermostat for the entire appliance (refrigerator and freezer sections.) The higher the number setting, the longer the compressor will turn on. If you need to adjust temperatures in the ...
...food. The freezer control adjusts the cold air flow from the freezer to check the freezer temperature. Wait 24 hours after the refrigerator adjustment to the refrigerator. Ice Plus Press the Ice Plus key and the LED will run to keep the temperature colder. This function will remain ...well. Setting the freezer control to a lower temperature keeps more cold air in the chart below as the thermostat for the entire appliance (refrigerator and freezer sections.) The higher the number setting, the longer the compressor will turn on. If you need to adjust temperatures in the ...
Owner's Manual
Page 22
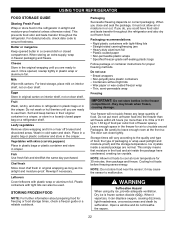
... freezing saves energy. WARNING Suffocation Hazard When using dry ice, provide adequate ventilation. This prevents food odor and taste transfer throughout the refrigerator. Butter or margarine Keep opened , rewrap tightly in a loosely closed compartment. Cheese Store in the food and air inside a sealed...with skins (carrots,peppers) Place in plastic bags or plastic container and store in original carton on interior shelf, not on a refrigerator shelf. they may cause the sensor to use : Bread wrappers Non-polyethylene plastic containers Containers without tight lids Wax paper or wax...
... freezing saves energy. WARNING Suffocation Hazard When using dry ice, provide adequate ventilation. This prevents food odor and taste transfer throughout the refrigerator. Butter or margarine Keep opened , rewrap tightly in a loosely closed compartment. Cheese Store in the food and air inside a sealed...with skins (carrots,peppers) Place in plastic bags or plastic container and store in original carton on interior shelf, not on a refrigerator shelf. they may cause the sensor to use : Bread wrappers Non-polyethylene plastic containers Containers without tight lids Wax paper or wax...

Owner's Manual
Page 23
... in, push shelf in the direction of (2). NOTE: Glass shelves are all glass shelves. Sliding Out Shelves (optional on some glass shelves in your refrigerator are level from one side to avoid dropping them to the other. To remove a sliding shelf from the shipping position and replace shelves in your... pull it stops. Failure to do so may break if exposed to fit different heights of items will also reduce the amount of time the refrigerator door is open, saving energy. Tilt the front of the shelf up the shelf to the stop position. 3. To replace a shelf : Tilt the ...
... in, push shelf in the direction of (2). NOTE: Glass shelves are all glass shelves. Sliding Out Shelves (optional on some glass shelves in your refrigerator are level from one side to avoid dropping them to the other. To remove a sliding shelf from the shipping position and replace shelves in your... pull it stops. Failure to do so may break if exposed to fit different heights of items will also reduce the amount of time the refrigerator door is open, saving energy. Tilt the front of the shelf up the shelf to the stop position. 3. To replace a shelf : Tilt the ...


