

Owner's Manual (English)
Page 2
...) Safety Instructions Grounding Requirements Parts and Features Refrigerator Installation Unpacking Your Refrigerator Installation Base Grille Removing, Reversing and Replacing Your Refrigerator Doors For Drawer Models For Swing Models Door Closing and Alignment Using Your Refrigerator Ensuring Proper Air Circulation Multi Flow Door Alarm Setting the Controls Adjusting Control Settings Food Storage Guide...
...) Safety Instructions Grounding Requirements Parts and Features Refrigerator Installation Unpacking Your Refrigerator Installation Base Grille Removing, Reversing and Replacing Your Refrigerator Doors For Drawer Models For Swing Models Door Closing and Alignment Using Your Refrigerator Ensuring Proper Air Circulation Multi Flow Door Alarm Setting the Controls Adjusting Control Settings Food Storage Guide...
Owner's Manual (English)
Page 3
...in material or workmanship under normal use . 4. LG Refrigerator / Freezer Warranty Period Product Parts Labor Refrigerator / Freezer 1 year 1 year [In-Home Service (Except Model GR-051)] Sealed System 7 years 1 year [In-Home Service (Except Model GR-051)] (Compressor, Condenser, Evaporator) No... resulting from the date of original purchase. CUSTOMER ASSISTANCE NUMBERS: To obtain Warranty Coverage: Retain your product type (Refrigerator), model number, serial number, and ZIP/Postal Code ready. 3 To obtain Product or Customer Service Assistance: To obtain the nearest...
...in material or workmanship under normal use . 4. LG Refrigerator / Freezer Warranty Period Product Parts Labor Refrigerator / Freezer 1 year 1 year [In-Home Service (Except Model GR-051)] Sealed System 7 years 1 year [In-Home Service (Except Model GR-051)] (Compressor, Condenser, Evaporator) No... resulting from the date of original purchase. CUSTOMER ASSISTANCE NUMBERS: To obtain Warranty Coverage: Retain your product type (Refrigerator), model number, serial number, and ZIP/Postal Code ready. 3 To obtain Product or Customer Service Assistance: To obtain the nearest...

Owner's Manual (English)
Page 6
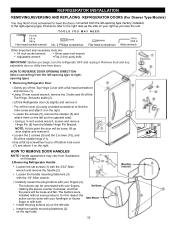
... finished, reconnect the refrigerator to the electrical source and reset the control (Thermostat, Refrigerator Control or Freezer Control, depending on the model) to have it is removed for their safety. GROUNDING REQUIREMENTS IMPORTANT: Please read carefully. TO CONNECT ELECTRICITY Where a standard two-prong... and outlet, and that they will increase the clearance needed for the back of an extension cord will sit for use by LG Electronics, to the desired setting. Have the wall outlet and the circuit checked by a qualified servicer. Junked or abandoned refrigerators ...
... finished, reconnect the refrigerator to the electrical source and reset the control (Thermostat, Refrigerator Control or Freezer Control, depending on the model) to have it is removed for their safety. GROUNDING REQUIREMENTS IMPORTANT: Please read carefully. TO CONNECT ELECTRICITY Where a standard two-prong... and outlet, and that they will increase the clearance needed for the back of an extension cord will sit for use by LG Electronics, to the desired setting. Have the wall outlet and the circuit checked by a qualified servicer. Junked or abandoned refrigerators ...

Owner's Manual (English)
Page 7
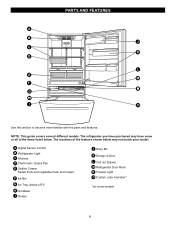
The refrigerator you have purchased may not match your model. The locations of the items listed below may have some models 7 A Digital Sensor Control B Refrigerator Light C Shelves D Temperature Control* E Chef Fresh / Snack Pan F Can Dispenser* G Optibin Crisper Keeps... and vegetable fresh and crisper H Ice Bin I Q J R K Use this section to become more familiar with the parts and features. NOTE: This guide covers several different models. PARTS AND FEATURES A B C L D M E N F O G H P I Ice Tray (Inside of H)* J Durabase K Divider L Dairy Bin M Design-A-Door N Egg Box...
The refrigerator you have purchased may not match your model. The locations of the items listed below may have some models 7 A Digital Sensor Control B Refrigerator Light C Shelves D Temperature Control* E Chef Fresh / Snack Pan F Can Dispenser* G Optibin Crisper Keeps... and vegetable fresh and crisper H Ice Bin I Q J R K Use this section to become more familiar with the parts and features. NOTE: This guide covers several different models. PARTS AND FEATURES A B C L D M E N F O G H P I Ice Tray (Inside of H)* J Durabase K Divider L Dairy Bin M Design-A-Door N Egg Box...
Owner's Manual (English)
Page 8
... Icemaker* *on some or all of F)* H Durabase I O Use this section to become more familiar with the parts and features. NOTE: This guide covers several different models. A Digital Sensor Control B Refrigerator Light C Shelves D Chef Fresh / Snack Pan E Optibin Crisper Keeps fruits and vegetable fresh and crisper F Ice Bin G Ice Tray (Inside of...
... Icemaker* *on some or all of F)* H Durabase I O Use this section to become more familiar with the parts and features. NOTE: This guide covers several different models. A Digital Sensor Control B Refrigerator Light C Shelves D Chef Fresh / Snack Pan E Optibin Crisper Keeps fruits and vegetable fresh and crisper F Ice Bin G Ice Tray (Inside of...

Owner's Manual (English)
Page 9
NOTE: This guide covers several different models. A Digital Sensor Control B Refrigerator Light C Shelves D Snack Pan E Optibin Crisper Keeps fruits and vegetable fresh and crisp F Ice Trays* G Ice Bin H Wire Durabase I C J D K E L F M G H N Use ... to become more familiar with the parts and features. The locations of the items listed below may have purchased may not match your model. The refrigerator you have some models 9 PARTS AND FEATURES A B I Dairy Bin J Design-A-Door K Wire Freezer Shelf L Refrigerator Door Rack M Freezer Light N Freezer Door Rack *on some or ...
NOTE: This guide covers several different models. A Digital Sensor Control B Refrigerator Light C Shelves D Snack Pan E Optibin Crisper Keeps fruits and vegetable fresh and crisp F Ice Trays* G Ice Bin H Wire Durabase I C J D K E L F M G H N Use ... to become more familiar with the parts and features. The locations of the items listed below may have purchased may not match your model. The refrigerator you have some models 9 PARTS AND FEATURES A B I Dairy Bin J Design-A-Door K Wire Freezer Shelf L Refrigerator Door Rack M Freezer Light N Freezer Door Rack *on some or ...

Owner's Manual (English)
Page 10
... the grille toward the refrigerator until it . Avoid placing the unit near heat sources, direct sunlight or moisture. Do not remove any warningtype labels, the model and serial number label, or the Tech Sheet that is heavy. Check the flow of cold air in back or other things. Leveling screws can...
... the grille toward the refrigerator until it . Avoid placing the unit near heat sources, direct sunlight or moisture. Do not remove any warningtype labels, the model and serial number label, or the Tech Sheet that is heavy. Check the flow of cold air in back or other things. Leveling screws can...
Owner's Manual (English)
Page 11
..., remove the 3 bolts and lift off the cover (4) using a slotted screwdriver to rightopening type) 1. REFRIGERATOR INSTALLATION REMOVING,REVERSING AND REPLACING REFRIGERATOR DOORS (For Drawer Type Models) 10 mm 1/4 in 3/8 in Hex head socket wrench TOOLS YOU MAY NEED No. 2 Phillips screwdriver Flat head screwdriver 1/4 in 3/32 in Allen wrench Other Important...
..., remove the 3 bolts and lift off the cover (4) using a slotted screwdriver to rightopening type) 1. REFRIGERATOR INSTALLATION REMOVING,REVERSING AND REPLACING REFRIGERATOR DOORS (For Drawer Type Models) 10 mm 1/4 in 3/8 in Hex head socket wrench TOOLS YOU MAY NEED No. 2 Phillips screwdriver Flat head screwdriver 1/4 in 3/32 in Allen wrench Other Important...

Owner's Manual (English)
Page 15
.... Loosen the 2 screws (11), the 2 screws (12), and lift off the base grille (14). REFRIGERATOR INSTALLATION REMOVING,REVERSING AND REPLACING REFRIGERATOR DOORS (For Swing Type Models) 10 mm 1/4 in 3/8 in Hex head socket wrench TOOLS YOU MAY NEED No. 2 Phillips screwdriver Flat head screwdriver 1/4 in 3/32 in installing the handle on...
.... Loosen the 2 screws (11), the 2 screws (12), and lift off the base grille (14). REFRIGERATOR INSTALLATION REMOVING,REVERSING AND REPLACING REFRIGERATOR DOORS (For Swing Type Models) 10 mm 1/4 in 3/8 in Hex head socket wrench TOOLS YOU MAY NEED No. 2 Phillips screwdriver Flat head screwdriver 1/4 in 3/32 in installing the handle on...

Owner's Manual (English)
Page 16
...) with the screw (5) and the screws (9). 6. REFRIGERATOR INSTALLATION Use an adjustable wrench to remove the handle mounting screws (3). Carefully loosen the plug buttons with your model. This may require some pressure, for this handle type is at the bottom. Installing Freezer Door Install the base grille (1).
...) with the screw (5) and the screws (9). 6. REFRIGERATOR INSTALLATION Use an adjustable wrench to remove the handle mounting screws (3). Carefully loosen the plug buttons with your model. This may require some pressure, for this handle type is at the bottom. Installing Freezer Door Install the base grille (1).

Owner's Manual (English)
Page 21
... of (1) and lift it will shatter into small pebblesized pieces. To remove a sliding shelf from its metal frame: 1. Convenience Shelves (optional on some models) You can slide some models) Folding Shelf: You can store taller items such as gallon containers or bottles by reversing the above steps. NOTE: Glass shelves are made...
... of (1) and lift it will shatter into small pebblesized pieces. To remove a sliding shelf from its metal frame: 1. Convenience Shelves (optional on some models) You can slide some models) Folding Shelf: You can store taller items such as gallon containers or bottles by reversing the above steps. NOTE: Glass shelves are made...
Owner's Manual (English)
Page 22
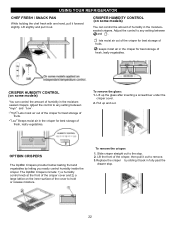
...the crisper. " " :Keeps moist air in the crisper for best storage of humidity in the moisturesealed crispers. CRISPER HUMIDITY CONTROL (on some models) You can control the amount of fruits. USING YOUR REFRIGERATOR CHEF FRESH / SNACK PAN While holding the chef fresh with one hand, pull it... forward slightly. CRISPER HUMIDITY CONTROL (on some models) You can control the amount of fresh, leafy vegetables. " ":Lets moist air out of the crisper for best storage of humidity in the...
...the crisper. " " :Keeps moist air in the crisper for best storage of humidity in the moisturesealed crispers. CRISPER HUMIDITY CONTROL (on some models) You can control the amount of fruits. USING YOUR REFRIGERATOR CHEF FRESH / SNACK PAN While holding the chef fresh with one hand, pull it... forward slightly. CRISPER HUMIDITY CONTROL (on some models) You can control the amount of fresh, leafy vegetables. " ":Lets moist air out of the crisper for best storage of humidity in the...

Owner's Manual (English)
Page 23
... the crisper cover support (2), pull the cover up the door rack (B). DESIGN-A-DOOR 1. Remove all bins are not firmely assembled. To replace lattice on some models) To remove the crisper cover: 1. DOOR RACKS The door racks may be hurt if door bins are correctly assembled so that they don' t fall out...
... the crisper cover support (2), pull the cover up the door rack (B). DESIGN-A-DOOR 1. Remove all bins are not firmely assembled. To replace lattice on some models) To remove the crisper cover: 1. DOOR RACKS The door racks may be hurt if door bins are correctly assembled so that they don' t fall out...
Owner's Manual (English)
Page 24
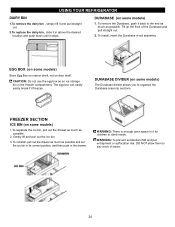
... storage bin in the freezer compartment. To remove the Durabase, push it back to play inside . EGG BOX (on some models) Store Egg Box on interior shelf, not on some models) The Durabase divider allows you to climb inside of the Durabase and pull straight out. 2. Gently lift and pull out the... position, and then push in it freezes. Tilt up the front of drawer. 24 DURABASE DIVIDER (on door shelf. FREEZER SECTION ICE BIN (on some models) 1.To separate the ice bin, pull out the drawer as much as possible. 2. DURABASE (on some...
... storage bin in the freezer compartment. To remove the Durabase, push it back to play inside . EGG BOX (on some models) Store Egg Box on interior shelf, not on some models) The Durabase divider allows you to climb inside of the Durabase and pull straight out. 2. Gently lift and pull out the... position, and then push in it freezes. Tilt up the front of drawer. 24 DURABASE DIVIDER (on door shelf. FREEZER SECTION ICE BIN (on some models) 1.To separate the ice bin, pull out the drawer as much as possible. 2. DURABASE (on some...
Owner's Manual (English)
Page 25
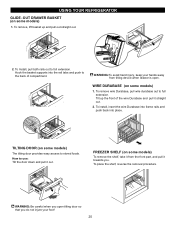
...into frame rails and push back into the rail tabs and push to full extension. TILTING DOOR (on some models) 1. How to full extension. E FREEZER SHELF (on some models) 1. WIRE DURABASE (on some models) The tilting door provides easy access to stored foods. adWjuAstRNING: Be careful when you open . Hook the...Durabase, pull wire durabase out to use: Tilt the door down and pull it out. USING YOUR REFRIGERATOR GLIDE -OUT DRAWER BASKET (on some models) To remove the shelf, take it from tilting device when drawer is open tilting door so that you . To Install, pull both rails out...
...into frame rails and push back into the rail tabs and push to full extension. TILTING DOOR (on some models) 1. How to full extension. E FREEZER SHELF (on some models) 1. WIRE DURABASE (on some models) The tilting door provides easy access to stored foods. adWjuAstRNING: Be careful when you open . Hook the...Durabase, pull wire durabase out to use: Tilt the door down and pull it out. USING YOUR REFRIGERATOR GLIDE -OUT DRAWER BASKET (on some models) To remove the shelf, take it from tilting device when drawer is open tilting door so that you . To Install, pull both rails out...
Owner's Manual (English)
Page 27
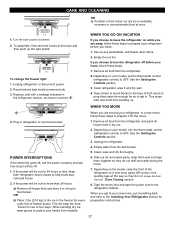
...counter clockwise. 5. Reach behind light shield to the refrigerator cabinet. WHEN YOU GO ON VACATION If you choose to leave the refrigerator on your model, turn the refrigerator off before you choose to turn the thermostat control (refrigerator control) to a new home, follow these steps. 1. If you...will be off , call the power company and ask how long it in refrigerator or reconnect power. Unplug the refrigerator. 4. Depending on your model, set the thermostat control (refrigerator control) to prepare it and dry well. 4. Tape the doors shut and tape the power cord to remove ...
...counter clockwise. 5. Reach behind light shield to the refrigerator cabinet. WHEN YOU GO ON VACATION If you choose to leave the refrigerator on your model, turn the refrigerator off before you choose to turn the thermostat control (refrigerator control) to a new home, follow these steps. 1. If you...will be off , call the power company and ask how long it in refrigerator or reconnect power. Unplug the refrigerator. 4. Depending on your model, set the thermostat control (refrigerator control) to prepare it and dry well. 4. Tape the doors shut and tape the power cord to remove ...

Owner's Manual (English)
Page 28
.... Anewly-installed refrigerator may take 12 to 24 hours to I (on ). Be sure nothing interferes with the cube size button. If ice is in certain models. If the power switch is not used for several days. To stop producing ice. If the ambient temperature will become cloudy, taste stale, and shrink...
.... Anewly-installed refrigerator may take 12 to 24 hours to I (on ). Be sure nothing interferes with the cube size button. If ice is in certain models. If the power switch is not used for several days. To stop producing ice. If the ambient temperature will become cloudy, taste stale, and shrink...

Owner's Manual (English)
Page 29
...necessary to water leakage or flooding. A cold water supply .The water pressure must be between 20 and 120 PSI or 0.137 and 0.82 MPa on models without a water filter and between 40 and 120 PSI or 0.275 and 0.82 MPa on the nearest faucet to the refrigerator. Do not install the... allows at the point of the refrigerator to avoid drawing off valve on your local plumbing codes. SHUT OFF THE MAIN WATER SUPPLY Turn on models with your product. When it is sufficient extra tubing (about 10" [25 cm] diameter) to allow water to connect into a horizontal water pipe, make sure...
...necessary to water leakage or flooding. A cold water supply .The water pressure must be between 20 and 120 PSI or 0.137 and 0.82 MPa on models without a water filter and between 40 and 120 PSI or 0.275 and 0.82 MPa on the nearest faucet to the refrigerator. Do not install the... allows at the point of the refrigerator to avoid drawing off valve on your local plumbing codes. SHUT OFF THE MAIN WATER SUPPLY Turn on models with your product. When it is sufficient extra tubing (about 10" [25 cm] diameter) to allow water to connect into a horizontal water pipe, make sure...

Owner's Manual (English)
Page 32
.... Light bulb has burned out. Refrigerator is designed to you, you may hear water running into a live outlet with same size and shape on the model) will click when the automatic defrost cycle begins and ends. Then... The thermostat control (or refrigerator control, depending on your food items at the desired...
.... Light bulb has burned out. Refrigerator is designed to you, you may hear water running into a live outlet with same size and shape on the model) will click when the automatic defrost cycle begins and ends. Then... The thermostat control (or refrigerator control, depending on your food items at the desired...

Owner's Manual (English)
Page 33
... baskets into their correct positions. Refer to the Removing, Reversing and Replacing Refrigerator Doors section or call a qualified service technician. The refrigerator was an older model. TROUBLESHOOTING GUIDE COMPRESSOR MOTOR SEEMS TO RUN TOO MUCH Check if... The refrigerator wobbles or seems unstable. See the Installation Section to run even more...
... baskets into their correct positions. Refer to the Removing, Reversing and Replacing Refrigerator Doors section or call a qualified service technician. The refrigerator was an older model. TROUBLESHOOTING GUIDE COMPRESSOR MOTOR SEEMS TO RUN TOO MUCH Check if... The refrigerator wobbles or seems unstable. See the Installation Section to run even more...


