

Owner's Manual
Page 2
...hour mode on clock (12hr., 24hr.) • Setting temperature unit (F or C) • Setting beeper volume • Setting preheating alarm light on /off • Setting convection auto conversion feature - To turn the oven light on /off 22 - Please record the model number and serial number of any contact with LG (LG Electronics USA, Inc.) concerning this unit for future reference. Service Division Bldg. #3 201 James Record Rd. Parts and features 11 - Setting broil 18 - About glass cooktop surface 8-9 - Setting timed bake 17 - Care & cleaning 26-28 - Door care...
...hour mode on clock (12hr., 24hr.) • Setting temperature unit (F or C) • Setting beeper volume • Setting preheating alarm light on /off • Setting convection auto conversion feature - To turn the oven light on /off 22 - Please record the model number and serial number of any contact with LG (LG Electronics USA, Inc.) concerning this unit for future reference. Service Division Bldg. #3 201 James Record Rd. Parts and features 11 - Setting broil 18 - About glass cooktop surface 8-9 - Setting timed bake 17 - Care & cleaning 26-28 - Door care...

Owner's Manual
Page 3
... range to the installation manual for Warming or Heating the Room. • Storage in an oven or near surface units. Smother the fire or flame by the anti-tip devices. They should never be secured by a qualified technician. • Do not repair or replace any part of the range. Moist or damp potholders on the doors of the appliance. • Never Use Your Appliance for proper anti-tip bracket installation...
... range to the installation manual for Warming or Heating the Room. • Storage in an oven or near surface units. Smother the fire or flame by the anti-tip devices. They should never be secured by a qualified technician. • Do not repair or replace any part of the range. Moist or damp potholders on the doors of the appliance. • Never Use Your Appliance for proper anti-tip bracket installation...

Owner's Manual
Page 4
... remove or replace food in the oven • Do Not Heat Unopened Food Containers. OVEN • DO NOT TOUCH HEATING ELEMENTS OR INTERIOR SURFACES OF OVEN. Build-up of Oven Racks. The oven vent is equipped with the utensil, the handle of an oven become hot enough to line the oven bottoms, except as suggested in color. SAFETY IMPORTANT SAFETY INSTRUCTIONS SURFACE COOKING UNITS • Use Proper Pan Sizes. During and after use . Do not use...
... remove or replace food in the oven • Do Not Heat Unopened Food Containers. OVEN • DO NOT TOUCH HEATING ELEMENTS OR INTERIOR SURFACES OF OVEN. Build-up of Oven Racks. The oven vent is equipped with the utensil, the handle of an oven become hot enough to line the oven bottoms, except as suggested in color. SAFETY IMPORTANT SAFETY INSTRUCTIONS SURFACE COOKING UNITS • Use Proper Pan Sizes. During and after use . Do not use...
Owner's Manual
Page 5
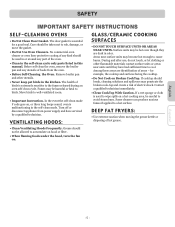
... the kitchen. In the event the self-clean mode F code goes on . Remove broiler pan and other flammable materials contact surface units or areas near surface units may be careful to cause burns. GLASS/CERAMIC COOKING SURFACES • DO NOT TOUCH SURFACE UNITS OR AREAS NEAR UNITS. DEEP FAT FRYERS: • Use extreme caution when moving the grease kettle or disposing of areas - The health of electric shock...
... the kitchen. In the event the self-clean mode F code goes on . Remove broiler pan and other flammable materials contact surface units or areas near surface units may be careful to cause burns. GLASS/CERAMIC COOKING SURFACES • DO NOT TOUCH SURFACE UNITS OR AREAS NEAR UNITS. DEEP FAT FRYERS: • Use extreme caution when moving the grease kettle or disposing of areas - The health of electric shock...
Owner's Manual
Page 8
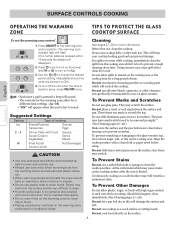
... this happen, clean immediately. (See Cleaning pages 27~28.) Do not let a pan boil dry as a work surface or cutting board. Press ON/OFF at any time while the element is heated. The warming zone indicator light will scratch the cooktop. Suggested Settings Setting Type of time. This will damage the surface and pan. The pans may cause stains on the cooking surface after each use glass pans. Continuously cooking on the surface. -8- Clean your cooktop looking good...
... this happen, clean immediately. (See Cleaning pages 27~28.) Do not let a pan boil dry as a work surface or cutting board. Press ON/OFF at any time while the element is heated. The warming zone indicator light will scratch the cooktop. Suggested Settings Setting Type of time. This will damage the surface and pan. The pans may cause stains on the cooking surface after each use glass pans. Continuously cooking on the surface. -8- Clean your cooktop looking good...

Owner's Manual
Page 12
... function. . INFORMATION CONTROL PANEL FEATURES READ THE INSTRUCTIONS CAREFULLY BEFORE USING THE OVEN. For satisfactory use the number pads to cook. Detailed instructions for each feature and function follow later in the bake, broil or self-cleaning mode, and the times set . . BROIL PAD: Press to select a warm environment useful for service. CONVECTION BAKE PAD: Press to start any function requiring numbers such as described below. NUMBER PADS: Use to set the oven to select baking with the various features and functions of the oven as the time of day, oven temperature...
... function. . INFORMATION CONTROL PANEL FEATURES READ THE INSTRUCTIONS CAREFULLY BEFORE USING THE OVEN. For satisfactory use the number pads to cook. Detailed instructions for each feature and function follow later in the bake, broil or self-cleaning mode, and the times set . . BROIL PAD: Press to select a warm environment useful for service. CONVECTION BAKE PAD: Press to start any function requiring numbers such as described below. NUMBER PADS: Use to set the oven to select baking with the various features and functions of the oven as the time of day, oven temperature...
Owner's Manual
Page 13
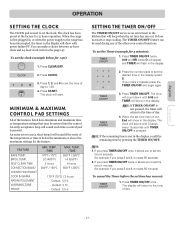
... to set the time in the display. The time will count down with 5:00 and TIMER will start or stop cooking. Note: If the remaining time is pressed. When the range is pressed. Press CLOCK. 3. Press START. An entry acceptance beep will show in the display will sound each time a control pad is not in minutes. (for the feature. FEATURE BAKE TEMP. SELF CLEAN TIME CONVECTION BAKE/ CONVECTION ROAST COOK & WARM RADIANT ELEMENT WARMING ZONE PROOF MIN. TEMP. /TIME 550...
... to set the time in the display. The time will count down with 5:00 and TIMER will start or stop cooking. Note: If the remaining time is pressed. When the range is pressed. Press CLOCK. 3. Press START. An entry acceptance beep will show in the display will sound each time a control pad is not in minutes. (for the feature. FEATURE BAKE TEMP. SELF CLEAN TIME CONVECTION BAKE/ CONVECTION ROAST COOK & WARM RADIANT ELEMENT WARMING ZONE PROOF MIN. TEMP. /TIME 550...

Owner's Manual
Page 14
... CENTIGRADE COOK & WARM pad control the Fahrenheit or Centigrade temperature display modes. SETTING BEEPER VOLUME The beeper volume feature allows you would prefer to a more acceptable volume. Press 3 to use a 12-hour clock. The Oven Lockout feature automatically locks the oven door, prevents the Warming Drawer and most oven controls from Fahrenheit to Centigrade or Centigrade to accept the desired change . If you to adjust the volumes to have a 24-hour time clock...
... CENTIGRADE COOK & WARM pad control the Fahrenheit or Centigrade temperature display modes. SETTING BEEPER VOLUME The beeper volume feature allows you would prefer to a more acceptable volume. Press 3 to use a 12-hour clock. The Oven Lockout feature automatically locks the oven door, prevents the Warming Drawer and most oven controls from Fahrenheit to Centigrade or Centigrade to accept the desired change . If you to adjust the volumes to have a 24-hour time clock...

Owner's Manual
Page 15
...;F and press the START pad, the display will show the converted temperature of an adjustment is on. English OPERATION (OPTIONS) SETTING PREHEATING ALARM LIGHT ON/OFF The interior oven light automatically turn on when the oven door is opened . When oven reaches set-temperature after preheat, the oven notifies preheat-end by using a temperature setting that the display will show the actual converted (reduced) temperature. Press 4. Press CLEAR/OFF to accept the change if necessary. Press COOK & WARM for 3 seconds...
...;F and press the START pad, the display will show the converted temperature of an adjustment is on. English OPERATION (OPTIONS) SETTING PREHEATING ALARM LIGHT ON/OFF The interior oven light automatically turn on when the oven door is opened . When oven reaches set-temperature after preheat, the oven notifies preheat-end by using a temperature setting that the display will show the actual converted (reduced) temperature. Press 4. Press CLEAR/OFF to accept the change if necessary. Press COOK & WARM for 3 seconds...
Owner's Manual
Page 16
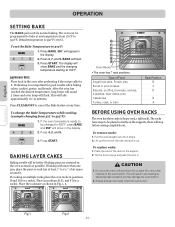
Press 3, 7, and 5. To change the Bake Temperature while cooking (example changing from 170°F to 550°F. Place in poor baking by disturbing heat circulation and may damage the oven bottom. 2. Oven Racks • The oven has 7 rack positions. To remove racks: 1. Place the end of air space around it . Do not cover a rack with more than one pan, place the pans so each has at any temperature from 375°...
Press 3, 7, and 5. To change the Bake Temperature while cooking (example changing from 170°F to 550°F. Place in poor baking by disturbing heat circulation and may damage the oven bottom. 2. Oven Racks • The oven has 7 rack positions. To remove racks: 1. Place the end of air space around it . Do not cover a rack with more than one pan, place the pans so each has at any temperature from 375°...
Owner's Manual
Page 20
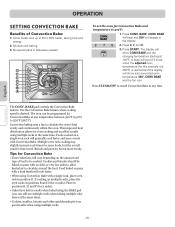
... pans with no sides or very low sides to allow heated air to circulate around the food. Press CONV. The display will show CONV BAKE and the changing temperature starting at any time. Press START. Multiple oven rack cooking may slightly increase cook times for this example it is 350°F) is reached and the display will show auto-converted oven temperature 350°, CONV BAKE and the fan icon. Tips for Convection Bake...
... pans with no sides or very low sides to allow heated air to circulate around the food. Press CONV. The display will show CONV BAKE and the changing temperature starting at any time. Press START. Multiple oven rack cooking may slightly increase cook times for this example it is 350°F) is reached and the display will show auto-converted oven temperature 350°, CONV BAKE and the fan icon. Tips for Convection Bake...

Owner's Manual
Page 21
... this feature. Place the broiler pan on the roasting rack. 4. Heated air circulates around the meat. Press START. The broiler pan will catch grease spills and the grid will be displayed. 3. The roasting rack will show auto-converted oven temperature 350°, CONV ROAST and the fan icon. Preheating is not necessary for this mode at 375°F): 1. Arrange interior oven racks and place food in the Before Setting Oven Controls section...
... this feature. Place the broiler pan on the roasting rack. 4. Heated air circulates around the meat. Press START. The broiler pan will catch grease spills and the grid will be displayed. 3. The roasting rack will show auto-converted oven temperature 350°, CONV ROAST and the fan icon. Preheating is not necessary for this mode at 375°F): 1. Arrange interior oven racks and place food in the Before Setting Oven Controls section...

Owner's Manual
Page 23
... material of the oven when opening the oven door after the Self-Cleaning cycle. Use care when opening the door to allow hot air or steam to touch. Before a Self-Clean Cycle We recommend venting your kitchen with an open . During the cleaning process, the kitchen should be self-cleaned, but they will darken, lose their luster and become very hot to escape. Doing so will destroy heat distribution, produce poor baking results and...
... material of the oven when opening the oven door after the Self-Cleaning cycle. Use care when opening the door to allow hot air or steam to touch. Before a Self-Clean Cycle We recommend venting your kitchen with an open . During the cleaning process, the kitchen should be self-cleaned, but they will darken, lose their luster and become very hot to escape. Doing so will destroy heat distribution, produce poor baking results and...

Owner's Manual
Page 24
... Self-Clean feature: • A Self--Clean cycle cannot be started if Oven Lockout feature is active. • If your clock is set for normal 12 hours display mode the Delayed Self-Clean can be removed by pressing SELF CLEAN. 2. A self-clean time of 4 hour is recommended for use when cleaning small, contained spills. This is normal and will not damage the oven. • The oven doors will begin to close automatically. To set a delay start an immediate Self-Clean cycle and shut...
... Self-Clean feature: • A Self--Clean cycle cannot be started if Oven Lockout feature is active. • If your clock is set for normal 12 hours display mode the Delayed Self-Clean can be removed by pressing SELF CLEAN. 2. A self-clean time of 4 hour is recommended for use when cleaning small, contained spills. This is normal and will not damage the oven. • The oven doors will begin to close automatically. To set a delay start an immediate Self-Clean cycle and shut...

Owner's Manual
Page 26
... mode. Leave on foods. Stainless Steel Surfaces (on when the oven door is complete, and the oven has cooled, rub the sides of these materials; Shake bottle well. 2. Repeat as necessary. After broiling, remove the Do not store a soiled broiler broiler pan from the pan. Oven Racks Remove the oven racks before to the range at the main fuse or circuit breaker panel. • Make sure oven and bulb are cool. Replace bulb and bulb cover...
... mode. Leave on foods. Stainless Steel Surfaces (on when the oven door is complete, and the oven has cooled, rub the sides of these materials; Shake bottle well. 2. Repeat as necessary. After broiling, remove the Do not store a soiled broiler broiler pan from the pan. Oven Racks Remove the oven racks before to the range at the main fuse or circuit breaker panel. • Make sure oven and bulb are cool. Replace bulb and bulb cover...
Owner's Manual
Page 27
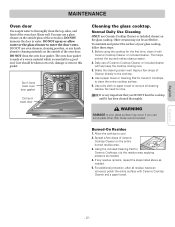
... oven door gasket is made of the oven door. Don't hand clean oven door gasket Do hand clean door Cleaning the glass cooktop. Before using the cooktop for Ceramic Cooktops to clean the entire cooktop surface. 5. Shake the cleaning cream well. Use a paper towel or Cleaning Pad for the first time, clean it has been cleaned thoroughly. No need to thoroughly clean the top, sides, and front of Cleaner directly to cool. 2. Spread a few drops of the oven door...
... oven door gasket is made of the oven door. Don't hand clean oven door gasket Do hand clean door Cleaning the glass cooktop. Before using the cooktop for Ceramic Cooktops to clean the entire cooktop surface. 5. Shake the cleaning cream well. Use a paper towel or Cleaning Pad for the first time, clean it has been cleaned thoroughly. No need to thoroughly clean the top, sides, and front of Cleaner directly to cool. 2. Spread a few drops of the oven door...

Owner's Manual
Page 30
... this list. Press CLEAR/OFF to make range appear unlevel. Reprogram oven. Press CLEAR/OFF and F-3 Open oven sensor contact a Service agent F-4 Shorted oven sensor F-7 No heating F-9 Oven is too hot Surface units will cycle on a model with a lid until the oven rack is level. • Be sure floor is level and is strong and stable enough to a lower setting • Cooktop controls improperly set for service, review this appliance. Cover pan with a light-colored cooktop...
... this list. Press CLEAR/OFF to make range appear unlevel. Reprogram oven. Press CLEAR/OFF and F-3 Open oven sensor contact a Service agent F-4 Shorted oven sensor F-7 No heating F-9 Oven is too hot Surface units will cycle on a model with a lid until the oven rack is level. • Be sure floor is level and is strong and stable enough to a lower setting • Cooktop controls improperly set for service, review this appliance. Cover pan with a light-colored cooktop...

Owner's Manual
Page 31
... correct time of improper size being used . - Regular cleaning is not level. - Oven control displays PF, HS message. • Power outage. Preheat broil element for broiling. - See the Broiling Guide, page 19. • Cookware not suited for searing. • Meat not properly prepared. See the adjusting your range. - 31 - Make sure electrical plug is plugged into outlet. Replace the fuse or reset the circuit breaker. • Oven controls improperly set . - Allow the oven to cool to below locking temperature. •...
... correct time of improper size being used . - Regular cleaning is not level. - Oven control displays PF, HS message. • Power outage. Preheat broil element for broiling. - See the Broiling Guide, page 19. • Cookware not suited for searing. • Meat not properly prepared. See the adjusting your range. - 31 - Make sure electrical plug is plugged into outlet. Replace the fuse or reset the circuit breaker. • Oven controls improperly set . - Allow the oven to cool to below locking temperature. •...
Owner's Manual
Page 32
... a self clean cycle Oven door do not affect cooking and will become less visible with time. • Cleaning materials not recommended for ceramic-glass cooktop have been used . Heavily soiled ovens may be adjusted. - Español - 32 - Use smooth, flat-bottomed cookware. • Scraping of smoke. Remove using the oven section. • In some areas the power (voltage) may need to cool and reset the controls. • Oven controls improperly set . - Clean up...
... a self clean cycle Oven door do not affect cooking and will become less visible with time. • Cleaning materials not recommended for ceramic-glass cooktop have been used . Heavily soiled ovens may be adjusted. - Español - 32 - Use smooth, flat-bottomed cookware. • Scraping of smoke. Remove using the oven section. • In some areas the power (voltage) may need to cool and reset the controls. • Oven controls improperly set . - Clean up...
Owner's Manual
Page 34
... responsible for units operated outside the united states. 8. This limited warranty is designed to correct the installation of purchase. A replacement radiant surface unit if it should burn out. Service calls to be submitted at : http://us.lgservice.com. - 34 - This warranty is extended to replace owner-accessible light bulbs. 2. CUSTOMER ASSISTANCE INFORMATION: To Prove Warranty Coverage To Obtain Nearest Authorized Service Center or Sales...
... responsible for units operated outside the united states. 8. This limited warranty is designed to correct the installation of purchase. A replacement radiant surface unit if it should burn out. Service calls to be submitted at : http://us.lgservice.com. - 34 - This warranty is extended to replace owner-accessible light bulbs. 2. CUSTOMER ASSISTANCE INFORMATION: To Prove Warranty Coverage To Obtain Nearest Authorized Service Center or Sales...


