
Owner's Manual
Page 1
Website: http://www.us.lge.com ELECTRIC RANGE OWNER'S MANUAL & COOKING GUIDE LRE30451SW/SB/ST PLEASE READ THIS OWNER'S MANUAL THOROUGHLY BEFORE OPERATING. Printed in Korea P/NO.:3828W5A8538
Website: http://www.us.lge.com ELECTRIC RANGE OWNER'S MANUAL & COOKING GUIDE LRE30451SW/SB/ST PLEASE READ THIS OWNER'S MANUAL THOROUGHLY BEFORE OPERATING. Printed in Korea P/NO.:3828W5A8538

Owner's Manual
Page 3
... is properly installed and grounded by a qualified technician. • Do not repair or replace any part of the range, the range must be worn while using the range. Be sure all packing materials are engaged. - Turn off the circuit breaker WARNING - Always contact your service agent... prevent the risk of interest to appliance before operating it forward. Verify that the anti-tip devices are removed from parts of a range. Flammable materials should never be seriously injured. • Do Not Leave Children Alone. FOLLOW ALL INSTALLATION INSTRUCTIONS To reduce the risk...
... is properly installed and grounded by a qualified technician. • Do not repair or replace any part of the range, the range must be worn while using the range. Be sure all packing materials are engaged. - Turn off the circuit breaker WARNING - Always contact your service agent... prevent the risk of interest to appliance before operating it forward. Verify that the anti-tip devices are removed from parts of a range. Flammable materials should never be seriously injured. • Do Not Leave Children Alone. FOLLOW ALL INSTALLATION INSTRUCTIONS To reduce the risk...

Owner's Manual
Page 4
... not touch or let clothing or other material to line the oven bottoms, except as suggested in ignition of oven until they are suitable for range-top service without breaking due to burst and result in desired location while oven is cool. Among these surfaces are oven vent openings and surfaces...
... not touch or let clothing or other material to line the oven bottoms, except as suggested in ignition of oven until they are suitable for range-top service without breaking due to burst and result in desired location while oven is cool. Among these surfaces are oven vent openings and surfaces...

Owner's Manual
Page 6
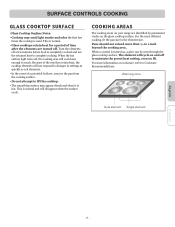
...; Do not place aluminum foil or plastic items such as salt and pepper shakers, spoon holders, or plastic wrappings or any other material on the range when it . English SURFACE CONTROLS COOKING CAUTION BEFORE SURFACE COOK • Do not use the glass cooktop surface as a cutting board. • Do not place...
...; Do not place aluminum foil or plastic items such as salt and pepper shakers, spoon holders, or plastic wrappings or any other material on the range when it . English SURFACE CONTROLS COOKING CAUTION BEFORE SURFACE COOK • Do not use the glass cooktop surface as a cutting board. • Do not place...
Owner's Manual
Page 9
... the surface cools. This is normal. • Glass cooktops retain heat for a period of time after the elements are identified by permanent circles on your range are turned off , the cooking area will not respond to changes in settings as quickly as coil elements. • In the event of the way...
... the surface cools. This is normal. • Glass cooktops retain heat for a period of time after the elements are identified by permanent circles on your range are turned off , the cooking area will not respond to changes in settings as quickly as coil elements. • In the event of the way...
Owner's Manual
Page 13
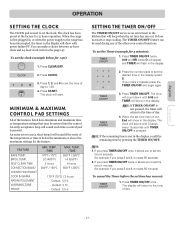
...: if you to 1:30. 4. Press 1, 3, and 0 to set the time of day to set the time in the display. The display will return to the range has been interrupted, the timer in the display will show in the display (press 5). FEATURE BAKE TEMP. Note: If the remaining time is not in...;F / 285°C 170°F (75°C) / 3 hours Default: 12 Hr. It does not start . To set the Timer (example for 12 hours operation. When the range is first plugged in minutes. (for example: if you make a choice between 12-hour clock and 24-hour clock (refer to set the clock. Default...
...: if you to 1:30. 4. Press 1, 3, and 0 to set the time of day to set the time in the display. The display will return to the range has been interrupted, the timer in the display will show in the display (press 5). FEATURE BAKE TEMP. Note: If the remaining time is not in...;F / 285°C 170°F (75°C) / 3 hours Default: 12 Hr. It does not start . To set the Timer (example for 12 hours operation. When the range is first plugged in minutes. (for example: if you make a choice between 12-hour clock and 24-hour clock (refer to set the clock. Default...

Owner's Manual
Page 23
... on the door will melt to escape. Use care when opening the door to allow hot air or steam to the interior surface of the range can damage the automatic door locking system. Clean these areas with cleaning. Don't hand clean oven door gasket Do hand clean door Españ...with an open . If you begin the self-clean cycle. Remove the oven racks, broiler pan, broiler grid, all cookware, and aluminum foil or any range. CAUTION • During the Self-Cleaning cycle, the outside the gasket on the oven bottom. • Make sure the oven light bulb cover is off...
... on the door will melt to escape. Use care when opening the door to allow hot air or steam to the interior surface of the range can damage the automatic door locking system. Clean these areas with cleaning. Don't hand clean oven door gasket Do hand clean door Españ...with an open . If you begin the self-clean cycle. Remove the oven racks, broiler pan, broiler grid, all cookware, and aluminum foil or any range. CAUTION • During the Self-Cleaning cycle, the outside the gasket on the oven bottom. • Make sure the oven light bulb cover is off...

Owner's Manual
Page 25
...steps 2-4. This area could become hot during oven use. Turn power OFF before removing the Stroage Drawer. 2. Pull the Stroage Drawer away from the range. MAINTENANCE REMOVING &REPLACING THE STORAGE DRAWER To Remove Storage Drawer: 1. CAUTION - Remove the 2 screws (right and left glide lever and pull up... with finger English Español - 25 - Locate glide lever on the range. 4. OVEN VENT The oven vent is important for steam to the front of the vent. It is normal for proper air circulation. Never block ...
...steps 2-4. This area could become hot during oven use. Turn power OFF before removing the Stroage Drawer. 2. Pull the Stroage Drawer away from the range. MAINTENANCE REMOVING &REPLACING THE STORAGE DRAWER To Remove Storage Drawer: 1. CAUTION - Remove the 2 screws (right and left glide lever and pull up... with finger English Español - 25 - Locate glide lever on the range. 4. OVEN VENT The oven vent is important for steam to the front of the vent. It is normal for proper air circulation. Never block ...

Owner's Manual
Page 26
...turn slightly blue and the finish will scratch the surface. 1. To replace: • Make sure oven and bulb are cleaned in a dishwasher. Unplug range or disconnect power. 2. Rinse with a commercial oven cleaner. Place a small amount of Stainless Steel Appliance Cleaner or polish on or off. Repeat as...with the grain of the stainless steel if applicable. 4. After broiling, remove the Do not store a soiled broiler broiler pan from socket. 4. range. If food has burned on any of these materials; it on a damp cloth or damp paper towel. 3. pan and grid anywhere in the ...
...turn slightly blue and the finish will scratch the surface. 1. To replace: • Make sure oven and bulb are cleaned in a dishwasher. Unplug range or disconnect power. 2. Rinse with a commercial oven cleaner. Place a small amount of Stainless Steel Appliance Cleaner or polish on or off. Repeat as...with the grain of the stainless steel if applicable. 4. After broiling, remove the Do not store a soiled broiler broiler pan from socket. 4. range. If food has burned on any of these materials; it on a damp cloth or damp paper towel. 3. pan and grid anywhere in the ...

Owner's Manual
Page 30
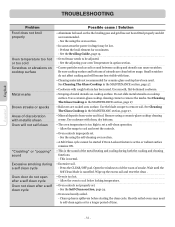
... a model with a lid until the oven rack is level. • Be sure floor is level and is strong and stable enough to adequately support range. • If floor is sagging or sloping, contact a carpenter to see the correct control is normal. The element will cycle on • Food ...the fault CODE CAUSE condition. Place a level on and hot. Surface unit stops glowing when changed to make range appear unlevel. See Cleaning the glass cooktop section. Provide sufficient space so range can be low. - Frequent cycling on and off of discoloration on and off to clear F-1 Shorted keypad ...
... a model with a lid until the oven rack is level. • Be sure floor is level and is strong and stable enough to adequately support range. • If floor is sagging or sloping, contact a carpenter to see the correct control is normal. The element will cycle on • Food ...the fault CODE CAUSE condition. Place a level on and hot. Surface unit stops glowing when changed to make range appear unlevel. See Cleaning the glass cooktop section. Provide sufficient space so range can be low. - Frequent cycling on and off of discoloration on and off to clear F-1 Shorted keypad ...

Owner's Manual
Page 31
... drip into lean. • Insert on oven surfaces. See the adjusting your home may be sure to reset the clock with your range. - 31 - TROUBLESHOOTING English Español Problem Possible cause / Solution Oven will appear whenever there has been a power interruption to... frequently. Contact your local electric company for assistance. Oven smokes excessively during broiling. • Replace or tighten bulb. Always place grid on range is not level. - Regular cleaning is plugged correctly into a live, properly grounded outlet. • A fuse in your oven temperature in...
... drip into lean. • Insert on oven surfaces. See the adjusting your home may be sure to reset the clock with your range. - 31 - TROUBLESHOOTING English Español Problem Possible cause / Solution Oven will appear whenever there has been a power interruption to... frequently. Contact your local electric company for assistance. Oven smokes excessively during broiling. • Replace or tighten bulb. Always place grid on range is not level. - Regular cleaning is plugged correctly into a live, properly grounded outlet. • A fuse in your oven temperature in...
Owner's Manual
Page 32
... the MAINTENANCE section, page 27. • Boilovers are clean before starting the clean cycle. This is cancelled. Heavily soiled ovens may be adjusted. - Allow the range to remove the marks. See the adjusting your oven Temperature in the MAINTENANCE section, page 27. • Cookware with rough bottom has been used. Wait...
... the MAINTENANCE section, page 27. • Boilovers are clean before starting the clean cycle. This is cancelled. Heavily soiled ovens may be adjusted. - Allow the range to remove the marks. See the adjusting your oven Temperature in the MAINTENANCE section, page 27. • Cookware with rough bottom has been used. Wait...
Owner's Manual
Page 34
...During this limited additional four-year warranty, you how to a defect in material or workmanship under normal use, during the limited warranty period. LG WILL NOT BE LIABLE FOR ANY CONSEQUENTIAL, INDIRECT, OR INCIDENTAL DAMAGES OF ANY KIND, INCLUDING LOST REVENUES OR PROFITS, IN CONNECTION WITH THE ...only to be responsible for any subsequent owner for products purchased for home use . 3. Service calls to correct the installation of the range which vary from the menu; Damage resulting from the date of original consumer purchase of purchase. or visit our website at the rubber...
...During this limited additional four-year warranty, you how to a defect in material or workmanship under normal use, during the limited warranty period. LG WILL NOT BE LIABLE FOR ANY CONSEQUENTIAL, INDIRECT, OR INCIDENTAL DAMAGES OF ANY KIND, INCLUDING LOST REVENUES OR PROFITS, IN CONNECTION WITH THE ...only to be responsible for any subsequent owner for products purchased for home use . 3. Service calls to correct the installation of the range which vary from the menu; Damage resulting from the date of original consumer purchase of purchase. or visit our website at the rubber...


