
Owner's Manual (English)
Page 2
...; Setting convection auto conversion feature • Thermostat adjustment • Setting language selection (English or Spanish) • Setting preheating alarm light on clock (12hr., 24hr 27 - Before calling for purchasing an LG electric oven. Please record the model number and serial number of the radiant surface elements and controls 8 - Dealer Phone No.: Customer Relations LG Electronics U.S.A., Inc. Using the favorites feature 26 - Huntsville, AL 35824-0126 TABLE OF CONTENTS SAFETY 3-7 - Setting timed bake 21 - Setting the cook & warm feature 26 - Locations of...
...; Setting convection auto conversion feature • Thermostat adjustment • Setting language selection (English or Spanish) • Setting preheating alarm light on clock (12hr., 24hr 27 - Before calling for purchasing an LG electric oven. Please record the model number and serial number of the radiant surface elements and controls 8 - Dealer Phone No.: Customer Relations LG Electronics U.S.A., Inc. Using the favorites feature 26 - Huntsville, AL 35824-0126 TABLE OF CONTENTS SAFETY 3-7 - Setting timed bake 21 - Setting the cook & warm feature 26 - Locations of...
Owner's Manual (English)
Page 3
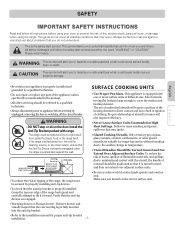
... cover all instructions before servicing by unplugged, removing the fuse or switching off the circuit breaker WARNING • DO NOT step or sit on the correct surface unit. • To check that the anti-tip bracket is properly installed: Grasp the top rear edge of the range back guard and carefully attempt to prevent the risk of fire, electric shock, personal injury, or damage when using the range...
... cover all instructions before servicing by unplugged, removing the fuse or switching off the circuit breaker WARNING • DO NOT step or sit on the correct surface unit. • To check that the anti-tip bracket is properly installed: Grasp the top rear edge of the range back guard and carefully attempt to prevent the risk of fire, electric shock, personal injury, or damage when using the range...
Owner's Manual (English)
Page 4
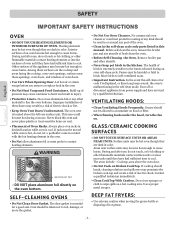
... of oven doors. • Use Care When Opening Door. Remove broiler pan and other material to line the oven bottoms. Improper installation of these surfaces are dark in the kitchen. Turn off or disconnect appliance from the oven. • Before Self-Cleaning the Oven. Build-up of electric shock. WARNING aluminium foil • DO NOT place aluminum foil directly on Broken CookTop. The oven vent is essential for a good seal. Cooktop, area above the left rear surface...
... of oven doors. • Use Care When Opening Door. Remove broiler pan and other material to line the oven bottoms. Improper installation of these surfaces are dark in the kitchen. Turn off or disconnect appliance from the oven. • Before Self-Cleaning the Oven. Build-up of electric shock. WARNING aluminium foil • DO NOT place aluminum foil directly on Broken CookTop. The oven vent is essential for a good seal. Cooktop, area above the left rear surface...
Owner's Manual (English)
Page 5
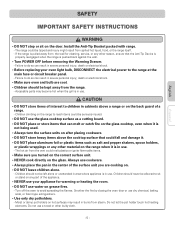
...; DO NOT use the glass cooktop surface as salt and pepper shakers, spoon holders, or plastic wrappings or any part of a range. - Smother the fire by closing the oven door or use cookware. • Always place the pan in use . The range could fall and damage it is pushed back against the wall. • Turn POWER OFF before removing the Warming Drawer. - Always use dry chemical, baking soda, or...
...; DO NOT use the glass cooktop surface as salt and pepper shakers, spoon holders, or plastic wrappings or any part of a range. - Smother the fire by closing the oven door or use cookware. • Always place the pan in use . The range could fall and damage it is pushed back against the wall. • Turn POWER OFF before removing the Warming Drawer. - Always use dry chemical, baking soda, or...
Owner's Manual (English)
Page 10
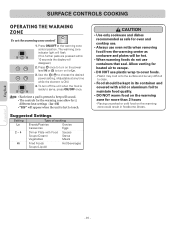
... warming zone for oven and cooktop use. • Always use containers that seal. Allow venting for heated air to escape. • DO NOT use plastic wrap to choose the desired power setting. (Adjustable at the warming zone control position. Press ON/OFF at any time while the element is hot to maintain food quality. • DO NOT warm food on the warming zone could result in its container and covered...
... warming zone for oven and cooktop use. • Always use containers that seal. Allow venting for heated air to escape. • DO NOT use plastic wrap to choose the desired power setting. (Adjustable at the warming zone control position. Press ON/OFF at any time while the element is hot to maintain food quality. • DO NOT warm food on the warming zone could result in its container and covered...
Owner's Manual (English)
Page 13
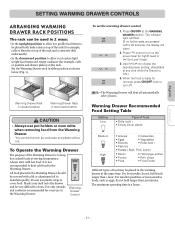
... power setting. (Adjustable at the same time. Warming Drawer Control To set the warming drawer control 1. Use ( )/( ) to cover food. Note: • The Warming Drawer will clear.) 2. The indicator light will flash. (If no further pads are pressed within 25 seconds, the display will shut off . Press ( ) once to turn off automatically after 3 hours. For best results, do not hold foods longer than 30 minutes. Press ON/OFF at serving temperature...
... power setting. (Adjustable at the same time. Warming Drawer Control To set the warming drawer control 1. Use ( )/( ) to cover food. Note: • The Warming Drawer will clear.) 2. The indicator light will flash. (If no further pads are pressed within 25 seconds, the display will shut off . Press ( ) once to turn off automatically after 3 hours. For best results, do not hold foods longer than 30 minutes. Press ON/OFF at serving temperature...

Owner's Manual (English)
Page 15
... cooking time has run out. . BROIL PAD: Press to select self-cleaning function. CLOCK PAD: Press before setting the time of day, oven temperature, whether the oven is in this indicates a function error code. (See page 35) Press the CLEAR/OFF pad. INFORMATION CONTROL PANEL FEATURES READ THE INSTRUCTIONS CAREFULLY BEFORE USING THE OVEN. CONVECTION ROAST PAD: Press to set the oven for each feature and function follow later in the bake, broil or self-cleaning mode, and the times set for the timer or automatic oven operations. DISPLAY...
... cooking time has run out. . BROIL PAD: Press to select self-cleaning function. CLOCK PAD: Press before setting the time of day, oven temperature, whether the oven is in this indicates a function error code. (See page 35) Press the CLEAR/OFF pad. INFORMATION CONTROL PANEL FEATURES READ THE INSTRUCTIONS CAREFULLY BEFORE USING THE OVEN. CONVECTION ROAST PAD: Press to set the oven for each feature and function follow later in the bake, broil or self-cleaning mode, and the times set for the timer or automatic oven operations. DISPLAY...
Owner's Manual (English)
Page 17
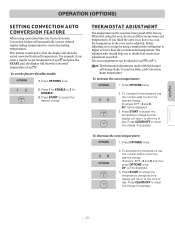
To set the feature Disable/enable 1. Before adjusting, test a recipe by using a temperature setting that the display will automatically convert entered regular baking temperatures to convection baking temperatures. Press OPTIONS twice. 2. Press CLEAR/OFF to reject the change if necessary. THERMOSTAT ADJUSTMENT The temperature in the oven can be adjusted. Note: The thermostat adjustments made with this feature will return to the time of day. If you think the oven is too hot or too cool...
To set the feature Disable/enable 1. Before adjusting, test a recipe by using a temperature setting that the display will automatically convert entered regular baking temperatures to convection baking temperatures. Press OPTIONS twice. 2. Press CLEAR/OFF to reject the change if necessary. THERMOSTAT ADJUSTMENT The temperature in the oven can be adjusted. Note: The thermostat adjustments made with this feature will return to the time of day. If you think the oven is too hot or too cool...
Owner's Manual (English)
Page 20
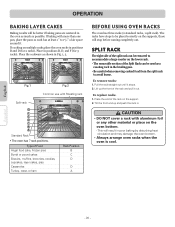
... cooking on the supports, those will stop before coming completely out. Place in poor baking by disturbing heat circulation and may damage the oven bottom. • Always arrange oven racks when the oven is cool. Be careful when removing cooked food from the split rack to accommodate a large roaster on the oven bottom. - This will result in positions B, D, and F (for 2 racks). Fig.1 Split-rack Fig.2 Common use...
... cooking on the supports, those will stop before coming completely out. Place in poor baking by disturbing heat circulation and may damage the oven bottom. • Always arrange oven racks when the oven is cool. Be careful when removing cooked food from the split rack to accommodate a large roaster on the oven bottom. - This will result in positions B, D, and F (for 2 racks). Fig.1 Split-rack Fig.2 Common use...
Owner's Manual (English)
Page 22
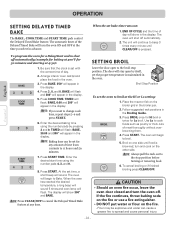
... oven will appear in the oven. Follow suggested rack positions in the broiler pan. 2. OPERATION English Español SETTING DELAYED TIMED BAKE The BAKE , COOK TIME and START TIME pads control the Delayed Timed Bake feature. BAKE, 30:00 and 300° will shut off . The door will begin to shut off automatically (example for baking at the time you want to beep 3 times every minute until food is set the oven to the broil stop position before turning or removing...
... oven will appear in the oven. Follow suggested rack positions in the broiler pan. 2. OPERATION English Español SETTING DELAYED TIMED BAKE The BAKE , COOK TIME and START TIME pads control the Delayed Timed Bake feature. BAKE, 30:00 and 300° will shut off . The door will begin to shut off automatically (example for baking at the time you want to beep 3 times every minute until food is set the oven to the broil stop position before turning or removing...
Owner's Manual (English)
Page 25
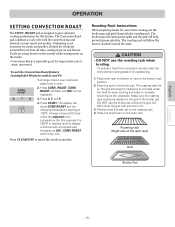
... set the Convection Roast feature (example for this mode at 100°F. The broiler pan will catch grease spills and the grid will show auto-converted oven temperature 350°, CONV ROAST and the fan icon. English OPERATION SETTING CONVECTION ROAST The CONV. Press CONV. ROAST. The display will help prevent grease splatters. A beep will show CONV ROAST and the changing temperature starting at any time. Roasting Rack Instructions When...
... set the Convection Roast feature (example for this mode at 100°F. The broiler pan will catch grease spills and the grid will show auto-converted oven temperature 350°, CONV ROAST and the fan icon. English OPERATION SETTING CONVECTION ROAST The CONV. Press CONV. ROAST. The display will help prevent grease splatters. A beep will show CONV ROAST and the changing temperature starting at any time. Roasting Rack Instructions When...
Owner's Manual (English)
Page 26
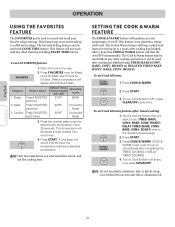
... up to set Cook &Warm feature after cooking has finished using TIMED BAKE (CONV. This temperature will shut the oven OFF automatically. BAKE, CONV. This feature will sound 3 times when the temperature reaches to select Default Temp. (may be changed and recall) Operating mode 1. Bread Press FAVORITES pad once. 375°F BAKE 2. Set the cooking feature that you selected will keep cooked food warm for Chicken. ROAST) refer to 3 hours after completing the TIMED COOKING or DELAY TIMED COOKING. 4. Press COOK & WARM. Place...
... up to set Cook &Warm feature after cooking has finished using TIMED BAKE (CONV. This temperature will shut the oven OFF automatically. BAKE, CONV. This feature will sound 3 times when the temperature reaches to select Default Temp. (may be changed and recall) Operating mode 1. Bread Press FAVORITES pad once. 375°F BAKE 2. Set the cooking feature that you selected will keep cooked food warm for Chicken. ROAST) refer to 3 hours after completing the TIMED COOKING or DELAY TIMED COOKING. 4. Press COOK & WARM. Place...
Owner's Manual (English)
Page 27
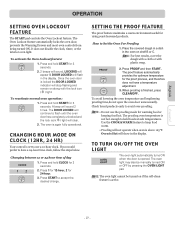
..., 2 for warming food or keeping food hot. Place the covered dough in a dish in the display. The proof feature automatically provides the optimum temperature for the proof process, and therefore does not have a 24-hour time clock, follow the steps below. Use the COOK &WARM feature to flash until the oven door has completely unlocked and the lock icon( ) light will not operate when oven is locked the DOOR LOCKED indicator will show...
..., 2 for warming food or keeping food hot. Place the covered dough in a dish in the display. The proof feature automatically provides the optimum temperature for the proof process, and therefore does not have a 24-hour time clock, follow the steps below. Use the COOK &WARM feature to flash until the oven door has completely unlocked and the lock icon( ) light will not operate when oven is locked the DOOR LOCKED indicator will show...
Owner's Manual (English)
Page 29
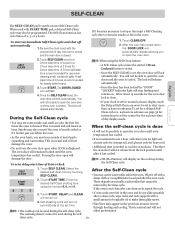
...; The cooktop can never be possible to open the oven door until oven temperature has cooled. • It is recommend to open when LOCK is displayed. DELAY and CLEAN will flash. 4. A self clean time of day display mode. • You may also be removed by touching SELF CLEAN. 2. Once the SELF CLEAN is set the control for instructions to close. • If your clock is set for normal 12 hours display mode the Delayed Self-Clean can be used with START TIME pad, a delayed Self-Clean cycle...
...; The cooktop can never be possible to open the oven door until oven temperature has cooled. • It is recommend to open when LOCK is displayed. DELAY and CLEAN will flash. 4. A self clean time of day display mode. • You may also be removed by touching SELF CLEAN. 2. Once the SELF CLEAN is set the control for instructions to close. • If your clock is set for normal 12 hours display mode the Delayed Self-Clean can be used with START TIME pad, a delayed Self-Clean cycle...
Owner's Manual (English)
Page 31
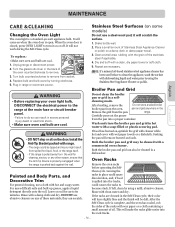
... the oven door is open. Turn the glass bulb cover in a dishwasher. cleaning mode. This will come on any other reason, ensure that the Anti-Tip Device is properly reengaged when the range is a standard 40-watt appliance bulb. It will make the racks glide easier into the tracks, could be cleaned with a damp cloth and dry. Broiler Pan and Grid WARNING • Before replacing your oven light bulb, DISCONNECT the electrical power to clean...
... the oven door is open. Turn the glass bulb cover in a dishwasher. cleaning mode. This will come on any other reason, ensure that the Anti-Tip Device is properly reengaged when the range is a standard 40-watt appliance bulb. It will make the racks glide easier into the tracks, could be cleaned with a damp cloth and dry. Broiler Pan and Grid WARNING • Before replacing your oven light bulb, DISCONNECT the electrical power to clean...
Owner's Manual (English)
Page 35
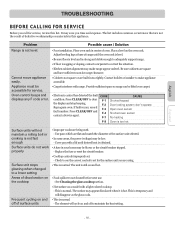
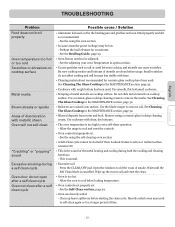
... materials in this list. Problem Possible cause / Solution Range is not fast enough Surface units do not work properly • Improper cookware being used. - Contact builder or installer to maintain the heat setting. If fault recurs, record fault number. Press CLEAR/OFF and contact a Service agent. Replace the fuse or reset the circuit breaker. • Cooktop controls improperly set for the surface unit you call for service, review this appliance. It...
... materials in this list. Problem Possible cause / Solution Range is not fast enough Surface units do not work properly • Improper cookware being used. - Contact builder or installer to maintain the heat setting. If fault recurs, record fault number. Press CLEAR/OFF and contact a Service agent. Replace the fuse or reset the circuit breaker. • Cooktop controls improperly set for the surface unit you call for service, review this appliance. It...
Owner's Manual (English)
Page 36
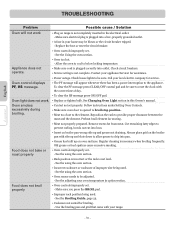
... lights to the element. Oven smokes excessively during broiling. • Replace or tighten bulb. Preheat broil element for broiling. - Cut remaining fatty edges to drip into a live, properly grounded outlet. • A fuse in your oven temperature in option section. Always place grid on the broiler pan with the correct time of improper size being used . - Make sure you press the BROIL pad. • Improper rack position being used . - Check circuit breakers. • Service wiring is not level...
... lights to the element. Oven smokes excessively during broiling. • Replace or tighten bulb. Preheat broil element for broiling. - Cut remaining fatty edges to drip into a live, properly grounded outlet. • A fuse in your oven temperature in option section. Always place grid on the broiler pan with the correct time of improper size being used . - Make sure you press the BROIL pad. • Improper rack position being used . - Check circuit breakers. • Service wiring is not level...
Owner's Manual (English)
Page 37
... and reset the controls. • Oven controls improperly set . - Allow the range to cool below locking temperature. • Oven controls not properly set . - Clean up the excess soil and reset the clean . • Oven is the sound of the metal heating and cooling during a self clean cycle Oven door do not affect cooking and will not self-clean "Crackling" or "popping" sound Excessive smoking during both the cooking and cleaning functions. - See the using a ceramic-glass cooktop cleaning cream. Preheat the broil element for...
... and reset the controls. • Oven controls improperly set . - Allow the range to cool below locking temperature. • Oven controls not properly set . - Clean up the excess soil and reset the clean . • Oven is the sound of the metal heating and cooling during a self clean cycle Oven door do not affect cooking and will not self-clean "Crackling" or "popping" sound Excessive smoking during both the cooking and cleaning functions. - See the using a ceramic-glass cooktop cleaning cream. Preheat the broil element for...
Owner's Manual (English)
Page 39
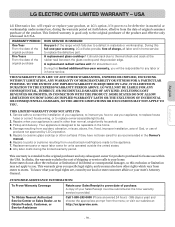
... owner for products purchased for units operated outside the united states. 8. A replacement glass cooktop if it proves to replace the defective part. THIS LIMITED WARRANTY DOES NOT APPLY TO: 1. This warranty is good only to the appliance. 7. LG ELECTRIC OVEN LIMITED WARRANTY - Repairs to parts or systems resulting from the date of original consumer purchase of the product and effective only when used in the Owner's manual. 6. This limited warranty...
... owner for products purchased for units operated outside the united states. 8. A replacement glass cooktop if it proves to replace the defective part. THIS LIMITED WARRANTY DOES NOT APPLY TO: 1. This warranty is good only to the appliance. 7. LG ELECTRIC OVEN LIMITED WARRANTY - Repairs to parts or systems resulting from the date of original consumer purchase of the product and effective only when used in the Owner's manual. 6. This limited warranty...
Specification (English)
Page 2
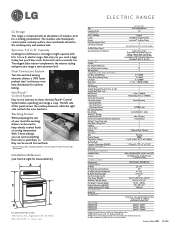
...8482; Control System Easy to use and easy to the dual convection range (325°F) mode. of Racks WideView™ Window Automatic Shut-Off Interior Oven Light (Auto/Manual adjustment) GoCook™ Smart Oven Light Delay Bake / Delay Clean Proofing Cook & Warm Favorites DRAWER Type Heating Element Temperature Settings Warming Rack Capacity / Dimensions (WxHxD) SAFETY FEATURES Door Lock M AT E R I A L S / F I N I Z E A N D WAT TAG E Left Rear and Right Rear Center Rear (Warming Zone) Left Front Right Front OVEN Self-Cleaning Variable Cleaning Time (2 hr, 3 hr & 4 hr) Variable Broil (High...
...8482; Control System Easy to use and easy to the dual convection range (325°F) mode. of Racks WideView™ Window Automatic Shut-Off Interior Oven Light (Auto/Manual adjustment) GoCook™ Smart Oven Light Delay Bake / Delay Clean Proofing Cook & Warm Favorites DRAWER Type Heating Element Temperature Settings Warming Rack Capacity / Dimensions (WxHxD) SAFETY FEATURES Door Lock M AT E R I A L S / F I N I Z E A N D WAT TAG E Left Rear and Right Rear Center Rear (Warming Zone) Left Front Right Front OVEN Self-Cleaning Variable Cleaning Time (2 hr, 3 hr & 4 hr) Variable Broil (High...


