
Owner's Manual (English)
Page 2
...retail purchase. Parts and features 14 - Setting timed bake 21 - English Thank you record the details of any contact with LG (LG Electronics USA, Inc.) concerning this unit for future reference. Huntsville, AL 35824-0126 TABLE OF CONTENTS SAFETY 3-7 - Setting broil... Removing & replacing the lift-off • Setting beeper volume • Setting temperature unit (F or C) - Removing and replacing the warming drawer .......30 - PF or HS message 8 - Recommended broiling guide 23 - Locations of this unit. Service Division Bldg. #3 201 James Record Rd. Options...
...retail purchase. Parts and features 14 - Setting timed bake 21 - English Thank you record the details of any contact with LG (LG Electronics USA, Inc.) concerning this unit for future reference. Huntsville, AL 35824-0126 TABLE OF CONTENTS SAFETY 3-7 - Setting broil... Removing & replacing the lift-off • Setting beeper volume • Setting temperature unit (F or C) - Removing and replacing the warming drawer .......30 - PF or HS message 8 - Recommended broiling guide 23 - Locations of this unit. Service Division Bldg. #3 201 James Record Rd. Options...
Owner's Manual (English)
Page 11
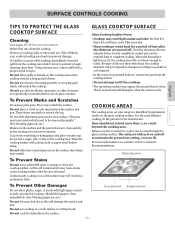
...use on the surface. - 11 - This is used. This is hot to clean the cooktop surface. Should this happen, clean immediately. (See Cleaning pages 29~30.) Do not let a pan boil dry as this will keep your range are turned off a few times the cooktop is normal. • Glass cooktops retain...using. COOKING AREAS The cooking areas on your cooktop looking good and can prevent damage. These items can be removed promptly." (See Cleaning pages 29~30.) Make sure the surface and the pan bottom are clean and dry before food is heated. Do not use , clean the cooktop. This will ...
...use on the surface. - 11 - This is used. This is hot to clean the cooktop surface. Should this happen, clean immediately. (See Cleaning pages 29~30.) Do not let a pan boil dry as this will keep your range are turned off a few times the cooktop is normal. • Glass cooktops retain...using. COOKING AREAS The cooking areas on your cooktop looking good and can prevent damage. These items can be removed promptly." (See Cleaning pages 29~30.) Make sure the surface and the pan bottom are clean and dry before food is heated. Do not use , clean the cooktop. This will ...
Owner's Manual (English)
Page 13
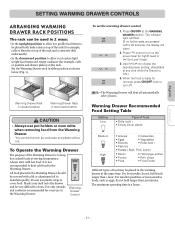
... ARRANGING WARMING DRAWER RACK POSITIONS The rack can be burned as cookware and plates will clear.) 2. For best results, do not hold foods longer than 30 minutes. When the food is ready for oven use in the Warming Drawer. Plastic may be hot. Use only utensils and cookware recommended for removal...
... ARRANGING WARMING DRAWER RACK POSITIONS The rack can be burned as cookware and plates will clear.) 2. For best results, do not hold foods longer than 30 minutes. When the food is ready for oven use in the Warming Drawer. Plastic may be hot. Use only utensils and cookware recommended for removal...
Owner's Manual (English)
Page 16
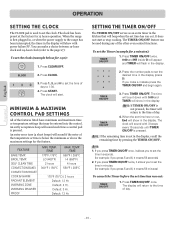
...for 5 minutes): 1. MINIMUM & MAXIMUM CONTROL PAD SETTINGS All of the features listed have minimum and maximum time or temperature settings that will return to 1:30. 4. An entry acceptance beep will flash in the display (press 5). FEATURE BAKE TEMP. The time will sound if the entry of day to the ...the other oven control functions. Press 1, 3, and 0 to the page 27): To set the time of the temperature or time is below for 1:30): 1. BROIL TEMP. The TIMER ON/OFF feature can make a mistake press the TIMER ON/OFF and begin again. 3. Note: 1. Español - 16...
...for 5 minutes): 1. MINIMUM & MAXIMUM CONTROL PAD SETTINGS All of the features listed have minimum and maximum time or temperature settings that will return to 1:30. 4. An entry acceptance beep will flash in the display (press 5). FEATURE BAKE TEMP. The time will sound if the entry of day to the ...the other oven control functions. Press 1, 3, and 0 to the page 27): To set the time of the temperature or time is below for 1:30): 1. BROIL TEMP. The TIMER ON/OFF feature can make a mistake press the TIMER ON/OFF and begin again. 3. Note: 1. Español - 16...
Owner's Manual (English)
Page 21
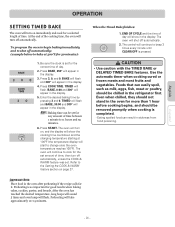
...3, 0, and 0. Preheating is set for the correct time of day will show the cooking time countdown and the changing temperature starting at 300°F for 30 minutes): 1. END OF CYCLE and the time of day. 2. The control will continue to the Setting the COOK & WARM feature section on page 27.... 3 times every minute until CLEAR/OFF is completed. - Preheating will flash. Press COOK TIME. Español - 21 - TIMED will flash and BAKE, 30:00 and 300° will appear in the oven for more than 1 hour before cooking begins, and should be removed promptly when cooking is pressed...
...3, 0, and 0. Preheating is set for the correct time of day will show the cooking time countdown and the changing temperature starting at 300°F for 30 minutes): 1. END OF CYCLE and the time of day. 2. The control will continue to the Setting the COOK & WARM feature section on page 27.... 3 times every minute until CLEAR/OFF is completed. - Preheating will flash. Press COOK TIME. Español - 21 - TIMED will flash and BAKE, 30:00 and 300° will appear in the oven for more than 1 hour before cooking begins, and should be removed promptly when cooking is pressed...
Owner's Manual (English)
Page 22
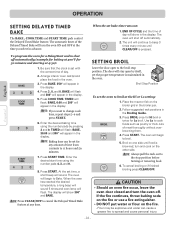
... Press START TIME. Follow suggested rack positions in advance. The oven will flash; To cancel broiling or if finished broiling press CLEAR/OFF. BAKE, 30:00 and 300° will appear in the display. SETTING BROIL Leave the door open by pressing 3 and 0. Press START. turn the oven ...of day will appear in the display. Note: Press CLEAR/OFF to cancel the Delayed Timed Bake feature at 4:30): 1. Press BROIL once for Hi broil or twice for 30 minutes and starting at any amount of meat thoroughly without overbrowning them. 4. CAUTION • Should an oven fire ...
... Press START TIME. Follow suggested rack positions in advance. The oven will flash; To cancel broiling or if finished broiling press CLEAR/OFF. BAKE, 30:00 and 300° will appear in the display. SETTING BROIL Leave the door open by pressing 3 and 0. Press START. turn the oven ...of day will appear in the display. Note: Press CLEAR/OFF to cancel the Delayed Timed Bake feature at 4:30): 1. Press BROIL once for Hi broil or twice for 30 minutes and starting at any amount of meat thoroughly without overbrowning them. 4. CAUTION • Should an oven fire ...
Owner's Manual (English)
Page 24
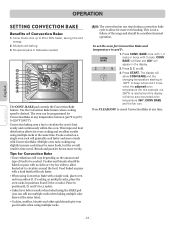
BAKE once with 1, 2 racks or twice with Convection Bake. Convection baking uses a fan to 30% faster, saving time and energy. 2. Breads and pastries brown more even heating. Place in positions B and D (for more evenly. The display will show auto-converted ...
BAKE once with 1, 2 racks or twice with Convection Bake. Convection baking uses a fan to 30% faster, saving time and energy. 2. Breads and pastries brown more even heating. Place in positions B and D (for more evenly. The display will show auto-converted ...
Owner's Manual (English)
Page 30
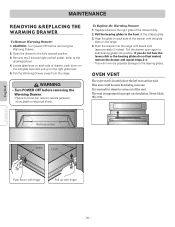
... 2 inches). WARNING • Turn POWER OFF before removing the Warming Drawer. 2. Replace shield on the right glide of the drawer with finger Español - 30 - Align the glide on the range. 4. Pull the drawer open again to the fully opened position. 3. This will minimize possible damage to the drowing below...
... 2 inches). WARNING • Turn POWER OFF before removing the Warming Drawer. 2. Replace shield on the right glide of the drawer with finger Español - 30 - Align the glide on the range. 4. Pull the drawer open again to the fully opened position. 3. This will minimize possible damage to the drowing below...
Owner's Manual (English)
Page 31
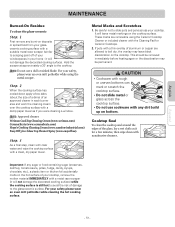
... anywhere in range or reconnect power. The range could causes the racks to 60 minutes. If the range is pulled away from the wall for 30 to become stuck. For more difficult soils and built-up grease, apply a liquid detergent directly onto the soil. DO NOT use a steel-wool pad; Plug...
... anywhere in range or reconnect power. The range could causes the racks to 60 minutes. If the range is pulled away from the wall for 30 to become stuck. For more difficult soils and built-up grease, apply a liquid detergent directly onto the soil. DO NOT use a steel-wool pad; Plug...
Owner's Manual (English)
Page 33
... step, clean with clear water and wipe the cooktop surface with a damp paper towel as if you were cleaning a window. Hold the scraper at approximately a 30˚ angle to slide pots and pans across the cooktop surface. • Do not use a dull or nicked blade. Be careful not to the cooktop...
... step, clean with clear water and wipe the cooktop surface with a damp paper towel as if you were cleaning a window. Hold the scraper at approximately a 30˚ angle to slide pots and pans across the cooktop surface. • Do not use a dull or nicked blade. Be careful not to the cooktop...
Specification (English)
Page 2
...1/4" 181 lbs / 205 lbs 33" x 30" x 51" 108 units UPC CODE LRE30757SW LRE30757SB LRE30757ST 1 Year Parts and Labor (In Home Service) 5 Years Limited on testing results comparing standard LG convection range to keep already cooked foods at right for measurements) A C B D LG ELECTRONICS INC. 1000 Sylvan Ave., Englewood Cliffs,... steel for a striking presentation. of Rack Positions No. LG Design and Life's Good are property of their respective owners. Dual Convection System Twin Fan and dual heating elements delivers a 30% faster preheat time* and insures even heat distribution for ...
...1/4" 181 lbs / 205 lbs 33" x 30" x 51" 108 units UPC CODE LRE30757SW LRE30757SB LRE30757ST 1 Year Parts and Labor (In Home Service) 5 Years Limited on testing results comparing standard LG convection range to keep already cooked foods at right for measurements) A C B D LG ELECTRONICS INC. 1000 Sylvan Ave., Englewood Cliffs,... steel for a striking presentation. of Rack Positions No. LG Design and Life's Good are property of their respective owners. Dual Convection System Twin Fan and dual heating elements delivers a 30% faster preheat time* and insures even heat distribution for ...