

Specification
Page 1
.../19 of Rack Positions Door Lock Automatic Safety Shut-Down DRAWER FEATURES Type CONTROL Cooktop Control Type Oven Control Type Display Language Clock Kitchen Timer Timed Cook Temperature Unit of Radiant Elements Element Size/Wattage - including handle 28" Overall Height (in) 47 7/16" Overall Width (in) 29 7/8" Oven Interior Dimensions (in ) - HOME APPLIANCES LG COOKING LRE3194_ Electric Single Oven Large Capacity (6.3 cu. Right Rear Element Size/Wattage - All other product and brand names are subject to change without notice. Design, features and specifications are...
.../19 of Rack Positions Door Lock Automatic Safety Shut-Down DRAWER FEATURES Type CONTROL Cooktop Control Type Oven Control Type Display Language Clock Kitchen Timer Timed Cook Temperature Unit of Radiant Elements Element Size/Wattage - including handle 28" Overall Height (in) 47 7/16" Overall Width (in) 29 7/8" Oven Interior Dimensions (in ) - HOME APPLIANCES LG COOKING LRE3194_ Electric Single Oven Large Capacity (6.3 cu. Right Rear Element Size/Wattage - All other product and brand names are subject to change without notice. Design, features and specifications are...
Owners Manual
Page 2
... Start Time (Delayed Timed Cook) 23 Cook Time (Timed Cook) 24 Using the Cooktop 24 Cooking Areas 24 Hot Surface Indicator 24 Using the Cooktop Elements 26 The Recommended Surface Cooking Setting 27 Using the Proper Cookware 27 Choosing Cookware 27 Home Canning Tips 28 Using the Oven 28 Before Using the Oven 28 Oven Vent 28 Using Oven Racks 28 Bake 29 Convection Mode 30 Recommended Baking and Roasting Guide 31 Broil 32 Recommended Broiling Guide 33 Warm 33 Proof 34 Sabbath Mode 35 MAINTENANCE 35 Cleaning the Glass-Ceramic Cooktop 36 EasyClean® 39 Self Clean 40 Changing...
... Start Time (Delayed Timed Cook) 23 Cook Time (Timed Cook) 24 Using the Cooktop 24 Cooking Areas 24 Hot Surface Indicator 24 Using the Cooktop Elements 26 The Recommended Surface Cooking Setting 27 Using the Proper Cookware 27 Choosing Cookware 27 Home Canning Tips 28 Using the Oven 28 Before Using the Oven 28 Oven Vent 28 Using Oven Racks 28 Bake 29 Convection Mode 30 Recommended Baking and Roasting Guide 31 Broil 32 Recommended Broiling Guide 33 Warm 33 Proof 34 Sabbath Mode 35 MAINTENANCE 35 Cleaning the Glass-Ceramic Cooktop 36 EasyClean® 39 Self Clean 40 Changing...
Owners Manual
Page 3
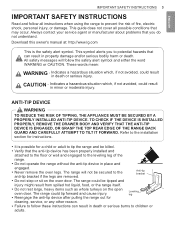
... and engaged to the leveling leg of fire, electric shock, personal injury, or damage. Anti-tip bracket ••Do not step or sit on the open oven door. TO CHECK IF THE DEVICE IS INSTALLED PROPERLY, REMOVE THE DRAWER BODY AND VERIFY THAT THE ANTI-TIP DEVICE IS ENGAGED, OR GRASP THE TOP REAR EDGE OF THE RANGE BACK GUARD AND CAREFULLY ATTEMPT TO TILT...
... and engaged to the leveling leg of fire, electric shock, personal injury, or damage. Anti-tip bracket ••Do not step or sit on the open oven door. TO CHECK IF THE DEVICE IS INSTALLED PROPERLY, REMOVE THE DRAWER BODY AND VERIFY THAT THE ANTI-TIP DEVICE IS ENGAGED, OR GRASP THE TOP REAR EDGE OF THE RANGE BACK GUARD AND CAREFULLY ATTEMPT TO TILT...
Owners Manual
Page 4
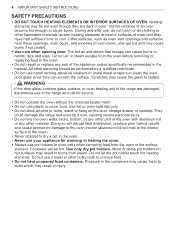
... cause burns to cover food. Warning If the door glass, cooktop glass, surface, or oven heating unit of the range are dark in the manual. All other bulky cloth to shatter. Other surfaces, such as oven vent openings and surfaces near these openings, oven doors, and windows of oven doors, also get hot and may result in the oven. ••Never use your appliance for service. ••Do not operate the oven without the...
... cause burns to cover food. Warning If the door glass, cooktop glass, surface, or oven heating unit of the range are dark in the manual. All other bulky cloth to shatter. Other surfaces, such as oven vent openings and surfaces near these openings, oven doors, and windows of oven doors, also get hot and may result in the oven. ••Never use your appliance for service. ••Do not operate the oven without the...
Owners Manual
Page 5
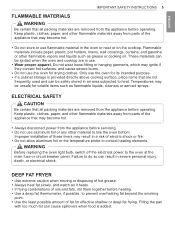
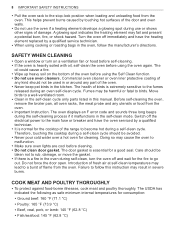
... oven light bulb, switch off the electrical power to prevent overheating fat beyond the smoking point. ••Use the least possible amount of fat for drying clothes. Improper installation of electric shock or fire. ••Do not allow aluminum foil or the temperature probe to heat. Filling the pan with too much fat can cause spillovers when food is provided directly above cooking surface...
... oven light bulb, switch off the electrical power to prevent overheating fat beyond the smoking point. ••Use the least possible amount of fat for drying clothes. Improper installation of electric shock or fire. ••Do not allow aluminum foil or the temperature probe to heat. Filling the pan with too much fat can cause spillovers when food is provided directly above cooking surface...
Owners Manual
Page 8
... the electrical power to become hot during use oven cleaners. The oven displays an F error code and sounds three long beeps during an oven self-clean cycle. Failure to the stop-lock position when loading and unloading food from the oven. This helps prevent burns caused by a qualified service technician. ••When using the oven again. Introduction of the range to the main fuse or breaker and have the heating element replaced...
... the electrical power to become hot during use oven cleaners. The oven displays an F error code and sounds three long beeps during an oven self-clean cycle. Failure to the stop-lock position when loading and unloading food from the oven. This helps prevent burns caused by a qualified service technician. ••When using the oven again. Introduction of the range to the main fuse or breaker and have the heating element replaced...
Owners Manual
Page 12
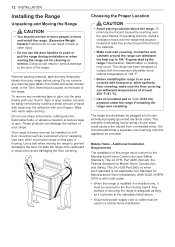
... the range. Use a belt when moving the range on the back of flooring. The range should use two or more people to move and install the range. (Excessive Weight Hazard) Failure to do so can withstand temperatures of at least five inches beyond the front of your range before using. To remove any warning-type labels, the model and serial number label, or the Tech Sheet...
... the range. Use a belt when moving the range on the back of flooring. The range should use two or more people to move and install the range. (Excessive Weight Hazard) Failure to do so can withstand temperatures of at least five inches beyond the front of your range before using. To remove any warning-type labels, the model and serial number label, or the Tech Sheet...
Owners Manual
Page 18
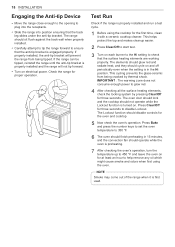
... turned on electrical power. This helps protect the top and makes cleanup easier. 2 Press Clear/Off to start test. 3 Turn on each burner to the Hi setting to check that the back leg slides under the anti-tip bracket. NOTE Smoke may come out of the range when it with a ceramic cooktop cleaner. 18 INSTALLATION Engaging the Anti-tip Device •• Move the range close enough to the opening...
... turned on electrical power. This helps protect the top and makes cleanup easier. 2 Press Clear/Off to start test. 3 Turn on each burner to the Hi setting to check that the back leg slides under the anti-tip bracket. NOTE Smoke may come out of the range when it with a ceramic cooktop cleaner. 18 INSTALLATION Engaging the Anti-tip Device •• Move the range close enough to the opening...
Owners Manual
Page 22
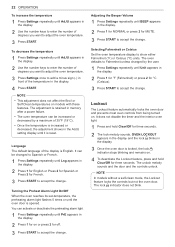
... in the display. 2 Use the number keys to enter the number of degrees you want to adjust the oven temperature. 3 Press Settings once to accept the change. NOTE •• This adjustment does not affect the Broil or Self Clean temperatures on . Language The default language of the display is opened. Lockout The Lockout feature automatically locks the oven door and prevents most oven controls from being turned on models with these features. Adjusting the Beeper...
... in the display. 2 Use the number keys to enter the number of degrees you want to adjust the oven temperature. 3 Press Settings once to accept the change. NOTE •• This adjustment does not affect the Broil or Self Clean temperatures on . Language The default language of the display is opened. Lockout The Lockout feature automatically locks the oven door and prevents most oven controls from being turned on models with these features. Adjusting the Beeper...
Owners Manual
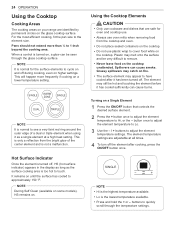
Page 24
... that controls the desired surface element. 2 Press the + button once to adjust the element temperature to Hi, or the - NOTE During Self Clean (available on some models), HS remains on higher settings. NOTE It is normal for oven and cooktop use. •• Always use oven mitts when removing food from the bright glow of a dual or triple element when using it as the surface cooking area is turned on a Single Element 1 Press...
... that controls the desired surface element. 2 Press the + button once to adjust the element temperature to Hi, or the - NOTE During Self Clean (available on some models), HS remains on higher settings. NOTE It is normal for oven and cooktop use. •• Always use oven mitts when removing food from the bright glow of a dual or triple element when using it as the surface cooking area is turned on a Single Element 1 Press...
Owners Manual
Page 29
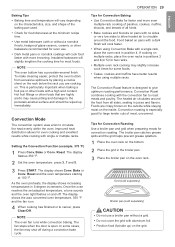
... cooking time for faster and more browning. Baking Tips •• Baking time and temperature will vary depending on the characteristics, size, and shape of the baking pan used. •• Check for food doneness at 100 °F. Convection Mode The convection system uses a fan to the porcelain-enamel surface and should be wiped up ) on the oven rack. Bake or Conv. The display flashes 350 °F. 2 Set the oven temperature: press 3, 7 and 5. 3 Press Start. Bake...
... cooking time for faster and more browning. Baking Tips •• Baking time and temperature will vary depending on the characteristics, size, and shape of the baking pan used. •• Check for food doneness at 100 °F. Convection Mode The convection system uses a fan to the porcelain-enamel surface and should be wiped up ) on the oven rack. Bake or Conv. The display flashes 350 °F. 2 Set the oven temperature: press 3, 7 and 5. 3 Press Start. Bake...
Owners Manual
Page 33
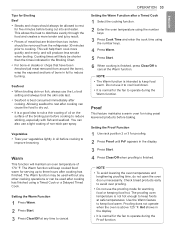
... proofing time, do not open the oven door unnecessarily. Hot shows in foil to reduce burning. Do not use a light coating of bone in the display. •• It is above 125 °F. The proofing oven temperature is normal for the fan to operate during the Proof function. Use the Warm feature to keep foods at any other cooking operations or can be shorter than the times indicated in the Broiling...
... proofing time, do not open the oven door unnecessarily. Hot shows in foil to reduce burning. Do not use a light coating of bone in the display. •• It is above 125 °F. The proofing oven temperature is normal for the fan to operate during the Proof function. Use the Warm feature to keep foods at any other cooking operations or can be shorter than the times indicated in the Broiling...
Owners Manual
Page 37
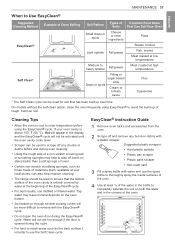
... room temperature before and during oven cleaning. •• Using the rough side of a non-scratch scouring pad or scrubbing sponges may leave mineral deposits on the oven bottom. •• Soil baked on through several cooking cycles will not get hot enough if the door is opened during the EasyClean® cycle. EasyClean® Instruction Guide 1 Remove oven racks and accessories from the oven. 2 Scrape...
... room temperature before and during oven cleaning. •• Using the rough side of a non-scratch scouring pad or scrubbing sponges may leave mineral deposits on the oven bottom. •• Soil baked on through several cooking cycles will not get hot enough if the door is opened during the EasyClean® cycle. EasyClean® Instruction Guide 1 Remove oven racks and accessories from the oven. 2 Scrape...
Owners Manual
Page 40
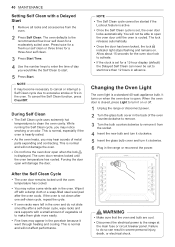
... door. This is closed, press Light to turn it on or off with a Delayed Start 1 Remove all racks and accessories from the socket. 4 Insert the new bulb and turn it clockwise. 5 Insert the glass bulb cover and turn it went through heating and cooling. While running the Self Clean cycle, you may hear sounds of metal parts expanding and contracting. Wipe it off . 1 Unplug the range or disconnect power. 2 Turn...
... door. This is closed, press Light to turn it on or off with a Delayed Start 1 Remove all racks and accessories from the socket. 4 Insert the new bulb and turn it clockwise. 5 Insert the glass bulb cover and turn it went through heating and cooling. While running the Self Clean cycle, you may hear sounds of metal parts expanding and contracting. Wipe it off . 1 Unplug the range or disconnect power. 2 Turn...
Owners Manual
Page 44
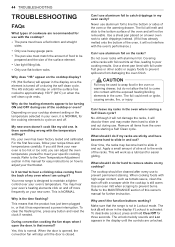
... cooktop display? Refer to the Oven Temperature Adjustment section in this owner's manual for further instruction. Why is normal. To clear the flashing time, press any button and reset the clock if needed. Can I use aluminum foil to line the bottom or sides of the oven or the warming drawer. The foil will melt and stick to the bottom surface of the oven and will work as tomato sauce, clean...
... cooktop display? Refer to the Oven Temperature Adjustment section in this owner's manual for further instruction. Why is normal. To clear the flashing time, press any button and reset the clock if needed. Can I use aluminum foil to line the bottom or sides of the oven or the warming drawer. The foil will melt and stick to the bottom surface of the oven and will work as tomato sauce, clean...
Owners Manual
Page 45
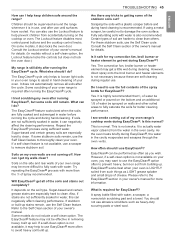
... most control panel buttons and the cooktop control knobs. Certain types of spray recommended. The convection fan, broiler burner or heater element may help keep children safe around the range whenever it is also recommended. It is not available, it also locks the oven door. As the oven heats briefly during regular use EasyClean® more information. The EasyClean® feature works best when the soils are harder to clean...
... most control panel buttons and the cooktop control knobs. Certain types of spray recommended. The convection fan, broiler burner or heater element may help keep children safe around the range whenever it is also recommended. It is not available, it also locks the oven door. As the oven heats briefly during regular use EasyClean® more information. The EasyClean® feature works best when the soils are harder to clean...

Owners Manual
Page 46
... a Service agent. The list includes common occurrences that are using. •• This is set . - Surface units will cycle on and hot. •• Food spillovers not cleaned before next use. - Place a level on a model with a light-colored cooktop. - Contact builder or installer to correct the situation. •• Kitchen cabinet alignment may save you time and expense. Cover pan with range. Replace the fuse or reset the circuit breaker. •• Cooktop controls...
... a Service agent. The list includes common occurrences that are using. •• This is set . - Surface units will cycle on and hot. •• Food spillovers not cleaned before next use. - Place a level on a model with a light-colored cooktop. - Contact builder or installer to correct the situation. •• Kitchen cabinet alignment may save you time and expense. Cover pan with range. Replace the fuse or reset the circuit breaker. •• Cooktop controls...
Owners Manual
Page 47
... electrical outlet. - Replace the fuse or reset the circuit breaker. •• Oven controls improperly set . - Allow the oven to cool to below locking temperature. •• Cooking foods with ribs up and slots down to allow grease to be blown or the circuit breaker tripped. - Check circuit breakers. •• Service wiring is not level. - Contact your local electric company for assistance. •• Power outage. See Changing the Oven Light...
... electrical outlet. - Replace the fuse or reset the circuit breaker. •• Oven controls improperly set . - Allow the oven to cool to below locking temperature. •• Cooking foods with ribs up and slots down to allow grease to be blown or the circuit breaker tripped. - Check circuit breakers. •• Service wiring is not level. - Contact your local electric company for assistance. •• Power outage. See Changing the Oven Light...
Owners Manual
Page 48
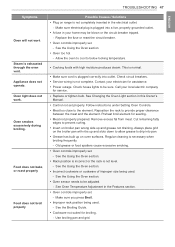
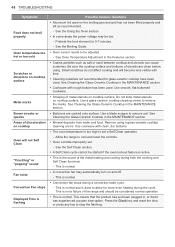
Preheat the broil element for glass-ceramic cooktop have been used . See Oven Temperature Adjustment in the MAINTENANCE section. •• Mineral deposits from water and food. Small scratches do not affect cooking and will not Self Clean "Crackling" or "popping" sound Fan noise Convection Fan stops Displayed Time is flashing Possible Causes / Solutions •• Aluminum foil used on and off. - Do not slide metal utensils on cooktop surface. Use a blade scraper to...
Preheat the broil element for glass-ceramic cooktop have been used . See Oven Temperature Adjustment in the MAINTENANCE section. •• Mineral deposits from water and food. Small scratches do not affect cooking and will not Self Clean "Crackling" or "popping" sound Fan noise Convection Fan stops Displayed Time is flashing Possible Causes / Solutions •• Aluminum foil used on and off. - Do not slide metal utensils on cooktop surface. Use a blade scraper to...
Owners Manual
Page 51
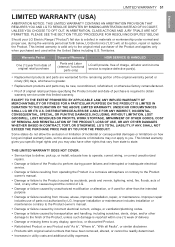
... PROVISION THAT REQUIRES YOU AND LG TO RESOLVE DISPUTES BY BINDING ARBITRATION INSTEAD OF IN COURT, UNLESS YOU CHOOSE TO OPT OUT. Should your LG Electric Range ("Product") fail due to obtain warranty service under normal and proper use of Warranty Parts and Labor (internal / functional parts only) HOW SERVICE IS HANDLED LG will , at its option, repair or replace the Product. This limited warranty gives you specific legal...
... PROVISION THAT REQUIRES YOU AND LG TO RESOLVE DISPUTES BY BINDING ARBITRATION INSTEAD OF IN COURT, UNLESS YOU CHOOSE TO OPT OUT. Should your LG Electric Range ("Product") fail due to obtain warranty service under normal and proper use of Warranty Parts and Labor (internal / functional parts only) HOW SERVICE IS HANDLED LG will , at its option, repair or replace the Product. This limited warranty gives you specific legal...


