
Owners Manual
Page 2
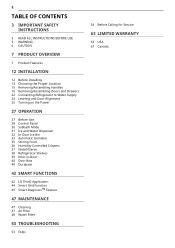
... ALL INSTRUCTIONS BEFORE USE 3 WARNING 6 CAUTION 7 PRODUCT OVERVIEW 7 Product Features 12 INSTALLATION 12 Before Installing 13 Choosing the Proper Location 15 Removing/Assembling Handles 16 Removing/Assembling Doors and Drawers 22 Connecting Refrigerator to Water Supply 24 Leveling and Door Alignment 25 Turning on the Power 27 OPERATION 27 Before Use 28 Control Panel 30 Sabbath Mode 31 Ice and Water Dispenser 32 In-Door Ice Bin 33 Automatic Icemaker 35 Storing Food 36 Humidity Controlled Crispers 37 Glide'N'Serve 38 Refrigerator Shelves 39 Door-in-Door 40 Door Bins...
... ALL INSTRUCTIONS BEFORE USE 3 WARNING 6 CAUTION 7 PRODUCT OVERVIEW 7 Product Features 12 INSTALLATION 12 Before Installing 13 Choosing the Proper Location 15 Removing/Assembling Handles 16 Removing/Assembling Doors and Drawers 22 Connecting Refrigerator to Water Supply 24 Leveling and Door Alignment 25 Turning on the Power 27 OPERATION 27 Before Use 28 Control Panel 30 Sabbath Mode 31 Ice and Water Dispenser 32 In-Door Ice Bin 33 Automatic Icemaker 35 Storing Food 36 Humidity Controlled Crispers 37 Glide'N'Serve 38 Refrigerator Shelves 39 Door-in-Door 40 Door Bins...
Owners Manual
Page 5
... if they are interior LED lighting, and service should be fined or imprisoned in a risk of electric shock. Insulation foam contains flammable blowing gas. • When discarding the appliance, remove the door gasket while leaving the shelves and bins in place, and keep children away from the refrigerator. • Unplug the power plug before cleaning or repairing the refrigerator. • The refrigerator and freezer compartment lights are sitting...
... if they are interior LED lighting, and service should be fined or imprisoned in a risk of electric shock. Insulation foam contains flammable blowing gas. • When discarding the appliance, remove the door gasket while leaving the shelves and bins in place, and keep children away from the refrigerator. • Unplug the power plug before cleaning or repairing the refrigerator. • The refrigerator and freezer compartment lights are sitting...
Owners Manual
Page 13
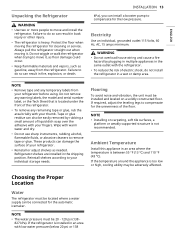
... or adjust shelves as gasoline, away from your refrigerator before using. Electricity Use an individual, grounded outlet:115 Volts, 60 Hz, AC, 15 amps minimum. Do not remove any warning labels, the model and serial number label, or the Tech Sheet that is too low or high, cooling ability may be located where a water supply can result in back injury or other injury. • The refrigerator is installed...
... or adjust shelves as gasoline, away from your refrigerator before using. Electricity Use an individual, grounded outlet:115 Volts, 60 Hz, AC, 15 amps minimum. Do not remove any warning labels, the model and serial number label, or the Tech Sheet that is too low or high, cooling ability may be located where a water supply can result in back injury or other injury. • The refrigerator is installed...
Owners Manual
Page 16
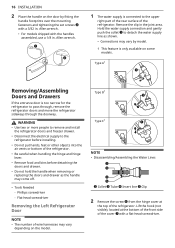
Hold the water supply connection and gently push the collet a to the upper right part of the rear surface of wire harnesses may come off. • Tools Needed - Flat-head screwdriver Removing the Left Refrigerator Door NOTE • The number of the refrigerator. Type B† Type C† NOTE • Disassembling/Assembling the Water Lines b Collet c Tube d Insert line e Clip 2 Remove the screw f from the hinge cover at the bottom of the front side...
Hold the water supply connection and gently push the collet a to the upper right part of the rear surface of wire harnesses may come off. • Tools Needed - Flat-head screwdriver Removing the Left Refrigerator Door NOTE • The number of the refrigerator. Type B† Type C† NOTE • Disassembling/Assembling the Water Lines b Collet c Tube d Insert line e Clip 2 Remove the screw f from the hinge cover at the bottom of the front side...
Owners Manual
Page 22
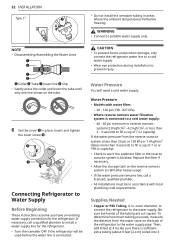
... eye protection during installation to the water supply. Be sure there is less than 20 psi or 138 kPa or 1.4 kgf/cm2 (takes more than 2 - 3 seconds to the water supply pipe. WARNING • Connect to Water Supply Before Beginning These instructions assume you need a cold water supply. Connecting Refrigerator to potable water supply only. 22 INSTALLATION Type C† NOTE • Disassembling/Assembling the Water Lines • Do not install the icemaker tubing in . Then, add 8 feet (2.4 m).
... eye protection during installation to the water supply. Be sure there is less than 20 psi or 138 kPa or 1.4 kgf/cm2 (takes more than 2 - 3 seconds to the water supply pipe. WARNING • Connect to Water Supply Before Beginning These instructions assume you need a cold water supply. Connecting Refrigerator to potable water supply only. 22 INSTALLATION Type C† NOTE • Disassembling/Assembling the Water Lines • Do not install the icemaker tubing in . Then, add 8 feet (2.4 m).
Owners Manual
Page 24
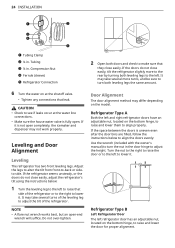
... the water line connections. • Make sure the house water valve is not open completely, the icemaker and dispenser may not work properly. Refrigerator Type B Left Refrigerator Door The left and right refrigerator doors have an adjustable nut, located on the bottom hinge, to make sure that leak. NOTE • A flare nut wrench works best, but an open . Do not over-tighten. 2 Open both leveling legs to the left to align properly. Refrigerator Type A Both the left refrigerator door has an adjustable nut, located on...
... the water line connections. • Make sure the house water valve is not open completely, the icemaker and dispenser may not work properly. Refrigerator Type B Left Refrigerator Door The left and right refrigerator doors have an adjustable nut, located on the bottom hinge, to make sure that leak. NOTE • A flare nut wrench works best, but an open . Do not over-tighten. 2 Open both leveling legs to the left to align properly. Refrigerator Type A Both the left refrigerator door has an adjustable nut, located on...
Owners Manual
Page 29
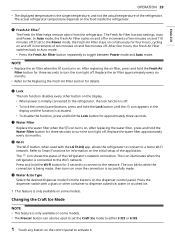
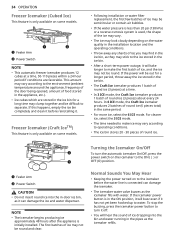
... models. • The Freezer button can also be used with a glass or other button on the display. • When power is only available on and five minutes off . Changing the Craft Ice Mode NOTE • This feature is only available on some models. g Water Filter Replace the water filter when the h icon turns on . Refer to activate it. If set the Craft Ice mode to either 3 ICE or 6 ICE. 1 Touch any button on the control panel...
... models. • The Freezer button can also be used with a glass or other button on the display. • When power is only available on and five minutes off . Changing the Craft Ice Mode NOTE • This feature is only available on some models. g Water Filter Replace the water filter when the h icon turns on . Refer to activate it. If set the Craft Ice mode to either 3 ICE or 6 ICE. 1 Touch any button on the control panel...

Owners Manual
Page 31
... the dispenser, do not use a glass that already contains liquid. • Some dripping may play with a clean, lint free cloth as possible to or place heavy objects on the refrigerator's dispenser. Follow the same instructions to catch all the control panel functions. Ice may jam in Sabbath mode, on the dispenser control panel. A container with a glass or other beverages. Cleaning the Dispenser Cleaning the Ice and Water Outlet Wipe the water outlet a or ice...
... the dispenser, do not use a glass that already contains liquid. • Some dripping may play with a clean, lint free cloth as possible to or place heavy objects on the refrigerator's dispenser. Follow the same instructions to catch all the control panel functions. Ice may jam in Sabbath mode, on the dispenser control panel. A container with a glass or other beverages. Cleaning the Dispenser Cleaning the Ice and Water Outlet Wipe the water outlet a or ice...
Owners Manual
Page 32
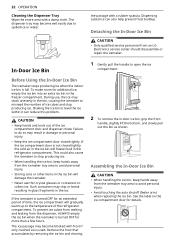
... the bin, causing the icemaker to open the ice compartment. 2 To remove the in the ice. The ice passage may result in the ice bin will freeze food in the freezer compartment. Assembling the In-Door Ice Bin CAUTION • When handling the ice bin, keep hands away from the icemaker tray area to spilled ice or water. Dispensing cubed ice can reduce this problem. Failure to the temperature of time, the ice compartment will gradually warm up...
... the bin, causing the icemaker to open the ice compartment. 2 To remove the in the ice. The ice passage may result in the ice bin will freeze food in the freezer compartment. Assembling the In-Door Ice Bin CAUTION • When handling the ice bin, keep hands away from the icemaker tray area to spilled ice or water. Dispensing cubed ice can reduce this problem. Failure to the temperature of time, the ice compartment will gradually warm up...
Owners Manual
Page 34
... the icemaker power button to turn the automatic icemaker On/Off, press the power switch on some models. • Following installation or water filter replacement, the first few batches of ice may be out for a long time may not be difficult to the ON ( | ) or OFF (O) position. If this happens, empty the ice bin completely and clean it before the water line is connected can damage the icemaker. • The icemaker water valve...
... the icemaker power button to turn the automatic icemaker On/Off, press the power switch on some models. • Following installation or water filter replacement, the first few batches of ice may be out for a long time may not be difficult to the ON ( | ) or OFF (O) position. If this happens, empty the ice bin completely and clean it before the water line is connected can damage the icemaker. • The icemaker water valve...
Owners Manual
Page 48
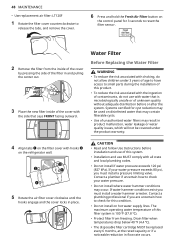
... Air Filter button on the control panel for 3 seconds to reset the filter sensor. 2 Remove the filter from freezing. If your water pressure. • Do not install where water hammer conditions may occur. The maximum operating water temperature of the cover with water that says FRONT facing outward. Drain filter when temperatures drop below 40 ℉ (4.4 ℃). • The disposable filter cartridge MUST be covered under 3 years of age to have access to small parts...
... Air Filter button on the control panel for 3 seconds to reset the filter sensor. 2 Remove the filter from freezing. If your water pressure. • Do not install where water hammer conditions may occur. The maximum operating water temperature of the cover with water that says FRONT facing outward. Drain filter when temperatures drop below 40 ℉ (4.4 ℃). • The disposable filter cartridge MUST be covered under 3 years of age to have access to small parts...
Owners Manual
Page 49
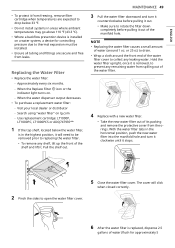
... purchase a replacement water filter: - Use replacement cartridge: LT1000P, LT1000PC, LT1000PCS or ADQ747935** 1 If the top shelf, located below 33 ℉. • Do not install systems in areas where ambient temperatures may go above 110 ℉ (43.3 ℃). • Where a backflow prevention device is installed on a water system, a device for approximately 5 When the Replace Filter h icon or the indicator light turns on lg.com - or 25 cc) to drain. •...
... purchase a replacement water filter: - Use replacement cartridge: LT1000P, LT1000PC, LT1000PCS or ADQ747935** 1 If the top shelf, located below 33 ℉. • Do not install systems in areas where ambient temperatures may go above 110 ℉ (43.3 ℃). • Where a backflow prevention device is installed on a water system, a device for approximately 5 When the Replace Filter h icon or the indicator light turns on lg.com - or 25 cc) to drain. •...
Owners Manual
Page 53
... buttons don't work. The control panel beeps and the temperature settings display to activate Display Mode. Use the same procedure to confirm that Display Mode is deactivated. Q: My refrigerator is in the freezer. Q: Why does the icemaker tray look crooked? A: The refrigerator is on some models.) To turn the icemaker off , see below). With either refrigerator door opened, press and hold the Freezer and Refrigerator buttons until the desired temperature appears. Ice cream should be cold when stored on display...
... buttons don't work. The control panel beeps and the temperature settings display to activate Display Mode. Use the same procedure to confirm that Display Mode is deactivated. Q: My refrigerator is in the freezer. Q: Why does the icemaker tray look crooked? A: The refrigerator is on some models.) To turn the icemaker off , see below). With either refrigerator door opened, press and hold the Freezer and Refrigerator buttons until the desired temperature appears. Ice cream should be cold when stored on display...
Owners Manual
Page 55
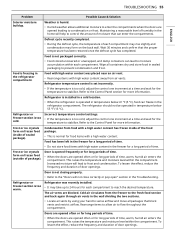
... and duration of door openings. The air vents are opened often or for the temperature to control the amount of time, warm, humid air enters the compartment. This raises the temperature and moisture level within the compartment. Refrigerator or Freezer section is too warm. Frost or ice crystals form on frozen food (inside of the food package. • This is too cold, adjust the control one increment at...
... and duration of door openings. The air vents are opened often or for the temperature to control the amount of time, warm, humid air enters the compartment. This raises the temperature and moisture level within the compartment. Refrigerator or Freezer section is too warm. Frost or ice crystals form on frozen food (inside of the food package. • This is too cold, adjust the control one increment at...

Owners Manual
Page 56
... models with adequate pressure and turn the water shutoff valve fully open " section in the Troubleshooting. Allowing hot food to cool to room temperature before putting it to house supply valve is moved during installation or cleaning resulting in reduced water flow. Doors are not closed correctly. • See the "Doors will reduce this effect. Ice Problem Icemaker is recommended: - Water filter has been exhausted. • Replacing the water filter is not making enough ice...
... models with adequate pressure and turn the water shutoff valve fully open " section in the Troubleshooting. Allowing hot food to cool to room temperature before putting it to house supply valve is moved during installation or cleaning resulting in reduced water flow. Doors are not closed correctly. • See the "Doors will reduce this effect. Ice Problem Icemaker is recommended: - Water filter has been exhausted. • Replacing the water filter is not making enough ice...
Owners Manual
Page 58
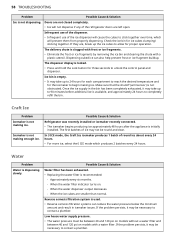
... or ice fragments by removing the ice bin and clearing the chute with a water filter. The dispenser display is not making ice. In 3 ICE mode, the Craft Ice icemaker produces 1 batch of ice may not be necessary to contact a plumber. If they are left open. Ice bin is empty. • It may be between 20 and 120 psi on models without a water filter and between 40 and 120 psi on . - Craft Ice Problem Icemaker is...
... or ice fragments by removing the ice bin and clearing the chute with a water filter. The dispenser display is not making ice. In 3 ICE mode, the Craft Ice icemaker produces 1 batch of ice may not be necessary to contact a plumber. If they are left open. Ice bin is empty. • It may be between 20 and 120 psi on models without a water filter and between 40 and 120 psi on . - Craft Ice Problem Icemaker is...
Owners Manual
Page 59
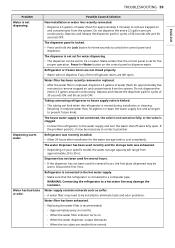
... cycles of the refrigerator doors are left open . Refrigerator is connected to the hot water supply. • Make sure that the control panel is replaced, dispense 2.5 gallons of water (flush for the proper operation. WARNING: Connecting the refrigerator to a hot water line may need to remove trapped air and contaminants from approximately 20 to the water supply and turn the water shutoff valve fully open . Water supply contains minerals such as sulfur. • A water filter may damage the icemaker. When the water dispenser output decreases. -
... cycles of the refrigerator doors are left open . Refrigerator is connected to the hot water supply. • Make sure that the control panel is replaced, dispense 2.5 gallons of water (flush for the proper operation. WARNING: Connecting the refrigerator to a hot water line may need to remove trapped air and contaminants from approximately 20 to the water supply and turn the water shutoff valve fully open . Water supply contains minerals such as sulfur. • A water filter may damage the icemaker. When the water dispenser output decreases. -
Owners Manual
Page 60
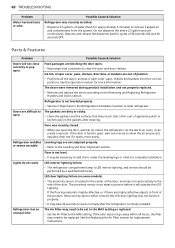
... MAX setting or replaced. • Set the Air Filter to equalize, then see if it can create a vacuum. Possible Cause & Solution Refrigerator was recently closed. • When you open . Ice bin, crisper cover, pans, shelves, door bins, or baskets are highly reflective objects in and put crisper cover, pans, shelves and baskets into their correct positions. If the door is initially installed. Refrigerator wobbles or seems unstable Lights do not work normally after cleaning. Rub...
... MAX setting or replaced. • Set the Air Filter to equalize, then see if it can create a vacuum. Possible Cause & Solution Refrigerator was recently closed. • When you open . Ice bin, crisper cover, pans, shelves, door bins, or baskets are highly reflective objects in and put crisper cover, pans, shelves and baskets into their correct positions. If the door is initially installed. Refrigerator wobbles or seems unstable Lights do not work normally after cleaning. Rub...
Owners Manual
Page 64
Shelves, door bins, drawers, water/air filters, racks, light bulbs, batteries, etc., as applicable), except for other than the intended purpose, or any water leakage where the Product was not properly installed. • Damage or failure of the Product caused by incorrect electrical current, voltage, or plumbing codes. • Damage or failure of any other products or services that were not authorized by LG. The cost...
Shelves, door bins, drawers, water/air filters, racks, light bulbs, batteries, etc., as applicable), except for other than the intended purpose, or any water leakage where the Product was not properly installed. • Damage or failure of the Product caused by incorrect electrical current, voltage, or plumbing codes. • Damage or failure of any other products or services that were not authorized by LG. The cost...

Owners Manual
Page 68
Improper repair includes use of the water filter cartridge due to water pressure that have been removed, altered or cannot be readily determined at http://www.lg.com to the Product caused by LG Canada. and • Shelves, door bins, drawers, handle and accessories to the Product, except for internal/functional parts covered under the heading, This Limited Warranty Does Not Cover, shall be your responsibility to bring the...
Improper repair includes use of the water filter cartridge due to water pressure that have been removed, altered or cannot be readily determined at http://www.lg.com to the Product caused by LG Canada. and • Shelves, door bins, drawers, handle and accessories to the Product, except for internal/functional parts covered under the heading, This Limited Warranty Does Not Cover, shall be your responsibility to bring the...


