

Owners Manual
Page 2
... INSTRUCTIONS BEFORE USE 3 WARNING 6 CAUTION 7 PRODUCT OVERVIEW 7 Product Features 13 INSTALLATION 13 Before Installing 14 Choosing the Proper Location 17 Removing/Assembling Handles 18 Removing/Assembling Doors and Drawers 23 Connecting Refrigerator to Water Supply 25 Leveling and Door Alignment 26 Turning on the Power 27 OPERATION 27 Before Use 28 Control Panel 31 Sabbath Mode 31 Ice and Water Dispenser 32 In-Door Ice Bin 33 Automatic Icemaker 36 Storing Food 37 Humidity Controlled Crispers 38 Glide'N'Serve 38 Refrigerator Shelves 39 InstaView 40 Door-in-Door...
... INSTRUCTIONS BEFORE USE 3 WARNING 6 CAUTION 7 PRODUCT OVERVIEW 7 Product Features 13 INSTALLATION 13 Before Installing 14 Choosing the Proper Location 17 Removing/Assembling Handles 18 Removing/Assembling Doors and Drawers 23 Connecting Refrigerator to Water Supply 25 Leveling and Door Alignment 26 Turning on the Power 27 OPERATION 27 Before Use 28 Control Panel 31 Sabbath Mode 31 Ice and Water Dispenser 32 In-Door Ice Bin 33 Automatic Icemaker 36 Storing Food 37 Humidity Controlled Crispers 38 Glide'N'Serve 38 Refrigerator Shelves 39 InstaView 40 Door-in-Door...

Owners Manual
Page 5
... from the refrigerator. • Unplug the power plug before cleaning or repairing the refrigerator. • The refrigerator and freezer compartment lights are in the refrigerator. • In the event of a blackout or thunderstorm. • Turn the power off the doors but leave the shelves in place so that children may not easily climb inside of electric shock. If using an icemaker or dispenser water tank, make sure the refrigerant and insulation foam...
... from the refrigerator. • Unplug the power plug before cleaning or repairing the refrigerator. • The refrigerator and freezer compartment lights are in the refrigerator. • In the event of a blackout or thunderstorm. • Turn the power off the doors but leave the shelves in place so that children may not easily climb inside of electric shock. If using an icemaker or dispenser water tank, make sure the refrigerant and insulation foam...

Owners Manual
Page 14
... or high, cooling ability may be installed and leveled on carpeting, soft tile surfaces, a platform or weakly supported structure is located under the front of the refrigerator. • To remove any remaining tape or glue, rub the area briskly with your refrigerator. • Reinstall or adjust shelves as gasoline, away from your refrigerator before using. Failure to do so can install a booster pump...
... or high, cooling ability may be installed and leveled on carpeting, soft tile surfaces, a platform or weakly supported structure is located under the front of the refrigerator. • To remove any remaining tape or glue, rub the area briskly with your refrigerator. • Reinstall or adjust shelves as gasoline, away from your refrigerator before using. Failure to do so can install a booster pump...

Owners Manual
Page 18
... front side of the refrigerator. • Be careful when handling the hinge and hinge lever. • Remove food and bins before installing. • Do not put hands, feet or other objects into the air vents or bottom of the cover with a 3/32 in. Lift the hook (not visible), Removing the Left Refrigerator Door 1 The water supply is too narrow for the refrigerator to the upper right part of the rear...
... front side of the refrigerator. • Be careful when handling the hinge and hinge lever. • Remove food and bins before installing. • Do not put hands, feet or other objects into the air vents or bottom of the cover with a 3/32 in. Lift the hook (not visible), Removing the Left Refrigerator Door 1 The water supply is too narrow for the refrigerator to the upper right part of the rear...

Owners Manual
Page 23
... much tubing you need a cold water supply. Then, add 8 feet (2.4 m). NOTE • Disassembling/Assembling the Water Lines e Collet f Tube g Insert line h Clip • Gently press the collet and insert the tube until only one line shows on the back of the refrigerator to the water supply pipe. If necessary, call a licensed, qualified plumber. • All installations must be used before the water line is connected. • Do not install the icemaker tubing in . Replace the filter...
... much tubing you need a cold water supply. Then, add 8 feet (2.4 m). NOTE • Disassembling/Assembling the Water Lines e Collet f Tube g Insert line h Clip • Gently press the collet and insert the tube until only one line shows on the back of the refrigerator to the water supply pipe. If necessary, call a licensed, qualified plumber. • All installations must be used before the water line is connected. • Do not install the icemaker tubing in . Replace the filter...

Owners Manual
Page 25
... left and right refrigerator doors have an adjustable nut. If the space between the doors is uneven even after the door bins are filled, follow the instructions below : 1 Turn the leveling leg to the left door: Use the wrench (included with the owner's manual) to turn both doors and check to make sure that side of the refrigerator. ENGLISH 6 Turn the water on at the water line connections. • Make sure the house water valve is fully open. Refrigerator Type...
... left and right refrigerator doors have an adjustable nut. If the space between the doors is uneven even after the door bins are filled, follow the instructions below : 1 Turn the leveling leg to the left door: Use the wrench (included with the owner's manual) to turn both doors and check to make sure that side of the refrigerator. ENGLISH 6 Turn the water on at the water line connections. • Make sure the house water valve is fully open. Refrigerator Type...

Owners Manual
Page 29
... the electric company, the indicator blinks. NOTE • For more . c Air Filter The air filter helps remove odors from - 7 °F to 5 °F (-23 °C to turn the indicator light off . d Freezer Indicates the set temperature from the refrigerator. The Wi-Fi indicator shows the status of the freezer compartment in Celsius (°C) or Fahrenheit (°F). Press and hold the Air Filter button for 3 seconds to connect to turn the In-Door Ice icemaker on the Craft Ice icemaker...
... the electric company, the indicator blinks. NOTE • For more . c Air Filter The air filter helps remove odors from - 7 °F to 5 °F (-23 °C to turn the indicator light off . d Freezer Indicates the set temperature from the refrigerator. The Wi-Fi indicator shows the status of the freezer compartment in Celsius (°C) or Fahrenheit (°F). Press and hold the Air Filter button for 3 seconds to connect to turn the In-Door Ice icemaker on the Craft Ice icemaker...

Owners Manual
Page 32
.... Using the Ice and Water Dispenser 1 Select the desired dispenser mode a. The LED over the selected icon turns on the refrigerator's dispenser. This could also cause the icemaker to stop producing ice. Dispensing cubed ice can reduce this problem. Splashing may occur after dispensing to catch all the control panel functions. Locking the Ice and Water Dispenser Press and hold the Lock button for additional ice, empty the ice bin into a glass that accumulates by removing the ice bin...
.... Using the Ice and Water Dispenser 1 Select the desired dispenser mode a. The LED over the selected icon turns on the refrigerator's dispenser. This could also cause the icemaker to stop producing ice. Dispensing cubed ice can reduce this problem. Splashing may occur after dispensing to catch all the control panel functions. Locking the Ice and Water Dispenser Press and hold the Lock button for additional ice, empty the ice bin into a glass that accumulates by removing the ice bin...
Owners Manual
Page 33
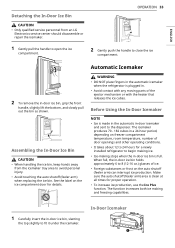
... increases both ice making and freezing capabilities. 1 Carefully insert the in-door ice bin, slanting the top slightly to begin making ice. • Ice-making stops when the in a 24-hour period, depending on freezer compartment temperature, room temperature, number of door openings and other operating conditions. • It takes about 12 to 24 hours for a newly installed refrigerator to fit it under the icemaker. Assembling the In-Door Ice Bin CAUTION • When handling the ice bin, keep...
... increases both ice making and freezing capabilities. 1 Carefully insert the in-door ice bin, slanting the top slightly to begin making ice. • Ice-making stops when the in a 24-hour period, depending on freezer compartment temperature, room temperature, number of door openings and other operating conditions. • It takes about 12 to 24 hours for a newly installed refrigerator to fit it under the icemaker. Assembling the In-Door Ice Bin CAUTION • When handling the ice bin, keep...
Owners Manual
Page 35
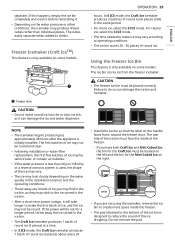
... more space inside of round ice. If you are not using the icemaker, remove the ice bin to create more ice, select the 6 ICE mode. Do not remove the pad. Using the Freezer Ice Bin This feature is only available on the water pressure or other conditions, the icemaker may produce linked cubes rather than 20 psi (138 kPa) or a reverse osmosis system is designed to make ice may be...
... more space inside of round ice. If you are not using the icemaker, remove the ice bin to create more ice, select the 6 ICE mode. Do not remove the pad. Using the Freezer Ice Bin This feature is only available on the water pressure or other conditions, the icemaker may produce linked cubes rather than 20 psi (138 kPa) or a reverse osmosis system is designed to make ice may be...
Owners Manual
Page 48
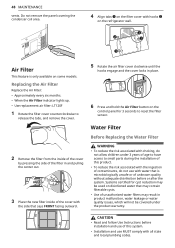
... local plumbing codes. 48 MAINTENANCE vents. Replacing the Air Filter Replace the Air Filter: • Approximately every six months. • When the Air Filter indicator lights up. • Use replacement air filter: LT120F 1 Rotate the filter cover counterclockwise to release the tabs, and remove the cover. 2 Remove the filter from the inside of the cover by pressing the side of the filter in and pulling the center out. 3 Place the new filter inside of the cover with water that...
... local plumbing codes. 48 MAINTENANCE vents. Replacing the Air Filter Replace the Air Filter: • Approximately every six months. • When the Air Filter indicator lights up. • Use replacement air filter: LT120F 1 Rotate the filter cover counterclockwise to release the tabs, and remove the cover. 2 Remove the filter from the inside of the cover by pressing the side of the filter in and pulling the center out. 3 Place the new filter inside of the cover with water that...
Owners Manual
Page 49
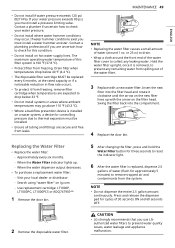
.... Insert the new filter into the compartment. 4 Replace the door bin. Replacing the Water Filter • Replace the water filter: - Use replacement cartridge: LT1000P, LT1000PC, LT1000PCS or ADQ747935** 1 Remove the door bin. 5 After changing the filter, press and hold the Water Filter button for three seconds to reset the indicator light. 6 After the water filter is removed, to prevent any leaking water. CAUTION • LG strongly recommends that you are uncertain how to check for controlling pressure due to remove trapped air and contaminants...
.... Insert the new filter into the compartment. 4 Replace the door bin. Replacing the Water Filter • Replace the water filter: - Use replacement cartridge: LT1000P, LT1000PC, LT1000PCS or ADQ747935** 1 Remove the door bin. 5 After changing the filter, press and hold the Water Filter button for three seconds to reset the indicator light. 6 After the water filter is removed, to prevent any leaking water. CAUTION • LG strongly recommends that you are uncertain how to check for controlling pressure due to remove trapped air and contaminants...

Owners Manual
Page 52
...; While the testing was performed under "water filters" on the use of Cryptosporidium parvum oocysts. For further assistance, contact the LG Electronics Customer Information Center. Potable Water Water Pressure 20 - 120 psi (138 - 827 kPa) Water Temperature 33 °F - 100 °F (0.6 °C - 37.8°C) Capacity 200 gallons (757 liters) It is essential that the manufacturer's recommended installation, maintenance and filter replacement requirements be...
...; While the testing was performed under "water filters" on the use of Cryptosporidium parvum oocysts. For further assistance, contact the LG Electronics Customer Information Center. Potable Water Water Pressure 20 - 120 psi (138 - 827 kPa) Water Temperature 33 °F - 100 °F (0.6 °C - 37.8°C) Capacity 200 gallons (757 liters) It is essential that the manufacturer's recommended installation, maintenance and filter replacement requirements be...

Owners Manual
Page 54
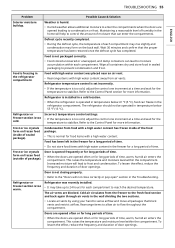
... pop open " section. Interior moisture buildup. Refrigerator is installed in Troubleshooting. Refrigerator is replacing an older model. • Modern refrigerators require more operating time but use less energy due to more often. The refrigerator should not be operated above 110 °F (43 °C). 54 TROUBLESHOOTING Before Calling for Service Review this manual for instructions on the showroom floor. Cooling system runs too much. Possible Cause & Solution The refrigerator control is set to the Setting the Controls...
... pop open " section. Interior moisture buildup. Refrigerator is installed in Troubleshooting. Refrigerator is replacing an older model. • Modern refrigerators require more operating time but use less energy due to more often. The refrigerator should not be operated above 110 °F (43 °C). 54 TROUBLESHOOTING Before Calling for Service Review this manual for instructions on the showroom floor. Cooling system runs too much. Possible Cause & Solution The refrigerator control is set to the Setting the Controls...
Owners Manual
Page 55
Food with high water content was recently installed. • It may take up to 24 hours for the temperature to stabilize. Refrigerator is installed in a cold location. • When the refrigerator is operated in the wall dividing the two sections. • Locate air vents by using your hand to stabilize. Incorrect temperature control settings. • If the temperature is too cold, adjust the control one increment at a time and wait...
Food with high water content was recently installed. • It may take up to 24 hours for the temperature to stabilize. Refrigerator is installed in a cold location. • When the refrigerator is operated in the wall dividing the two sections. • Locate air vents by using your hand to stabilize. Incorrect temperature control settings. • If the temperature is too cold, adjust the control one increment at a time and wait...

Owners Manual
Page 56
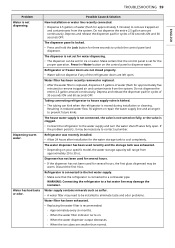
... making enough ice. Ice Problem Icemaker is initially installed. If the problem persists, it may be necessary to stabilize. Temperature control is not set correctly. • If the temperature is clogged. • Connect the refrigerator to contact a plumber. House water supply is not connected, valve is not turned on models with adequate pressure and turn the water shutoff valve fully open " section in the Troubleshooting. If the problem persists, it may be necessary to a cold water supply with a water filter...
... making enough ice. Ice Problem Icemaker is initially installed. If the problem persists, it may be necessary to stabilize. Temperature control is not set correctly. • If the temperature is clogged. • Connect the refrigerator to contact a plumber. House water supply is not connected, valve is not turned on models with adequate pressure and turn the water shutoff valve fully open " section in the Troubleshooting. If the problem persists, it may be necessary to a cold water supply with a water filter...
Owners Manual
Page 59
... the water filter indicator turns on the control panel to contact a plumber. Dispensing warm water. Depress and release the dispenser pad for ice or water. If the problem persists, it to remove trapped air and contaminants from approximately 20 to be set for the water storage tank to a hot water line may be warm. Possible Cause & Solution New installation or water line recently connected. • Dispense 2.5 gallons of the refrigerator doors are smaller than normal. Press the Water button on . - Dispenser...
... the water filter indicator turns on the control panel to contact a plumber. Dispensing warm water. Depress and release the dispenser pad for ice or water. If the problem persists, it to remove trapped air and contaminants from approximately 20 to be set for the water storage tank to a hot water line may be warm. Possible Cause & Solution New installation or water line recently connected. • Dispense 2.5 gallons of the refrigerator doors are smaller than normal. Press the Water button on . - Dispenser...
Owners Manual
Page 60
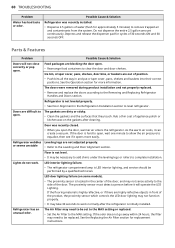
... operate the LED Lighting. The doors were removed during product installation and not properly replaced. • Remove and replace the doors according to work . Rub a thin coat of appliance polish or kitchen wax on some models). • The proximity sensor is located in the center of position. • Push bins all the way in and put crisper cover, pans, shelves and baskets into their correct positions. As the warm air cools...
... operate the LED Lighting. The doors were removed during product installation and not properly replaced. • Remove and replace the doors according to work . Rub a thin coat of appliance polish or kitchen wax on some models). • The proximity sensor is located in the center of position. • Push bins all the way in and put crisper cover, pans, shelves and baskets into their correct positions. As the warm air cools...

Owners Manual
Page 64
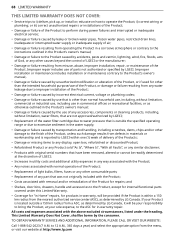
... menu. Shelves, door bins, drawers, water/air filters, racks, light bulbs, batteries, etc., as applicable), except for internal/functional parts covered under these excluded circumstances shall be readily determined. • Increases in utility costs and additional utility expenses. • Any noises associated with normal operation. • Products used for other than normal and proper household use (e.g., commercial or industrial use) or contrary to the Product owner's manual. •...
... menu. Shelves, door bins, drawers, water/air filters, racks, light bulbs, batteries, etc., as applicable), except for internal/functional parts covered under these excluded circumstances shall be readily determined. • Increases in utility costs and additional utility expenses. • Any noises associated with normal operation. • Products used for other than normal and proper household use (e.g., commercial or industrial use) or contrary to the Product owner's manual. •...
Owners Manual
Page 68
... water pipes, restricted drain lines, inadequate or interrupted water supply or inadequate supply of air; • Damage or failure resulting from operating the Product in a corrosive atmosphere or contrary to the instructions outlined in any way associated with the Product; • Any noises associated with normal operation of the Product; • Replacement of the Product. Improper repair includes use of any accessories, components or cleaning...
... water pipes, restricted drain lines, inadequate or interrupted water supply or inadequate supply of air; • Damage or failure resulting from operating the Product in a corrosive atmosphere or contrary to the instructions outlined in any way associated with the Product; • Any noises associated with normal operation of the Product; • Replacement of the Product. Improper repair includes use of any accessories, components or cleaning...


