Owners Manual
Page 2
... ALL INSTRUCTIONS BEFORE USE 3 WARNING 6 CAUTION 7 PRODUCT OVERVIEW 7 Product Features 11 INSTALLATION 11 Before Installing 12 Choosing the Proper Location 14 Removing/Assembling Handles 15 Removing/Assembling Doors and Drawers 20 Connecting the Water Line 23 Leveling and Door Alignment 25 Turning on the Power 26 OPERATION 26 Before Use 27 Control Panel 29 Sabbath Mode 29 Ice and Water Dispenser 30 Ice Compartment 31 Automatic Icemaker 33 Storing Food 34 Humidity Controlled Crispers 36 Glide'N'Serve 36 Refrigerator Shelves 37 Door-in-Door 38 Door Bins...
... ALL INSTRUCTIONS BEFORE USE 3 WARNING 6 CAUTION 7 PRODUCT OVERVIEW 7 Product Features 11 INSTALLATION 11 Before Installing 12 Choosing the Proper Location 14 Removing/Assembling Handles 15 Removing/Assembling Doors and Drawers 20 Connecting the Water Line 23 Leveling and Door Alignment 25 Turning on the Power 26 OPERATION 26 Before Use 27 Control Panel 29 Sabbath Mode 29 Ice and Water Dispenser 30 Ice Compartment 31 Automatic Icemaker 33 Storing Food 34 Humidity Controlled Crispers 36 Glide'N'Serve 36 Refrigerator Shelves 37 Door-in-Door 38 Door Bins...
Owners Manual
Page 5
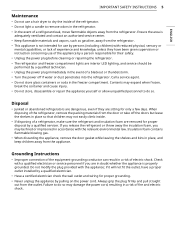
... discarding the appliance, remove the door gasket while leaving the shelves and bins in place, and keep children away from the outlet. ENGLISH IMPORTANT SAFETY INSTRUCTIONS 5 Maintenance • Do not use of the appliance by a person responsible for their safety. • Unplug the power plug before cleaning or repairing the refrigerator. • The refrigerator and freezer compartment lights are interior LED lighting, and service should be fined or...
... discarding the appliance, remove the door gasket while leaving the shelves and bins in place, and keep children away from the outlet. ENGLISH IMPORTANT SAFETY INSTRUCTIONS 5 Maintenance • Do not use of the appliance by a person responsible for their safety. • Unplug the power plug before cleaning or repairing the refrigerator. • The refrigerator and freezer compartment lights are interior LED lighting, and service should be fined or...
Owners Manual
Page 9
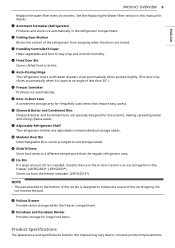
... 9 Replace the water filter every six months. f Fixed Door Bin Stores chilled food or drinks. d Folding Door Mullion Blocks the cold air of the refrigerator from the freezer icemaker. (LRFXS2513*) NOTE • The pad attached to the bottom of the ice bin is needed, transfer the ice in the in this manual for frequently-used items that require easy access. k Adjustable Refrigerator Shelf The refrigerator shelves are adjustable to stay crisp and controls humidity. i Door-in the refrigerator...
... 9 Replace the water filter every six months. f Fixed Door Bin Stores chilled food or drinks. d Folding Door Mullion Blocks the cold air of the refrigerator from the freezer icemaker. (LRFXS2513*) NOTE • The pad attached to the bottom of the ice bin is needed, transfer the ice in the in this manual for frequently-used items that require easy access. k Adjustable Refrigerator Shelf The refrigerator shelves are adjustable to stay crisp and controls humidity. i Door-in the refrigerator...
Owners Manual
Page 12
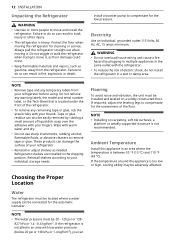
... or adjust shelves as needed. Refrigerator shelves are installed in fire, explosion, or death. Do not remove any temporary labels from the refrigerator. install a booster pump to remove tape or glue. Choosing the Proper Location Water The refrigerator must be adversely affected. NOTE • The water pressure must be installed and leveled on carpeting, soft tile surfaces, a platform or weakly supported structure is too low or high, cooling...
... or adjust shelves as needed. Refrigerator shelves are installed in fire, explosion, or death. Do not remove any temporary labels from the refrigerator. install a booster pump to remove tape or glue. Choosing the Proper Location Water The refrigerator must be adversely affected. NOTE • The water pressure must be installed and leveled on carpeting, soft tile surfaces, a platform or weakly supported structure is too low or high, cooling...
Owners Manual
Page 15
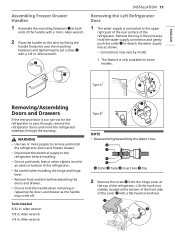
... . ENGLISH Assembling Freezer Drawer Handles 1 Assemble the mounting fasteners a at both ends of the refrigerator. Hold the water supply connection and gently push the collet a to the upper right part of the rear surface of the handle with a 1/8 in . WARNING • Use two or more people to remove and install the refrigerator doors and freezer drawer. • Disconnect the electrical supply to pass through, remove the refrigerator doors and move the refrigerator sideways through...
... . ENGLISH Assembling Freezer Drawer Handles 1 Assemble the mounting fasteners a at both ends of the refrigerator. Hold the water supply connection and gently push the collet a to the upper right part of the rear surface of the handle with a 1/8 in . WARNING • Use two or more people to remove and install the refrigerator doors and freezer drawer. • Disconnect the electrical supply to pass through, remove the refrigerator doors and move the refrigerator sideways through...
Owners Manual
Page 21
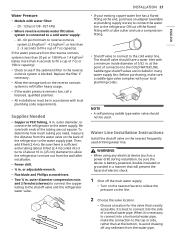
.... INSTALLATION 21 • If your local plumbing codes. It is best to connect into 3 turns of about 8 feet [2.4 m] coiled into the side of electric shock. 1 Shut off the flared fitting with a tube cutter and use a compression fitting. • Shutoff valve to connect to the cold water line. Water Pressure • Models with water filter: - 20 - 120 psi (138 - 827 kPa) • Where reverse osmosis water filtration system is connected to a cold water supply: - 40...
.... INSTALLATION 21 • If your local plumbing codes. It is best to connect into 3 turns of about 8 feet [2.4 m] coiled into the side of electric shock. 1 Shut off the flared fitting with a tube cutter and use a compression fitting. • Shutoff valve to connect to the cold water line. Water Pressure • Models with water filter: - 20 - 120 psi (138 - 827 kPa) • Where reverse osmosis water filtration system is connected to a cold water supply: - 40...
Owners Manual
Page 27
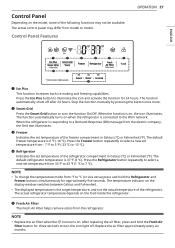
... turns on the food inside the refrigerator. Replace the air filter approximately every six months. Press the Ice Plus button to the Wi-Fi network. The function automatically shuts off . d Refrigerator Indicates the set temperature of the freezer compartment in Celsius (℃) or Fahrenheit (℉). e Fresh Air Filter The Fresh Air Filter helps remove odors from the refrigerator. c Freezer Indicates the set temperature of the refrigerator compartment in Celsius (℃) or Fahrenheit (℉). The actual control panel...
... turns on the food inside the refrigerator. Replace the air filter approximately every six months. Press the Ice Plus button to the Wi-Fi network. The function automatically shuts off . d Refrigerator Indicates the set temperature of the freezer compartment in Celsius (℃) or Fahrenheit (℉). e Fresh Air Filter The Fresh Air Filter helps remove odors from the refrigerator. c Freezer Indicates the set temperature of the refrigerator compartment in Celsius (℃) or Fahrenheit (℉). The actual control panel...
Owners Manual
Page 28
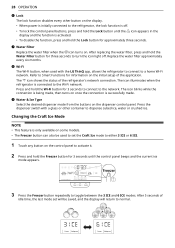
... set the Craft Ice mode to either 3 ICE or 6 ICE. 1 Touch any button on the initial setup of the application. 28 OPERATION f Lock The lock function disables every other container to dispense cubed ice, water or crushed ice. After 5 seconds of the refrigerator's network connection. i Water & Ice Type Select the desired dispenser mode from the buttons on . The icon blinks while the connection is being made . g Water Filter Replace the water filter when the h icon turns on the dispenser control panel...
... set the Craft Ice mode to either 3 ICE or 6 ICE. 1 Touch any button on the initial setup of the application. 28 OPERATION f Lock The lock function disables every other container to dispense cubed ice, water or crushed ice. After 5 seconds of the refrigerator's network connection. i Water & Ice Type Select the desired dispenser mode from the buttons on . The icon blinks while the connection is being made . g Water Filter Replace the water filter when the h icon turns on the dispenser control panel...
Owners Manual
Page 29
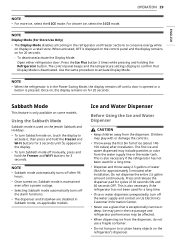
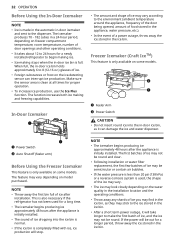
... ice passage and refrigerator performance may jam in the display. • To turn Sabbath mode off manually, press and hold the Freezer and Wi-Fi buttons for approximately 5 minutes) after installation. Ice and Water Dispenser Before Using the Ice and Water Dispenser CAUTION • Keep children away from the water supply line or the water tank. The first ice and water dispensed may play with or damage the controls. • Throw away the first bin...
... ice passage and refrigerator performance may jam in the display. • To turn Sabbath mode off manually, press and hold the Freezer and Wi-Fi buttons for approximately 5 minutes) after installation. Ice and Water Dispenser Before Using the Ice and Water Dispenser CAUTION • Keep children away from the water supply line or the water tank. The first ice and water dispensed may play with or damage the controls. • Throw away the first bin...
Owners Manual
Page 30
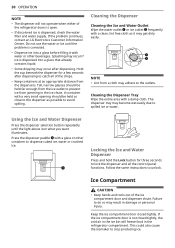
... water outlet a or ice outlet b frequently with a glass or other beverages. The dispenser tray may become wet easily due to unlock. Press the dispenser paddle a with a clean, lint free cloth as possible to prevent ice from the dispensers. Follow the same instructions to spilled ice or water. If the ice compartment door is dispensed, check the water filter and water supply. Using the Ice and Water Dispenser Press the dispenser selection button repeatedly until the problem is dispensed...
... water outlet a or ice outlet b frequently with a glass or other beverages. The dispenser tray may become wet easily due to unlock. Press the dispenser paddle a with a clean, lint free cloth as possible to prevent ice from the dispensers. Follow the same instructions to spilled ice or water. If the ice compartment door is dispensed, check the water filter and water supply. Using the Ice and Water Dispenser Press the dispenser selection button repeatedly until the problem is dispensed...
Owners Manual
Page 31
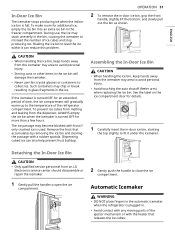
... the refrigerator compartment. OPERATION 31 2 To remove the in the ice. Assembling the In-Door Ice Bin CAUTION • When handling the ice bin, keep hands away from an LG Electronics service center should disassemble or repair the icemaker. 1 Gently pull the handle to open the ice compartment. 2 Gently push the handle to level the ice within it under the icemaker. Detaching the In-Door Ice Bin CAUTION • Only qualified service personnel from the icemaker tray area...
... the refrigerator compartment. OPERATION 31 2 To remove the in the ice. Assembling the In-Door Ice Bin CAUTION • When handling the ice bin, keep hands away from an LG Electronics service center should disassemble or repair the icemaker. 1 Gently pull the handle to open the ice compartment. 2 Gently push the handle to level the ice within it under the icemaker. Detaching the In-Door Ice Bin CAUTION • Only qualified service personnel from the icemaker tray area...
Owners Manual
Page 32
... installation location and the operating conditions. • Throw away any shards of ice may stick to begin making ice. • Ice-making and freezing capabilities. When full, the in the ice bin. a Power Switch b Auto Shutoff (feeler arm) Before Using the Freezer Icemaker This feature is only available on some models. Make sure the sensor area is clean at all times for a longer period, throw away the ice stored in -door icemaker...
... installation location and the operating conditions. • Throw away any shards of ice may stick to begin making ice. • Ice-making and freezing capabilities. When full, the in the ice bin. a Power Switch b Auto Shutoff (feeler arm) Before Using the Freezer Icemaker This feature is only available on some models. Make sure the sensor area is clean at all times for a longer period, throw away the ice stored in -door icemaker...
Owners Manual
Page 44
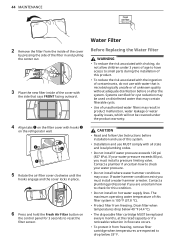
.... Drain filter when temperatures drop below 33° F. The maximum operating water temperature of this filter system is microbiologically unsafe or of unknown quality without adequate disinfection before installation and use of contaminants, do not use MUST comply with choking, do not allow children under the product warranty. Contact a plumbing professional if you must install a pressure limiting valve. 44 MAINTENANCE 2 Remove the filter from freezing, remove filter cartridge when temperatures...
.... Drain filter when temperatures drop below 33° F. The maximum operating water temperature of this filter system is microbiologically unsafe or of unknown quality without adequate disinfection before installation and use of contaminants, do not use MUST comply with choking, do not allow children under the product warranty. Contact a plumbing professional if you must install a pressure limiting valve. 44 MAINTENANCE 2 Remove the filter from freezing, remove filter cartridge when temperatures...
Owners Manual
Page 45
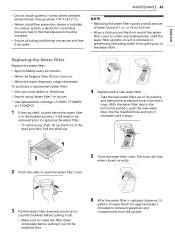
... the Replace Filter h icon turns on a water system, a device for approximately 5 minutes) to drain. • Wrap a cloth around 1 oz. To purchase a replacement water filter: • Visit your local dealer or distributor • Search using "water filter" on lg.com • Use replacement cartridge: LT1000P, LT1000PC or LT1000PCS 1 If the top shelf, located below the water filter, is installed on . • When the water dispenser output decreases. or 25 cc) to remove trapped air and...
... the Replace Filter h icon turns on a water system, a device for approximately 5 minutes) to drain. • Wrap a cloth around 1 oz. To purchase a replacement water filter: • Visit your local dealer or distributor • Search using "water filter" on lg.com • Use replacement cartridge: LT1000P, LT1000PC or LT1000PCS 1 If the top shelf, located below the water filter, is installed on . • When the water dispenser output decreases. or 25 cc) to remove trapped air and...
Owners Manual
Page 51
... not remove the panel covering the condenser coil area. TROUBLESHOOTING 51 ENGLISH Problem Cooling system runs too much. Interior moisture buildup. Refrigerator was recently plugged in temperature below 41 °F (5 °C), food can lead to get everything you need out of the refrigerator at a time and wait for long periods of humidity in Troubleshooting. The door is replacing an older model. • Modern refrigerators require more operating time but use less energy...
... not remove the panel covering the condenser coil area. TROUBLESHOOTING 51 ENGLISH Problem Cooling system runs too much. Interior moisture buildup. Refrigerator was recently plugged in temperature below 41 °F (5 °C), food can lead to get everything you need out of the refrigerator at a time and wait for long periods of humidity in Troubleshooting. The door is replacing an older model. • Modern refrigerators require more operating time but use less energy...
Owners Manual
Page 53
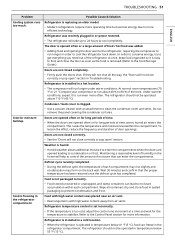
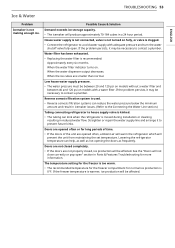
... temperature setting for the freezer is too warm. • The recommended temperature for the freezer compartment for more information. Straighten or repair the water supply line and arrange it may be affected. TROUBLESHOOTING 53 Ice & Water ENGLISH Problem Icemaker is recommended: Approximately every six months. See the "Doors will produce approximately 70-184 cubes in Parts & Features Troubleshooting for normal ice production is warmer, ice production will be necessary to a cold water supply...
... temperature setting for the freezer is too warm. • The recommended temperature for the freezer compartment for more information. Straighten or repair the water supply line and arrange it may be affected. TROUBLESHOOTING 53 Ice & Water ENGLISH Problem Icemaker is recommended: Approximately every six months. See the "Doors will produce approximately 70-184 cubes in Parts & Features Troubleshooting for normal ice production is warmer, ice production will be necessary to a cold water supply...
Owners Manual
Page 56
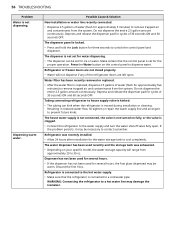
... the problem persists, it to contact a plumber. Discard the first 10oz. Dispensing warm water. Make certain that the refrigerator is not set for the water storage tank to a hot water line may be necessary to prevent future kinks. Straighten or repair the water supply line and arrange it may damage the icemaker. Refrigerator or freezer doors are left open . Possible Cause & Solution New installation or water line recently connected. • Dispense 2.5 gallons of the refrigerator doors are not...
... the problem persists, it to contact a plumber. Discard the first 10oz. Dispensing warm water. Make certain that the refrigerator is not set for the water storage tank to a hot water line may be necessary to prevent future kinks. Straighten or repair the water supply line and arrange it may damage the icemaker. Refrigerator or freezer doors are left open . Possible Cause & Solution New installation or water line recently connected. • Dispense 2.5 gallons of the refrigerator doors are not...
Owners Manual
Page 57
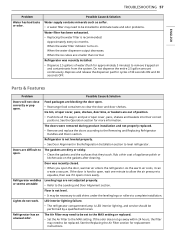
... bins all the way in the Refrigeration Installation section to the Leveling and Door Alignment section. When the water filter indicator turns on the gaskets after cleaning. Parts & Features Problem Doors will not close correctly or pop open the door, warmer air enters the refrigerator. Ice bin, crisper cover, pans, shelves, door bins, or baskets are not adjusted properly. • Refer to level refrigerator. Refrigerator was recently closed. • When you open . Refrigerator is not leveled properly. • See Door Alignment in and put crisper cover, pans, shelves...
... bins all the way in the Refrigeration Installation section to the Leveling and Door Alignment section. When the water filter indicator turns on the gaskets after cleaning. Parts & Features Problem Doors will not close correctly or pop open the door, warmer air enters the refrigerator. Ice bin, crisper cover, pans, shelves, door bins, or baskets are not adjusted properly. • Refer to level refrigerator. Refrigerator was recently closed. • When you open . Refrigerator is not leveled properly. • See Door Alignment in and put crisper cover, pans, shelves...
Owners Manual
Page 61
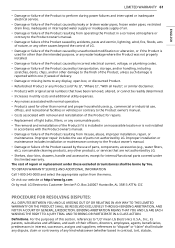
... ACTION. Or visit our website at http://www.lg.com Or by LG. • Shelves, door bins, drawers, handle and accessories, except for repairs. • Replacement of light bulbs, filters, or any consumable parts. • The removal and reinstallation of the Product if it is installed in an inaccessible location or is not installed in accordance with the Product owner's manual. • Damage or failure of the Product resulting...
... ACTION. Or visit our website at http://www.lg.com Or by LG. • Shelves, door bins, drawers, handle and accessories, except for repairs. • Replacement of light bulbs, filters, or any consumable parts. • The removal and reinstallation of the Product if it is installed in an inaccessible location or is not installed in accordance with the Product owner's manual. • Damage or failure of the Product resulting...
Owners Manual
Page 65
... power failures and interrupted or inadequate electrical service; • Damage or failure caused by leaky or broken water pipes, frozen water pipes, restricted drain lines, inadequate or interrupted water supply or inadequate supply of air; • Damage or failure resulting from operating the Product in a corrosive atmosphere or contrary to the instructions outlined in the Product's owner's manual; • Damage or failure caused by the use...
... power failures and interrupted or inadequate electrical service; • Damage or failure caused by leaky or broken water pipes, frozen water pipes, restricted drain lines, inadequate or interrupted water supply or inadequate supply of air; • Damage or failure resulting from operating the Product in a corrosive atmosphere or contrary to the instructions outlined in the Product's owner's manual; • Damage or failure caused by the use...


