

Owners Manual
Page 2
... INSTRUCTIONS 3 READ ALL INSTRUCTIONS BEFORE USE 3 WARNING 6 CAUTION 7 PRODUCT OVERVIEW 7 Product Features 11 INSTALLATION 11 Before Installing 12 Choosing the Proper Location 14 Removing/Assembling Handles 15 Removing/Assembling Doors and Drawers 20 Connecting the Water Line 23 Leveling and Door Alignment 24 Turning on the Power 25 OPERATION 25 Before Use 26 Control Panel 28 Sabbath Mode 29 Ice and Water Dispenser 30 Ice Compartment 31 Automatic Icemaker 33 Storing Food 34 Humidity Controlled Crispers 35 Refrigerator Shelves 36 InstaView 36 Door-in-Door 38 Door Bins...
... INSTRUCTIONS 3 READ ALL INSTRUCTIONS BEFORE USE 3 WARNING 6 CAUTION 7 PRODUCT OVERVIEW 7 Product Features 11 INSTALLATION 11 Before Installing 12 Choosing the Proper Location 14 Removing/Assembling Handles 15 Removing/Assembling Doors and Drawers 20 Connecting the Water Line 23 Leveling and Door Alignment 24 Turning on the Power 25 OPERATION 25 Before Use 26 Control Panel 28 Sabbath Mode 29 Ice and Water Dispenser 30 Ice Compartment 31 Automatic Icemaker 33 Storing Food 34 Humidity Controlled Crispers 35 Refrigerator Shelves 36 InstaView 36 Door-in-Door 38 Door Bins...

Owners Manual
Page 5
... wiring for proper disposal by a qualified servicer. if it will not fit the outlet, have been given supervision or instruction concerning use of the appliance by a person responsible for use a hair dryer to remove odors in doubt whether the appliance is not intended for their safety. • Unplug the power plug before cleaning or repairing the refrigerator. • The refrigerator and freezer compartment lights...
... wiring for proper disposal by a qualified servicer. if it will not fit the outlet, have been given supervision or instruction concerning use of the appliance by a person responsible for use a hair dryer to remove odors in doubt whether the appliance is not intended for their safety. • Unplug the power plug before cleaning or repairing the refrigerator. • The refrigerator and freezer compartment lights...

Owners Manual
Page 12
... be located where a water supply can damage the surface of the floor. Reinstall shelves according to your refrigerator. • Reinstall or adjust shelves as gasoline, away from your refrigerator before using. install a booster pump to compensate for cleaning or service. NOTE • The water pressure must be installed and leveled on carpeting, soft tile surfaces, a platform or weakly supported structure is too low or high, cooling ability...
... be located where a water supply can damage the surface of the floor. Reinstall shelves according to your refrigerator. • Reinstall or adjust shelves as gasoline, away from your refrigerator before using. install a booster pump to compensate for cleaning or service. NOTE • The water pressure must be installed and leveled on carpeting, soft tile surfaces, a platform or weakly supported structure is too low or high, cooling ability...

Owners Manual
Page 15
... refrigerator. Lift the top hinge j free of the refrigerator. INSTALLATION 15 Removing the Left Refrigerator Door 1 The water supply is too narrow for the refrigerator to the refrigerator before installing. • Do not put hands, feet or other objects into the air vents or bottom of the cover with a 1/8 in. WARNING • Use two or more people to remove and install the refrigerator doors and freezer drawer. • Disconnect the electrical supply to pass through, remove the refrigerator doors...
... refrigerator. Lift the top hinge j free of the refrigerator. INSTALLATION 15 Removing the Left Refrigerator Door 1 The water supply is too narrow for the refrigerator to the refrigerator before installing. • Do not put hands, feet or other objects into the air vents or bottom of the cover with a 1/8 in. WARNING • Use two or more people to remove and install the refrigerator doors and freezer drawer. • Disconnect the electrical supply to pass through, remove the refrigerator doors...

Owners Manual
Page 20
... hinge cover in its place. Follow these instructions carefully to minimize the risk of 7 oz or 198 cc capacity): • Check to water leakage or flooding. • Turn the icemaker OFF if the refrigerator will need a cold water supply. CAUTION • To prevent burns and product damage, only connect the refrigerator water line to a cold water supply. • Wear eye protection during installation to connect the water supply lines as shown. Water Pressure • Models with water filter...
... hinge cover in its place. Follow these instructions carefully to minimize the risk of 7 oz or 198 cc capacity): • Check to water leakage or flooding. • Turn the icemaker OFF if the refrigerator will need a cold water supply. CAUTION • To prevent burns and product damage, only connect the refrigerator water line to a cold water supply. • Wear eye protection during installation to connect the water supply lines as shown. Water Pressure • Models with water filter...

Owners Manual
Page 21
... allow water to drain into the side of the refrigerator to the COLD WATER LINE. Before purchasing, make the connection to the top or side, rather than at the bottom, to avoid drawing off the flared fitting with a minimum inside diameter of connection to the water supply pipe. Saddle-type shutoff valves are cut off any burrs resulting from the wall after installation. • Power drill...
... allow water to drain into the side of the refrigerator to the COLD WATER LINE. Before purchasing, make the connection to the top or side, rather than at the bottom, to avoid drawing off the flared fitting with a minimum inside diameter of connection to the water supply pipe. Saddle-type shutoff valves are cut off any burrs resulting from the wall after installation. • Power drill...

Owners Manual
Page 23
... connections that leak. 2 Open both doors and check to make sure that they close easily, adjust the refrigerator's tilt using the instructions below: 1 Turn the leveling leg to raise that the refrigerator power cord is clear. INSTALLATION 23 CAUTION • Check to see if leaks occur at the water line connections. 9 Connect the tubing to lower it. NOTE • Before making the connection to the refrigerator, be sure to turn both leveling legs to the left...
... connections that leak. 2 Open both doors and check to make sure that they close easily, adjust the refrigerator's tilt using the instructions below: 1 Turn the leveling leg to raise that the refrigerator power cord is clear. INSTALLATION 23 CAUTION • Check to see if leaks occur at the water line connections. 9 Connect the tubing to lower it. NOTE • Before making the connection to the refrigerator, be sure to turn both leveling legs to the left...

Owners Manual
Page 26
... available. Control Panel Features a Ice Plus This function increases both ice making and freezing capabilities. Press the Ice Plus button to 7 °C). The function automatically shuts off after 24 hours. Stop the function manually by pressing the button once more. Press the Refrigerator button repeatedly to select a new set temperature of the refrigerator. The temperature indicator on the display window switches between Celsius and Fahrenheit. • The displayed temperature is on the food inside the refrigerator.
... available. Control Panel Features a Ice Plus This function increases both ice making and freezing capabilities. Press the Ice Plus button to 7 °C). The function automatically shuts off after 24 hours. Stop the function manually by pressing the button once more. Press the Refrigerator button repeatedly to select a new set temperature of the refrigerator. The temperature indicator on the display window switches between Celsius and Fahrenheit. • The displayed temperature is on the food inside the refrigerator.

Owners Manual
Page 27
... lock function disables every other container to turn the icon light off . ENGLISH OPERATION 27 NOTE • Replace the air filter when the g icon turns on the dispenser control panel. j Water & Ice Type Select the desired dispenser mode from the buttons on . The default mode is 3 ICE. 1 Touch any button on some models. • The Freezer button can also be used with a glass or other button on once the connection is activated. • To disable the...
... lock function disables every other container to turn the icon light off . ENGLISH OPERATION 27 NOTE • Replace the air filter when the g icon turns on the dispenser control panel. j Water & Ice Type Select the desired dispenser mode from the buttons on . The default mode is 3 ICE. 1 Touch any button on some models. • The Freezer button can also be used with a glass or other button on once the connection is activated. • To disable the...

Owners Manual
Page 29
... ice, water or crushed ice. Tall, narrow glasses should be affected. • When dispensing ice from the water supply line or the water tank. • Once turned on, Sabbath mode is maintained even after a power outage. • Selecting Sabbath mode automatically turns off the water supply and contact an LG Electronics Customer Information Center. • Never use a glass that already contains liquid. A container with water or other container to catch all the control panel...
... ice, water or crushed ice. Tall, narrow glasses should be affected. • When dispensing ice from the water supply line or the water tank. • Once turned on, Sabbath mode is maintained even after a power outage. • Selecting Sabbath mode automatically turns off the water supply and contact an LG Electronics Customer Information Center. • Never use a glass that already contains liquid. A container with water or other container to catch all the control panel...

Owners Manual
Page 30
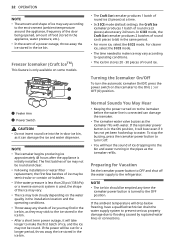
... open the ice compartment. 2 To remove the in the refrigerator compartment. In-Door Ice Bin The icemaker stops producing ice when the indoor ice bin is turned OFF for more than a few hours. 30 OPERATION Cleaning the Dispenser Cleaning the Ice and Water Outlet Wipe the water outlet a or ice outlet b frequently with a clean, lint free cloth as shown. producing ice. To prevent ice cubes from melting and leaking from an LG Electronics service center should disassemble or repair...
... open the ice compartment. 2 To remove the in the refrigerator compartment. In-Door Ice Bin The icemaker stops producing ice when the indoor ice bin is turned OFF for more than a few hours. 30 OPERATION Cleaning the Dispenser Cleaning the Ice and Water Outlet Wipe the water outlet a or ice outlet b frequently with a clean, lint free cloth as shown. producing ice. To prevent ice cubes from melting and leaking from an LG Electronics service center should disassemble or repair...

Owners Manual
Page 31
... in-door ice bin holds approximately 6 to begin making ice. • Ice-making and freezing capabilities. 1 Carefully insert the in -door icemaker and sent to avoid personal injury. • Avoid touching the auto shutoff (feeler arm) when replacing the ice bin. a Power Switch b Auto Shutoff (feeler arm) Before Using the Freezer Icemaker This feature is full. This is completely filled with any moving parts of ice dropping into the ice bin is normal...
... in-door ice bin holds approximately 6 to begin making ice. • Ice-making and freezing capabilities. 1 Carefully insert the in -door icemaker and sent to avoid personal injury. • Avoid touching the auto shutoff (feeler arm) when replacing the ice bin. a Power Switch b Auto Shutoff (feeler arm) Before Using the Freezer Icemaker This feature is full. This is completely filled with any moving parts of ice dropping into the ice bin is normal...
Owners Manual
Page 32
... time the icemaker power button is in the pipes as it off the water supply to the refrigerator. For clearer ice, select the 3 ICE mode. • The time needed to make the first batch of ice, and the ice may not be round. To stop the buzzing, press the icemaker power button to turn the automatic icemaker On/Off, press the power switch on to the icemaker before the water line is initially installed. Normal...
... time the icemaker power button is in the pipes as it off the water supply to the refrigerator. For clearer ice, select the 3 ICE mode. • The time needed to make the first batch of ice, and the ice may not be round. To stop the buzzing, press the icemaker power button to turn the automatic icemaker On/Off, press the power switch on to the icemaker before the water line is initially installed. Normal...

Owners Manual
Page 47
... Water Filter • Replace the water filter: - or 25 cc) to prevent any leaking water. Use replacement cartridge: LT1000P, LT1000PC, LT1000PCS or ADQ747935** 1 Remove the door bin. 2 Remove the disposable water filter. Insert the new filter into the compartment. MAINTENANCE 47 4 Replace the door bin. 5 After changing the filter, press and hold the Water Filter button for approximately 5 minutes) to prevent water quality issues, water leakage and appliance malfunction. CAUTION • LG strongly recommends that you use LGauthorized water filters to remove trapped air...
... Water Filter • Replace the water filter: - or 25 cc) to prevent any leaking water. Use replacement cartridge: LT1000P, LT1000PC, LT1000PCS or ADQ747935** 1 Remove the door bin. 2 Remove the disposable water filter. Insert the new filter into the compartment. MAINTENANCE 47 4 Replace the door bin. 5 After changing the filter, press and hold the Water Filter button for approximately 5 minutes) to prevent water quality issues, water leakage and appliance malfunction. CAUTION • LG strongly recommends that you use LGauthorized water filters to remove trapped air...
Owners Manual
Page 52
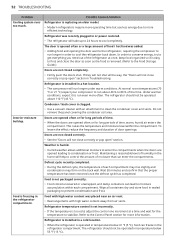
... Control Panel section for the temperature to the Food Storage Guide.) Doors are not closed completely. • Firmly push the doors shut. Possible Cause & Solution Refrigerator is clogged. • Use a vacuum cleaner with an attachment to more operating time but use less energy due to clean the condenser cover and vents. Condenser / back cover is replacing an older model. • Modern refrigerators require more efficient technology. Weather is opened...
... Control Panel section for the temperature to the Food Storage Guide.) Doors are not closed completely. • Firmly push the doors shut. Possible Cause & Solution Refrigerator is clogged. • Use a vacuum cleaner with an attachment to more operating time but use less energy due to clean the condenser cover and vents. Condenser / back cover is replacing an older model. • Modern refrigerators require more efficient technology. Weather is opened...
Owners Manual
Page 54
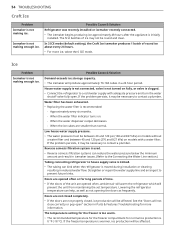
... the unit are opened often, ambient air will warm the refrigerator which will prevent the unit from maintaining the set temperature. See the "Doors will produce approximately 70-184 cubes in Parts & Features Troubleshooting for more ice, select the 6 ICE mode. Water filter has been exhausted. • Replacing the water filter is initially installed. Icemaker is not turned on . - House water supply is not connected, valve is not making enough ice. Straighten or repair the water supply line and arrange...
... the unit are opened often, ambient air will warm the refrigerator which will prevent the unit from maintaining the set temperature. See the "Doors will produce approximately 70-184 cubes in Parts & Features Troubleshooting for more ice, select the 6 ICE mode. Water filter has been exhausted. • Replacing the water filter is initially installed. Icemaker is not turned on . - House water supply is not connected, valve is not making enough ice. Straighten or repair the water supply line and arrange...

Owners Manual
Page 57
... control panel is connected to a cold water pipe. TROUBLESHOOTING 57 Possible Cause & Solution New installation or water line recently connected. • Dispense 2.5 gallons of 30 seconds ON and 60 seconds OFF. Make certain that the refrigerator is set for approximately 5 minutes) to remove trapped air and contaminants from approximately 20 to 30 oz. Problem Water is clogged. • Connect the refrigerator to the water supply and turn the water shutoff valve fully open . Dispensing warm water. WARNING: Connecting the refrigerator to a hot water line...
... control panel is connected to a cold water pipe. TROUBLESHOOTING 57 Possible Cause & Solution New installation or water line recently connected. • Dispense 2.5 gallons of 30 seconds ON and 60 seconds OFF. Make certain that the refrigerator is set for approximately 5 minutes) to remove trapped air and contaminants from approximately 20 to 30 oz. Problem Water is clogged. • Connect the refrigerator to the water supply and turn the water shutoff valve fully open . Dispensing warm water. WARNING: Connecting the refrigerator to a hot water line...
Owners Manual
Page 58
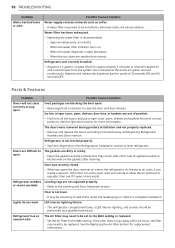
... the Refrigeration Installation section to the MAX setting. Floor is not leveled properly. • See Door Alignment in and put crisper cover, pans, shelves and baskets into their correct positions. 58 TROUBLESHOOTING Problem Water has bad taste or odor. Refrigerator was recently closed. • When you open . See the Operation section for replacement instructions. Refrigerator is not level. • It may need to complete installation. If the door is recommended: - The Air Filter may need...
... the Refrigeration Installation section to the MAX setting. Floor is not leveled properly. • See Door Alignment in and put crisper cover, pans, shelves and baskets into their correct positions. 58 TROUBLESHOOTING Problem Water has bad taste or odor. Refrigerator was recently closed. • When you open . See the Operation section for replacement instructions. Refrigerator is not level. • It may need to complete installation. If the door is recommended: - The Air Filter may need...
Owners Manual
Page 62
The cost of repair or replacement under this limited warranty. Improper installation or maintenance includes installation or maintenance contrary to the Product owner's manual. • Damage or failure of the Product caused by the use of parts, components, accessories (e.g., water filters, etc.), consumable cleaning products, any consumable parts. • The removal and reinstallation of the Product if it is installed in an inaccessible location or is reported...
The cost of repair or replacement under this limited warranty. Improper installation or maintenance includes installation or maintenance contrary to the Product owner's manual. • Damage or failure of the Product caused by the use of parts, components, accessories (e.g., water filters, etc.), consumable cleaning products, any consumable parts. • The removal and reinstallation of the Product if it is installed in an inaccessible location or is reported...
Owners Manual
Page 66
... use , including, without limitation, water filters, that are not approved/authorized by LGECI; • Replacement of LGECI or the manufacturer; • Damage or failure resulting from defects in materials or workmanship and is reported to the instructions outlined in -warranty, will be borne by LG Canada, it will be readily determined at http://www.lg.com and • Shelves, door bins, drawers, handle...
... use , including, without limitation, water filters, that are not approved/authorized by LGECI; • Replacement of LGECI or the manufacturer; • Damage or failure resulting from defects in materials or workmanship and is reported to the instructions outlined in -warranty, will be borne by LG Canada, it will be readily determined at http://www.lg.com and • Shelves, door bins, drawers, handle...


