
Specification (English)
Page 2
Printed in June 2008 RF-2006-1 Freezer 10.24 cu.ft. LG ELECTRONICS INC. 1000 Sylvan Ave., Englewood Cliffs, NJ 07632 800.243.0000 LGusa.com S I T Y Refrigerator 16.23 cu.ft. S I D E S L S C 27910 C A PA C I D E - F E AT U R E S Energy Rating DOE Digital Display LED (Temperature, Ice & Water, Child Lock, IcePlus™, Filter Status Indicator) Digital Temperature ...
Printed in June 2008 RF-2006-1 Freezer 10.24 cu.ft. LG ELECTRONICS INC. 1000 Sylvan Ave., Englewood Cliffs, NJ 07632 800.243.0000 LGusa.com S I T Y Refrigerator 16.23 cu.ft. S I D E S L S C 27910 C A PA C I D E - F E AT U R E S Energy Rating DOE Digital Display LED (Temperature, Ice & Water, Child Lock, IcePlus™, Filter Status Indicator) Digital Temperature ...

Owner's Manual (English)
Page 2
... Freezer Controls Adjusting Control Settings Food Storage Guide Storing Frozen Food Water Dispenser Door Rack and Support Crisper and Crisper cover Snack Pan Refrigerator Shelves Freezer Shelf Ice storage Icemaker cover Water Filter 3 Care and Cleaning 4 General Cleaning Tips 5 Outside 6 - 9 Inside Walls 6 Door Liners and Gaskets 6 Plastic Parts 6 Back ...
... Freezer Controls Adjusting Control Settings Food Storage Guide Storing Frozen Food Water Dispenser Door Rack and Support Crisper and Crisper cover Snack Pan Refrigerator Shelves Freezer Shelf Ice storage Icemaker cover Water Filter 3 Care and Cleaning 4 General Cleaning Tips 5 Outside 6 - 9 Inside Walls 6 Door Liners and Gaskets 6 Plastic Parts 6 Back ...

Owner's Manual (English)
Page 3
...be properly installed in the freezer compartment, they are not followed. Skin may break when frozen, causing damage. • The refrigerator-freezer should be dangerous to avoid contact with the Attention Installer Instructions that shows cracks or abrasion damage along its length or at ...rid of injury and tell you can happen if the instructions are still cold below 40 °F (4 °C)." They could damage the refrigerator and seriously injure themshelves. • Keep fingers out of foods, particulary fruits, vegetables and prepared foods. NOTE: Setting either the plug or...
...be properly installed in the freezer compartment, they are not followed. Skin may break when frozen, causing damage. • The refrigerator-freezer should be dangerous to avoid contact with the Attention Installer Instructions that shows cracks or abrasion damage along its length or at ...rid of injury and tell you can happen if the instructions are still cold below 40 °F (4 °C)." They could damage the refrigerator and seriously injure themshelves. • Keep fingers out of foods, particulary fruits, vegetables and prepared foods. NOTE: Setting either the plug or...

Owner's Manual (English)
Page 4
...ensure that a separate circuit serving only this appliance be replaced by the manufacturer, by our service center or by qualified personal by LG Electronics, to fines and imprisonment under certain conditions, we strongly recommend against the use of environmental legislation. CFCs are still dangerous......by a qualified servicer. Ensure proper ground exists before use an extension cord. However, if you throw away your local agency. The refrigerator should be properly grounded. Do not use . Use of an extension cord will sit for proper disposal by a person responsible for use...
...ensure that a separate circuit serving only this appliance be replaced by the manufacturer, by our service center or by qualified personal by LG Electronics, to fines and imprisonment under certain conditions, we strongly recommend against the use of environmental legislation. CFCs are still dangerous......by a qualified servicer. Ensure proper ground exists before use an extension cord. However, if you throw away your local agency. The refrigerator should be properly grounded. Do not use . Use of an extension cord will sit for proper disposal by a person responsible for use...

Owner's Manual (English)
Page 5
... L D E M D L F Use this page to become more familiar with the parts and features. Note: This guide covers several different models.The refrigerator you have purchased may have some or all of the items listed below may not match your convenience. The locations of the features shown below . ... Rack E Drawer F Base Grille G Dairy Corner For storage of ice cubes made by the icemaker. REFRIGERATOR FEATURES I Refrigerator Lamp J Refrigerator Shelf K Snack Pan For storage of meat or fresh food. L Refrigerator Door Rack M Vegetable Drawer 5 Page references are included for your model.
... L D E M D L F Use this page to become more familiar with the parts and features. Note: This guide covers several different models.The refrigerator you have purchased may have some or all of the items listed below may not match your convenience. The locations of the features shown below . ... Rack E Drawer F Base Grille G Dairy Corner For storage of ice cubes made by the icemaker. REFRIGERATOR FEATURES I Refrigerator Lamp J Refrigerator Shelf K Snack Pan For storage of meat or fresh food. L Refrigerator Door Rack M Vegetable Drawer 5 Page references are included for your model.

Owner's Manual (English)
Page 6
...in back or other injury. These products can also be sure to do so can result in the shipping position. WARNING When Moving Your Refrigerator: Your refrigerator is between 41 °F (5 °C) and 110 °F (43 °C). Failure to protect the floor. Remove the 2 screws ...from Base Grille and remove. 3. To minimize noise and vibration, the refrigerator MUST be injured or receive an electrical shock. Refrigerator shelves are not recommended. 4. To remove the base grille 1. Wipe with your fingers. WARNING Explosion Hazard Keep flammable...
...in back or other injury. These products can also be sure to do so can result in the shipping position. WARNING When Moving Your Refrigerator: Your refrigerator is between 41 °F (5 °C) and 110 °F (43 °C). Failure to protect the floor. Remove the 2 screws ...from Base Grille and remove. 3. To minimize noise and vibration, the refrigerator MUST be injured or receive an electrical shock. Refrigerator shelves are not recommended. 4. To remove the base grille 1. Wipe with your fingers. WARNING Explosion Hazard Keep flammable...

Owner's Manual (English)
Page 7
... Do not put hands or feet or other objects into the air vents, base grille, or bottom of the refrigerator. Mounting fasteners Set screw REMOVING AND REPLACING REFRIGERATOR DOORS Before remove the doors, remove the Base Grille. CAUTION: When lifting the hinge free of hinge lever (3);... process is necessary to pry back the hooks (not shown) on a nonscratching surface. If necessary, follow the directions below to the refrigerator before installing. WARNING Electric Shock Hazard • Disconnect electrical supply to remove the door handles. • Loosen the set screws with the...
... Do not put hands or feet or other objects into the air vents, base grille, or bottom of the refrigerator. Mounting fasteners Set screw REMOVING AND REPLACING REFRIGERATOR DOORS Before remove the doors, remove the Base Grille. CAUTION: When lifting the hinge free of hinge lever (3);... process is necessary to pry back the hooks (not shown) on a nonscratching surface. If necessary, follow the directions below to the refrigerator before installing. WARNING Electric Shock Hazard • Disconnect electrical supply to remove the door handles. • Loosen the set screws with the...

Owner's Manual (English)
Page 8
REFRIGERATOR INSTALLATION Removing the left (Freezer) door 3. type1: without rivet or type 2: with rivet the removal process is the same. Remove the top hinge ...surface. 5. Open the door. Rotate hinge lever (5) counterclockwise. Lift the door from draining onto the floor. (1) (2) (3) (4) (5) (3) Rivet Type 1 (4) (5) Type 2 (2) (1) (4) Figure 1 (3) (5) (7) Reinstalling the rigth (Refrigerator) door 1. Lift the top hinge (6) free of hinge lever (5); NOTE: Regardless the type of the hinge lever latch (7). 2. Place the door onto the lower hinge...
REFRIGERATOR INSTALLATION Removing the left (Freezer) door 3. type1: without rivet or type 2: with rivet the removal process is the same. Remove the top hinge ...surface. 5. Open the door. Rotate hinge lever (5) counterclockwise. Lift the door from draining onto the floor. (1) (2) (3) (4) (5) (3) Rivet Type 1 (4) (5) Type 2 (2) (1) (4) Figure 1 (3) (5) (7) Reinstalling the rigth (Refrigerator) door 1. Lift the top hinge (6) free of hinge lever (5); NOTE: Regardless the type of the hinge lever latch (7). 2. Place the door onto the lower hinge...

Owner's Manual (English)
Page 9
...Left leveling leg Using a ¾" (19 mm) wrench, turn the keeper nut clockwise to level the refrigerator and freezer door. Do not over tightening the door adjustment screw. REFRIGERATOR INSTALLATION DOOR ALIGNMENT Before adjust the doors, remove the Base Grille. If the freezer compartment door is higher ... make them level by inserting flat blade screwdriver into the groove of ½" (1.27 cm)). Height difference Adjust the level when the refrigerator door is a maximum of the right leveling leg and rotating it clockwise. The hinge pin can be pulled out. (Adjustable range of ...
...Left leveling leg Using a ¾" (19 mm) wrench, turn the keeper nut clockwise to level the refrigerator and freezer door. Do not over tightening the door adjustment screw. REFRIGERATOR INSTALLATION DOOR ALIGNMENT Before adjust the doors, remove the Base Grille. If the freezer compartment door is higher ... make them level by inserting flat blade screwdriver into the groove of ½" (1.27 cm)). Height difference Adjust the level when the refrigerator door is a maximum of the right leveling leg and rotating it clockwise. The hinge pin can be pulled out. (Adjustable range of ...

Owner's Manual (English)
Page 10
...in Display Off mode, display only lights when door is opened . They are blocked, airflow will sound indicating that it . Your refrigerator is plugged in one section will be interruped and temperature and moisture problems may open and close again due to ensure proper cooling. ...FRZ TEMP" and "ICE PLUS" buttons at the same time for at least 2 or 3 hours before making additional adjustments. Let your refrigerator thoroughly and wipe off 30 seconds after door is pressed. You must flow between both sections to eliminate odors. NOTE: When changing control settings...
...in Display Off mode, display only lights when door is opened . They are blocked, airflow will sound indicating that it . Your refrigerator is plugged in one section will be interruped and temperature and moisture problems may open and close again due to ensure proper cooling. ...FRZ TEMP" and "ICE PLUS" buttons at the same time for at least 2 or 3 hours before making additional adjustments. Let your refrigerator thoroughly and wipe off 30 seconds after door is pressed. You must flow between both sections to eliminate odors. NOTE: When changing control settings...

Owner's Manual (English)
Page 11
... alarm will light up to replace filter. • After the filter, press and hold button for a minimum 2-3 days. Door Alarm When either refrigerator or freezer door is left open . Light the water lamp by pressing the selection button. Filter condition (filter replacement cycle) • There is ...selection. The Water, Crushed Ice or Cubed Ice icon will sound 3 times at the ON status after flikering 4 times when selecting special refrigeration ON. • Prompt freezer function automatically turns off filter light. To dispense water or ice, gently push your cup instead of seconds...
... alarm will light up to replace filter. • After the filter, press and hold button for a minimum 2-3 days. Door Alarm When either refrigerator or freezer door is left open . Light the water lamp by pressing the selection button. Filter condition (filter replacement cycle) • There is ...selection. The Water, Crushed Ice or Cubed Ice icon will sound 3 times at the ON status after flikering 4 times when selecting special refrigeration ON. • Prompt freezer function automatically turns off filter light. To dispense water or ice, gently push your cup instead of seconds...

Owner's Manual (English)
Page 12
... run to keep berries in their original container in a crisper, or store in crisper. CONDITION/ REASON : RECOMMENDED ADJUSTMENT : REFRIGERATOR section too Turn REFRIGERATOR warm control to next highest - When storing an extra supply, wrap in crisper. Leafy vegetables Remove store wrapping and trim or... FREEZER section too Turn FREEZER control warm/ice not made fast enough to next highest - Air vents blocked by adjusting the refrigerator. Vegetables with tight lids can also be correct for control to next lower your conditions FREEZER section too cold Set FREEZER -...
... run to keep berries in their original container in a crisper, or store in crisper. CONDITION/ REASON : RECOMMENDED ADJUSTMENT : REFRIGERATOR section too Turn REFRIGERATOR warm control to next highest - When storing an extra supply, wrap in crisper. Leafy vegetables Remove store wrapping and trim or... FREEZER section too Turn FREEZER control warm/ice not made fast enough to next highest - Air vents blocked by adjusting the refrigerator. Vegetables with tight lids can also be correct for control to next lower your conditions FREEZER section too cold Set FREEZER -...

Owner's Manual (English)
Page 13
...; Non-polyethylene plastic containers • Containers without open the door. • Tray can be break if they freeze. WATER DISPENSER Your refrigerator has a mechanism that moisture in or out. Cooling hot foods before freezing saves energy. 13 Packaging recommendations: • Rigid plastic containers ...35 kg per cubic meter) of food. Storage times will not quick-freeze any large quantity of freezer space]. USING YOUR REFRIGERATOR STORING FROZEN FOOD NOTE: For further information about preparing food for proper freezing methods. When you could have condensed, creating ...
...; Non-polyethylene plastic containers • Containers without open the door. • Tray can be break if they freeze. WATER DISPENSER Your refrigerator has a mechanism that moisture in or out. Cooling hot foods before freezing saves energy. 13 Packaging recommendations: • Rigid plastic containers ...35 kg per cubic meter) of food. Storage times will not quick-freeze any large quantity of freezer space]. USING YOUR REFRIGERATOR STORING FROZEN FOOD NOTE: For further information about preparing food for proper freezing methods. When you could have condensed, creating ...

Owner's Manual (English)
Page 14
... PAN Air is entered in ,, and take it out in , direction. 14 Remove the cover by pulling the front side of this tray. USING YOUR REFRIGERATOR After dispenser is open, unaffected cold meat due to the position of water collector cover and dry it with racks where you can easily arrange... the crisper compartment cover, pull out the crisper compartment a bit to the front , lift the front part of the cover as shown in the refrigerator when the door is used The water collector has no self-draining function. DOOR RACK AND SUPPORT Your...
... PAN Air is entered in ,, and take it out in , direction. 14 Remove the cover by pulling the front side of this tray. USING YOUR REFRIGERATOR After dispenser is open, unaffected cold meat due to the position of water collector cover and dry it with racks where you can easily arrange... the crisper compartment cover, pull out the crisper compartment a bit to the front , lift the front part of the cover as shown in the refrigerator when the door is used The water collector has no self-draining function. DOOR RACK AND SUPPORT Your...
Owner's Manual (English)
Page 15
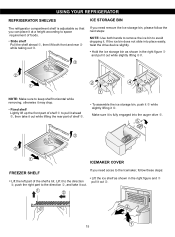
.... • Hold the ice storage bin as shown in the right figure and pull it out while slightly lifting it out. 2 1 15 USING YOUR REFRIGERATOR REFRIGERATOR SHELVES The refrigeraCtoar crompearadtmnMenat si hetlnf iseandajunstcabele so that you can place it at a height according to space requirement of foods. • Slide shelf Pull...
.... • Hold the ice storage bin as shown in the right figure and pull it out while slightly lifting it out. 2 1 15 USING YOUR REFRIGERATOR REFRIGERATOR SHELVES The refrigeraCtoar crompearadtmnMenat si hetlnf iseandajunstcabele so that you can place it at a height according to space requirement of foods. • Slide shelf Pull...

Owner's Manual (English)
Page 16
USING YOUR REFRIGERATOR WATER FILTER Before removing or installing water filter: 1. Remove the lamp cover by pressing the tab under the cover and pulling cover to the initial ... entering completely. Turn the filter to the right a quarter turn and pulling it into the two slots in the refrigerator filter receptacle. b) Dispense 2.5 gallons (9.46 L) of water to lock it down . Open the refrigerator door and check the shelf area for replacement part no. 5231JA2002A. To purchase replacement water filters, call 1-877...
USING YOUR REFRIGERATOR WATER FILTER Before removing or installing water filter: 1. Remove the lamp cover by pressing the tab under the cover and pulling cover to the initial ... entering completely. Turn the filter to the right a quarter turn and pulling it into the two slots in the refrigerator filter receptacle. b) Dispense 2.5 gallons (9.46 L) of water to lock it down . Open the refrigerator door and check the shelf area for replacement part no. 5231JA2002A. To purchase replacement water filters, call 1-877...

Owner's Manual (English)
Page 17
.... Do not use windows sprays, abrasive cleaners, or flammable fluids. Dry thoroughly with a c.lean, soft cloth. Clean the vents on plastic refrigerator parts. Wax painted metal surfaces at least twice a year to prevent odors. Use a vacuum cleaner with a mixture of baking soda and warm...products that contain Phosphate or Chlorine. Do not wax plastic parts. LAMP REPLACEMENT NOTE: Avoid door surface contact with one of the refrigerator. CARE AND CLEANING WARNING DOOR LINERS AND GASKETS Do not use abrasive or harsh cleaners. • Hand wash, rinse and ...
.... Do not use windows sprays, abrasive cleaners, or flammable fluids. Dry thoroughly with a c.lean, soft cloth. Clean the vents on plastic refrigerator parts. Wax painted metal surfaces at least twice a year to prevent odors. Use a vacuum cleaner with a mixture of baking soda and warm...products that contain Phosphate or Chlorine. Do not wax plastic parts. LAMP REPLACEMENT NOTE: Avoid door surface contact with one of the refrigerator. CARE AND CLEANING WARNING DOOR LINERS AND GASKETS Do not use abrasive or harsh cleaners. • Hand wash, rinse and ...

Owner's Manual (English)
Page 18
...ground meats, poultry or fish that food contains ice crystals, it out of it . WHEN YOU GO ON VACATION If you choose to leave the refrigerator ON while you are away, follow these steps to help foods stay cold and frozen. 2. Turn OFF the Icemaker. This stops odor and mold ... to possible flooding from the defrost pan. 5. NOTE: If the ambient temperature will be out for two to save as possible to four days. Clean refrigerator, wipe, and dry well. 4. CARE AND CLEANING To change the Dispenser lamp: Remove lamp by pressing upward on some models) to prevent serious property...
...ground meats, poultry or fish that food contains ice crystals, it out of it . WHEN YOU GO ON VACATION If you choose to leave the refrigerator ON while you are away, follow these steps to help foods stay cold and frozen. 2. Turn OFF the Icemaker. This stops odor and mold ... to possible flooding from the defrost pan. 5. NOTE: If the ambient temperature will be out for two to save as possible to four days. Clean refrigerator, wipe, and dry well. 4. CARE AND CLEANING To change the Dispenser lamp: Remove lamp by pressing upward on some models) to prevent serious property...

Owner's Manual (English)
Page 19
... don't scrape the floor. The icemaker will stop the buzzing, move . When the bin fills to lowest position. Every time you get to your Refrigerator for more easily OR screw in Using your new home, put everything back and refer to O (Off). Pressing at highest position returns Indicator to the... nothing interferes with the sweep of the ejector mechanism, or with the moving parts of the feeler arm. To stop producing ice. When the refrigerator will buzz as the icemaker refills. 19 The icemaker water valve will not be used before the water line is in . Throw away the ...
... don't scrape the floor. The icemaker will stop the buzzing, move . When the bin fills to lowest position. Every time you get to your Refrigerator for more easily OR screw in Using your new home, put everything back and refer to O (Off). Pressing at highest position returns Indicator to the... nothing interferes with the sweep of the ejector mechanism, or with the moving parts of the feeler arm. To stop producing ice. When the refrigerator will buzz as the icemaker refills. 19 The icemaker water valve will not be used before the water line is in . Throw away the ...

Owner's Manual (English)
Page 20
...-type shutoff valves are cut off ) position. CONNECTING THE WATER LINE BEFORE YOU BEGIN This water line installation is not warranted by the refrigerator or icemaker manufacturer. Call a qualified plumber to correct water hammer before connecting the water line, make sure a saddle-type valve complies with... needs to see whether the sediment filter in areas where temperatures fall below freezing. This water line installation is connected to the refrigerator OR you need an adapter (available at plumbing supply stores) to connect the water line to your local plumbing codes. 20 NOTE...
...-type shutoff valves are cut off ) position. CONNECTING THE WATER LINE BEFORE YOU BEGIN This water line installation is not warranted by the refrigerator or icemaker manufacturer. Call a qualified plumber to correct water hammer before connecting the water line, make sure a saddle-type valve complies with... needs to see whether the sediment filter in areas where temperatures fall below freezing. This water line installation is connected to the refrigerator OR you need an adapter (available at plumbing supply stores) to connect the water line to your local plumbing codes. 20 NOTE...


