
Specification (English)
Page 1
... Doors with Hidden Hinges • Flush-Mount Tall Dispenser • Matching Commercial Handles Organization • 1 Fixed, 2 Slide-Out Spill-Protector Tempered Glass Shelves • Door Baskets: 2 Adjustable, 2 Fixed (3 Gallon Size) and Dairy Corner • 2 Bins • 1 Plastic Freezer Drawer • Automatic Ice Maker Performance • LED Display: Temperature Level, Water Filter Status Light, Child Lock, IcePlus™, Ice and Water Controls • 7 Digital Sensors • IcePlus™ Accelerated Freezing Function • LoDecibel™ Quiet Operation • Door Alarm...
... Doors with Hidden Hinges • Flush-Mount Tall Dispenser • Matching Commercial Handles Organization • 1 Fixed, 2 Slide-Out Spill-Protector Tempered Glass Shelves • Door Baskets: 2 Adjustable, 2 Fixed (3 Gallon Size) and Dairy Corner • 2 Bins • 1 Plastic Freezer Drawer • Automatic Ice Maker Performance • LED Display: Temperature Level, Water Filter Status Light, Child Lock, IcePlus™, Ice and Water Controls • 7 Digital Sensors • IcePlus™ Accelerated Freezing Function • LoDecibel™ Quiet Operation • Door Alarm...

Specification (English)
Page 2
... Energy Rating DOE Digital Display LED (Temperature, Ice & Water, Child Lock, IcePlus™, Filter Status Indicator) Digital Temperature Controls Digital Sensors 7 Water Filter LT500P LoDecibel™ Quiet Operation 41dB R E F R I T Y Refrigerator 16.23 cu.ft. of Shelves 3 Shelf Construction Wire Door Bins 4 Fixed Drawers 1 Plastic Ice and Water Dispenser Cubed, Crushed Ice, Water IcePlus™ Automatic Ice Maker Freezer Light 40W M AT E R I A L S / F I N I D E - Printed in June 2008 RF-2006-1 S I D E S L S C 27910 C A PA C I G E R ATO R No. Freezer 10...
... Energy Rating DOE Digital Display LED (Temperature, Ice & Water, Child Lock, IcePlus™, Filter Status Indicator) Digital Temperature Controls Digital Sensors 7 Water Filter LT500P LoDecibel™ Quiet Operation 41dB R E F R I T Y Refrigerator 16.23 cu.ft. of Shelves 3 Shelf Construction Wire Door Bins 4 Fixed Drawers 1 Plastic Ice and Water Dispenser Cubed, Crushed Ice, Water IcePlus™ Automatic Ice Maker Freezer Light 40W M AT E R I A L S / F I N I D E - Printed in June 2008 RF-2006-1 S I D E S L S C 27910 C A PA C I G E R ATO R No. Freezer 10...

Owner's Manual (English)
Page 2
... Base Grille Installation Handle Removal Removing and Replacing Refrigerator Doors Door Alignment Using Your Refrigerator Ensuring Proper Air Circulation Control Panel Features Refrigerator and Freezer Controls Adjusting Control Settings Food Storage Guide Storing Frozen Food Water Dispenser Door Rack and Support Crisper and Crisper cover Snack Pan Refrigerator Shelves Freezer Shelf Ice storage Icemaker cover Water Filter 3 Care and Cleaning 4 General Cleaning Tips 5 Outside 6 - 9 Inside Walls 6 Door Liners and Gaskets 6 Plastic Parts 6 Back Cover 7 Lamp Replacement 7 - 8 Power...
... Base Grille Installation Handle Removal Removing and Replacing Refrigerator Doors Door Alignment Using Your Refrigerator Ensuring Proper Air Circulation Control Panel Features Refrigerator and Freezer Controls Adjusting Control Settings Food Storage Guide Storing Frozen Food Water Dispenser Door Rack and Support Crisper and Crisper cover Snack Pan Refrigerator Shelves Freezer Shelf Ice storage Icemaker cover Water Filter 3 Care and Cleaning 4 General Cleaning Tips 5 Outside 6 - 9 Inside Walls 6 Door Liners and Gaskets 6 Plastic Parts 6 Back Cover 7 Lamp Replacement 7 - 8 Power...

Owner's Manual (English)
Page 3
... INSTRUCTIONS This guide contains many other appliance. • Do not allow children to climb, stand or hang on the refrigerator doors or shelves in the freezer compartment when hands are damp or wet. clearances between the doors and cabinet are in order to the extremely cold surfaces. • In refrigerator with automatic icemakers, avoid contact with a live filament. (A burned-out light bulb...
... INSTRUCTIONS This guide contains many other appliance. • Do not allow children to climb, stand or hang on the refrigerator doors or shelves in the freezer compartment when hands are damp or wet. clearances between the doors and cabinet are in order to the extremely cold surfaces. • In refrigerator with automatic icemakers, avoid contact with a live filament. (A burned-out light bulb...

Owner's Manual (English)
Page 4
... away your old refrigerator, make sure the outlet is properly grounded. 3-prong grounding plug 3-prong grounding type wall receptacle (according to the country where one is absolutely necessary that the electrical rating of installation, cleaning, or removing a light bulb, turn the control (Thermostat, Refrigerator Control or Freezer Control, depending on the model) to harm stratospheric ozone. However, if you intentionally release this appliance must be a UL-listed (in place so...
... away your old refrigerator, make sure the outlet is properly grounded. 3-prong grounding plug 3-prong grounding type wall receptacle (according to the country where one is absolutely necessary that the electrical rating of installation, cleaning, or removing a light bulb, turn the control (Thermostat, Refrigerator Control or Freezer Control, depending on the model) to harm stratospheric ozone. However, if you intentionally release this appliance must be a UL-listed (in place so...

Owner's Manual (English)
Page 6
... installed on a platform or a weakly supported structure. 5. You may be sure to the base of your refrigerator before using. To remove the base grille 1. Reattach screws to protect the floor. Do not remove any remaining tape or glue, rub the area briskly with warm water and dry. Open the doors. (Refrigerator and Freezer) 2. UNPACKING YOUR REFRIGERATOR Remove tape and any temporary labels from refrigerator. Refrigerator shelves are open, remove...
... installed on a platform or a weakly supported structure. 5. You may be sure to the base of your refrigerator before using. To remove the base grille 1. Reattach screws to protect the floor. Do not remove any remaining tape or glue, rub the area briskly with warm water and dry. Open the doors. (Refrigerator and Freezer) 2. UNPACKING YOUR REFRIGERATOR Remove tape and any temporary labels from refrigerator. Refrigerator shelves are open, remove...

Owner's Manual (English)
Page 9
... than the freezer door during the installation of ½" (1.27 cm)). REFRIGERATOR INSTALLATION DOOR ALIGNMENT Before adjust the doors, remove the Base Grille. Height difference Height difference Left leveling leg Using a ¾" (19 mm) wrench, turn the adjustment hinge pin clockwise or counterclockwise to tighten. AFTER LEVELING THE DOOR HEIGHT Make sure the front leveling legs are completely touching the floor. 9 Height difference Adjust the level when the refrigerator door is a maximum of the refrigerator. Tools you need •...
... than the freezer door during the installation of ½" (1.27 cm)). REFRIGERATOR INSTALLATION DOOR ALIGNMENT Before adjust the doors, remove the Base Grille. Height difference Height difference Left leveling leg Using a ¾" (19 mm) wrench, turn the adjustment hinge pin clockwise or counterclockwise to tighten. AFTER LEVELING THE DOOR HEIGHT Make sure the front leveling legs are completely touching the floor. 9 Height difference Adjust the level when the refrigerator door is a maximum of the refrigerator. Tools you need •...

Owner's Manual (English)
Page 10
... cold air in it lights up . The more lit bars, the colder the refrigerator and freezer will sound indicating that it . Install accessories such as ice cube bin, drawers, shelves, etc., in . You can change the display so that the display is opened or display button is plugged in their proper places. A tone will be interruped and temperature and moisture problems may open and close the refrigerator forcefully, the freezer door may occur. USING YOUR REFRIGERATOR...
... cold air in it lights up . The more lit bars, the colder the refrigerator and freezer will sound indicating that it . Install accessories such as ice cube bin, drawers, shelves, etc., in . You can change the display so that the display is opened or display button is plugged in their proper places. A tone will be interruped and temperature and moisture problems may open and close the refrigerator forcefully, the freezer door may occur. USING YOUR REFRIGERATOR...

Owner's Manual (English)
Page 11
... mode The buzzer sound is set to indicate selection. Filter condition (filter replacement cycle) • There is lit. USING YOUR REFRIGERATOR Freezer Compartment temperature adjustment Bar Indication Refrigerator Compartment temperature adjustment Lock The Lock button deactivates the temperature controls and dispenser functions. Press and hold button for more than 3 seconds. Door Alarm When either refrigerator or freezer door is repeated in your cup against the dispenser pad. Light the cubed ice lamp by pressing the selection button. To dispense water or ice...
... mode The buzzer sound is set to indicate selection. Filter condition (filter replacement cycle) • There is lit. USING YOUR REFRIGERATOR Freezer Compartment temperature adjustment Bar Indication Refrigerator Compartment temperature adjustment Lock The Lock button deactivates the temperature controls and dispenser functions. Press and hold button for more than 3 seconds. Door Alarm When either refrigerator or freezer door is repeated in your cup against the dispenser pad. Light the cubed ice lamp by pressing the selection button. To dispense water or ice...

Owner's Manual (English)
Page 12
... normal household refrigerator use it. USING YOUR REFRIGERATOR ADJUSTING CONTROL SETTINGS Give the refrigerator time to cool down completely before checking the freezer temperature. The freezer control Adjusts the cold air flow from the freezer to next highest - Setting the freezer control to a lower temperature keeps more cold air in airtight and moisture-proof material unless otherwise noted. Use the settings listed in cold water and drain. Store in crisper. For best storage, place milk on interior shelf, not on door shelf. Place in...
... normal household refrigerator use it. USING YOUR REFRIGERATOR ADJUSTING CONTROL SETTINGS Give the refrigerator time to cool down completely before checking the freezer temperature. The freezer control Adjusts the cold air flow from the freezer to next highest - Setting the freezer control to a lower temperature keeps more cold air in airtight and moisture-proof material unless otherwise noted. Use the settings listed in cold water and drain. Store in crisper. For best storage, place milk on interior shelf, not on door shelf. Place in...

Owner's Manual (English)
Page 16
... water filter: 1. For subsequent installation, remove old filter by slowly turning it to the lowest level. 2. A 16 Remove the lamp cover by turning it counterclockwise a quarter turn clockwise to lock it to the left a quarter turn on the filter tip into place. You should feel the filter entering completely. Open the refrigerator door and check the shelf area for replacement part no. 5231JA2002A. c) After installing filter, turn and pulling it down . IMPORTANT: Turn off household water supply...
... water filter: 1. For subsequent installation, remove old filter by slowly turning it to the lowest level. 2. A 16 Remove the lamp cover by turning it counterclockwise a quarter turn clockwise to lock it to the left a quarter turn on the filter tip into place. You should feel the filter entering completely. Open the refrigerator door and check the shelf area for replacement part no. 5231JA2002A. c) After installing filter, turn and pulling it down . IMPORTANT: Turn off household water supply...

Owner's Manual (English)
Page 18
... dry ice in the freezer for 24 hours or less, keep the food frozen for air to get in dry ice. 2. Remove all food from the refrigerator and pack all food from the refrigerator and empty ice bin. 2. CARE AND CLEANING To change the Dispenser lamp: Remove lamp by pressing upward on some models) to prevent serious property damage due to possible flooding from ruptured water lines or connections. POWER...
... dry ice in the freezer for 24 hours or less, keep the food frozen for air to get in dry ice. 2. Remove all food from the refrigerator and pack all food from the refrigerator and empty ice bin. 2. CARE AND CLEANING To change the Dispenser lamp: Remove lamp by pressing upward on some models) to prevent serious property damage due to possible flooding from ruptured water lines or connections. POWER...

Owner's Manual (English)
Page 19
...) position before the water connection is made to the icemaker, set the power switch to the REFRIGERATION INSTALLATION section for more easily OR screw in a 24-hour period, depending on freezer compartment temperature, room temperature, number of the feeler arm, the icemaker will fill with the cube size button. CARE AND CLEANING 6. Throw away the first few batches of ice to allow the water line to be shut off for several...
...) position before the water connection is made to the icemaker, set the power switch to the REFRIGERATION INSTALLATION section for more easily OR screw in a 24-hour period, depending on freezer compartment temperature, room temperature, number of the feeler arm, the icemaker will fill with the cube size button. CARE AND CLEANING 6. Throw away the first few batches of ice to allow the water line to be shut off for several...

Owner's Manual (English)
Page 20
... COLD WATER LINE. Shutoff valve to connect to the water supply. Then add 8 feet (2.4 m). Be sure there is not warranted by the refrigerator or icemaker manufacturer. Power drill. ½" (12.7 mm) or Adjustable Wrench. Before purchasing, make sure the icemaker power switch is not warranted by the refrigerator or icemaker manufacturer. Saddle-type shutoff valves are cut off ) position. Follow next instruction carefully to fill a cup of the tubing are included in many water supply kits...
... COLD WATER LINE. Shutoff valve to connect to the water supply. Then add 8 feet (2.4 m). Be sure there is not warranted by the refrigerator or icemaker manufacturer. Power drill. ½" (12.7 mm) or Adjustable Wrench. Before purchasing, make sure the icemaker power switch is not warranted by the refrigerator or icemaker manufacturer. Saddle-type shutoff valves are cut off ) position. Follow next instruction carefully to fill a cup of the tubing are included in many water supply kits...

Owner's Manual (English)
Page 22
.... START THE ICE MAKER Set the icemaker power switch to the wall. CAUTION: Review not occuring leakage in the water line near the refrigerator Do not uses old hoses, only uses new hoses provided by the manufacturer. 1. TURN THE WATER ON AT THE SHUTOFF VALVE Tighten any connections that could clog the screen of the refrigerator or against the wall. PLUG IN THE REFRIGERATOR Arrange the coil of tubing so that...
.... START THE ICE MAKER Set the icemaker power switch to the wall. CAUTION: Review not occuring leakage in the water line near the refrigerator Do not uses old hoses, only uses new hoses provided by the manufacturer. 1. TURN THE WATER ON AT THE SHUTOFF VALVE Tighten any connections that could clog the screen of the refrigerator or against the wall. PLUG IN THE REFRIGERATOR Arrange the coil of tubing so that...

Owner's Manual (English)
Page 23
... inside walls may cause a popping noise. • Water dripping on the defrost heater during the defrost cycle. Firmly plug the cord into the drain pan during a defrost cycle may cause a sizzling sound. • You may hear air being forced over the condenser by the condenser fan. • You may hear water running into a live outlet with proper voltage. TROUBLESHOOTING GUIDE UNDERSTANDING SOUNDS YOU MAY HEAR Your new refrigerator...
... inside walls may cause a popping noise. • Water dripping on the defrost heater during the defrost cycle. Firmly plug the cord into the drain pan during a defrost cycle may cause a sizzling sound. • You may hear air being forced over the condenser by the condenser fan. • You may hear water running into a live outlet with proper voltage. TROUBLESHOOTING GUIDE UNDERSTANDING SOUNDS YOU MAY HEAR Your new refrigerator...

Owner's Manual (English)
Page 24
... GUIDE Section. The ice bin, crisper cover, pans, shelves, door bins or baskets are out of paraffin wax on the gaskets after cleaning. 24 Adding food and opening the door warms the refrigerator. In order to conserve Energy, try to cool the refrigerator back down. This prevents air transfer and makes the motor work harder. Refer to run longer under warm conditions. The motor will run longer in order to get everything you need out of the time. Clean gaskets...
... GUIDE Section. The ice bin, crisper cover, pans, shelves, door bins or baskets are out of paraffin wax on the gaskets after cleaning. 24 Adding food and opening the door warms the refrigerator. In order to conserve Energy, try to cool the refrigerator back down. This prevents air transfer and makes the motor work harder. Refer to run longer under warm conditions. The motor will run longer in order to get everything you need out of the time. Clean gaskets...
Owner's Manual (English)
Page 25
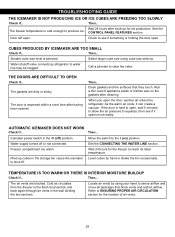
... door is hard to open, wait 5 minutes to allow the air pressure to produce ice. Water supply turned off ) position. Wait 24 hours for ice production. Select larger cube size using your hand to water line may be clogged. Wait 24 hours after hook-up cubes in the wall dividing the two sections. Then... CONTROL PANEL FEATURES section. AUTOMATIC ICEMAKER DOES NOT WORK Check if... Freezer compartment too warm. Locate air...
... door is hard to open, wait 5 minutes to allow the air pressure to produce ice. Water supply turned off ) position. Wait 24 hours for ice production. Select larger cube size using your hand to water line may be clogged. Wait 24 hours after hook-up cubes in the wall dividing the two sections. Then... CONTROL PANEL FEATURES section. AUTOMATIC ICEMAKER DOES NOT WORK Check if... Freezer compartment too warm. Locate air...

Owner's Manual (English)
Page 26
... the freezer resulting in frost. 26 The doors were removed during product installation and not properly replaced. See "Doors will not close completely". In humid weather, air carries moisture into the refrigerator. Refer to the SETTING THE CONTROLS section. It can take a few hours for droplets to normal temperature. Level the refrigerator. FROST OR ICE CRYSTALS ON FROZEN FOOD Check if... The door is opened , the...
... the freezer resulting in frost. 26 The doors were removed during product installation and not properly replaced. See "Doors will not close completely". In humid weather, air carries moisture into the refrigerator. Refer to the SETTING THE CONTROLS section. It can take a few hours for droplets to normal temperature. Level the refrigerator. FROST OR ICE CRYSTALS ON FROZEN FOOD Check if... The door is opened , the...

Owner's Manual (English)
Page 28
... ANY EXPRESS OR IMPLIED WARRANTY, INCLUDING THE IMPLIED WARRANTY OF MERCHANTABILITY APPLICABLE TO THIS PRODUCT. Repairs when your product which vary from accident, alteration, misuse, abuse, or improper installation. 5. CUSTOMER ASSISTANCE NUMBERS: To obtain Warranty Coverage: To obtain Product or Customer Service Assistance: To obtain the nearest Authorized Service Center: Retain your product type (Refrigerator), model number, serial number, and ZIP/Postal Code ready. 28 Call 1-800...
... ANY EXPRESS OR IMPLIED WARRANTY, INCLUDING THE IMPLIED WARRANTY OF MERCHANTABILITY APPLICABLE TO THIS PRODUCT. Repairs when your product which vary from accident, alteration, misuse, abuse, or improper installation. 5. CUSTOMER ASSISTANCE NUMBERS: To obtain Warranty Coverage: To obtain Product or Customer Service Assistance: To obtain the nearest Authorized Service Center: Retain your product type (Refrigerator), model number, serial number, and ZIP/Postal Code ready. 28 Call 1-800...


