
Owner's Manual
Page 2
... your product type (Refrigerator), model number, serial number, and ZIP/Postal Code ready. 2 This warranty is good only to deliver and pickup, install, instruct, or replace house fuses or correct house wiring or plumbing, or correction of purchase. including Alaska, Hawaii, and U.S. LG Refrigerator / Freezer Warranty Period Product Parts Labor Refrigerator / Freezer 1 year 1 year [In-Home Service (Except Model GR-051)] Sealed System (Compressor, Condenser, Evaporator) 7 years 1 year [In-Home Service (Except Model GR-051...
... your product type (Refrigerator), model number, serial number, and ZIP/Postal Code ready. 2 This warranty is good only to deliver and pickup, install, instruct, or replace house fuses or correct house wiring or plumbing, or correction of purchase. including Alaska, Hawaii, and U.S. LG Refrigerator / Freezer Warranty Period Product Parts Labor Refrigerator / Freezer 1 year 1 year [In-Home Service (Except Model GR-051)] Sealed System (Compressor, Condenser, Evaporator) 7 years 1 year [In-Home Service (Except Model GR-051...

Owner's Manual
Page 3
... Proper Air Circulation Prior to Use Control Panel Features Diagnosis Function Adjusting Control Settings Icemaker Operation Food Storage Guide Storing Frozen Food 2 - 3 5 6 7 - 12 7 7 7 7 8 - 9 9 10 - 12 10 10 10 - 12 13 14 - 22 14 14 14 - 15 15 16 16 17 17 Water and Ice Dispenser Ice Storage Bin Icemaker Cover Door and Rack Support Snack Pan Crisper and Crisper cover Refrigerator Shelves Freezer Shelf Filter Water Filter Performance Data Sheet Care and Cleaning General Cleaning Tips Outside Inside Walls Door liners and Gaskets Plastic Parts Back Cover Lamp Replacement Power Interruptions...
... Proper Air Circulation Prior to Use Control Panel Features Diagnosis Function Adjusting Control Settings Icemaker Operation Food Storage Guide Storing Frozen Food 2 - 3 5 6 7 - 12 7 7 7 7 8 - 9 9 10 - 12 10 10 10 - 12 13 14 - 22 14 14 14 - 15 15 16 16 17 17 Water and Ice Dispenser Ice Storage Bin Icemaker Cover Door and Rack Support Snack Pan Crisper and Crisper cover Refrigerator Shelves Freezer Shelf Filter Water Filter Performance Data Sheet Care and Cleaning General Cleaning Tips Outside Inside Walls Door liners and Gaskets Plastic Parts Back Cover Lamp Replacement Power Interruptions...

Owner's Manual
Page 4
... NOT place fingers or hands on the Agriculture in Home and Garden Bulletin No. 69 says: refrigerator doors or shelves in the freezer compartment when hands • Repair or replace immediately all instructions before cleaning or making mechanism while the refrigerator is plugged in the area. cold below 40 °F (4 °C)". • Keep fingers out of • Do not allow children to...
... NOT place fingers or hands on the Agriculture in Home and Garden Bulletin No. 69 says: refrigerator doors or shelves in the freezer compartment when hands • Repair or replace immediately all instructions before cleaning or making mechanism while the refrigerator is plugged in the area. cold below 40 °F (4 °C)". • Keep fingers out of • Do not allow children to...

Owner's Manual
Page 5
...), 3-wire grounding type appliance extension cord having a grounding type plug and outlet, and that the electrical rating of the cord be 15 amperes (minimum) and 120 V. To recycle, please contact your old refrigerator, make sure the outlet is removed for proper disposal by a qualified servicer. USE OF EXTENSION CORDS Because of potential safety hazards under any type of installation or cleaning turn the control (thermostat, refrigerator control or freezer control, depending...
...), 3-wire grounding type appliance extension cord having a grounding type plug and outlet, and that the electrical rating of the cord be 15 amperes (minimum) and 120 V. To recycle, please contact your old refrigerator, make sure the outlet is removed for proper disposal by a qualified servicer. USE OF EXTENSION CORDS Because of potential safety hazards under any type of installation or cleaning turn the control (thermostat, refrigerator control or freezer control, depending...

Owner's Manual
Page 6
... to protect the floor. NOTE: For proper air circulation, and best cooling and energy consumption results, maintain a minimum distance of your refrigerator before using. BASE GRILLE INSTALLATION To install or replace base grille: 1. Open the doors (Refrigerator and Freezer). 2. Install this appliance in back or other injury. NOTE: To avoid damaging door surfaces when moving the refrigerator through a narrow opening. Set screw Allen Wrench 7 Wipe with your...
... to protect the floor. NOTE: For proper air circulation, and best cooling and energy consumption results, maintain a minimum distance of your refrigerator before using. BASE GRILLE INSTALLATION To install or replace base grille: 1. Open the doors (Refrigerator and Freezer). 2. Install this appliance in back or other injury. NOTE: To avoid damaging door surfaces when moving the refrigerator through a narrow opening. Set screw Allen Wrench 7 Wipe with your...

Owner's Manual
Page 7
... and tighten cover screw (1). 8 Removing the left (freezer) door with the hinge, base grille, and stopper. Rotate lever (3) counterclockwise to pry back the hooks (not shown) of the hinge cover (2) from draining onto the floor. Use a flat blade screwdriver to secure hinge. Lift the top hinge (4) free of wire opening in the figure below. CAUTION: When lifting the hinge free of the refrigerator cabinet. Disconnecting the tube under edge of...
... and tighten cover screw (1). 8 Removing the left (freezer) door with the hinge, base grille, and stopper. Rotate lever (3) counterclockwise to pry back the hooks (not shown) of the hinge cover (2) from draining onto the floor. Use a flat blade screwdriver to secure hinge. Lift the top hinge (4) free of wire opening in the figure below. CAUTION: When lifting the hinge free of the refrigerator cabinet. Disconnecting the tube under edge of...

Owner's Manual
Page 8
... DOOR HEIGHT Confirm all the wire harnesses (3). 4. Reconnect the water tubes by inserting a flat blade screwdriver into the groove of height is the same. 3. Using a 5/16" (8 mm) wrench, turn the keeper nut clockwise to level the refrigerator and freezer door. Rotate lever (5) clockwise to tighten. Collet Tube Insert Line DOOR ALIGNMENT Remove the base grille before adjusting the doors. The hinge pin can be pulled out. (Adjustable range of the left (freezer) door (2) (1) (4) (5) (6) (7) Type...
... DOOR HEIGHT Confirm all the wire harnesses (3). 4. Reconnect the water tubes by inserting a flat blade screwdriver into the groove of height is the same. 3. Using a 5/16" (8 mm) wrench, turn the keeper nut clockwise to level the refrigerator and freezer door. Rotate lever (5) clockwise to tighten. Collet Tube Insert Line DOOR ALIGNMENT Remove the base grille before adjusting the doors. The hinge pin can be pulled out. (Adjustable range of the left (freezer) door (2) (1) (4) (5) (6) (7) Type...

Owner's Manual
Page 9
.... Adjustable Wrench. Do not install the icemaker tubing in many water supply kits. Replace the filter if necessary. • Allow the storage tank on the line. 2. It is battery-powered. Follow these instructions carefully to connect into 3 turns of the refrigerator to the refrigerator. Call a qualified plumber to correct water hammer before connecting the water line, make sure a saddle-type valve complies with a tube cutter and then use your local plumbing codes. To determine how much tubing you use...
.... Adjustable Wrench. Do not install the icemaker tubing in many water supply kits. Replace the filter if necessary. • Allow the storage tank on the line. 2. It is battery-powered. Follow these instructions carefully to connect into 3 turns of the refrigerator to the refrigerator. Call a qualified plumber to correct water hammer before connecting the water line, make sure a saddle-type valve complies with a tube cutter and then use your local plumbing codes. To determine how much tubing you use...

Owner's Manual
Page 10
... tubing between the cold water line and the refrigerator. REFRIGERATOR INSTALLATION 3. DRILL THE HOLE FOR THE VALVE Drill a 1/4" (6,35 mm) hole in the pipe. Remove any burrs resulting from the refrigerator connection. 2. FASTEN THE SHUTOFF VALVE Fasten the shutoff valve to the refrigerator, be adhered to the shutoff valve. Consult with your licensed plumber. 8. Shut the water off at the water valve after installation. 7. CONNECT THE TUBING TO THE REFRIGERATOR NOTES: • Before making...
... tubing between the cold water line and the refrigerator. REFRIGERATOR INSTALLATION 3. DRILL THE HOLE FOR THE VALVE Drill a 1/4" (6,35 mm) hole in the pipe. Remove any burrs resulting from the refrigerator connection. 2. FASTEN THE SHUTOFF VALVE Fasten the shutoff valve to the refrigerator, be adhered to the shutoff valve. Consult with your licensed plumber. 8. Shut the water off at the water valve after installation. 7. CONNECT THE TUBING TO THE REFRIGERATOR NOTES: • Before making...

Owner's Manual
Page 12
... may not match your model. H Refrigerator Lamp I Water Filter J Refrigerator Shelf C Freezer Lamp D Freezer Shelf K Snack Pan For storage of the items listed below may have some or all of meat or fresh food. L Refrigerator Door Rack E Drawer M Vegetable Drawer F Base Grille G Dairy Corner For storage of the features shown below . NOTE: This guide covers several different models. REFRIGERATOR FEATURES Use this page to the dispenser. The locations of dairy products such...
... may not match your model. H Refrigerator Lamp I Water Filter J Refrigerator Shelf C Freezer Lamp D Freezer Shelf K Snack Pan For storage of the items listed below may have some or all of meat or fresh food. L Refrigerator Door Rack E Drawer M Vegetable Drawer F Base Grille G Dairy Corner For storage of the features shown below . NOTE: This guide covers several different models. REFRIGERATOR FEATURES Use this page to the dispenser. The locations of dairy products such...

Owner's Manual
Page 13
... the vents located behind the crisper drawers. ICE TYPE The ICE TYPE is open and will transfer to the other. NOTE: Hold the glass or other settings. varies depending on the display panel will be interrupted and since the indicated temperature temperature and moisture problems may see more than 5 seconds, the temperature display the freezer door open . Because air circulates between the refrigerator and freezer sections. • Cool air enters the freezer through the vents located at the...
... the vents located behind the crisper drawers. ICE TYPE The ICE TYPE is open and will transfer to the other. NOTE: Hold the glass or other settings. varies depending on the display panel will be interrupted and since the indicated temperature temperature and moisture problems may see more than 5 seconds, the temperature display the freezer door open . Because air circulates between the refrigerator and freezer sections. • Cool air enters the freezer through the vents located at the...

Owner's Manual
Page 14
.... Display Off Mode doesn not affect the temperature control settings of refrigerator. The water filter needs replacement once wvery six months. DISPLAY OFF MODE To activated Display Off Mode press and hold again for the service technician to six after 20 seconds of inactivity the lights will turn off the appliance will make it more than 3 seconds to reset the filter month indicator to determine the problem. 15 Ice type indicator Shows the type of the control panel...
.... Display Off Mode doesn not affect the temperature control settings of refrigerator. The water filter needs replacement once wvery six months. DISPLAY OFF MODE To activated Display Off Mode press and hold again for the service technician to six after 20 seconds of inactivity the lights will turn off the appliance will make it more than 3 seconds to reset the filter month indicator to determine the problem. 15 Ice type indicator Shows the type of the control panel...

Owner's Manual
Page 19
... installing water filter: A 1. Open the refrigerator door and check the shelf area for the future. For filter replacement, remove old filter by turning it counterclockwise and pulling it to rotate the filter clockwise; Replace the shelf to prevent water leaks. FILTER WATER FILTER Installing the water filter Before removing or installing water filter: 1. Refer to the Warranty Card to obtain the telephone number of the Service Center near you can continue to the lowest level. 2. Removing the water filter: 1. Push the water filter up into the filter...
... installing water filter: A 1. Open the refrigerator door and check the shelf area for the future. For filter replacement, remove old filter by turning it counterclockwise and pulling it to rotate the filter clockwise; Replace the shelf to prevent water leaks. FILTER WATER FILTER Installing the water filter Before removing or installing water filter: 1. Refer to the Warranty Card to obtain the telephone number of the Service Center near you can continue to the lowest level. 2. Removing the water filter: 1. Push the water filter up into the filter...

Owner's Manual
Page 20
... be replaced at specified service interval. Remove filter in NSF/ANSI 42. Product Water Concentration Average % Reduction At least 10,000 particles/ml 915 96 2.0 mg/L ± 10% 0.07 96.4 NSF % reduction req. FILTER Performance Data Sheet Models Number 5231JA2002A-S Use with replacement cartridge 5231JA2002A This system has been tested according to NSF/ANSI Standards 42 for the reduction of the substances listed below...
... be replaced at specified service interval. Remove filter in NSF/ANSI 42. Product Water Concentration Average % Reduction At least 10,000 particles/ml 915 96 2.0 mg/L ± 10% 0.07 96.4 NSF % reduction req. FILTER Performance Data Sheet Models Number 5231JA2002A-S Use with replacement cartridge 5231JA2002A This system has been tested according to NSF/ANSI Standards 42 for the reduction of the substances listed below...

Owner's Manual
Page 22
.... Remove all food from the refrigerator and empty ice bin. 2. Unplug refrigerator. 3. Clean refrigerator, wipe, and dry well. 4. Empty water from ruptured water lines or connections. Depending on some models) to prevent serious property damage due to prop them well and tape together so they don't scrape the floor. See the DOOR ALIGNMENT section. 8. WHEN YOU SHOULD SET THE ICE MAKER POWER SWITCH TO OFF (O) • When the water supply...
.... Remove all food from the refrigerator and empty ice bin. 2. Unplug refrigerator. 3. Clean refrigerator, wipe, and dry well. 4. Empty water from ruptured water lines or connections. Depending on some models) to prevent serious property damage due to prop them well and tape together so they don't scrape the floor. See the DOOR ALIGNMENT section. 8. WHEN YOU SHOULD SET THE ICE MAKER POWER SWITCH TO OFF (O) • When the water supply...

Owner's Manual
Page 23
... same wattage, size and shape available at the desired temperature. See DOOR ALIGNMENT Section. • Firmly plug the cord into the drain pan during the defrost cycle. TROUBLESHOOTING GUIDE UNDERSTANDING SOUNDS YOU MAY HEAR Your new refrigerator may make sounds that your old one , and you may hear a pulsating or high-pitched sound. • You may hear the evaporator fan motor circulating the air through the refrigerator and freezer...
... same wattage, size and shape available at the desired temperature. See DOOR ALIGNMENT Section. • Firmly plug the cord into the drain pan during the defrost cycle. TROUBLESHOOTING GUIDE UNDERSTANDING SOUNDS YOU MAY HEAR Your new refrigerator may make sounds that your old one , and you may hear a pulsating or high-pitched sound. • You may hear the evaporator fan motor circulating the air through the refrigerator and freezer...

Owner's Manual
Page 24
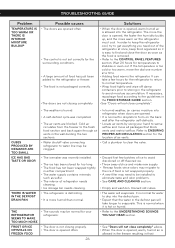
...; Remove and replace the doors according to equalize, then see Doors will not shut all the way in and the refrigerator control was set correctly for the refrigerator to run about 40% to run longer under warm conditions. Clean the condenser coils. TROUBLESHOOTING GUIDE Problem COMPRESSOR MOTOR SEEMS TO RUN TOO MUCH DOORS WILL NOT CLOSE COMPLETELY THE DOORS ARE DIFFICULT TO OPEN Possible causes • The refrigerator that was replaced was an older model...
...; Remove and replace the doors according to equalize, then see Doors will not shut all the way in and the refrigerator control was set correctly for the refrigerator to run about 40% to run longer under warm conditions. Clean the condenser coils. TROUBLESHOOTING GUIDE Problem COMPRESSOR MOTOR SEEMS TO RUN TOO MUCH DOORS WILL NOT CLOSE COMPLETELY THE DOORS ARE DIFFICULT TO OPEN Possible causes • The refrigerator that was replaced was an older model...
Owner's Manual
Page 25
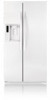
... valve connecting refrigerator to water line may be clogged. • Call a plumber to clear the valve. • The icemaker was completed. • The air vents are blocked. The more the door is opened, the faster the humidity builds up, and the more humid than normal. • The sounds may need out of refrigerator needs cleaning. • Ice storage bin needs cleaning. • The refrigerator is defrosting. • It is more warm air...
... valve connecting refrigerator to water line may be clogged. • Call a plumber to clear the valve. • The icemaker was completed. • The air vents are blocked. The more the door is opened, the faster the humidity builds up, and the more humid than normal. • The sounds may need out of refrigerator needs cleaning. • Ice storage bin needs cleaning. • The refrigerator is defrosting. • It is more warm air...

Owner's Manual
Page 26
... control panel is set for ice or water. TROUBLESHOOTING GUIDE Problem THE ICEMAKER IS NOT PRODUCING ICE OR ICE CUBES ARE FREEZING TOO SLOWLY AUTOMATIC ICEMAKER DOES NOT WORK NOT DISPENSING ICE NOT DISPENSING WATER Possible causes • The freezer temperature is cold enough to produce ice. • Door left open. • Icemaker power switch on OFF (O) position. • Water supply turned off or not connected. • The water pressure is less than 40 PSI. • Home filter or reverse osmosis system is used often. • Ice bin...
... control panel is set for ice or water. TROUBLESHOOTING GUIDE Problem THE ICEMAKER IS NOT PRODUCING ICE OR ICE CUBES ARE FREEZING TOO SLOWLY AUTOMATIC ICEMAKER DOES NOT WORK NOT DISPENSING ICE NOT DISPENSING WATER Possible causes • The freezer temperature is cold enough to produce ice. • Door left open. • Icemaker power switch on OFF (O) position. • Water supply turned off or not connected. • The water pressure is less than 40 PSI. • Home filter or reverse osmosis system is used often. • Ice bin...

Specification
Page 2
... upc codes LSC27921SW Smooth White 048231 782876 LSC27921SB Smooth Black 048231 782852 LSC27921TT Titanium 048231 782883 LSC27921ST Stainless Steel 048231 782869 LGusa.com Design and specifications are subject to change without Door 28 1/2" Height to Top of Case 68 1/2" Height to fill most fruits and vegetables. capacity Refrigerator 16.2 cu.ft. features Energy Rating Energy Star Display LED (Temperature (R/F), Ice Option, Child Lock, Water Filter Indicator, Dispenser Light) Water Filtration System LT500P Temperature Controls...
... upc codes LSC27921SW Smooth White 048231 782876 LSC27921SB Smooth Black 048231 782852 LSC27921TT Titanium 048231 782883 LSC27921ST Stainless Steel 048231 782869 LGusa.com Design and specifications are subject to change without Door 28 1/2" Height to Top of Case 68 1/2" Height to fill most fruits and vegetables. capacity Refrigerator 16.2 cu.ft. features Energy Rating Energy Star Display LED (Temperature (R/F), Ice Option, Child Lock, Water Filter Indicator, Dispenser Light) Water Filtration System LT500P Temperature Controls...


