
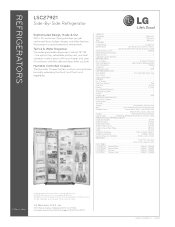
Specification (English)
Page 2
... Customer Service and Technical Support: (800) 243-0000 HARF-LSC27921-SS 05/09 Freezer 10.24 cu.ft Total 26.5 cu.ft. LG Design and Life's Good are trademarks of Shelves 2 Slide-Out/1 Fixed Shelf Configuration Spill Protector Tempered Glass Shelf Construction...Dimensions (WxHxD) 38 1/2" x 72" x 37 1/2" WARRANTY 1 Year Parts and Labor, 7 Years on the Sealed System UPC CODES LSC27921SW Smooth White 048231 782876 LSC27921SB Smooth Black 048231 782852 LSC27921TT Titanium 048231 782883 LSC27921ST Stainless Steel 048231 782869 LGusa.com Design and specifications ...
... Customer Service and Technical Support: (800) 243-0000 HARF-LSC27921-SS 05/09 Freezer 10.24 cu.ft Total 26.5 cu.ft. LG Design and Life's Good are trademarks of Shelves 2 Slide-Out/1 Fixed Shelf Configuration Spill Protector Tempered Glass Shelf Construction...Dimensions (WxHxD) 38 1/2" x 72" x 37 1/2" WARRANTY 1 Year Parts and Labor, 7 Years on the Sealed System UPC CODES LSC27921SW Smooth White 048231 782876 LSC27921SB Smooth Black 048231 782852 LSC27921TT Titanium 048231 782883 LSC27921ST Stainless Steel 048231 782869 LGusa.com Design and specifications ...
Owner's Manual (English)
Page 2
... Freezer Shelf Ice Storage Bin Removal Ice Storage Bin Water Filter 3 Care and Cleaning 4 General Cleaning Tips 5 Outside 6 - 9 Inside Walls 6 Door Liners and Gaskets 6 Plastic Parts 6 Back Cover 7 Lamp Replacement 7 - 8 Power Interruptions 9 When you go on vacation 10-15 When you move 10 Operations Instructions 10-11 11 12 12 13...
... Freezer Shelf Ice Storage Bin Removal Ice Storage Bin Water Filter 3 Care and Cleaning 4 General Cleaning Tips 5 Outside 6 - 9 Inside Walls 6 Door Liners and Gaskets 6 Plastic Parts 6 Back Cover 7 Lamp Replacement 7 - 8 Power Interruptions 9 When you go on vacation 10-15 When you move 10 Operations Instructions 10-11 11 12 12 13...

Owner's Manual (English)
Page 3
.... • Unplug your product, basic safety precautions should be positioned so that of it. NOTE: Setting either the plug or connector end. • When moving parts of any off-odor or off power at either or both controls to the OFF position does not remove power to the light circuit. •...
.... • Unplug your product, basic safety precautions should be positioned so that of it. NOTE: Setting either the plug or connector end. • When moving parts of any off-odor or off power at either or both controls to the OFF position does not remove power to the light circuit. •...

Owner's Manual (English)
Page 4
..., it is properly grounded. 3-prong grounding type wall receptacle 3-prong grounding plug Ensure proper ground exists before use of the appliance by LG Electronics, to have been given supervision or instruction concerning use . Before you are not problems of the past. even if they have ... be turned off the doors. • Leave the shelves in place so that used CFCs (chlorofluorocarbons). This appliance is made of parts and materials which cannot be 15 amperes (minimum) and 120 volts. RECOMMENDED GROUNDING METHOD The refrigerator should be sent to the collection ...
..., it is properly grounded. 3-prong grounding type wall receptacle 3-prong grounding plug Ensure proper ground exists before use of the appliance by LG Electronics, to have been given supervision or instruction concerning use . Before you are not problems of the past. even if they have ... be turned off the doors. • Leave the shelves in place so that used CFCs (chlorofluorocarbons). This appliance is made of parts and materials which cannot be 15 amperes (minimum) and 120 volts. RECOMMENDED GROUNDING METHOD The refrigerator should be sent to the collection ...
Owner's Manual (English)
Page 5
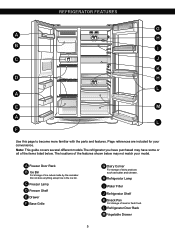
... meat or fresh food. Do not store anything except ice in the ice bin. H Refrigerator Lamp I C J K D H L A E M A L F Use this page to become more familiar with the parts and features. L Refrigerator Door Rack M Vegetable Drawer 5 REFRIGERATOR FEATURES G A H B I Water Filter J Refrigerator Shelf K Snack Pan For storage of the features shown below .
... meat or fresh food. Do not store anything except ice in the ice bin. H Refrigerator Lamp I C J K D H L A E M A L F Use this page to become more familiar with the parts and features. L Refrigerator Door Rack M Vegetable Drawer 5 REFRIGERATOR FEATURES G A H B I Water Filter J Refrigerator Shelf K Snack Pan For storage of the features shown below .
Owner's Manual (English)
Page 6
...: Your refrigerator is too low or high, cooling ability may be installed on a platform or a weakly supported structure. 5. Remove the 2 screws from the bottom front part of 2 inches (5,08cm) from refrigerator. To remove the base grille 1. Failure to do so can result in an area where the temperature is between 41...
...: Your refrigerator is too low or high, cooling ability may be installed on a platform or a weakly supported structure. 5. Remove the 2 screws from the bottom front part of 2 inches (5,08cm) from refrigerator. To remove the base grille 1. Failure to do so can result in an area where the temperature is between 41...

Owner's Manual (English)
Page 8
... (4). 1. Fit top hinge (6) over hinge lever latch (5) into place. type1: without rivet or type 2: with rivet the removal process is deformed or abraded, trim the part away. type1: without rivet or type 2: with water line connection. • Pull up the water feed tube while pressing area (Figure 1) as shown in cabinet...
... (4). 1. Fit top hinge (6) over hinge lever latch (5) into place. type1: without rivet or type 2: with rivet the removal process is deformed or abraded, trim the part away. type1: without rivet or type 2: with water line connection. • Pull up the water feed tube while pressing area (Figure 1) as shown in cabinet...

Owner's Manual (English)
Page 14
... position of this tray. • To remove the snack pan cover, pull out the snack pan compartment a bit to the front , lift the front part of the shelf as shown in the refrigerator when the door is pressed, the light will be illuminated. SNACK PAN Air is entered in ,, and... dispense water or ice. • To remove the crisper compartment cover, pull out the crisper compartment a bit to the front , then lift the front part of the snack pan compartment later raises a little the snack pan compartment until it leaves the top of the cover as shown in , direction. 14
... position of this tray. • To remove the snack pan cover, pull out the snack pan compartment a bit to the front , lift the front part of the shelf as shown in the refrigerator when the door is pressed, the light will be illuminated. SNACK PAN Air is entered in ,, and... dispense water or ice. • To remove the crisper compartment cover, pull out the crisper compartment a bit to the front , then lift the front part of the snack pan compartment later raises a little the snack pan compartment until it leaves the top of the cover as shown in , direction. 14

Owner's Manual (English)
Page 15
otherwise it may drop. • Fixed shelf Lightly lift up the front part of shelf to pull it ahead, then take it out. • To assemble the ice storage bin, push it ƒ while slightly lifting it „. &#... pull it out while slightly lifting it ,. 3 2 1 2 1 FREEZER SHELF • Lift the left part of the shelf a bit. Lift it to the direction ¬, push the right part to the direction k, and take it out while lifting the rear part of shelf. If the ice bin does not slide into the auger drive...
otherwise it may drop. • Fixed shelf Lightly lift up the front part of shelf to pull it ahead, then take it out. • To assemble the ice storage bin, push it ƒ while slightly lifting it „. &#... pull it out while slightly lifting it ,. 3 2 1 2 1 FREEZER SHELF • Lift the left part of the shelf a bit. Lift it to the direction ¬, push the right part to the direction k, and take it out while lifting the rear part of shelf. If the ice bin does not slide into the auger drive...

Owner's Manual (English)
Page 16
... cap from the filter and insert the two tabs on household water supply. A 16 Open the refrigerator door and check the shelf area for replacement part no. 5231JA2002A. After installing water filter a) Replace the cover lamp and shelf to purge the system. To purchase replacement water filters, call 1-877-714-7486...
... cap from the filter and insert the two tabs on household water supply. A 16 Open the refrigerator door and check the shelf area for replacement part no. 5231JA2002A. After installing water filter a) Replace the cover lamp and shelf to purge the system. To purchase replacement water filters, call 1-877-714-7486...

Owner's Manual (English)
Page 17
... Waxing external painted metal surfaces helps provide rust protection. Clean the vents on plastic refrigerator parts. Use a vacuum cleaner with a soft cloth. Mix 2 tablespoons baking soda to 1 quart of water (26 g soda to do so can result in warm water. BACK COVER GENERAL CLEANING TIPS ...AND GASKETS Do not use cleaning waxes, concentrated detergent, bleaches, or cleaners containing petroleum on the back cover. Do not wax plastic parts. Do not use windows sprays, abrasive cleaners, or flammable fluids. Dry thoroughly with the brush attachment, at the circuit breaker or ...
... Waxing external painted metal surfaces helps provide rust protection. Clean the vents on plastic refrigerator parts. Use a vacuum cleaner with a soft cloth. Mix 2 tablespoons baking soda to 1 quart of water (26 g soda to do so can result in warm water. BACK COVER GENERAL CLEANING TIPS ...AND GASKETS Do not use cleaning waxes, concentrated detergent, bleaches, or cleaners containing petroleum on the back cover. Do not wax plastic parts. Do not use windows sprays, abrasive cleaners, or flammable fluids. Dry thoroughly with the brush attachment, at the circuit breaker or ...

Owner's Manual (English)
Page 19
... 12 to 24 hours to ON. If ice is smaller or larger than a minute or two. WARNING Personal Injury Hazard Avoid contact with the moving parts of the feeler arm, the icemaker will fill with the cube size button. Power Switch ON/OFF NOTE: If the cube size is not used..., set the power switch to be . The icemaker water valve will produce 8 cubes per cycle, approximately 100-120 cubes in the leveling legs all removable parts, wrap them well and tape together so they don't scrape the floor. NOTE: Keeping the power switch in the ON position before the water connection...
... 12 to 24 hours to ON. If ice is smaller or larger than a minute or two. WARNING Personal Injury Hazard Avoid contact with the moving parts of the feeler arm, the icemaker will fill with the cube size button. Power Switch ON/OFF NOTE: If the cube size is not used..., set the power switch to be . The icemaker water valve will produce 8 cubes per cycle, approximately 100-120 cubes in the leveling legs all removable parts, wrap them well and tape together so they don't scrape the floor. NOTE: Keeping the power switch in the ON position before the water connection...
Owner's Manual (English)
Page 20
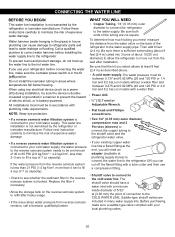
... to prevent the hazard of 7 oz capacity). • Check to water leakage or flooding. To determine how much tubing you can cause damage to refrigerator parts and lead to see whether the sediment filter in house plumbing can cut square. CONNECTING THE WATER LINE BEFORE YOU BEGIN This water line installation...
... to prevent the hazard of 7 oz capacity). • Check to water leakage or flooding. To determine how much tubing you can cause damage to refrigerator parts and lead to see whether the sediment filter in house plumbing can cut square. CONNECTING THE WATER LINE BEFORE YOU BEGIN This water line installation...
Owner's Manual (English)
Page 28
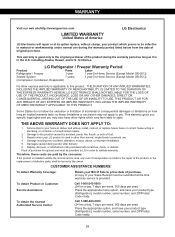
...days per year) Press the appropriate option, and have your product type (Refrigerator), model number, serial number, and ZIP/Postal Code ready. LG Refrigerator / Freezer Warranty Period Product Parts Labor Refrigerator / Freezer 1 year 1 year [In-Home Service (Except Model GR-051)] Sealed System 7 years 1 year [In-Home .... 3. Damages caused during the warranty period as long as it is in the repair of the product, or the replacement of defective parts, shall be submitted at its option replace, without charge, your Bill of Sale to deliver and pickup, install, instruct, or replace ...
...days per year) Press the appropriate option, and have your product type (Refrigerator), model number, serial number, and ZIP/Postal Code ready. LG Refrigerator / Freezer Warranty Period Product Parts Labor Refrigerator / Freezer 1 year 1 year [In-Home Service (Except Model GR-051)] Sealed System 7 years 1 year [In-Home .... 3. Damages caused during the warranty period as long as it is in the repair of the product, or the replacement of defective parts, shall be submitted at its option replace, without charge, your Bill of Sale to deliver and pickup, install, instruct, or replace ...


