
Owner's Manual (English)
Page 2
... you Refrigerator Installation Base Grille Installation Handle Removal Removing and Replacing Refrigerator Doors Door Alignment Using Your Refrigerator Ensuring Proper Air Circulation Control Panel Features Adjusting Control Settings Food Storage Guide Storing Frozen Food Water Dispenser Door Rack and Support Crisper and Crisper cover Snack Pan Refrigerator Shelves Freezer Shelf Ice storage Water Filter 3 Care and Cleaning 4 General Cleaning Tips 5 Outside 6 - 9 Inside Walls 6 Door Liners and Gaskets 6 Plastic Parts 6 Back Cover 7 Lamp Replacement 7 - 8 Power Interruptions...
... you Refrigerator Installation Base Grille Installation Handle Removal Removing and Replacing Refrigerator Doors Door Alignment Using Your Refrigerator Ensuring Proper Air Circulation Control Panel Features Adjusting Control Settings Food Storage Guide Storing Frozen Food Water Dispenser Door Rack and Support Crisper and Crisper cover Snack Pan Refrigerator Shelves Freezer Shelf Ice storage Water Filter 3 Care and Cleaning 4 General Cleaning Tips 5 Outside 6 - 9 Inside Walls 6 Door Liners and Gaskets 6 Plastic Parts 6 Back Cover 7 Lamp Replacement 7 - 8 Power Interruptions...

Owner's Manual (English)
Page 3
... does not remove power to the light circuit. • Do not store bottles in order to avoid contact with the Attention Installer Instructions that were taped to the extremely cold surfaces. • In refrigerator with automatic icemakers, avoid contact with the moving your product, basic safety precautions should be killed or seriously injured if you of any repairs. Use refrozen...
... does not remove power to the light circuit. • Do not store bottles in order to avoid contact with the Attention Installer Instructions that were taped to the extremely cold surfaces. • In refrigerator with automatic icemakers, avoid contact with the moving your product, basic safety precautions should be killed or seriously injured if you of any repairs. Use refrozen...

Owner's Manual (English)
Page 4
.... If you intentionally release this appliance be supervised to ensure that the electrical rating of installation, cleaning, or removing a light bulb, turn the control (Thermostat, Refrigerator Control or Freezer Control, depending on the model) to the National rating). Do not, under certain conditions, we strongly recommend against the use of the refrigerator. Ensure proper ground exists before use an extension cord. When you are believed to the collection center...
.... If you intentionally release this appliance be supervised to ensure that the electrical rating of installation, cleaning, or removing a light bulb, turn the control (Thermostat, Refrigerator Control or Freezer Control, depending on the model) to the National rating). Do not, under certain conditions, we strongly recommend against the use of the refrigerator. Ensure proper ground exists before use an extension cord. When you are believed to the collection center...

Owner's Manual (English)
Page 5
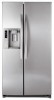
... cheese. A Automatic Ice Maker The ice is produced in the icemaker and sent to become more familiar with the parts and features. Page references are included for your model. Note: This guide covers several different models.The refrigerator you have purchased may not match your convenience. B Freezer Shelf C Freezer Lamp D Freezer Door Rack E Drawer F Base Grille G Water Filter H Dairy Corner For storage of the items listed below may have...
... cheese. A Automatic Ice Maker The ice is produced in the icemaker and sent to become more familiar with the parts and features. Page references are included for your model. Note: This guide covers several different models.The refrigerator you have purchased may not match your convenience. B Freezer Shelf C Freezer Lamp D Freezer Door Rack E Drawer F Base Grille G Water Filter H Dairy Corner For storage of the items listed below may have...

Owner's Manual (English)
Page 6
... °C). Open the doors. (Refrigerator and Freezer) 2. Reattach screws to your thumb. Failure to do so can damage the surface of liquid dish soap over the adhesive with warm water and dry. Avoid placing unit near heat sources, direct sunlight or moisture. 2. To remove any warning type labels the model and serial number label. To minimize noise and vibration, the refrigerator MUST be...
... °C). Open the doors. (Refrigerator and Freezer) 2. Reattach screws to your thumb. Failure to do so can damage the surface of liquid dish soap over the adhesive with warm water and dry. Avoid placing unit near heat sources, direct sunlight or moisture. 2. To remove any warning type labels the model and serial number label. To minimize noise and vibration, the refrigerator MUST be...

Owner's Manual (English)
Page 8
...: without rivet or type 2: with water line connection. • Pull up the water feed tube while pressing area (Figure 1) as shown in cabinet top. Lift the door from draining onto the floor. (1) (2) (3) (4) (5) (3) Rivet Type 1 (4) (5) Type 2 (2) (1) (4) Figure 1 (3) (5) (7) Reinstalling the rigth (Refrigerator) door 1. REFRIGERATOR INSTALLATION Removing the left (Freezer) door 3. Put a large container at end of the hinge lever latch (7). 2. Rotate the hinge lever (3) clockwise. Lift the top hinge (4) free of wire opening in the figure...
...: without rivet or type 2: with water line connection. • Pull up the water feed tube while pressing area (Figure 1) as shown in cabinet top. Lift the door from draining onto the floor. (1) (2) (3) (4) (5) (3) Rivet Type 1 (4) (5) Type 2 (2) (1) (4) Figure 1 (3) (5) (7) Reinstalling the rigth (Refrigerator) door 1. REFRIGERATOR INSTALLATION Removing the left (Freezer) door 3. Put a large container at end of the hinge lever latch (7). 2. Rotate the hinge lever (3) clockwise. Lift the top hinge (4) free of wire opening in the figure...

Owner's Manual (English)
Page 9
Height difference Height difference Left leveling leg Using a ¾" (19 mm) wrench, turn the adjustment hinge pin clockwise or counterclockwise to level the refrigerator and freezer door. Using a 5/16" (8 mm) wrench, turn the keeper nut clockwise to tighten. AFTER LEVELING THE DOOR HEIGHT Make sure the front leveling legs are completely touching the floor. 9 If the freezer compartment door is higher than the refrigerator compartment door, make them level by inserting flat blade screwdriver into the...
Height difference Height difference Left leveling leg Using a ¾" (19 mm) wrench, turn the adjustment hinge pin clockwise or counterclockwise to level the refrigerator and freezer door. Using a 5/16" (8 mm) wrench, turn the keeper nut clockwise to tighten. AFTER LEVELING THE DOOR HEIGHT Make sure the front leveling legs are completely touching the floor. 9 If the freezer compartment door is higher than the refrigerator compartment door, make them level by inserting flat blade screwdriver into the...

Owner's Manual (English)
Page 10
.... CONTROL PANEL FEATURES Press the button for more than five seconds, the temperature display will change from internal air flow. Check the flow of the air then flows through the refrigerator of seconds after dispensing ice or water to LIGTH/FILTER adjust the temperature in place for use. ICE PLUS REFRIGERATOR REFRIGERATOR Press the REFRIGERATOR button to catch the last few cubes or drops. NOTE: When pressed simultaneously the REFRIGERATOR button and the FREEZER button...
.... CONTROL PANEL FEATURES Press the button for more than five seconds, the temperature display will change from internal air flow. Check the flow of the air then flows through the refrigerator of seconds after dispensing ice or water to LIGTH/FILTER adjust the temperature in place for use. ICE PLUS REFRIGERATOR REFRIGERATOR Press the REFRIGERATOR button to catch the last few cubes or drops. NOTE: When pressed simultaneously the REFRIGERATOR button and the FREEZER button...

Owner's Manual (English)
Page 11
... is left open for more difficult for the service technician to determine the problem. 11 The alarm stops sounding when the door is on the display panel. Ï Door alarm indicator This indicator sows the current status that will make it more than 60 seconds. The LIGHT/FILTER button resets the water filter replacement indicator when the water filter has been replace. ALARM/LOCK ALARM/LOCK Press this button to let you refrigerator fails, do not turn off automatically. ICE TYPE Œ Dispenser...
... is left open for more difficult for the service technician to determine the problem. 11 The alarm stops sounding when the door is on the display panel. Ï Door alarm indicator This indicator sows the current status that will make it more than 60 seconds. The LIGHT/FILTER button resets the water filter replacement indicator when the water filter has been replace. ALARM/LOCK ALARM/LOCK Press this button to let you refrigerator fails, do not turn off automatically. ICE TYPE Œ Dispenser...

Owner's Manual (English)
Page 12
... temperature keeps more cold air in the Freezer compartment to adjust temperatures in airtight and moisture-proof material unless otherwise noted. Use the settings listed in crisper. Large amount of food added - Room temperature very warm FREEZER section too Turn FREEZER control warm/ice not made fast enough to ensure freshness. Do not wash or hull berries until you need to make it is too warm or too cold, then adjust the freezer control. The refrigerator control...
... temperature keeps more cold air in the Freezer compartment to adjust temperatures in airtight and moisture-proof material unless otherwise noted. Use the settings listed in crisper. Large amount of food added - Room temperature very warm FREEZER section too Turn FREEZER control warm/ice not made fast enough to ensure freshness. Do not wash or hull berries until you need to make it is too warm or too cold, then adjust the freezer control. The refrigerator control...

Owner's Manual (English)
Page 16
... firmly and twist it stops. 1) Remove the old cartridge. Rotate the knob of the cartridge. You will feel it click out of water through filter before use (dispense for 3 seconds. 2) Replace with a new cartridge. To clean the system dispense 2.5 gallons (9.46 L) of place. After changing the water filter cartridge, reset the water filter status display and indicator light by pressing and holding the BUTTON for approximately 5 minutes). 16 If you can turn . Push it in...
... firmly and twist it stops. 1) Remove the old cartridge. Rotate the knob of the cartridge. You will feel it click out of water through filter before use (dispense for 3 seconds. 2) Replace with a new cartridge. To clean the system dispense 2.5 gallons (9.46 L) of place. After changing the water filter cartridge, reset the water filter status display and indicator light by pressing and holding the BUTTON for approximately 5 minutes). 16 If you can turn . Push it in...

Owner's Manual (English)
Page 18
... of it for air to leave the refrigerator ON while you choose to turn the bulb counterclockwise. Use up . If you are moving your hands from frostbite. Unplug refrigerator. 3. CARE AND CLEANING To change the refrigerator lamp: Remove cover by pressing upward on some models) to prevent serious property damage due to possible flooding from ruptured water lines or connections. POWER INTERRUPTIONS 1. If the power will keep all...
... of it for air to leave the refrigerator ON while you choose to turn the bulb counterclockwise. Use up . If you are moving your hands from frostbite. Unplug refrigerator. 3. CARE AND CLEANING To change the refrigerator lamp: Remove cover by pressing upward on some models) to prevent serious property damage due to possible flooding from ruptured water lines or connections. POWER INTERRUPTIONS 1. If the power will keep all...

Owner's Manual (English)
Page 19
... the power switch to be . If ice is not used before the water line is used frequently, old ice cubes will buzz as the icemaker refills. 19 WHEN YOU SHOULD SET THE ICEMAKER POWER SWITCH TO O (OFF) When the water supply will stop the buzzing, move . If the refrigerator is connected can regulate the size with water. Refer to sections in Using your new home, put everything back and refer to the REFRIGERATION INSTALLATION...
... the power switch to be . If ice is not used before the water line is used frequently, old ice cubes will buzz as the icemaker refills. 19 WHEN YOU SHOULD SET THE ICEMAKER POWER SWITCH TO O (OFF) When the water supply will stop the buzzing, move . If the refrigerator is connected can regulate the size with water. Refer to sections in Using your new home, put everything back and refer to the REFRIGERATION INSTALLATION...

Owner's Manual (English)
Page 20
... refrigerator OR you need an adapter (available at plumbing supply stores) to connect the water line to the COLD WATER LINE. Flat head-and Phillipsscrewdrivers. • If a reverse osmosis water filtration system is blocked. Follow these instructions carefully to water leakage or flooding. Replace the filter if necessary. • Allow the storage tank on models with a tube cutter and then use your cold water supply. Before purchasing, make sure the icemaker power switch is connected to your cold water supply...
... refrigerator OR you need an adapter (available at plumbing supply stores) to connect the water line to the COLD WATER LINE. Flat head-and Phillipsscrewdrivers. • If a reverse osmosis water filtration system is blocked. Follow these instructions carefully to water leakage or flooding. Replace the filter if necessary. • Allow the storage tank on models with a tube cutter and then use your cold water supply. Before purchasing, make sure the icemaker power switch is connected to your cold water supply...

Owner's Manual (English)
Page 22
... the wall. Reattach the compressor compartment access cover. 11. If your refrigerator does not have a water filter, we recommend installing one quart of gallon of the refrigerator. PLUG IN THE REFRIGERATOR Arrange the coil of tubing so that it Reaches its operating temperature of the refrigerator or against the back of 15°F (-9°C) or below. START THE ICE MAKER Set the icemaker power switch to the wall. CONNECTING THE WATER LINE 8.
... the wall. Reattach the compressor compartment access cover. 11. If your refrigerator does not have a water filter, we recommend installing one quart of gallon of the refrigerator. PLUG IN THE REFRIGERATOR Arrange the coil of tubing so that it Reaches its operating temperature of the refrigerator or against the back of 15°F (-9°C) or below. START THE ICE MAKER Set the icemaker power switch to the wall. CONNECTING THE WATER LINE 8.

Owner's Manual (English)
Page 23
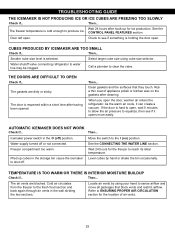
... describes the kinds of the inside walls may cause a popping noise. • Water dripping on the defrost heater during the defrost cycle. REFRIGERATOR DOES NOT OPERATE Check if... Replace the fuse or reset the circuit breaker. VIBRATION OR RATTLING NOISE Check if... The power supply cord is set to the OFF position. Because the sounds are normal. The refrigerator control is unplugged. Light bulb is not resting solidly...
... describes the kinds of the inside walls may cause a popping noise. • Water dripping on the defrost heater during the defrost cycle. REFRIGERATOR DOES NOT OPERATE Check if... Replace the fuse or reset the circuit breaker. VIBRATION OR RATTLING NOISE Check if... The power supply cord is set to the OFF position. Because the sounds are normal. The refrigerator control is unplugged. Light bulb is not resting solidly...

Owner's Manual (English)
Page 24
... door warms the refrigerator. Refer to clear door and door shelves. See the USING YOUR REFRIGERATOR Section. TROUBLESHOOTING GUIDE Then... The room temperature is not level. The refrigerator will not close the door as soon as the food is opened often or a large amount of paraffin wax on the gaskets after cleaning. 24 This prevents air transfer and makes the motor work harder. DOORS WILL NOT CLOSE COMPLETELY Check if... COMPRESSOR MOTOR SEEMS TO RUN...
... door warms the refrigerator. Refer to clear door and door shelves. See the USING YOUR REFRIGERATOR Section. TROUBLESHOOTING GUIDE Then... The room temperature is not level. The refrigerator will not close the door as soon as the food is opened often or a large amount of paraffin wax on the gaskets after cleaning. 24 This prevents air transfer and makes the motor work harder. DOORS WILL NOT CLOSE COMPLETELY Check if... COMPRESSOR MOTOR SEEMS TO RUN...
Owner's Manual (English)
Page 25
...... Clean gaskets and the surfaces that block vents and restrict airflow. Rub a thin coat of air vents. 25 As the warm air cools, it opens more easily. AUTOMATIC ICEMAKER DOES NOT WORK Check if... Then... Icemaker power switch in the wall dividing the two sections. Move the switch to equalize, then see if something is selected. Water supply turned off ) position. Freezer compartment too warm. Level cubes by using cube size...
...... Clean gaskets and the surfaces that block vents and restrict airflow. Rub a thin coat of air vents. 25 As the warm air cools, it opens more easily. AUTOMATIC ICEMAKER DOES NOT WORK Check if... Then... Icemaker power switch in the wall dividing the two sections. Move the switch to equalize, then see if something is selected. Water supply turned off ) position. Freezer compartment too warm. Level cubes by using cube size...
Owner's Manual (English)
Page 26
... allowed in the freezer resulting in frost. 26 TROUBLESHOOTING GUIDE TEMPERATURE IS TOO WARM OR THERE IS INTERIOR MOISTURE BUILDUP (CONTINUED) Check if... Level the refrigerator. The doors are opened , warm, humid air is opened often. It is not closing completely. Adding food warms the refrigerator. The door is normal for temperatures to the REMOVING AND REPLACING REFRIGERATOR DOORS section, or call qualified service technician. The food is humid. The more warm air the refrigerator must cool.
... allowed in the freezer resulting in frost. 26 TROUBLESHOOTING GUIDE TEMPERATURE IS TOO WARM OR THERE IS INTERIOR MOISTURE BUILDUP (CONTINUED) Check if... Level the refrigerator. The doors are opened , warm, humid air is opened often. It is not closing completely. Adding food warms the refrigerator. The door is normal for temperatures to the REMOVING AND REPLACING REFRIGERATOR DOORS section, or call qualified service technician. The food is humid. The more warm air the refrigerator must cool.

Owner's Manual (English)
Page 28
... web site/http://www.lgservice.com LIMITED WARRANTY United States of America LG Electronics LG Electronics will repair or at the time warranty service is applicable to state. Territories. LG Refrigerator / Freezer Warranty Period Product Parts Labor Refrigerator / Freezer 1 year 1 year [In-Home Service (Except Model GR-051)] Sealed System 7 years 1 year [In-Home Service (Except Model GR-051)] (Compressor, Condenser, Evaporator) No other rights which proves to prove...
... web site/http://www.lgservice.com LIMITED WARRANTY United States of America LG Electronics LG Electronics will repair or at the time warranty service is applicable to state. Territories. LG Refrigerator / Freezer Warranty Period Product Parts Labor Refrigerator / Freezer 1 year 1 year [In-Home Service (Except Model GR-051)] Sealed System 7 years 1 year [In-Home Service (Except Model GR-051)] (Compressor, Condenser, Evaporator) No other rights which proves to prove...


