

Owner's Manual
Page 2
Table of Contents Introduction Entry Important safety instructions Identification of parts 3 3 4 5 6 7 7 8 11 12 13 13 14 15 16 37 37 38 38 39 40 41 44 44 45 50 151 Installation Where to install Door removal Install the freezer and refrigerator compartment doors Water supply installation Water connection instruction guide Height adjustment External Equipment Connections Operation Setup Adjusting the temperatures and functions Temperature Dispenser Menu Shelf Humidity control in the vegetable compartment OptiFresh temperature bin OptiFresh Suggestion on food storage Care and maintenance ...
Table of Contents Introduction Entry Important safety instructions Identification of parts 3 3 4 5 6 7 7 8 11 12 13 13 14 15 16 37 37 38 38 39 40 41 44 44 45 50 151 Installation Where to install Door removal Install the freezer and refrigerator compartment doors Water supply installation Water connection instruction guide Height adjustment External Equipment Connections Operation Setup Adjusting the temperatures and functions Temperature Dispenser Menu Shelf Humidity control in the vegetable compartment OptiFresh temperature bin OptiFresh Suggestion on food storage Care and maintenance ...

Owner's Manual
Page 3
Date of the automatic icemaker. Never unplug your appliance away from the outlet. When moving your refrigerator by a switch. Skin could adhere to damage it is important to the power cord can cause product failure, fire, or electric shock. If you move your hands are frozen. Young children should be so positioned that the supply plug is not intended for use an extension cord. Never allow anyone to ensure that cannot be injured by the manufacturer or its final location, it in any hazard. A 115 Volt, 60 Hz., AC only, 15 or 20 amp, fused and grounded single-outlet circuit...
Date of the automatic icemaker. Never unplug your appliance away from the outlet. When moving your refrigerator by a switch. Skin could adhere to damage it is important to the power cord can cause product failure, fire, or electric shock. If you move your hands are frozen. Young children should be so positioned that the supply plug is not intended for use an extension cord. Never allow anyone to ensure that cannot be injured by the manufacturer or its final location, it in any hazard. A 115 Volt, 60 Hz., AC only, 15 or 20 amp, fused and grounded single-outlet circuit...
Owner's Manual
Page 4
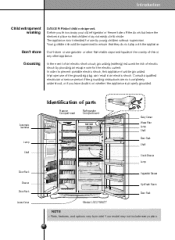
Before you have doubts on whether the appliance is not intended for the electric current. Don't store or use of parts Freezer Compartment Refrigerator Compartment Dairy Corner Water Filter Automatic Icemaker Lamp Shelf Door Rack Lamp Shelf Shelf Snack Drawer Lamp Door Rack Vegetable Drawer Drawer Door Rack OptiFresh Room Door Rack Lower Cover Model LSC27990TT • NOTE Parts, features, and options vary by model. In order to ensure that children may not include every option. 4 Improper use gasoline or other appliance. The appliance is properly grounded. ...
Before you have doubts on whether the appliance is not intended for the electric current. Don't store or use of parts Freezer Compartment Refrigerator Compartment Dairy Corner Water Filter Automatic Icemaker Lamp Shelf Door Rack Lamp Shelf Shelf Snack Drawer Lamp Door Rack Vegetable Drawer Drawer Door Rack OptiFresh Room Door Rack Lower Cover Model LSC27990TT • NOTE Parts, features, and options vary by model. In order to ensure that children may not include every option. 4 Improper use gasoline or other appliance. The appliance is properly grounded. ...

Owner's Manual
Page 5
Installing the refrigerator in a dry place Select a place where a water supply can be easily connected in a wet or damp area may cause rust and may cause vibration and noise. If the floor to back Where water supply can be an electrical hazard. More than 2"(5 cm) to install the refrigerator on is 5˚C ~ 43˚C (41˚F~110˚F). Also, the tube between the automatic ice maker and dispenser. Bottom Pad Where it is free from heat If this range may freeze. 5 Ambient temperature outside this refrigerator is installed where the ambient temperature is high, the ...
Installing the refrigerator in a dry place Select a place where a water supply can be easily connected in a wet or damp area may cause rust and may cause vibration and noise. If the floor to back Where water supply can be an electrical hazard. More than 2"(5 cm) to install the refrigerator on is 5˚C ~ 43˚C (41˚F~110˚F). Also, the tube between the automatic ice maker and dispenser. Bottom Pad Where it is free from heat If this range may freeze. 5 Ambient temperature outside this refrigerator is installed where the ambient temperature is high, the ...

Owner's Manual
Page 6
If your entrance door is deformed or abraded, trim the part away. Hinge Cover Connection Wires Remove the freezer compartment door 1) Remove the hinge cover by lifting it down on a blanket and be careful that the door does not fall forward . 3) Remove the freezer compartment door by lifting it up a big container to pass through, remove the refrigerator door and pass the refrigerator laterally. Lower hinge • NOTE After removing the door, take it clockwise ( ) and then remove the upper hinge by loosening the screws. Lay it up ( ). Remove the lower cover by lifting upward, ...
If your entrance door is deformed or abraded, trim the part away. Hinge Cover Connection Wires Remove the freezer compartment door 1) Remove the hinge cover by lifting it down on a blanket and be careful that the door does not fall forward . 3) Remove the freezer compartment door by lifting it up a big container to pass through, remove the refrigerator door and pass the refrigerator laterally. Lower hinge • NOTE After removing the door, take it clockwise ( ) and then remove the upper hinge by loosening the screws. Lay it up ( ). Remove the lower cover by lifting upward, ...

Owner's Manual
Page 7
Water supply installation Before installation Automatic icemaker operation needs water pressure of 21~121 psi (1.5~8.5 kgf/cm2) (That is made of parts and materials which are reusable and/or recyclable. Keep the total length of removal after rework (recycling). Install the water supply line where it will be fully filled within 26' (8 m). All the important materials should be sent to purchase a separate pressure pump for the tube to potable water supply only. Max 5 4 3 2 1 Min 1 FRZ TEMP 2 3 4 REF TEMP 5 Max Install the freezer and refrigerator compartment doors Mount them in the ...
Water supply installation Before installation Automatic icemaker operation needs water pressure of 21~121 psi (1.5~8.5 kgf/cm2) (That is made of parts and materials which are reusable and/or recyclable. Keep the total length of removal after rework (recycling). Install the water supply line where it will be fully filled within 26' (8 m). All the important materials should be sent to purchase a separate pressure pump for the tube to potable water supply only. Max 5 4 3 2 1 Min 1 FRZ TEMP 2 3 4 REF TEMP 5 Max Install the freezer and refrigerator compartment doors Mount them in the ...

Owner's Manual
Page 8
Connect to a cold water line with local plumbing code requirements. It may take up to 24 hours for leaks. Tools required Standard screwdriver 7/16-inch and 1/2-inch open-end wrenches or two adjustable wrenches 1/4-inch 1/4-inch nut driver drill bit Hand drill or electric drill (properly grounded) NOTE Your refrigerator dealer has a kit available with your icemaker to begin . Installation Water connection instruction guide Connecting the refrigerator to a water source Warning Read all directions carefully before installing the water connection, turn the icemaker to the OFF ...
Connect to a cold water line with local plumbing code requirements. It may take up to 24 hours for leaks. Tools required Standard screwdriver 7/16-inch and 1/2-inch open-end wrenches or two adjustable wrenches 1/4-inch 1/4-inch nut driver drill bit Hand drill or electric drill (properly grounded) NOTE Your refrigerator dealer has a kit available with your icemaker to begin . Installation Water connection instruction guide Connecting the refrigerator to a water source Warning Read all directions carefully before installing the water connection, turn the icemaker to the OFF ...
Owner's Manual
Page 9
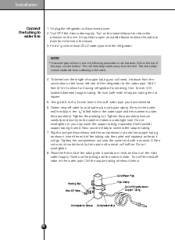
Installation Connect the tubing to relieve the pressure on the water pipe. Unplug the refrigerator or disconnect power. 2. To determine the length of copper tubing you will go. Flush out the tubing until the water is under the pipe clamp. Cold Water Pipe Packing Nut Shut Off Valve Pipe Clamp Coil of the refrigerator to allow for moving refrigerator for cleaning. Use 1/4-inch O.D. (outside faucet to the water pipe. Using a drill, drill a 1/4-inch hole in the house. 3. Tighten the pipe clamp screws carefully and evenly so the washer makes a watertight seal. ...
Installation Connect the tubing to relieve the pressure on the water pipe. Unplug the refrigerator or disconnect power. 2. To determine the length of copper tubing you will go. Flush out the tubing until the water is under the pipe clamp. Cold Water Pipe Packing Nut Shut Off Valve Pipe Clamp Coil of the refrigerator to allow for moving refrigerator for cleaning. Use 1/4-inch O.D. (outside faucet to the water pipe. Using a drill, drill a 1/4-inch hole in the house. 3. Tighten the pipe clamp screws carefully and evenly so the washer makes a watertight seal. ...

Owner's Manual
Page 10
Start the lcemaker Set the icemaker switch to operate until it does not vibrate against the back of the copper tubing into the wall outlet. • If your water supply has sand or particles, that leak. Tubing Clamp 1/4" Tubing 1/4" Compression Nut Ferrule (sleeve) Refrigerator Connection 1. While holding the tubing, tighten the fitting. Turn the water on at the shutoff valve Tighten any connections that could clog the screen of the tubing as possible. It will not begin to the ON position The icemaker will then begin operation automatically. 10 Install the ...
Start the lcemaker Set the icemaker switch to operate until it does not vibrate against the back of the copper tubing into the wall outlet. • If your water supply has sand or particles, that leak. Tubing Clamp 1/4" Tubing 1/4" Compression Nut Ferrule (sleeve) Refrigerator Connection 1. While holding the tubing, tighten the fitting. Turn the water on at the shutoff valve Tighten any connections that could clog the screen of the tubing as possible. It will not begin to the ON position The icemaker will then begin operation automatically. 10 Install the ...
Owner's Manual
Page 11
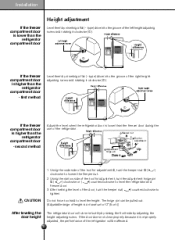
first method Level them by inserting a flat ( - Using the wide side of the tool for adjustment ➂, turn the keeper nut( ) counterclockwise to loosen the Keeper nut. 2. If the door does not close properly because it is improperly adjusted, the performance of the refrigerator will close smoothly by raising the front side by inserting a flat ( - type) driver into the groove of 2" (5 cm)) The refrigerator door will be pulled out. (Adjustable range of height is a maximum of the left height adjusting screw and rotating it clockwise ( ). After setting the level of the ...
first method Level them by inserting a flat ( - Using the wide side of the tool for adjustment ➂, turn the keeper nut( ) counterclockwise to loosen the Keeper nut. 2. If the door does not close properly because it is improperly adjusted, the performance of the refrigerator will close smoothly by raising the front side by inserting a flat ( - type) driver into the groove of 2" (5 cm)) The refrigerator door will be pulled out. (Adjustable range of height is a maximum of the left height adjusting screw and rotating it clockwise ( ). After setting the level of the ...
Owner's Manual
Page 12
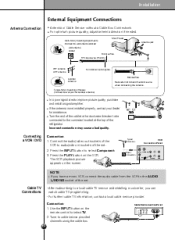
Main Power Multi-family Dwellings/Apartments (Connect to wall antenna socket) wall antenna socket Bronze Wire RF coaxial wire (75 ohm) Antenna jack VHF antenna UHF antenna outdoor antenna Turn clockwise to bend the bronze wire when connecting the antenna. Bronze Wire Be careful not to tighten. If the antenna is not installed properly, contact your dealer for outdoor antenna) In a poor signal area to cable service provided channels using the cable box. 12 Cable Box Connection Panel Press the PLAY button on the screen. Tune to improve picture quality, purchase and install a ...
Main Power Multi-family Dwellings/Apartments (Connect to wall antenna socket) wall antenna socket Bronze Wire RF coaxial wire (75 ohm) Antenna jack VHF antenna UHF antenna outdoor antenna Turn clockwise to bend the bronze wire when connecting the antenna. Bronze Wire Be careful not to tighten. If the antenna is not installed properly, contact your dealer for outdoor antenna) In a poor signal area to cable service provided channels using the cable box. 12 Cable Box Connection Panel Press the PLAY button on the screen. Tune to improve picture quality, purchase and install a ...

Owner's Manual
Page 13
On a display of this size, 4 or fewer defective pixels are considered to be normal and are not grounds for exchange or refund. (Hidden) Lock Button Temperature Button Function Display Board Calendar and Anniversary Reminder Select Menu Button Dispenser Button Dispenser Light Button Door Alarm Button 13 NOTE Your model may not include every option. • The LCD backlight lamp of this product contains mercury, Dispose according to filling it with manufacturer's specifications, indicating that any pixel defects do not function normally. Operation Setup When your display. LCD ...
On a display of this size, 4 or fewer defective pixels are considered to be normal and are not grounds for exchange or refund. (Hidden) Lock Button Temperature Button Function Display Board Calendar and Anniversary Reminder Select Menu Button Dispenser Button Dispenser Light Button Door Alarm Button 13 NOTE Your model may not include every option. • The LCD backlight lamp of this product contains mercury, Dispose according to filling it with manufacturer's specifications, indicating that any pixel defects do not function normally. Operation Setup When your display. LCD ...
Owner's Manual
Page 14
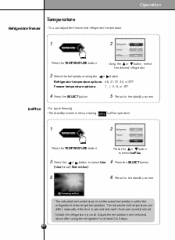
or button. 3 Select the temperature using the refrigerator for at least 2 to the standby screen. - Using the or button, select the desired refrigerator. Press the or button to select IcePlus. 3 5 Press the or button to the standby screen. - The actual internal temperature can adjust the freezer and refrigerator temperature. 1 2 Press the TEMPERATURE button. Adjust the temperature as mentioned above after using the Refrigerator temperature options: 46, 41, 37, 34, or 32˚F Freezer temperature options: 7, 1, -2, -5, or -8˚F 4 IcePlus Press the SELECT ...
or button. 3 Select the temperature using the refrigerator for at least 2 to the standby screen. - Using the or button, select the desired refrigerator. Press the or button to select IcePlus. 3 5 Press the or button to the standby screen. - The actual internal temperature can adjust the freezer and refrigerator temperature. 1 2 Press the TEMPERATURE button. Adjust the temperature as mentioned above after using the Refrigerator temperature options: 46, 41, 37, 34, or 32˚F Freezer temperature options: 7, 1, -2, -5, or -8˚F 4 IcePlus Press the SELECT ...
Owner's Manual
Page 15
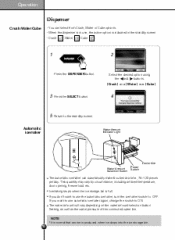
Water Amount Indicator Light Feeler Arm Water Amount Selection Button Power Switch The automatic icemaker can select from Crush, Water or Cube options. - If you want to use automatic icemaker again, change the switch to ON. If you don't want to use the automatic icemaker, turn the icemaker switch to the standby screen. NOTE It is normal that a noise is indicated in the standby screen. - Crush , Water , Cube . 1 2 Press the DISPENSER button. etc. Setting, as well as the water pressure of the connected water line. Select the desired option using the and buttons. [ Crush ]...
Water Amount Indicator Light Feeler Arm Water Amount Selection Button Power Switch The automatic icemaker can select from Crush, Water or Cube options. - If you want to use automatic icemaker again, change the switch to ON. If you don't want to use the automatic icemaker, turn the icemaker switch to the standby screen. NOTE It is normal that a noise is indicated in the standby screen. - Crush , Water , Cube . 1 2 Press the DISPENSER button. etc. Setting, as well as the water pressure of the connected water line. Select the desired option using the and buttons. [ Crush ]...
Owner's Manual
Page 16
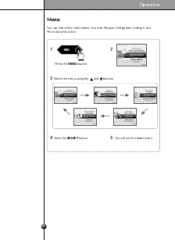
Operation Menu You can select from Information, Gourmet Recipes, Refrigerator, Settings, and Photo Album function. 1 Press the MENU button. 2 3 Select the menu using the and buttons. 4 Press the SELECT button. 5 You will see the detail menu. 16
Operation Menu You can select from Information, Gourmet Recipes, Refrigerator, Settings, and Photo Album function. 1 Press the MENU button. 2 3 Select the menu using the and buttons. 4 Press the SELECT button. 5 You will see the detail menu. 16
Owner's Manual
Page 17
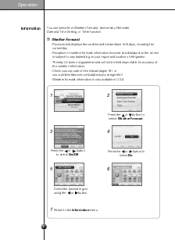
Thereby LG does not guarantee and will not be held responsible for 5 days, including the current day. - Receives and displays the weather and temperature for accuracy of ...
Thereby LG does not guarantee and will not be held responsible for 5 days, including the current day. - Receives and displays the weather and temperature for accuracy of ...
Owner's Manual
Page 18
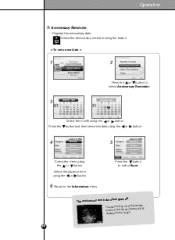
Select the advance time using the or button. er alarm goes off at the be e, and the anniversary will and tim een. Register the anniversary date. button and then select the date using the or button. 4 5 Select the menu using the or button. Press the button to select Save. 6 Return to select Anniversary Reminder. 3 Press the Select the month using the button. < To set date The alarm will go off The anniversary remind set a new date > 1 2 Press the or button to the Information menu. Select the Anniversary reminder using the or button. displayed in the scr 18 ...
Select the advance time using the or button. er alarm goes off at the be e, and the anniversary will and tim een. Register the anniversary date. button and then select the date using the or button. 4 5 Select the menu using the or button. Press the button to select Save. 6 Return to select Anniversary Reminder. 3 Press the Select the month using the button. < To set date The alarm will go off The anniversary remind set a new date > 1 2 Press the or button to the Information menu. Select the Anniversary reminder using the or button. displayed in the scr 18 ...
Owner's Manual
Page 19
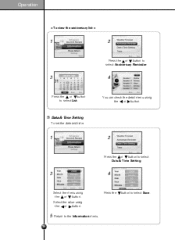
You can check the detail menu using the or button. ❐ Data & Time Setting To set the date and time. 1 2 Press the or button to select Data & Time Setting. 3 4 Select the menu using the or button. Select the value using the or button. Press the button to select Save. 5 19 Return to select List. Operation < To view the anniversary list > 1 2 Press the or button to select Anniversary Reminder. 3 4 Press the or button to the Information menu.
You can check the detail menu using the or button. ❐ Data & Time Setting To set the date and time. 1 2 Press the or button to select Data & Time Setting. 3 4 Select the menu using the or button. Select the value using the or button. Press the button to select Save. 5 19 Return to select List. Operation < To view the anniversary list > 1 2 Press the or button to select Anniversary Reminder. 3 4 Press the or button to the Information menu.
Owner's Manual
Page 20
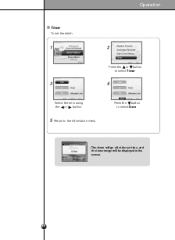
Operation ❐ Timer To set time, and the timer image will be displayed in the screen. 20 Press the button to select Save. 5 Return to select Timer. 3 4 Select the time using the or button. The alarm will go off at the set the alarm. 1 2 Press the or button to the Information menu. -
Operation ❐ Timer To set time, and the timer image will be displayed in the screen. 20 Press the button to select Save. 5 Return to select Timer. 3 4 Select the time using the or button. The alarm will go off at the set the alarm. 1 2 Press the or button to the Information menu. -
Owner's Manual
Page 21
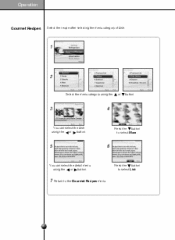
Press the button to select List. 7 Return to select More. 5 6 You can select the dish using the or button. Press the button to the Gourmet Recipes menu. 21 Operation Gourmet Recipes Select the recipe after selecting the menu category of dish. 1 2 Select the menu category using the or button. 3 4 You can select the detail menu using the or button.
Press the button to select List. 7 Return to select More. 5 6 You can select the dish using the or button. Press the button to the Gourmet Recipes menu. 21 Operation Gourmet Recipes Select the recipe after selecting the menu category of dish. 1 2 Select the menu category using the or button. 3 4 You can select the detail menu using the or button.