
Owners Manual
Page 1
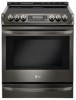
ENGLISH Español OWNER'S MANUAL ELECTRIC RANGE Read this owner's manual thoroughly before operating the appliance and keep it handy for reference at all times. LSE4613ST LSE4613BD MFL68881504_04 www.lg.com
ENGLISH Español OWNER'S MANUAL ELECTRIC RANGE Read this owner's manual thoroughly before operating the appliance and keep it handy for reference at all times. LSE4613ST LSE4613BD MFL68881504_04 www.lg.com
Owners Manual
Page 2
... TABLE OF CONTENTS 3 IMPORTANT SAFETY INSTRUCTIONS 9 PRODUCT OVERVIEW 9 Parts 9 Accessories 10 INSTALLATION 10 Installation Overview 10 Product Specifications 11 Before Installing the Range 12 Installing the Range 14 Connecting Electricity 18 Engaging the Anti-tip Device 18 Optional Rear Filler 19 Test Run 20 OPERATION 20 Control Panel Overview 21 Knob Positions 22...
... TABLE OF CONTENTS 3 IMPORTANT SAFETY INSTRUCTIONS 9 PRODUCT OVERVIEW 9 Parts 9 Accessories 10 INSTALLATION 10 Installation Overview 10 Product Specifications 11 Before Installing the Range 12 Installing the Range 14 Connecting Electricity 18 Engaging the Anti-tip Device 18 Optional Rear Filler 19 Test Run 20 OPERATION 20 Control Panel Overview 21 Knob Positions 22...
Owners Manual
Page 3
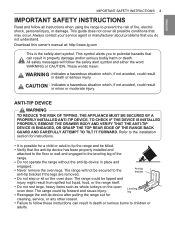
.... which , if not avoided, could tip forward and cause injury. These words mean: WARNING - Download this owner's manual at: http://www.lg.com This is possible for cleaning, service, or any other reason. ••Failure to follow these instructions can result in death or hazardous ...or wall and engaged to the leveling leg of fire, electric shock, personal injury, or damage. This guide does not cover all instructions when using the range to prevent the risk of the range. ••Do not operate the range without the anti-tip device in place and engaged. &#...
.... which , if not avoided, could tip forward and cause injury. These words mean: WARNING - Download this owner's manual at: http://www.lg.com This is possible for cleaning, service, or any other reason. ••Failure to follow these instructions can result in death or hazardous ...or wall and engaged to the leveling leg of fire, electric shock, personal injury, or damage. This guide does not cover all instructions when using the range to prevent the risk of the range. ••Do not operate the range without the anti-tip device in place and engaged. &#...
Owners Manual
Page 6
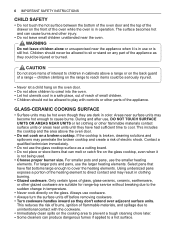
... not place or store items that have had sufficient time to direct contact and may penetrate the broken cooktop and create a risk of electric shock. Areas near the appliance when it is not being used. ••Choose proper burner size. During and after use or ...in operation. Using undersized pans exposes a portion of the heating element to cool. Always use the glass cooktop surface as they are suitable for range-top service without breaking due to cover the heating elements. Contact a qualified technician immediately. ••Do not use cookware. ••...
... not place or store items that have had sufficient time to direct contact and may penetrate the broken cooktop and create a risk of electric shock. Areas near the appliance when it is not being used. ••Choose proper burner size. During and after use or ...in operation. Using undersized pans exposes a portion of the heating element to cool. Always use the glass cooktop surface as they are suitable for range-top service without breaking due to cover the heating elements. Contact a qualified technician immediately. ••Do not use cookware. ••...
Owners Manual
Page 8
... extremely sensitive to a well-ventilated room. ••Clean in the self-clean cycle only parts listed in the self-clean mode. Switch off the electrical power to rub, damage, or move the gasket. ••If there is essential for a good seal. Care should be harmful or fatal to the... in this instruction may be taken not to the main fuse or breaker and have the heating element replaced by touching hot surfaces of the range to go out. Before self-cleaning the oven, remove the broiler pan, all oven racks, the meat probe and any kind should be used in...
... extremely sensitive to a well-ventilated room. ••Clean in the self-clean cycle only parts listed in the self-clean mode. Switch off the electrical power to rub, damage, or move the gasket. ••If there is essential for a good seal. Care should be harmful or fatal to the... in this instruction may be taken not to the main fuse or breaker and have the heating element replaced by touching hot surfaces of the range to go out. Before self-cleaning the oven, remove the broiler pan, all oven racks, the meat probe and any kind should be used in...
Owners Manual
Page 10
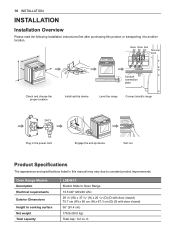
ft. Black White Red Terminal block Check and choose the proper location Conduit connection plate Install anti-tip device Level the range Connect electric range 240 V Plug in the power cord Engage the anti-tip device Test run Product Specifications The appearance and specifications listed in this product or transporting ...
ft. Black White Red Terminal block Check and choose the proper location Conduit connection plate Install anti-tip device Level the range Connect electric range 240 V Plug in the power cord Engage the anti-tip device Test run Product Specifications The appearance and specifications listed in this product or transporting ...
Owners Manual
Page 11
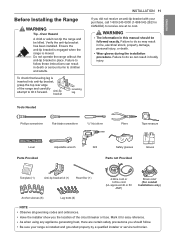
...the circuit breaker or fuse. Failure to do so may result in death or serious burns to children and adults. ENGLISH Before Installing the Range Warning Tip - Failure to tilt it for easy reference. •• As when using any appliance generating heat, there are certain ...-0000 (1-888-542-2623 in CANADA) to do so can result in fire, electrical shock, property damage, personal injury, or death. •• Wear gloves during the installation procedure. Do not operate the range without the anti-tip bracket in bodily injury. Mark it forward. Tools Needed Phillips...
...the circuit breaker or fuse. Failure to do so may result in death or serious burns to children and adults. ENGLISH Before Installing the Range Warning Tip - Failure to tilt it for easy reference. •• As when using any appliance generating heat, there are certain ...-0000 (1-888-542-2623 in CANADA) to do so can result in fire, electrical shock, property damage, personal injury, or death. •• Wear gloves during the installation procedure. Do not operate the range without the anti-tip bracket in bodily injury. Mark it forward. Tools Needed Phillips...
Owners Manual
Page 12
.... This prevents overloading house wiring circuits which could cause a fire hazard from your range. Your range is located on the back of this appliance be plugged into its own individual properly grounded electrical outlet. Use care when moving the range on soft floor coverings such as it must be used in a mobile home installation...
.... This prevents overloading house wiring circuits which could cause a fire hazard from your range. Your range is located on the back of this appliance be plugged into its own individual properly grounded electrical outlet. Use care when moving the range on soft floor coverings such as it must be used in a mobile home installation...
Owners Manual
Page 13
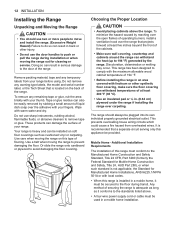
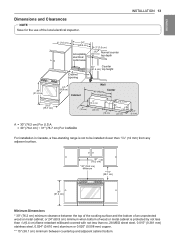
... 0.020" (0.508 mm) copper. ** 15" (38.1 cm) minimum between the top of the cooking surface and the bottom of the local electrical inspector. ENGLISH Dimensions and Clearances NOTE Save for the use of an unprotected wood or metal cabinet; INSTALLATION 13 3" (7.6 cm) 24" (60.9 cm) ...15.2 cm) 9" (23 cm) 2.5" (6.3 cm) A = 30" (76.2 cm) For U.S.A = 30" (76.2 cm) ~ 31" (78.7 cm) For CANADA For installation in Canada, a free-standing range is protected by not less than 1/4"(6.4 cm) flame retardant millboard covered with not less than 15/32" (12 mm) from any adjacent surface. 30" (76...
... 0.020" (0.508 mm) copper. ** 15" (38.1 cm) minimum between the top of the cooking surface and the bottom of the local electrical inspector. ENGLISH Dimensions and Clearances NOTE Save for the use of an unprotected wood or metal cabinet; INSTALLATION 13 3" (7.6 cm) 24" (60.9 cm) ...15.2 cm) 9" (23 cm) 2.5" (6.3 cm) A = 30" (76.2 cm) For U.S.A = 30" (76.2 cm) ~ 31" (78.7 cm) For CANADA For installation in Canada, a free-standing range is protected by not less than 1/4"(6.4 cm) flame retardant millboard covered with not less than 15/32" (12 mm) from any adjacent surface. 30" (76...
Owners Manual
Page 14
... may be installed and grounded on the oven rack, and check each direction for use with the template. This range requires a single-phase, 3 wire, A.C 120/208 V or 120/240 V 60 Hz electrical system. A range cord rated at 40 amps with upturned ends or similar termination. First check direction . All wiring should be killed...
... may be installed and grounded on the oven rack, and check each direction for use with the template. This range requires a single-phase, 3 wire, A.C 120/208 V or 120/240 V 60 Hz electrical system. A range cord rated at 40 amps with upturned ends or similar termination. First check direction . All wiring should be killed...
Owners Manual
Page 15
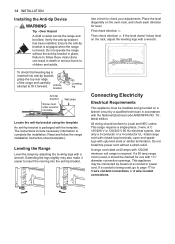
... For power cord installations, hook the strain relief over the 13/8 in serious burns or electrical shock. Remove the connection plate for power cord installations. Specified power-supply-cord kit rating Range rating, watts 120/240 volts 3-wire 120/208 volts 3-wire Specified rating of power supplycord... relief and fasten the strain relief with a screwdriver. Connect the power cord and plug directly. •• Electrical ground is required on this appliance. •• Make sure that the range can result in . (3.5 cm) power cord hole located below the rear of the oven. Wire...
... For power cord installations, hook the strain relief over the 13/8 in serious burns or electrical shock. Remove the connection plate for power cord installations. Specified power-supply-cord kit rating Range rating, watts 120/240 volts 3-wire 120/208 volts 3-wire Specified rating of power supplycord... relief and fasten the strain relief with a screwdriver. Connect the power cord and plug directly. •• Electrical ground is required on this appliance. •• Make sure that the range can result in . (3.5 cm) power cord hole located below the rear of the oven. Wire...
Owners Manual
Page 16
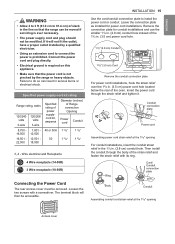
... ground strap to the block. 4-wire connection Black White Red Conduit connection plate If screws are not tightened securely, it can result in electrical spark and severe personal injury or death. The remaining two wires of the main terminal connection block. Do not remove the ground strap connections...: Power Cord Warning •• Only a 4-conductor power-supply cord kit rated 120/240 volts, 50 amperes and marked for use with ranges with closedloop connectors or opened spade lugs with upturned ends shall be connected to the frame of the oven. The center screw now attaches the...
... ground strap to the block. 4-wire connection Black White Red Conduit connection plate If screws are not tightened securely, it can result in electrical spark and severe personal injury or death. The remaining two wires of the main terminal connection block. Do not remove the ground strap connections...: Power Cord Warning •• Only a 4-conductor power-supply cord kit rated 120/240 volts, 50 amperes and marked for use with ranges with closedloop connectors or opened spade lugs with upturned ends shall be connected to the frame of the oven. The center screw now attaches the...
Owners Manual
Page 17
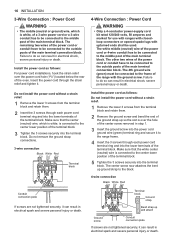
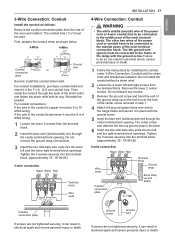
...and insert it must be 6 or 8 AWG wiring. 1 Loosen the lower 3 screws from the terminal block. Failure to the frame of the range with the ground screw. 5 Insert the bare wire (white/neutral) end through the body of the ground strap up and attach Conduit connection plate... the conduit as shown below. 3-Wire 4-Wire Conduit or connection plate Ground wire Second, install the conduit strain relief. If the wire in electrical spark and severe personal injury or death. Tighten the 3 screws securely into the terminal block. (approximately 35 - 50 IN-LB) 4-wire ...
...and insert it must be 6 or 8 AWG wiring. 1 Loosen the lower 3 screws from the terminal block. Failure to the frame of the range with the ground screw. 5 Insert the bare wire (white/neutral) end through the body of the ground strap up and attach Conduit connection plate... the conduit as shown below. 3-Wire 4-Wire Conduit or connection plate Ground wire Second, install the conduit strain relief. If the wire in electrical spark and severe personal injury or death. Tighten the 3 screws securely into the terminal block. (approximately 35 - 50 IN-LB) 4-wire ...
Owners Manual
Page 18
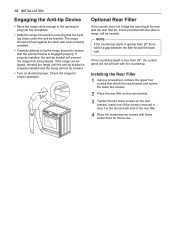
... the anti-tip bracket. Check the range for future use. Installing the Rear Filler 1 Using a screwdriver, remove the upper four screws that attach the rear bracket and loosen the lower two screws. 2 Place the rear filler on the rear bracket. 3 Tighten the two lower screws on electrical power. Insert one of the... rear wall the rear filler kit, that is provided with the slide in the slot at each end of the screws removed in step 1 in range, will not tip forward. •• Turn on the rear bracket. NOTE If the countertop depth is greater than 25" there will be tipped, reinstall...
... the anti-tip bracket. Check the range for future use. Installing the Rear Filler 1 Using a screwdriver, remove the upper four screws that attach the rear bracket and loosen the lower two screws. 2 Place the rear filler on the rear bracket. 3 Tighten the two lower screws on electrical power. Insert one of the... rear wall the rear filler kit, that is provided with the slide in the slot at each end of the screws removed in step 1 in range, will not tip forward. •• Turn on the rear bracket. NOTE If the countertop depth is greater than 25" there will be tipped, reinstall...
Owners Manual
Page 44
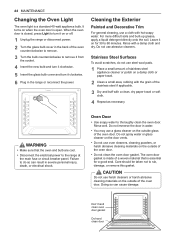
... onto the soil. Do not use a cloth with the grain of a woven material that the oven and bulb are cool. •• Disconnect the electrical power to remove it from the socket. 4 Insert the new bulb and turn it clockwise. 5 Insert the glass bulb cover and turn it on or...door gasket Do hand clean door Leave it clockwise. 6 Plug in severe personal injury, death, or electrical shock. Care should be taken not to thoroughly clean the oven door. Doing so can result in the range or reconnect the power. Stainless Steel Surfaces To avoid scratches, do so can cause damage. Rinse...
... onto the soil. Do not use a cloth with the grain of a woven material that the oven and bulb are cool. •• Disconnect the electrical power to remove it from the socket. 4 Insert the new bulb and turn it clockwise. 5 Insert the glass bulb cover and turn it on or...door gasket Do hand clean door Leave it clockwise. 6 Plug in severe personal injury, death, or electrical shock. Care should be taken not to thoroughly clean the oven door. Doing so can result in the range or reconnect the power. Stainless Steel Surfaces To avoid scratches, do so can cause damage. Rinse...
Owners Manual
Page 46
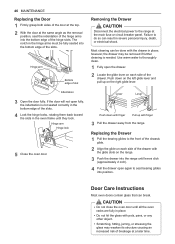
... of the hinge arms into the bottom edge of the drawer. Most cleaning can result in severe personal injury, death, or electrical shock. Use warm water to the range at a later time. Push down with finger Pull up on each side of the hinge slots. Hinge arm Hinge lock 5...done with the glide slots on each side of slot Removing the Drawer CAUTION Disconnect the electrical power to thoroughly clean. 1 Fully open the drawer. 2 Locate the glide lever on the range. 3 Push the drawer into the range until levers click (approximately 2 inch). 4 Pull the drawer open fully, the indentation is...
... of the hinge arms into the bottom edge of the drawer. Most cleaning can result in severe personal injury, death, or electrical shock. Use warm water to the range at a later time. Push down with finger Pull up on each side of the hinge slots. Hinge arm Hinge lock 5...done with the glide slots on each side of slot Removing the Drawer CAUTION Disconnect the electrical power to thoroughly clean. 1 Fully open the drawer. 2 Locate the glide lever on the range. 3 Push the drawer into the range until levers click (approximately 2 inch). 4 Pull the drawer open fully, the indentation is...
Owners Manual
Page 50
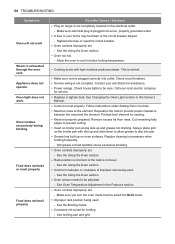
.... Make sure you turn the oven mode knob to prevent curling. •• Insert on broiler pan wrong side up on range is not completely inserted in the Features section. •• Oven controls improperly set properly. Regular cleaning is exhausted through the ...position being used . - 50 TROUBLESHOOTING Symptoms Oven will not work . Oven light does not work Steam is necessary when broiling frequently. - Make sure electrical plug is not level. - Replace the fuse or reset the circuit breaker. •• Oven controls improperly set . - This is normal. ...
.... Make sure you turn the oven mode knob to prevent curling. •• Insert on broiler pan wrong side up on range is not completely inserted in the Features section. •• Oven controls improperly set properly. Regular cleaning is exhausted through the ...position being used . - 50 TROUBLESHOOTING Symptoms Oven will not work . Oven light does not work Steam is necessary when broiling frequently. - Make sure electrical plug is not level. - Replace the fuse or reset the circuit breaker. •• Oven controls improperly set . - This is normal. ...
Owners Manual
Page 54
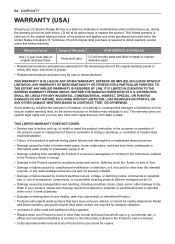
54 WARRANTY WARRANTY (USA) Should your LG Electric Range fail due to a defect in materials or workmanship under this limited warranty. DISTRIBUTOR SHALL BE LIABLE FOR ANY INCIDENTAL, CONSEQUENTIAL, INDIRECT, SPECIAL, OR PUNITIVE DAMAGES... THIS LIMITED WARRANTY DOES NOT COVER: •• Service trips to obtain warranty service under normal home use, during power failures and interruptions or inadequate electrical service. •• Damage caused by leaky or broken water pipes, frozen water pipes, restricted drain lines, inadequate or interrupted water supply or inadequate supply...
54 WARRANTY WARRANTY (USA) Should your LG Electric Range fail due to a defect in materials or workmanship under this limited warranty. DISTRIBUTOR SHALL BE LIABLE FOR ANY INCIDENTAL, CONSEQUENTIAL, INDIRECT, SPECIAL, OR PUNITIVE DAMAGES... THIS LIMITED WARRANTY DOES NOT COVER: •• Service trips to obtain warranty service under normal home use, during power failures and interruptions or inadequate electrical service. •• Damage caused by leaky or broken water pipes, frozen water pipes, restricted drain lines, inadequate or interrupted water supply or inadequate supply...


