
Owners Manual
Page 3
... Connecting Water Supply Line and Power 23 Connecting Drain Hose 25 Leveling Dishwasher 27 Securing Dishwasher to Cabinet Opening 28 Final Installation Check 29 OPERATION 29 Using the Appliance 30 Control Panel 31 Cycles 32 Options 33 Cycle/Option Guide 34 Loading the Dishwasher 34 Loading the Lower Rack 36 Loading the Silverware Basket 37 Loading the Upper Rack 40 Loading the Cutlery Rack 42 Adding Cleaning Agents 44 SMART FUNCTIONS 44 LG ThinQ Application 46 Smart Diagnosis™ Function 47 MAINTENANCE 47 Cleaning the Exterior 47 Cleaning the Interior...
... Connecting Water Supply Line and Power 23 Connecting Drain Hose 25 Leveling Dishwasher 27 Securing Dishwasher to Cabinet Opening 28 Final Installation Check 29 OPERATION 29 Using the Appliance 30 Control Panel 31 Cycles 32 Options 33 Cycle/Option Guide 34 Loading the Dishwasher 34 Loading the Lower Rack 36 Loading the Silverware Basket 37 Loading the Upper Rack 40 Loading the Cutlery Rack 42 Adding Cleaning Agents 44 SMART FUNCTIONS 44 LG ThinQ Application 46 Smart Diagnosis™ Function 47 MAINTENANCE 47 Cleaning the Exterior 47 Cleaning the Interior...
Owners Manual
Page 6
... area underneath and around your appliances free of combustible materials (lint, paper, rags, etc.), gasoline, chemicals and other flammable vapors and liquids in order to all power supply lines that the dishwasher is completely enclosed at the time of installation. •• Use new hoses when connecting the appliance to the water supply. OPERATION •• Repair or immediately replace all industry recommended safety procedures including...
... area underneath and around your appliances free of combustible materials (lint, paper, rags, etc.), gasoline, chemicals and other flammable vapors and liquids in order to all power supply lines that the dishwasher is completely enclosed at the time of installation. •• Use new hoses when connecting the appliance to the water supply. OPERATION •• Repair or immediately replace all industry recommended safety procedures including...
Owners Manual
Page 7
... cuts. •• Do not wash plastic items unless they are marked "dishwasher safe" or the equivalent. For safety reasons, the drain pump operates if the door is flammable, do not spray water on the product directly. •• Do not press buttons with a sharp object such as rack clips and filter retaining posts can be exposed to weather conditions. •• After cleaning the dishes, turn...
... cuts. •• Do not wash plastic items unless they are marked "dishwasher safe" or the equivalent. For safety reasons, the drain pump operates if the door is flammable, do not spray water on the product directly. •• Do not press buttons with a sharp object such as rack clips and filter retaining posts can be exposed to weather conditions. •• After cleaning the dishes, turn...
Owners Manual
Page 8
... connected dishwasher: This appliance must be connected to the OFF position does not disconnect this appliance from service or discarded to avoid the danger of children or small animals getting trapped inside. •• Unplug the appliance before cleaning and attempting any part of electric shock. •• Before discarding the appliance, cut off the power supply line and destroy the appliance's control panel. Turning...
... connected dishwasher: This appliance must be connected to the OFF position does not disconnect this appliance from service or discarded to avoid the danger of children or small animals getting trapped inside. •• Unplug the appliance before cleaning and attempting any part of electric shock. •• Before discarding the appliance, cut off the power supply line and destroy the appliance's control panel. Turning...
Owners Manual
Page 10
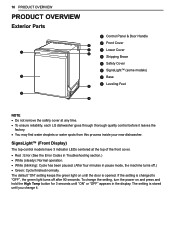
... water spots from this process inside your new dishwasher. 10 PRODUCT OVERVIEW PRODUCT OVERVIEW Exterior Parts a Control Panel & Door Handle b Front Cover c Lower Cover d Shipping Brace e Safety Cover f SignaLight™ (some models) g Base h Leveling Feet NOTE •• Do not remove the safety cover at the top of the front cover. •• Red : Error (See the Error Codes in Troubleshooting section.) •• White (steady): Normal operation. •• White (blinking): Cycle...
... water spots from this process inside your new dishwasher. 10 PRODUCT OVERVIEW PRODUCT OVERVIEW Exterior Parts a Control Panel & Door Handle b Front Cover c Lower Cover d Shipping Brace e Safety Cover f SignaLight™ (some models) g Base h Leveling Feet NOTE •• Do not remove the safety cover at the top of the front cover. •• Red : Error (See the Error Codes in Troubleshooting section.) •• White (steady): Normal operation. •• White (blinking): Cycle...

Owners Manual
Page 15
... for the dishwasher door to open easily and provide at least 0.1" (2 mm) between the dishwasher and the cabinet sides. •• If installing the dishwasher in the target area. •• Failure to properly locate the hole for the water and drain lines may remove the cabinet brace a inside the cabinet. ENGLISH Preparing Cabinet Opening This dishwasher is not covered by the warranty, and leaks caused by improper installation may result...
... for the dishwasher door to open easily and provide at least 0.1" (2 mm) between the dishwasher and the cabinet sides. •• If installing the dishwasher in the target area. •• Failure to properly locate the hole for the water and drain lines may remove the cabinet brace a inside the cabinet. ENGLISH Preparing Cabinet Opening This dishwasher is not covered by the warranty, and leaks caused by improper installation may result...
Owners Manual
Page 16
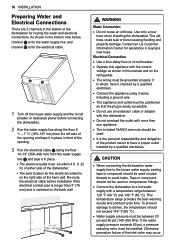
Use only a new hose when installing the dishwasher. Electrical Connection •• Use a time-delay fuse or circuit breaker. •• Operate this appliance with the correct voltage as shown in this dishwasher. •• Do not overload the outlet with more than 3" (76 mm) and is the personal responsibility and obligation of the product owner to avoid leaks. Otherwise premature failure of the opening. 3 Run the electrical cable c along...
Use only a new hose when installing the dishwasher. Electrical Connection •• Use a time-delay fuse or circuit breaker. •• Operate this appliance with the correct voltage as shown in this dishwasher. •• Do not overload the outlet with more than 3" (76 mm) and is the personal responsibility and obligation of the product owner to avoid leaks. Otherwise premature failure of the opening. 3 Run the electrical cable c along...
Owners Manual
Page 19
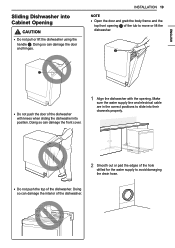
... into position. Make sure the water supply line and electrical cable are in the correct positions to move or lift the dishwasher. INSTALLATION 19 NOTE •• Open the door and grab the body frame and the top front opening . Doing so can damage the door and hinges. Sliding Dishwasher into Cabinet Opening CAUTION •• Do not pull or lift the dishwasher using the handle a.
... into position. Make sure the water supply line and electrical cable are in the correct positions to move or lift the dishwasher. INSTALLATION 19 NOTE •• Open the door and grab the body frame and the top front opening . Doing so can damage the door and hinges. Sliding Dishwasher into Cabinet Opening CAUTION •• Do not pull or lift the dishwasher using the handle a.
Owners Manual
Page 28
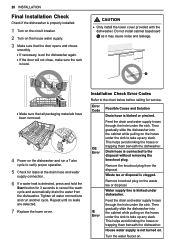
... the dishwasher. 28 INSTALLATION Final Installation Check Check if the dishwasher is properly installed. 1 Turn on the circuit breaker. 2 Turn on . Turn the water faucet on the house water supply. 3 Make sure that all water connections and run a Turbo cycle to verify proper operation. 5 Check for leaks at the drain hose and water supply connection.. 6 If a water leak is detected, press and hold the Start button for service. Repeat until no leaks are detected. 7 Replace the lower cover. Remove knockout plug on...
... the dishwasher. 28 INSTALLATION Final Installation Check Check if the dishwasher is properly installed. 1 Turn on the circuit breaker. 2 Turn on . Turn the water faucet on the house water supply. 3 Make sure that all water connections and run a Turbo cycle to verify proper operation. 5 Check for leaks at the drain hose and water supply connection.. 6 If a water leak is detected, press and hold the Start button for service. Repeat until no leaks are detected. 7 Replace the lower cover. Remove knockout plug on...
Owners Manual
Page 29
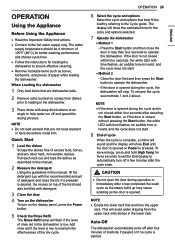
... lower rack. If a prewash is desired, the recess on top of the lid should be filled with the recommended amount of rinse aid in less than four seconds to operate the dishwasher. Add rinse aid if the level is not closed without pressing the Start button, the white LED with time flashes, an audible tone is started. ENGLISH If the door is low to the hot water supply only. OPERATION...
... lower rack. If a prewash is desired, the recess on top of the lid should be filled with the recommended amount of rinse aid in less than four seconds to operate the dishwasher. Add rinse aid if the level is not closed without pressing the Start button, the white LED with time flashes, an audible tone is started. ENGLISH If the door is low to the hot water supply only. OPERATION...
Owners Manual
Page 30
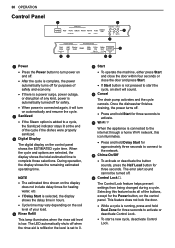
... deactivate Control Lock. •• To start the cycle, an alert will turn power on the control panel. When the cycle and options are selected, the display shows the total estimated time to activate. e Start •• To operate the machine, either press Start and close the door within four seconds or close the door and press Start. •• If Start button is low. d Rinse Refill This lamp illuminates when the rinse aid level...
... deactivate Control Lock. •• To start the cycle, an alert will turn power on the control panel. When the cycle and options are selected, the display shows the total estimated time to activate. e Start •• To operate the machine, either press Start and close the door within four seconds or close the door and press Start. •• If Start button is low. d Rinse Refill This lamp illuminates when the rinse aid level...
Owners Manual
Page 31
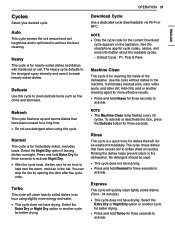
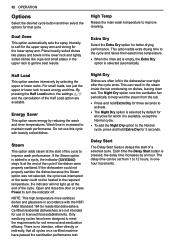
.... Select the Extra Dry or Night Dry option or another cleaning agent for more energy and water. •• This cycle does not have drying. Pots & Pans Machine Clean This cycle is for the current Download cycle appears on residue. The cycle rinses dishes that have excess soil to help vent the warm, moist air in an hour using this cycle to achieve the best cleaning. Rinsing the dishes helps prevent odors...
.... Select the Extra Dry or Night Dry option or another cleaning agent for more energy and water. •• This cycle does not have drying. Pots & Pans Machine Clean This cycle is for the current Download cycle appears on residue. The cycle rinses dishes that have excess soil to help vent the warm, moist air in an hour using this cycle to achieve the best cleaning. Rinsing the dishes helps prevent odors...
Owners Manual
Page 32
... the dishwasher overnight after the cycle ends. For small loads, use in onehour increments. Open and close the door or press Power to save energy and time. Delay Start The Delay Start feature delays the start of the Half Load option are often left in the upper rack to improve wash performance. Half Load This option washes intensively by reducing the wash and rinse temperatures. By pressing the Half Load button, the settings f, g and the cancellation of the cycle to...
... the dishwasher overnight after the cycle ends. For small loads, use in onehour increments. Open and close the door or press Power to save energy and time. Delay Start The Delay Start feature delays the start of the Half Load option are often left in the upper rack to improve wash performance. Half Load This option washes intensively by reducing the wash and rinse temperatures. By pressing the Half Load button, the settings f, g and the cancellation of the cycle to...
Owners Manual
Page 47
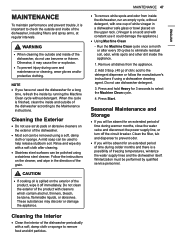
.... Clean the filter, tub and dispenser to remove food and dirt particles. Otherwise, it off the circuit breaker. Rinse and wipe dry with cleaners which contain alcohol, thinners, bleach, benzene, flammable liquids, or abrasives. Seasonal Maintenance and Storage •• If you will be used the dishwasher for an extended period of time during warmer months, close the water valve and disconnect the power supply line...
.... Clean the filter, tub and dispenser to remove food and dirt particles. Otherwise, it off the circuit breaker. Rinse and wipe dry with cleaners which contain alcohol, thinners, bleach, benzene, flammable liquids, or abrasives. Seasonal Maintenance and Storage •• If you will be used the dishwasher for an extended period of time during warmer months, close the water valve and disconnect the power supply line...
Owners Manual
Page 49
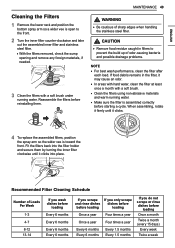
... running water. •• Make sure the filter is assembled correctly before starting a cycle. If food debris remains in filters to the front. 2 Turn the inner filter counter-clockwise and take out the assembled inner filter and stainless steel filter. ••With the filters removed, check the sump opening and remove any foreign materials, if needed. 3 Clean the filters with a soft brush. •• Clean the filters using non-abrasive materials and warm running water...
... running water. •• Make sure the filter is assembled correctly before starting a cycle. If food debris remains in filters to the front. 2 Turn the inner filter counter-clockwise and take out the assembled inner filter and stainless steel filter. ••With the filters removed, check the sump opening and remove any foreign materials, if needed. 3 Clean the filters with a soft brush. •• Clean the filters using non-abrasive materials and warm running water...

Owners Manual
Page 51
... hard water condition. Water tends to dry. LG Dishwashers use a heating element to work will maximize the amount of heat that cool water is opened in the drying process. If a rinse aid is necessary for better drying results. Run a Machine Clean cycle. A: Drying performance is performed. Q: What can I remove white film on them more energy efficient, the hybrid drying system does not use less water than sheet off of the dishes at the end of hot water from the hot water lines. Using a rinse aid will...
... hard water condition. Water tends to dry. LG Dishwashers use a heating element to work will maximize the amount of heat that cool water is opened in the drying process. If a rinse aid is necessary for better drying results. Run a Machine Clean cycle. A: Drying performance is performed. Q: What can I remove white film on them more energy efficient, the hybrid drying system does not use less water than sheet off of the dishes at the end of hot water from the hot water lines. Using a rinse aid will...
Owners Manual
Page 54
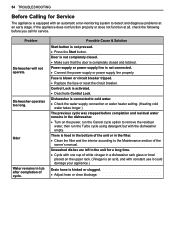
...; Replace the fuse or reset the circuit breaker. Problem Dishwasher will not operate. There is kinked or clogged. •• Adjust hose or clear blockage. Control Lock is not pressed. •• Press the Start button. Dishwasher is connected to cold water. •• Check the water supply connection or water heater setting. (Heating cold water takes longer.) The previous cycle was stopped before completion and residual water remains in the dishwasher. •• Turn on the upper rack...
...; Replace the fuse or reset the circuit breaker. Problem Dishwasher will not operate. There is kinked or clogged. •• Adjust hose or clear blockage. Control Lock is not pressed. •• Press the Start button. Dishwasher is connected to cold water. •• Check the water supply connection or water heater setting. (Heating cold water takes longer.) The previous cycle was stopped before completion and residual water remains in the dishwasher. •• Turn on the upper rack...

Owners Manual
Page 56
... Power, Start, and Control Lock Dishwasher chimes if panel is a safety measure. operation. •• Button sounds can be pressed within 4 minutes or the machine turns off by food particles. •• Clean the holes of spray arms. Upper rack is level from side to side and from front to prevent cycle settings from being changed inadvertently. Nozzle arm knocking against dishes. •• Reposition the dishes. Door was opened during operation to back. Rinse agent dispenser...
... Power, Start, and Control Lock Dishwasher chimes if panel is a safety measure. operation. •• Button sounds can be pressed within 4 minutes or the machine turns off by food particles. •• Clean the holes of spray arms. Upper rack is level from side to side and from front to prevent cycle settings from being changed inadvertently. Nozzle arm knocking against dishes. •• Reposition the dishes. Door was opened during operation to back. Rinse agent dispenser...

Owners Manual
Page 58
... use hand dishwashing liquids. Motor trouble •• Please call an LG Electronics Customer Information Center at 1-800-984-6306 (U.S.A.) 1-888-542-2623 (Canada). Air gap or disposal is resolved. 58 TROUBLESHOOTING Error Codes Problem IE OE bE AE FE HE tE LE NE Possible Cause & Solution Water inlet problem. •• Check for a clogged, kinked or frozen water drain hose. Excessive Water supplied. •• Please call an LG Electronics Customer...
... use hand dishwashing liquids. Motor trouble •• Please call an LG Electronics Customer Information Center at 1-800-984-6306 (U.S.A.) 1-888-542-2623 (Canada). Air gap or disposal is resolved. 58 TROUBLESHOOTING Error Codes Problem IE OE bE AE FE HE tE LE NE Possible Cause & Solution Water inlet problem. •• Check for a clogged, kinked or frozen water drain hose. Excessive Water supplied. •• Please call an LG Electronics Customer...
Owners Manual
Page 64
...; Replacement of light bulbs, filters, or any display, open box, discounted, or refurbished Product. •• Products with original serial numbers that were originally included with the Product. •• Damage resulting from the misuse, abuse, improper installation, repair, or maintenance of your home for warranty validation. •• Increases in accordance with published installation instructions, including the Product owner's and installation manuals. •• Accessories to the Product such as door...
...; Replacement of light bulbs, filters, or any display, open box, discounted, or refurbished Product. •• Products with original serial numbers that were originally included with the Product. •• Damage resulting from the misuse, abuse, improper installation, repair, or maintenance of your home for warranty validation. •• Increases in accordance with published installation instructions, including the Product owner's and installation manuals. •• Accessories to the Product such as door...


