Owner's Manual
Page 4
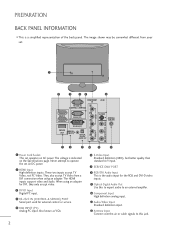
... 1 Power Cord Socket This set on DC power. 2 HDMI Input High definition inputs. The HDMI inputs support video and audio. PREPARATION BACK PANEL INFORMATION I This is indicated on AC power. These two inputs accept TV Video, not PC Video. The image shown may be somewhat different from a DVI connection when using an adapter for DVI, they only accept video. 3 DVI-D Input Digital PC input. 4 RS-232C IN (CONTROL & SERVICE) PORT Serial port used for the RGB and DVI-D video inputs. 9 Optical Digital Audio Out Use this jack. 2 Also known as VGA. 6 S-Video Input Standard...
... 1 Power Cord Socket This set on DC power. 2 HDMI Input High definition inputs. The HDMI inputs support video and audio. PREPARATION BACK PANEL INFORMATION I This is indicated on AC power. These two inputs accept TV Video, not PC Video. The image shown may be somewhat different from a DVI connection when using an adapter for DVI, they only accept video. 3 DVI-D Input Digital PC input. 4 RS-232C IN (CONTROL & SERVICE) PORT Serial port used for the RGB and DVI-D video inputs. 9 Optical Digital Audio Out Use this jack. 2 Also known as VGA. 6 S-Video Input Standard...
Owner's Manual
Page 11
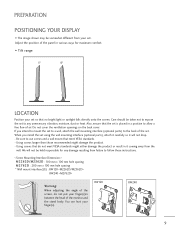
... set to allow a free flow of the set so that meet VESA standards might damage the product. - Using screws that the set . Do not cover the ventilation openings on the back cover. Adjust the position of the screen, do not meet VESA standards. - Also, ensure that do not put your set is placed in a position to any damage resulting from failure to follow these instructions. < Screw Mounting Interface Dimension > M2262D...
... set to allow a free flow of the set so that meet VESA standards might damage the product. - Using screws that the set . Do not cover the ventilation openings on the back cover. Adjust the position of the screen, do not meet VESA standards. - Also, ensure that do not put your set is placed in a position to any damage resulting from failure to follow these instructions. < Screw Mounting Interface Dimension > M2262D...

Owner's Manual
Page 15
... signal needs to be split for two TVs, use an antenna signal splitter for outdoor antenna) ANTENNA/ CABLE IN AV 1 AV 2 UHF Antenna AC IN Signal Amplifier VHF ANTENNA/ CABLE IN I For optimum picture quality, adjust antenna direction. I An antenna cable and converter are not supplied. ANTENNA CONNECTION I In poor signal areas, to get better picture quality, install a signal amplifier to wall jack for connection. 13 AV 1 AV 2 Wall...
... signal needs to be split for two TVs, use an antenna signal splitter for outdoor antenna) ANTENNA/ CABLE IN AV 1 AV 2 UHF Antenna AC IN Signal Amplifier VHF ANTENNA/ CABLE IN I For optimum picture quality, adjust antenna direction. I An antenna cable and converter are not supplied. ANTENNA CONNECTION I In poor signal areas, to get better picture quality, install a signal amplifier to wall jack for connection. 13 AV 1 AV 2 Wall...
Owner's Manual
Page 17
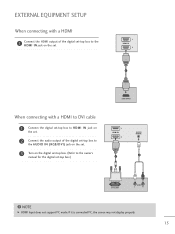
NOTE G HDMI Input does not support PC mode. If it is connected PC, the screen may not display properly. 15 EXTERNAL EQUIPMENT SETUP When connecting with a HDMI 1 Connect the HDMI output of the digital set-top box to the HDMI IN jack on the set. 1 HDMI IN 2 1 When connecting with a HDMI to DVI cable 1 Connect the digital set-top box to HDMI IN jack on the set. 2 Connect the audio output of the digital set-top box to the AUDIO IN (RGB/DVI) jack...
NOTE G HDMI Input does not support PC mode. If it is connected PC, the screen may not display properly. 15 EXTERNAL EQUIPMENT SETUP When connecting with a HDMI 1 Connect the HDMI output of the digital set-top box to the HDMI IN jack on the set. 1 HDMI IN 2 1 When connecting with a HDMI to DVI cable 1 Connect the digital set-top box to HDMI IN jack on the set. 2 Connect the audio output of the digital set-top box to the AUDIO IN (RGB/DVI) jack...
Owner's Manual
Page 22
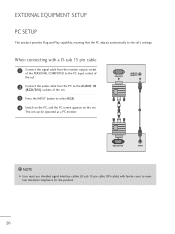
... NOTE G User must use shielded signal interface cables (D sub 15 pin cable, DVI cable) with a D-sub 15 pin cable 1 Connect the signal cable from the monitor output socket of the PERSONAL COMPUTER to the PC input socket of the set. 2 Connect the audio cable from the PC to the AUDIO IN (RGB/DVI) sockets of the set. 3 Press the INPUT button to select R G B. 4 Switch on the PC, and the PC screen appears on the set can...
... NOTE G User must use shielded signal interface cables (D sub 15 pin cable, DVI cable) with a D-sub 15 pin cable 1 Connect the signal cable from the monitor output socket of the PERSONAL COMPUTER to the PC input socket of the set. 2 Connect the audio cable from the PC to the AUDIO IN (RGB/DVI) sockets of the set. 3 Press the INPUT button to select R G B. 4 Switch on the PC, and the PC screen appears on the set can...

Owner's Manual
Page 27
... the on-screen menus and adjust the system set on. SAP * Toggles through preset sound settings. POWER TV/PC INPUT PICTURE SOUND SAP RATIO POWER Turns your preference. 25 INPUT External input modes rotate in an interactive application or other user interaction function. CHANNEL Select available channels. WATCHING TV / CHANNEL CONTROL REMOTE CONTROL KEY FUNCTIONS When using analog audio. * DTV mode: Changes the audio language. MENU Displays the main menu. TV/PC Selects TV or PC mode. ENTER VOLUME UP...
... the on-screen menus and adjust the system set on. SAP * Toggles through preset sound settings. POWER TV/PC INPUT PICTURE SOUND SAP RATIO POWER Turns your preference. 25 INPUT External input modes rotate in an interactive application or other user interaction function. CHANNEL Select available channels. WATCHING TV / CHANNEL CONTROL REMOTE CONTROL KEY FUNCTIONS When using analog audio. * DTV mode: Changes the audio language. MENU Displays the main menu. TV/PC Selects TV or PC mode. ENTER VOLUME UP...
Owner's Manual
Page 28
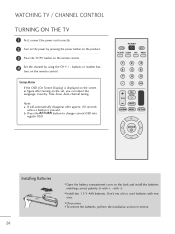
... button on the back and install the batteries matching correct polarity (+ with +, - tons on the set, you can adjust the Language, Country, Time Zone, Auto channel tuning. WATCHING TV / CHANNEL CONTROL TURNING ON THE TV 1 First, connect the power cord correctly. 2 Turn on the power by using the CH + / - b. POWER TV/PC INPUT PICTURE SOUND SAP RATIO 123 4 56 789 - 0 FLASHBK FAV LIGHTING VOL CH MUTE Q.MENU MENU RETURN ENTER Installing Batteries I Install...
... button on the back and install the batteries matching correct polarity (+ with +, - tons on the set, you can adjust the Language, Country, Time Zone, Auto channel tuning. WATCHING TV / CHANNEL CONTROL TURNING ON THE TV 1 First, connect the power cord correctly. 2 Turn on the power by using the CH + / - b. POWER TV/PC INPUT PICTURE SOUND SAP RATIO 123 4 56 789 - 0 FLASHBK FAV LIGHTING VOL CH MUTE Q.MENU MENU RETURN ENTER Installing Batteries I Install...
Owner's Manual
Page 31
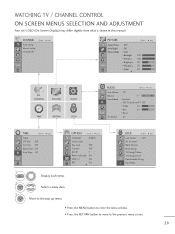
... E LOCK Move Enter Lock System : Off Set Password Block Channel Movie Rating TV Rating-Children TV Rating-General Downloadable Rating Input Block • Press the MENU button to close the menu window. • Press the RETURN button to move to the pop up menu. Select a menu item. CHANNEL Auto tuning Manual tuning Channel Edit Move Enter PICTURE Move Enter Aspect Ratio : 16:9 Auto Bright : Off Picture Mode : Vivid • Backlight 100 • Contrast 100 • Brightness 50...
... E LOCK Move Enter Lock System : Off Set Password Block Channel Movie Rating TV Rating-Children TV Rating-General Downloadable Rating Input Block • Press the MENU button to close the menu window. • Press the RETURN button to move to the pop up menu. Select a menu item. CHANNEL Auto tuning Manual tuning Channel Edit Move Enter PICTURE Move Enter Aspect Ratio : 16:9 Auto Bright : Off Picture Mode : Vivid • Backlight 100 • Contrast 100 • Brightness 50...

Owner's Manual
Page 43
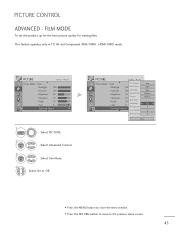
...; Advancceedd CCoonnttrrooll E Enter G PICTURE Move Enter D Picture Mode : Vivid • Backlight Color Temperature Cool 100 Fresh Contrast F High G • Contrast 100 • Brightness 50 • Sharpness 70 • Color 70 • Tint 0 • Advancceedd CCoonnttrrooll E Fresh Color Noise Reduction Gamma Black Level Film Mode Red Contrast Green Contrast High Medium Medium Auto Off 0 0 Blue Contrast 0 Close 1 MENU 2 ENTER Select PICTURE. Fresh Color Adjusts the color of the reflection. Noise Reduction Removes interference up to the...
...; Advancceedd CCoonnttrrooll E Enter G PICTURE Move Enter D Picture Mode : Vivid • Backlight Color Temperature Cool 100 Fresh Contrast F High G • Contrast 100 • Brightness 50 • Sharpness 70 • Color 70 • Tint 0 • Advancceedd CCoonnttrrooll E Fresh Color Noise Reduction Gamma Black Level Film Mode Red Contrast Green Contrast High Medium Medium Auto Off 0 0 Blue Contrast 0 Close 1 MENU 2 ENTER Select PICTURE. Fresh Color Adjusts the color of the reflection. Noise Reduction Removes interference up to the...
Owner's Manual
Page 44
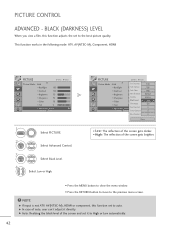
... 0 Film Mode R G Off • Advancceedd CCoonnttrrooll Red Contrast 0 E Green Contrast 0 Blue Contrast 0 Close • Low: The reflection of the screen gets darker. • High: The reflection of the screen gets brighter. • Press the MENU button to close the menu window. • Press the RETURN button to move to the best picture quality. NOTE G If input is not ATV, AV(NTSC-M), HDMI or component, this function adjusts the set to...
... 0 Film Mode R G Off • Advancceedd CCoonnttrrooll Red Contrast 0 E Green Contrast 0 Blue Contrast 0 Close • Low: The reflection of the screen gets darker. • High: The reflection of the screen gets brighter. • Press the MENU button to close the menu window. • Press the RETURN button to move to the best picture quality. NOTE G If input is not ATV, AV(NTSC-M), HDMI or component, this function adjusts the set to...
Owner's Manual
Page 45
...; Sharpness 70 Gamma Medium • Color Black Level 70 Auto • Tint Film Mode 0R F G Off G • Advancceedd CCoonnttrrooll Red Contrast 0 E Green Contrast 0 Blue Contrast 0 Close • Press the MENU button to close the menu window. • Press the RETURN button to move to the previous menu screen. 43 PICTURE CONTROL ADVANCED - PICTURE Move D Picture Mode : Vivid • Backlight 100 • Contrast 100 • Brightness 50 • Sharpness 70 • Color 70 • Tint 0R •...
...; Sharpness 70 Gamma Medium • Color Black Level 70 Auto • Tint Film Mode 0R F G Off G • Advancceedd CCoonnttrrooll Red Contrast 0 E Green Contrast 0 Blue Contrast 0 Close • Press the MENU button to close the menu window. • Press the RETURN button to move to the previous menu screen. 43 PICTURE CONTROL ADVANCED - PICTURE Move D Picture Mode : Vivid • Backlight 100 • Contrast 100 • Brightness 50 • Sharpness 70 • Color 70 • Tint 0R •...
Owner's Manual
Page 47
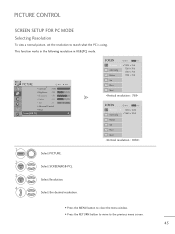
... Control • Reset Screen(RGB-PC) Enter G SCREEN Move MENU Prev. Move MENU Prev. 1400 x 1050 1680 x 1050 Position Size Phase Reset 1 MENU 2 ENTER Select PICTURE. Resolution G Auto Config. Select the desired resolution. • Press the MENU button to close the menu window. • Press the RETURN button to move to match what the PC is using. This function works in the following resolution in RGB[PC] mode. PICTURE CONTROL SCREEN SETUP FOR PC MODE Selecting Resolution To view a normal picture, set the resolution to...
... Control • Reset Screen(RGB-PC) Enter G SCREEN Move MENU Prev. Move MENU Prev. 1400 x 1050 1680 x 1050 Position Size Phase Reset 1 MENU 2 ENTER Select PICTURE. Resolution G Auto Config. Select the desired resolution. • Press the MENU button to close the menu window. • Press the RETURN button to move to match what the PC is using. This function works in the following resolution in RGB[PC] mode. PICTURE CONTROL SCREEN SETUP FOR PC MODE Selecting Resolution To view a normal picture, set the resolution to...

Owner's Manual
Page 48
.... Select SCREEN(RGB-PC). PICTURE CONTROL Auto Configure (RGB [PC] mode only) Automatically adjusts picture position and minimizes image instability. Using OSD PICTURE D • Contrast Move : 100 • Brightness : 50 • Sharpness : 70 • Colour : 50 • Tint :0 R • Advanced Control • Reset Screen(RGB-PC) Enter G SCREEN Resolution Move MENU Prev. Using ENTER(Remocon or control key) This function is still not correct, try Auto adjustment again. • If picture needs to the previous menu screen. 46 Select Auto Config. Auto Config...
.... Select SCREEN(RGB-PC). PICTURE CONTROL Auto Configure (RGB [PC] mode only) Automatically adjusts picture position and minimizes image instability. Using OSD PICTURE D • Contrast Move : 100 • Brightness : 50 • Sharpness : 70 • Colour : 50 • Tint :0 R • Advanced Control • Reset Screen(RGB-PC) Enter G SCREEN Resolution Move MENU Prev. Using ENTER(Remocon or control key) This function is still not correct, try Auto adjustment again. • If picture needs to the previous menu screen. 46 Select Auto Config. Auto Config...

Owner's Manual
Page 81
... where the product's power cord was plugged in pictures A Check antenna (Change the direction of possible interference. A Check your area. If the picture still doesn't appear, contact an authorized service center in the menu. No picture & No sound A Check whether the product is set ? A Are the video cables installed properly? A Ensure that the batteries are pointing the remote control directly at the set. No color, poor color, or poor picture A Adjust Color in your antenna...
... where the product's power cord was plugged in pictures A Check antenna (Change the direction of possible interference. A Check your area. If the picture still doesn't appear, contact an authorized service center in the menu. No picture & No sound A Check whether the product is set ? A Are the video cables installed properly? A Ensure that the batteries are pointing the remote control directly at the set. No color, poor color, or poor picture A Adjust Color in your antenna...
Owner's Manual
Page 82
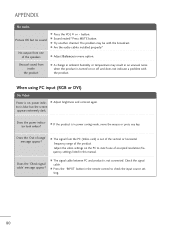
Press MUTE button. A Are the audio cables installed properly? When using PC input (RGB or DVI) No Video. A Adjust brightness and contrast again. Does the 'Out of the product. Adjust the video settings on the PC to check the input source setting. 80 button. Does the power indica- tor look amber? A The signal from the PC (Video card) is in menu option. Does the 'Check signal cable' message appear? A If the product is out of the vertical or horizontal frequency range of range' message...
Press MUTE button. A Are the audio cables installed properly? When using PC input (RGB or DVI) No Video. A Adjust brightness and contrast again. Does the 'Out of the product. Adjust the video settings on the PC to check the input source setting. 80 button. Does the power indica- tor look amber? A The signal from the PC (Video card) is in menu option. Does the 'Check signal cable' message appear? A If the product is out of the vertical or horizontal frequency range of range' message...
Owner's Manual
Page 83
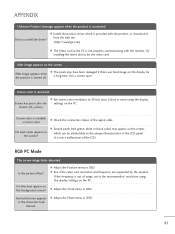
....com) A The Video card in OSD. 81 After-image appears when A The pixels may appear on the display for the video card. olution (16_colors). A Several pixels (red, green, white or black color) may have been damaged if there was fixed image on the screen, which is turned off. Use a screen saver. Screen color is not properly communicating with the product, or download it Did you install the driver? Screen color is connected. After-image appears on the screen? Do back...
....com) A The Video card in OSD. 81 After-image appears when A The pixels may appear on the display for the video card. olution (16_colors). A Several pixels (red, green, white or black color) may have been damaged if there was fixed image on the screen, which is turned off. Use a screen saver. Screen color is not properly communicating with the product, or download it Did you install the driver? Screen color is connected. After-image appears on the screen? Do back...

Owner's Manual
Page 85
... SPECIFICATIONS LCD Panel Screen Type Pixel Pitch 546.86 mm Wide (21.53 inch) TFT (Thin Film Transistor) LCD (Liquid Crystal Display) Panel Visible diagonal size : 546.86 mm 0.248 mm (H) x 0.248 mm (V) Video Signal Max. Resolution 1920 x 1080 @ 60 Hz Recommended Resolution 1920 x 1080 @ 60 Hz Horizontal Frequency 30 kHz to 83 kHz Vertical Frequency 56 Hz to 75 Hz Input Connector Synchronization Type Separate Sync, Digital TV, D-Sub Analog, PC Audio In, component, DVI-D, HDMI*2, CVBS, S-VIDEO Power Rated...
... SPECIFICATIONS LCD Panel Screen Type Pixel Pitch 546.86 mm Wide (21.53 inch) TFT (Thin Film Transistor) LCD (Liquid Crystal Display) Panel Visible diagonal size : 546.86 mm 0.248 mm (H) x 0.248 mm (V) Video Signal Max. Resolution 1920 x 1080 @ 60 Hz Recommended Resolution 1920 x 1080 @ 60 Hz Horizontal Frequency 30 kHz to 83 kHz Vertical Frequency 56 Hz to 75 Hz Input Connector Synchronization Type Separate Sync, Digital TV, D-Sub Analog, PC Audio In, component, DVI-D, HDMI*2, CVBS, S-VIDEO Power Rated...
Owner's Manual
Page 88
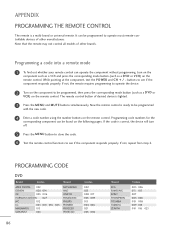
... lighted. 3 Press the MENU and MUTE buttons simultaneously. buttons to operate most remote-controllable devices of desired device is correct, the device will turn on the component such as a VCR and press the corresponding mode button (such as a D V D or V C R) on the following pages. PROGRAMMING CODE DVD Brand Codes APEX DIGITAL 022 DENON 020 014 GE 005 006 HARMAN KARDON 027 JVC 012 LG...
... lighted. 3 Press the MENU and MUTE buttons simultaneously. buttons to operate most remote-controllable devices of desired device is correct, the device will turn on the component such as a VCR and press the corresponding mode button (such as a D V D or V C R) on the following pages. PROGRAMMING CODE DVD Brand Codes APEX DIGITAL 022 DENON 020 014 GE 005 006 HARMAN KARDON 027 JVC 012 LG...

Owner's Manual
Page 95
... adjust color temperature. Auto configuration only works in the AUDIO menu. I Close cover. Data 03 & 04: Minor Channel Number Not needed for the Major and Minor, normally only the second byte is used batteries with new ones. OSD Select (Command: k l) To select OSD (On Screen Display) on/off Data 01: Lock on Acknowledgement [m][ ][Set ID][ ][OK/NG][Data][x] If you're not using the remote control and front panel controls on...
... adjust color temperature. Auto configuration only works in the AUDIO menu. I Close cover. Data 03 & 04: Minor Channel Number Not needed for the Major and Minor, normally only the second byte is used batteries with new ones. OSD Select (Command: k l) To select OSD (On Screen Display) on/off Data 01: Lock on Acknowledgement [m][ ][Set ID][ ][OK/NG][Data][x] If you're not using the remote control and front panel controls on...

Specification
Page 2
... respective companies. 03/10/10 LCD MONITOR M2262D LCD PANEL SPECIFICATION Screen Size 22" Class (21.5" diagonal) Resolution 1920 x 1080p Brightness (cd/m2) 300 (Typical) Dynamic Contrast Ratio 50,000:1 Response Time (GTG) 5ms (Typical) Viewing Angle (H/V) 170º/160º Color Supported 16.7M Aspect Ratio 16:9 Panel Surface Anti-Glare, 3H Audio/Video Input/Outputs HDMI™ 2 15 pin D-Sub 1 DVI-D 1 Composite 1 SCART 2 PC Audio In 1 Headphone Out 1 Special...
... respective companies. 03/10/10 LCD MONITOR M2262D LCD PANEL SPECIFICATION Screen Size 22" Class (21.5" diagonal) Resolution 1920 x 1080p Brightness (cd/m2) 300 (Typical) Dynamic Contrast Ratio 50,000:1 Response Time (GTG) 5ms (Typical) Viewing Angle (H/V) 170º/160º Color Supported 16.7M Aspect Ratio 16:9 Panel Surface Anti-Glare, 3H Audio/Video Input/Outputs HDMI™ 2 15 pin D-Sub 1 DVI-D 1 Composite 1 SCART 2 PC Audio In 1 Headphone Out 1 Special...


