Owners Manual
Page 3
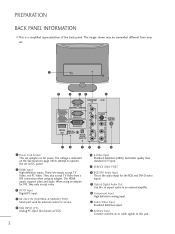
... Video, not PC Video. The image shown may be somewhat different from a DVI connection when using an adapter for DVI, they only accept video. 3 DVI-D Input Digital PC input. 4 RS-232C IN (CONTROL & SERVICE) PORT Serial port used for the RGB and DVI-D video inputs. 9 Optical Digital Audio Out Use this to export audio to an external amplifer. 10 Component Input High definition analog input. 11 Audio/Video Input Standard definition input. 12 Antenna Input Connect over-the-air or cable signals to operate the set operates on AC power...
... Video, not PC Video. The image shown may be somewhat different from a DVI connection when using an adapter for DVI, they only accept video. 3 DVI-D Input Digital PC input. 4 RS-232C IN (CONTROL & SERVICE) PORT Serial port used for the RGB and DVI-D video inputs. 9 Optical Digital Audio Out Use this to export audio to an external amplifer. 10 Component Input High definition analog input. 11 Audio/Video Input Standard definition input. 12 Antenna Input Connect over-the-air or cable signals to operate the set operates on AC power...
Owners Manual
Page 11
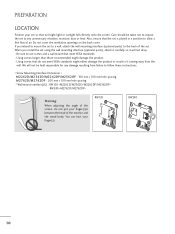
... * Wall mount interface(LG) : RW120 RW240 Warning: When adjusting the angle of the screen, do not meet VESA standards. - Using screws longer than those recommended might either damage the product or result in between the head of the monitor and the stand body. We will not drop. - Be sure to allow a free flow of the set. RW120 RW240 10 If you install the set using...
... * Wall mount interface(LG) : RW120 RW240 Warning: When adjusting the angle of the screen, do not meet VESA standards. - Using screws longer than those recommended might either damage the product or result in between the head of the monitor and the stand body. We will not drop. - Be sure to allow a free flow of the set. RW120 RW240 10 If you install the set using...
Owners Manual
Page 16
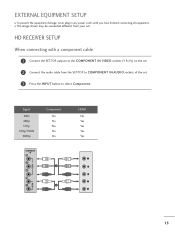
HD RECEIVER SETUP When connecting with a component cable 1 Connect the SET-TOP outputs to select Component. EXTERNAL EQUIPMENT SETUP I The image shown may be somewhat different from the SET-TOP to COMPONENT IN AUDIO sockets of the set. 3 Press the INPUT button to the COMPONENT IN VIDEO sockets (Y PB PR) on the set. 2 Connect the audio cable from your set. Signal 480i 480p 576p 720p/1080i 1080p Component Yes Yes No Yes Yes COMPONENT IN Y VIDEO PB 1 PR L R 2 HDMI No...
HD RECEIVER SETUP When connecting with a component cable 1 Connect the SET-TOP outputs to select Component. EXTERNAL EQUIPMENT SETUP I The image shown may be somewhat different from the SET-TOP to COMPONENT IN AUDIO sockets of the set. 3 Press the INPUT button to the COMPONENT IN VIDEO sockets (Y PB PR) on the set. 2 Connect the audio cable from your set. Signal 480i 480p 576p 720p/1080i 1080p Component Yes Yes No Yes Yes COMPONENT IN Y VIDEO PB 1 PR L R 2 HDMI No...

Owners Manual
Page 17
... the digital set-top box to the HDMI IN jack on the set. 1 HDMI IN 2 1 When connecting with a HDMI to DVI cable 1 Connect the digital set-top box to HDMI IN jack on the set. 2 Connect the audio output of the digital set-top box to the AUDIO IN (RGB/DVI) jack on the set. 3 Turn on the digital set-top box. (Refer to the owner's manual for the digital set-top box.) 1 HDMI IN 2 AUDIO IN (RGB/DVI) 2 1 DVI OUTPUT AUDIO L R ! NOTE G HDMI Input does not support PC mode.
... the digital set-top box to the HDMI IN jack on the set. 1 HDMI IN 2 1 When connecting with a HDMI to DVI cable 1 Connect the digital set-top box to HDMI IN jack on the set. 2 Connect the audio output of the digital set-top box to the AUDIO IN (RGB/DVI) jack on the set. 3 Turn on the digital set-top box. (Refer to the owner's manual for the digital set-top box.) 1 HDMI IN 2 AUDIO IN (RGB/DVI) 2 1 DVI OUTPUT AUDIO L R ! NOTE G HDMI Input does not support PC mode.
Owners Manual
Page 18
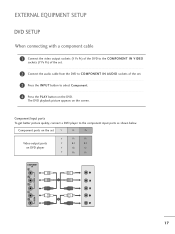
... INPUT button to select Component. 4 Press the PLAY button on the DVD. EXTERNAL EQUIPMENT SETUP DVD SETUP When connecting with a component cable 1 Connect the video output sockets (Y PB PR) of the DVD to the COMPONENT IN VIDEO sockets (Y PB PR) of the set. 2 Connect the audio cable from the DVD to COMPONENT IN AUDIO sockets of the set Y PB PR Video output ports on DVD player Y PB PR Y B-Y R-Y Y Cb Cr Y Pb Pr COMPONENT IN Y VIDEO PB 1 PR L R 2 AUDIO 17 Component Input ports To get better picture quality, connect a DVD player to the component input ports...
... INPUT button to select Component. 4 Press the PLAY button on the DVD. EXTERNAL EQUIPMENT SETUP DVD SETUP When connecting with a component cable 1 Connect the video output sockets (Y PB PR) of the DVD to the COMPONENT IN VIDEO sockets (Y PB PR) of the set. 2 Connect the audio cable from the DVD to COMPONENT IN AUDIO sockets of the set Y PB PR Video output ports on DVD player Y PB PR Y B-Y R-Y Y Cb Cr Y Pb Pr COMPONENT IN Y VIDEO PB 1 PR L R 2 AUDIO 17 Component Input ports To get better picture quality, connect a DVD player to the component input ports...
Owners Manual
Page 19
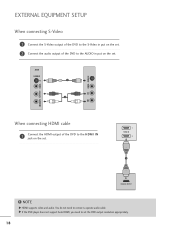
AV-IN S-VIDEO 1 2 S-VIDEO VIDEO L VIDEO (MONO) L AUDIO R R When connecting HDMI cable 1 Connect the HDMI output of the DVD to the AUDIO in put on the set. 2 Connect the audio output of the DVD to the HDMI IN jack on the set. G If the DVD player does not support Auto HDMI, you need to connect a sperate audio cable. EXTERNAL EQUIPMENT SETUP When connecting S-Video 1 Connect the S-Video output of the DVD to the S-Video in put on the set the DVD output resolution appropriately. 18 NOTE G HDMI supports video and audio. You do not need to set . 1 HDMI IN 2 1 !
AV-IN S-VIDEO 1 2 S-VIDEO VIDEO L VIDEO (MONO) L AUDIO R R When connecting HDMI cable 1 Connect the HDMI output of the DVD to the AUDIO in put on the set. 2 Connect the audio output of the DVD to the HDMI IN jack on the set. G If the DVD player does not support Auto HDMI, you need to connect a sperate audio cable. EXTERNAL EQUIPMENT SETUP When connecting S-Video 1 Connect the S-Video output of the DVD to the S-Video in put on the set the DVD output resolution appropriately. 18 NOTE G HDMI supports video and audio. You do not need to set . 1 HDMI IN 2 1 !
Owners Manual
Page 22
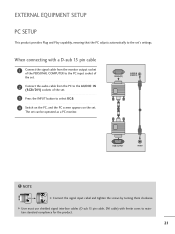
... (PC) AUDIO IN (RGB/DVI) 1 2 RGB OUTPUT AUDIO ! EXTERNAL EQUIPMENT SETUP PC SETUP This product provides Plug and Play capability, meaning that the PC adjusts automatically to the set can be operated as a PC monitor. G User must use shielded signal interface cables (D sub 15 pin cable, DVI cable) with a D-sub 15 pin cable 1 Connect the signal cable from the monitor output socket of the PERSONAL COMPUTER to the PC input socket of the set. 2 Connect the audio cable from...
... (PC) AUDIO IN (RGB/DVI) 1 2 RGB OUTPUT AUDIO ! EXTERNAL EQUIPMENT SETUP PC SETUP This product provides Plug and Play capability, meaning that the PC adjusts automatically to the set can be operated as a PC monitor. G User must use shielded signal interface cables (D sub 15 pin cable, DVI cable) with a D-sub 15 pin cable 1 Connect the signal cable from the monitor output socket of the PERSONAL COMPUTER to the PC input socket of the set. 2 Connect the audio cable from...
Owners Manual
Page 23
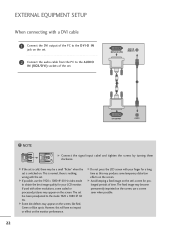
.../DVI) 2 1 DVI OUTPUT AUDIO ! G Avoid keeping a fixed image on the set is switched on. G If the set is nothing wrong with other resolutions, some temporary distortion effects on the screen. G Some dot defects may become permanently imprinted on the screen; NOTE G Connect the signal input cabel and tighten the screws by turning them clockwise. The set . use the 1920 x 1080 @ 60 Hz video mode to the mode 1920 x 1080...
.../DVI) 2 1 DVI OUTPUT AUDIO ! G Avoid keeping a fixed image on the set is switched on. G If the set is nothing wrong with other resolutions, some temporary distortion effects on the screen. G Some dot defects may become permanently imprinted on the screen; NOTE G Connect the signal input cabel and tighten the screws by turning them clockwise. The set . use the 1920 x 1080 @ 60 Hz video mode to the mode 1920 x 1080...
Owners Manual
Page 27
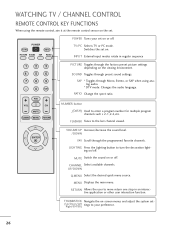
... Q.MENU MENU RETURN PICTURE Toggles through preset sound settings. THUMBSTICK Navigate the on-screen menus and adjust the system set on or off . NUMBER button _(DASH) Used to the last channel viewed. MUTE Switch the sound on . RETURN Allows the user to turn the decoration lighting on/off . POWER TV/PC INPUT PICTURE SOUND SAP RATIO POWER Turns your preference. 26 INPUT External input modes rotate in an interactive application or other user interaction function. SOUND Toggles through the factory preset picture settings...
... Q.MENU MENU RETURN PICTURE Toggles through preset sound settings. THUMBSTICK Navigate the on-screen menus and adjust the system set on or off . NUMBER button _(DASH) Used to the last channel viewed. MUTE Switch the sound on . RETURN Allows the user to turn the decoration lighting on/off . POWER TV/PC INPUT PICTURE SOUND SAP RATIO POWER Turns your preference. 26 INPUT External input modes rotate in an interactive application or other user interaction function. SOUND Toggles through the factory preset picture settings...
Owners Manual
Page 28
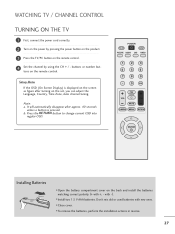
... power by using the CH + / - tons on the remote control. 4 Set the channel by pressing the power button on the product. 3 Press the TV/PC button on the remote control. Note: a. I Install two 1.5 V AAA batteries. buttons or number but- It will automatically disappear after turning on the back and install the batteries matching correct polarity (+ with +, - POWER TV/PC INPUT PICTURE SOUND SAP RATIO 1 2 3 4 56 7 8 9 - 0 FLASHBK FAV LIGHTING VOL CH MUTE Q.MENU MENU...
... power by using the CH + / - tons on the remote control. 4 Set the channel by pressing the power button on the product. 3 Press the TV/PC button on the remote control. Note: a. I Install two 1.5 V AAA batteries. buttons or number but- It will automatically disappear after turning on the back and install the batteries matching correct polarity (+ with +, - POWER TV/PC INPUT PICTURE SOUND SAP RATIO 1 2 3 4 56 7 8 9 - 0 FLASHBK FAV LIGHTING VOL CH MUTE Q.MENU MENU...
Owners Manual
Page 30
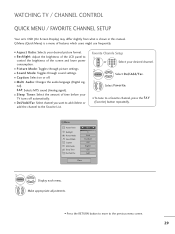
Q.Menu (Quick Menu) is shown in this manual. I Caption: Select on or off automatically. I To tune to control the brightness of the screen and lower power consumption. I Picture Mode: Toggles through sound settings. I Sound Mode: Toggles through picture settings. SAP: Selects MTS sound (Analog signal). I Backlight: Adjust the brightness of the LCD panel to a favorite channel, press the F A V (Favorite) button repeatedly. Favorite Channle Setup 1 CH 123 or 4 5 6 Select your TV turns off . I Del/Add/Fav: Select channel you...
Q.Menu (Quick Menu) is shown in this manual. I Caption: Select on or off automatically. I To tune to control the brightness of the screen and lower power consumption. I Picture Mode: Toggles through sound settings. I Sound Mode: Toggles through picture settings. SAP: Selects MTS sound (Analog signal). I Backlight: Adjust the brightness of the LCD panel to a favorite channel, press the F A V (Favorite) button repeatedly. Favorite Channle Setup 1 CH 123 or 4 5 6 Select your TV turns off . I Del/Add/Fav: Select channel you...
Owners Manual
Page 35
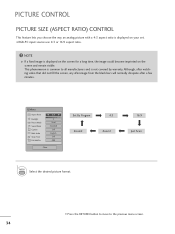
... previous menu screen. 34 PICTURE CONTROL PICTURE SIZE (ASPECT RATIO) CONTROL This feature lets you choose the way an analog picture with a 4:3 aspect ratio is displayed on the screen and remain visible. Q.Menu Aspect Ratio Backlight Picture Mode Sound Mode Caption Multi Audio Sleep Timer CH Del/Add/Fav F 16:9 G 3 Vivid Standard Off English Off Add Close Set By Program 4:3 Zoom2 Zoom1 16:9 Just Scan 1 RATIO Select the desired picture format. • Press the RETURN button to...
... previous menu screen. 34 PICTURE CONTROL PICTURE SIZE (ASPECT RATIO) CONTROL This feature lets you choose the way an analog picture with a 4:3 aspect ratio is displayed on the screen and remain visible. Q.Menu Aspect Ratio Backlight Picture Mode Sound Mode Caption Multi Audio Sleep Timer CH Del/Add/Fav F 16:9 G 3 Vivid Standard Off English Off Add Close Set By Program 4:3 Zoom2 Zoom1 16:9 Just Scan 1 RATIO Select the desired picture format. • Press the RETURN button to...

Owners Manual
Page 37
Q.Menu Aspect Ratio Backlight Picture Mode Sound Mode Caption Multi Audio Sleep Timer CH Del/Add/Fav 16:9 3 F Vivid G Standard Off English Off Add Close Vivid Game Standard Cinema Sport 1 PICTURE Select Vivid, Standard, Cinema, Sport, or Game. I Vivid, Standard, Cinema, Sport, or Game Settings are not adjustable. • Press the RETURN button to move to the previous menu screen. 36 PICTURE CONTROL PRESET PICTURE SETTINGS Picture Mode-Preset There are factory presets for the optimum picture quality...
Q.Menu Aspect Ratio Backlight Picture Mode Sound Mode Caption Multi Audio Sleep Timer CH Del/Add/Fav 16:9 3 F Vivid G Standard Off English Off Add Close Vivid Game Standard Cinema Sport 1 PICTURE Select Vivid, Standard, Cinema, Sport, or Game. I Vivid, Standard, Cinema, Sport, or Game Settings are not adjustable. • Press the RETURN button to move to the previous menu screen. 36 PICTURE CONTROL PRESET PICTURE SETTINGS Picture Mode-Preset There are factory presets for the optimum picture quality...
Owners Manual
Page 53
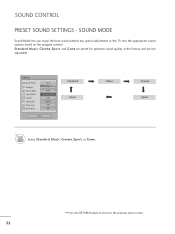
SOUND MODE Sound Mode lets you enjoy the best sound without any special adjustment as the TV sets the appropriate sound options based on the program content. Standard, Music, Cinema, Sport, and G ame are preset for optimum sound quality at the factory and are not adjustable. Q.Menu Aspect Ratio Backlight Picture Mode Sound Mode Caption Multi Audio Sleep Timer CH Del/Add/Fav 16:9 3 Vivid F Standard G Off English Off Add Close Standard Game Music 1 SOUND Select Standard...
SOUND MODE Sound Mode lets you enjoy the best sound without any special adjustment as the TV sets the appropriate sound options based on the program content. Standard, Music, Cinema, Sport, and G ame are preset for optimum sound quality at the factory and are not adjustable. Q.Menu Aspect Ratio Backlight Picture Mode Sound Mode Caption Multi Audio Sleep Timer CH Del/Add/Fav 16:9 3 Vivid F Standard G Off English Off Add Close Standard Game Music 1 SOUND Select Standard...
Owners Manual
Page 58
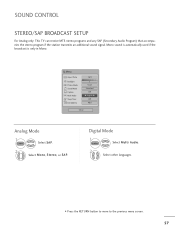
... button to move to the previous menu screen. 57 Mono sound is automatically used if the broadcast is only in Mono. Q.Menu Aspect Ratio Backlight Picture Mode Sound Mode Caption Multi Audio Sleep Timer CH Del/Add/Fav 16:9 3 Vivid Standard Off F English G Off Add Close Analog Mode 1 Q.MENU Select S A P. 2 Select Mono, Stereo, or S A P. SOUND CONTROL STEREO/SAP BROADCAST SETUP For Analog only: This TV can receive MTS stereo programs and any SAP (Secondary Audio Program...
... button to move to the previous menu screen. 57 Mono sound is automatically used if the broadcast is only in Mono. Q.Menu Aspect Ratio Backlight Picture Mode Sound Mode Caption Multi Audio Sleep Timer CH Del/Add/Fav 16:9 3 Vivid Standard Off F English G Off Add Close Analog Mode 1 Q.MENU Select S A P. 2 Select Mono, Stereo, or S A P. SOUND CONTROL STEREO/SAP BROADCAST SETUP For Analog only: This TV can receive MTS stereo programs and any SAP (Secondary Audio Program...
Owners Manual
Page 80
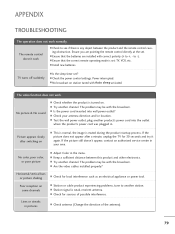
... or streaks in . A Check the power control settings. No color, poor color, or poor picture A Adjust Color in your antenna direction and/or location. A Station signal is any object between this product and other electronics. The remote control doesn't work A Check to -). TV turns off suddenly A Is the sleep timer set? A Is the power cord inserted into the outlet where the product's power cord was plugged in pictures A Check antenna (Change the direction of possible interference...
... or streaks in . A Check the power control settings. No color, poor color, or poor picture A Adjust Color in your antenna direction and/or location. A Station signal is any object between this product and other electronics. The remote control doesn't work A Check to -). TV turns off suddenly A Is the sleep timer set? A Is the power cord inserted into the outlet where the product's power cord was plugged in pictures A Check antenna (Change the direction of possible interference...

Owners Manual
Page 82
... install the driver? A Several pixels (red, green, white or black color) may have been damaged if there was fixed image on the display for the video card. RGB PC Mode The screen image looks abnormal. APPENDIX 'Unknown Product' message appears when the product is not a malfunction of the signal cable. After-image appears when A The pixels may appear on the screen? olution (16_colors). A Adjust the Clock menu...
... install the driver? A Several pixels (red, green, white or black color) may have been damaged if there was fixed image on the display for the video card. RGB PC Mode The screen image looks abnormal. APPENDIX 'Unknown Product' message appears when the product is not a malfunction of the signal cable. After-image appears when A The pixels may appear on the screen? olution (16_colors). A Adjust the Clock menu...

Owners Manual
Page 90
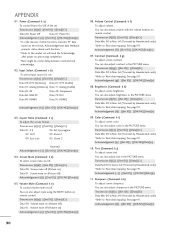
... 18. At this format when receiving abnormal data from non-viable functions or communication errors. OSD Select k 13. Input Select x 03. Color Temperature k e 00 to 64 19. Channel Add/Del m g 00 to 01 17. Aspect Ratio k 04. Volume Mute k 06. Bass k c (G p.90) 16. Balance k d 00 to 64 21. Power k 02. Remote Control Lock Mode k a 00 to choose desired set ID to 01 14...
... 18. At this format when receiving abnormal data from non-viable functions or communication errors. OSD Select k 13. Input Select x 03. Color Temperature k e 00 to 64 19. Channel Add/Del m g 00 to 01 17. Aspect Ratio k 04. Volume Mute k 06. Bass k c (G p.90) 16. Balance k d 00 to 64 21. Power k 02. Remote Control Lock Mode k a 00 to choose desired set ID to 01 14...
Owners Manual
Page 91
... after power on remote control. Transmission [k][c][ ][Set ID][ ][Data][Cr] Data 01: 4:3 06: Set by Hexadecimal code) *Refer to 'Real data mapping'. You can also adjust color in the PICTURE menu. Contrast (Command: k g) To adjust screen contrast. Transmission [k][g][ ][Set ID][ ][Data][Cr] Data Min: 00 to Max: 64 (*transmit by Hexadecimal code) *Refer to 'Real data mapping'. You can also adjust volume with the volume buttons on this format...
... after power on remote control. Transmission [k][c][ ][Set ID][ ][Data][Cr] Data 01: 4:3 06: Set by Hexadecimal code) *Refer to 'Real data mapping'. You can also adjust color in the PICTURE menu. Contrast (Command: k g) To adjust screen contrast. Transmission [k][g][ ][Set ID][ ][Data][Cr] Data Min: 00 to Max: 64 (*transmit by Hexadecimal code) *Refer to 'Real data mapping'. You can also adjust volume with the volume buttons on this format...
Owners Manual
Page 93
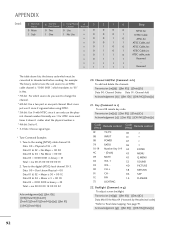
... adjust screen backlight. Transmission [m][c][ ][Set ID][ ][Data][Cr] Acknowledgement [c][ ][Set ID][ ][OK/NG][Data][x] Code (Hexa) Remote control Code (Hexa) Remote control 0F 0B 08 79 10-19 4C 09 02 03 00 01 1E 73 TV/PC 40 INPUT 41 POWER 07 RATIO 06 Number Key 0-9 44 - (Dash) 43 MUTE 45 VOL + 52 VOL - 4D CH + 5B CH - 0A FAV 1A LIGHTING ENTER MENU Q.MENU SOUND PICTURE...
... adjust screen backlight. Transmission [m][c][ ][Set ID][ ][Data][Cr] Acknowledgement [c][ ][Set ID][ ][OK/NG][Data][x] Code (Hexa) Remote control Code (Hexa) Remote control 0F 0B 08 79 10-19 4C 09 02 03 00 01 1E 73 TV/PC 40 INPUT 41 POWER 07 RATIO 06 Number Key 0-9 44 - (Dash) 43 MUTE 45 VOL + 52 VOL - 4D CH + 5B CH - 0A FAV 1A LIGHTING ENTER MENU Q.MENU SOUND PICTURE...


