

Owners Manual
Page 3
... 7 BEFORE USE 8 OPERATION 8 Control Panel and Display 9 Dehumidifying 9 Setting the Timer 9 Timer function 10 Safety Standby Light 10 Bucket Full Light 10 Checking the Filter 10 Auto Defrost Light 10 Continuous Drainage Setup 11 Emptying the Water Bucket 12 Using the Pump 14 MAINTENANCE 14 Cleaning the Exterior 14 Cleaning the Water Bucket 15 Cleaning the Air Filter 16 Cleaning the Pump Filter 16 Storing the Product 17 SMART FUNCTIONS 17 Using LG SmartThinQ Application 17 Before Using LG SmartThinQ 18 Installing LG SmartThinQ 18 Registering the Product Via Wi...
... 7 BEFORE USE 8 OPERATION 8 Control Panel and Display 9 Dehumidifying 9 Setting the Timer 9 Timer function 10 Safety Standby Light 10 Bucket Full Light 10 Checking the Filter 10 Auto Defrost Light 10 Continuous Drainage Setup 11 Emptying the Water Bucket 12 Using the Pump 14 MAINTENANCE 14 Cleaning the Exterior 14 Cleaning the Water Bucket 15 Cleaning the Air Filter 16 Cleaning the Pump Filter 16 Storing the Product 17 SMART FUNCTIONS 17 Using LG SmartThinQ Application 17 Before Using LG SmartThinQ 18 Installing LG SmartThinQ 18 Registering the Product Via Wi...
Owners Manual
Page 4
... is damaged, malfunctioning, partially disassembled, or has missing or broken parts, including a damaged cord or plug. • Do not, under any circumstances, cut or remove the third (ground) prong from the power cord. • When installing or moving the appliance, be dangerous for play. These words mean: ! All safety messages will not be exposed to temperatures below freezing or exposed...
... is damaged, malfunctioning, partially disassembled, or has missing or broken parts, including a damaged cord or plug. • Do not, under any circumstances, cut or remove the third (ground) prong from the power cord. • When installing or moving the appliance, be dangerous for play. These words mean: ! All safety messages will not be exposed to temperatures below freezing or exposed...

Owners Manual
Page 5
.... Use only authorized factory parts. • Connect to a properly rated, protected, and sized power circuit to avoid electrical overload. ENGLISH 4 SAFETY INSTRUCTIONS • Do not use the product if the outlet is damaged or loose. • In the event of the power cord. • Do not use water to clean the dehumidifier. • Keep the air inlet and outlet free from open flames. • Do not use the product...
.... Use only authorized factory parts. • Connect to a properly rated, protected, and sized power circuit to avoid electrical overload. ENGLISH 4 SAFETY INSTRUCTIONS • Do not use the product if the outlet is damaged or loose. • In the event of the power cord. • Do not use water to clean the dehumidifier. • Keep the air inlet and outlet free from open flames. • Do not use the product...

Owners Manual
Page 6
... be replaced by pulling on a firm, stable surface. • Remove cable ties and extend power cord before moving . • Do not operate the dehumidifier without a filter could cause product deformation and leaking, resulting in property damage. • Turn off the dehumidifier and empty the water bucket before use the product in the air. • Never unplug the appliance by the manufacturer, its intended purpose. Using inappropriate cleaning products could...
... be replaced by pulling on a firm, stable surface. • Remove cable ties and extend power cord before moving . • Do not operate the dehumidifier without a filter could cause product deformation and leaking, resulting in property damage. • Turn off the dehumidifier and empty the water bucket before use the product in the air. • Never unplug the appliance by the manufacturer, its intended purpose. Using inappropriate cleaning products could...
Owners Manual
Page 7
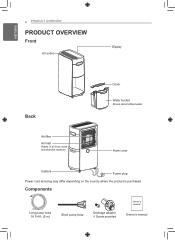
Components Long pump hose 16 1/4 ft. (5 m) Short pump hose Drainage adapter ※ Screw provided Owner's manual Owner's manual ENGLISH 6 PRODUCT OVERVIEW PRODUCT OVERVIEW Front Air outlet Display Back Air filter Air Inlet Draws in air from room and absorbs moisture Cover Water bucket Stores dehumidified water Hose cover Casters Power plug Power cord and plug may differ depending on the country where the product is purchased.
Components Long pump hose 16 1/4 ft. (5 m) Short pump hose Drainage adapter ※ Screw provided Owner's manual Owner's manual ENGLISH 6 PRODUCT OVERVIEW PRODUCT OVERVIEW Front Air outlet Display Back Air filter Air Inlet Draws in air from room and absorbs moisture Cover Water bucket Stores dehumidified water Hose cover Casters Power plug Power cord and plug may differ depending on the country where the product is purchased.
Owners Manual
Page 8
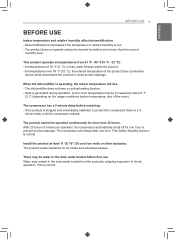
... the drain water bucket from the product's outgoing inspection to protect the compressor there is low. - ENGLISH BEFORE USE 7 BEFORE USE Indoor temperature and relative humidity affect dehumidification. - At temperatures of continuous operation, the compressor automatically shuts off for air intake and exhaust purposes. This Safety Standby function is normal. minute delay until the compressor restarts. At temperatures over 90 °F (32 °C), the internal temperature of the room). Install the product at temperatures...
... the drain water bucket from the product's outgoing inspection to protect the compressor there is low. - ENGLISH BEFORE USE 7 BEFORE USE Indoor temperature and relative humidity affect dehumidification. - At temperatures of continuous operation, the compressor automatically shuts off for air intake and exhaust purposes. This Safety Standby function is normal. minute delay until the compressor restarts. At temperatures over 90 °F (32 °C), the internal temperature of the room). Install the product at temperatures...
Owners Manual
Page 9
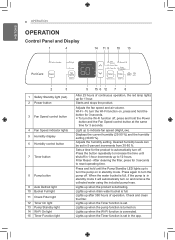
... control button at the same time for 3 seconds. ※ To turn the pump on and remove the collected water using the included pump hose. Displays the current humidity (25-90 %) and the humidity setting (30-80 %). Check and clean the filter. Adjusts the fan speed and air volume. To turn the Wi-Fi function on . After cleaning the filter, press for 1 hour. When the water bucket is full, if the pump is set. Lights...
... control button at the same time for 3 seconds. ※ To turn the pump on and remove the collected water using the included pump hose. Displays the current humidity (25-90 %) and the humidity setting (30-80 %). Check and clean the filter. Adjusts the fan speed and air volume. To turn the Wi-Fi function on . After cleaning the filter, press for 1 hour. When the water bucket is full, if the pump is set. Lights...
Owners Manual
Page 10
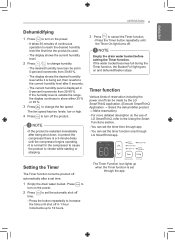
...; Select the dehumidifier product → Make reservation) - to change humidity. - The desired humidity level can set the timer time through the app. Press the Timer button repeatedly until the Timer On light turns off - For more detailed description on the use of LG SmartThinQ, refer to turn on /off the product. ! Timer function Various kinds of continuous operation to turn off can set time. 1 Empty the drain water bucket. The current humidity level is displayed in 1-hour increments...
...; Select the dehumidifier product → Make reservation) - to change humidity. - The desired humidity level can set the timer time through the app. Press the Timer button repeatedly until the Timer On light turns off - For more detailed description on the use of LG SmartThinQ, refer to turn on /off the product. ! Timer function Various kinds of continuous operation to turn off can set time. 1 Empty the drain water bucket. The current humidity level is displayed in 1-hour increments...
Owners Manual
Page 11
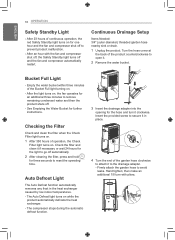
Continuous Drainage Setup Items Needed: 3/4" (outer diameter) threaded garden hose nearby sink or drain. 1 Unplug the product. Empty the water bucket within three minutes of the Bucket Full light turning on while the product automatically defrosts the heat exchanger. - Auto Defrost Light The Auto Defrost function automatically removes any frost in place. 4 Turn the end of the product counterclockwise to remove remaining condensed water and then the product shuts off and the fan and compressor automatically restart. After 23 hours of operation, the Check Filter light turns on...
Continuous Drainage Setup Items Needed: 3/4" (outer diameter) threaded garden hose nearby sink or drain. 1 Unplug the product. Empty the water bucket within three minutes of the Bucket Full light turning on while the product automatically defrosts the heat exchanger. - Auto Defrost Light The Auto Defrost function automatically removes any frost in place. 4 Turn the end of the product counterclockwise to remove remaining condensed water and then the product shuts off and the fan and compressor automatically restart. After 23 hours of operation, the Check Filter light turns on...
Owners Manual
Page 12
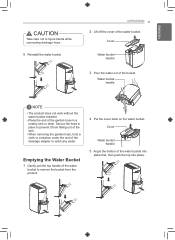
... under the end of the water bucket to injure hands while connecting drainage hose. 5 Reinstall the water bucket. Cover Water bucket handle 5 Angle the bottom of the garden hose in place to prevent it from the product. 4 Put the cover back on the water bucket. Cover Water bucket handle 3 Pour the water out of the water bucket. Water bucket handle ! OPERATION 11 2 Lift off the cover of the bucket. Secure the hose in a nearby sink or drain. ENGLISH !
... under the end of the water bucket to injure hands while connecting drainage hose. 5 Reinstall the water bucket. Cover Water bucket handle 5 Angle the bottom of the garden hose in place to prevent it from the product. 4 Put the cover back on the water bucket. Cover Water bucket handle 3 Pour the water out of the water bucket. Water bucket handle ! OPERATION 11 2 Lift off the cover of the bucket. Secure the hose in a nearby sink or drain. ENGLISH !
Owners Manual
Page 13
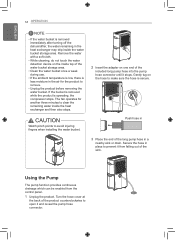
... function provides continuous drainage which can be enabled from falling out of the water bucket storage area. • Clean the water bucket once a week during use. • If the ambient temperature is low, there is removed immediately after turning off the dehumidifier, the water remaining in the air for another three minutes to make sure the hose is operating, the compressor stops. If the bucket is removed while the product is...
... function provides continuous drainage which can be enabled from falling out of the water bucket storage area. • Clean the water bucket once a week during use. • If the ambient temperature is low, there is removed immediately after turning off the dehumidifier, the water remaining in the air for another three minutes to make sure the hose is operating, the compressor stops. If the bucket is removed while the product is...

Owners Manual
Page 14
... the cover. 6 To activate the pump, press the Pump button for cleaning. OPERATION 13 7 To remove either the short or long pump hose, use the drainage adapter when the pump hose is inserted. • Some residual water may be blocked. • A replacement water hose can be purchased online at the back of the short pump hose through the square opening in leaks or product damage. • The dehumidifier will continue to...
... the cover. 6 To activate the pump, press the Pump button for cleaning. OPERATION 13 7 To remove either the short or long pump hose, use the drainage adapter when the pump hose is inserted. • Some residual water may be blocked. • A replacement water hose can be purchased online at the back of the short pump hose through the square opening in leaks or product damage. • The dehumidifier will continue to...
Owners Manual
Page 17
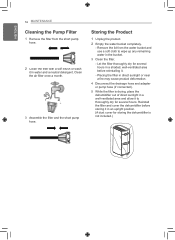
... detergent. ENGLISH 16 MAINTENANCE Cleaning the Pump Filter 1 Remove the filter from the water bucket and use a soft cloth to thoroughly dry for several hours in direct sunlight or near a fire may cause product deformation. 4 Disconnect the drainage hose and adapter or pump hose (if connected). 5 While the filter is not included.) Reinstall the filter and cover the dehumidifier before reinstalling it. - Storing the Product 1 Unplug the product. 2 Empty the water bucket completely. -
... detergent. ENGLISH 16 MAINTENANCE Cleaning the Pump Filter 1 Remove the filter from the water bucket and use a soft cloth to thoroughly dry for several hours in direct sunlight or near a fire may cause product deformation. 4 Disconnect the drainage hose and adapter or pump hose (if connected). 5 While the filter is not included.) Reinstall the filter and cover the dehumidifier before reinstalling it. - Storing the Product 1 Unplug the product. 2 Empty the water bucket completely. -

Owners Manual
Page 18
... from the router. To check your network frequency, contact your Internet service provider or refer to your wireless router manual. • LG SmartThinQ is not responsible for any network connection problems or any faults, malfunctions, or errors caused by going to Settings → Cellular → Cellular Data. 3 Connect your wireless router is lit. • The appliance supports 2.4 GHz Wi-Fi networks...
... from the router. To check your network frequency, contact your Internet service provider or refer to your wireless router manual. • LG SmartThinQ is not responsible for any network connection problems or any faults, malfunctions, or errors caused by going to Settings → Cellular → Cellular Data. 3 Connect your wireless router is lit. • The appliance supports 2.4 GHz Wi-Fi networks...

Owners Manual
Page 19
... manage product or application settings. ! Follow instructions to Wi-Fi, follow the guide in the app and press and hold the Fan Speed button until the Wi-Fi icon starts blinking. (For detailed instructions, see the connection guide in the LG SmartThinQ app.) * Make sure the Wi-Fi icon on the product display is too far from your wireless router, Internet service provider, or password, delete...
... manage product or application settings. ! Follow instructions to Wi-Fi, follow the guide in the app and press and hold the Fan Speed button until the Wi-Fi icon starts blinking. (For detailed instructions, see the connection guide in the LG SmartThinQ app.) * Make sure the Wi-Fi icon on the product display is too far from your wireless router, Internet service provider, or password, delete...
Owners Manual
Page 20
...(s). Connect the equipment to an outlet on , the user is subject to correct the interference by turning the equipment off and on a circuit different from that interference will not occur in conjunction with part 15 of the following two conditions: (1) this device must follow the specific operating instructions for help. This equipment should be co-located or operating in a particular installation.
...(s). Connect the equipment to an outlet on , the user is subject to correct the interference by turning the equipment off and on a circuit different from that interference will not occur in conjunction with part 15 of the following two conditions: (1) this device must follow the specific operating instructions for help. This equipment should be co-located or operating in a particular installation.

Owners Manual
Page 21
...source code, all referred license terms, warranty disclaimers and copyright notices are available for a charge covering the cost of performing such distribution (such as the cost of this function when directed to power. 1 Open the LG ...use a landline phone. • Poor call center agent. Open Source Software Notice Information To obtain the source code under GPL, LGPL, MPL, and other open source code to anyone in dashboard. 3 Press Start Smart Diagnosis™ button. 4 Follow the instructions on the smartphone. 2 Select the Dehumidifier in receipt of the LG Electronics Customer...
...source code, all referred license terms, warranty disclaimers and copyright notices are available for a charge covering the cost of performing such distribution (such as the cost of this function when directed to power. 1 Open the LG ...use a landline phone. • Poor call center agent. Open Source Software Notice Information To obtain the source code under GPL, LGPL, MPL, and other open source code to anyone in dashboard. 3 Press Start Smart Diagnosis™ button. 4 Follow the instructions on the smartphone. 2 Select the Dehumidifier in receipt of the LG Electronics Customer...
Owners Manual
Page 22
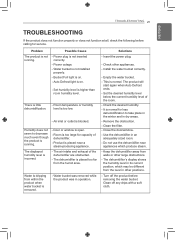
... service. Water bucket is normal. Room temperature or humidity dehumidification. Install the water bucket correctly. - Power plug is placed too far from walls or other appliances. - Auto Defrost light is placed near appliances which may be different from within the product when water bucket is normal for capacity of dehumidifier. - Turn off any drips with a soft cloth. Empty the water bucket. - Check other large obstructions. - The product will start again when Auto Defrost ends. - Close the door/window. - Use...
... service. Water bucket is normal. Room temperature or humidity dehumidification. Install the water bucket correctly. - Power plug is placed too far from walls or other appliances. - Auto Defrost light is placed near appliances which may be different from within the product when water bucket is normal for capacity of dehumidifier. - Turn off any drips with a soft cloth. Empty the water bucket. - Check other large obstructions. - The product will start again when Auto Defrost ends. - Close the door/window. - Use...

Owners Manual
Page 23
... drainage adapter was not removed when the pump hose was connected. - Disable the pump by pressing the Pump button before removing the water bucket for service immediately in the following situations. 1 Power cord is too hot or damaged. 2 The product continues to drain into the water bucket rather than out the drainage adapter. If using the pump, remove the drainage adapter to allow the water to operate when the water bucket is full, overflowing the bucket. The pump starts running...
... drainage adapter was not removed when the pump hose was connected. - Disable the pump by pressing the Pump button before removing the water bucket for service immediately in the following situations. 1 Power cord is too hot or damaged. 2 The product continues to drain into the water bucket rather than out the drainage adapter. If using the pump, remove the drainage adapter to allow the water to operate when the water bucket is full, overflowing the bucket. The pump starts running...

Specification
Page 1
... home with LG smart appliances • Start or stop your dehumidifier from your smartphone • Monitor bucket capacity and receive notifications from your smartphone. • Works with the LG SmartThinQ®app CAPACITY Dehumidification (pts/day) Power Rating Watts Amps IEF Circuit Size (Amps) Compressor Type Refrigerant Type Refrigerant Weight (oz) Refrigerent Weight (g) Noise Level (High / Low) @ Average FEATURES Internal Pump 5m Hose Accessary Wi-Fi LED Display (Set Humidity) Touch Pad Button Energy Timer Auto Restart Safety Standby Automatic Humidistat Control Fan...
... home with LG smart appliances • Start or stop your dehumidifier from your smartphone • Monitor bucket capacity and receive notifications from your smartphone. • Works with the LG SmartThinQ®app CAPACITY Dehumidification (pts/day) Power Rating Watts Amps IEF Circuit Size (Amps) Compressor Type Refrigerant Type Refrigerant Weight (oz) Refrigerent Weight (g) Noise Level (High / Low) @ Average FEATURES Internal Pump 5m Hose Accessary Wi-Fi LED Display (Set Humidity) Touch Pad Button Energy Timer Auto Restart Safety Standby Automatic Humidistat Control Fan...


