Training Manual
Page 2
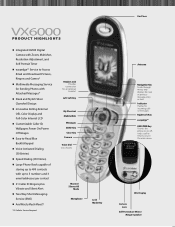
... headset Left Soft Key My Shortcut Mobile Web Messages SEND Key Clear Key Camera Voice Dial (not shown) Manner/ Silence All Mode Microphone Lock Mode Key Ear Piece Antenna Navigation Key Scrolls through menus and displays the next or previous message, entry or item Indicator Flashes for incoming calls or messages Right Soft Key easyedgeSM END/PWR Key Powers the phone on or off, ends a call or returns you to the main menu OEL Display Camera Lens Self Portraiture Mirror /Ringer Speaker
... headset Left Soft Key My Shortcut Mobile Web Messages SEND Key Clear Key Camera Voice Dial (not shown) Manner/ Silence All Mode Microphone Lock Mode Key Ear Piece Antenna Navigation Key Scrolls through menus and displays the next or previous message, entry or item Indicator Flashes for incoming calls or messages Right Soft Key easyedgeSM END/PWR Key Powers the phone on or off, ends a call or returns you to the main menu OEL Display Camera Lens Self Portraiture Mirror /Ringer Speaker
Training Manual
Page 3
... press . To exit to 5 numbers and 3 email addresses per contact. Two-Touch Speed Dialing: Enables you to 99). 1. Select a name from the list using a single key press. One-Touch Speed Dialing One-Touch Speed Dialing: Enables you to dial numbers in a quiet place using a clear voice. For locations 1 through 9, you to view the list of your phone book in the phone book. 1. From the Contacts (2) menu, select Speed Dials (5). 2. Select Voice Dial Prompt (1) and press OK . 3. Select desired option (Key press, Flip open, or Disable) and press OK . These...
... press . To exit to 5 numbers and 3 email addresses per contact. Two-Touch Speed Dialing: Enables you to 99). 1. Select a name from the list using a single key press. One-Touch Speed Dialing One-Touch Speed Dialing: Enables you to dial numbers in a quiet place using a clear voice. For locations 1 through 9, you to view the list of your phone book in the phone book. 1. From the Contacts (2) menu, select Speed Dials (5). 2. Select Voice Dial Prompt (1) and press OK . 3. Select desired option (Key press, Flip open, or Disable) and press OK . These...
Training Manual
Page 4
... Key to stop recording. Select from the list of dialed, received, and missed calls. From the Tools (8) menu, select Voice Memo (3). 2. Enter your memo using your Navigation Key and press Left Soft Key to add a new event. 3. Making a Call from the main menu. From the Tools (8) menu, select Alarm Clock (2). 2. Start recording at the tone. 4. From the Tools (8) menu, select Schedule (1). 2. Scheduling an Alarm 1. Press Left Soft Key for Done to Save. Call History Call History automatically logs up to 30 numbers for New...
... Key to stop recording. Select from the list of dialed, received, and missed calls. From the Tools (8) menu, select Voice Memo (3). 2. Enter your memo using your Navigation Key and press Left Soft Key to add a new event. 3. Making a Call from the main menu. From the Tools (8) menu, select Alarm Clock (2). 2. Start recording at the tone. 4. From the Tools (8) menu, select Schedule (1). 2. Scheduling an Alarm 1. Press Left Soft Key for Done to Save. Call History Call History automatically logs up to 30 numbers for New...
Training Manual
Page 5
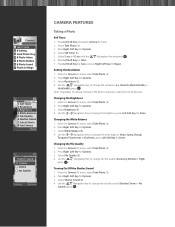
... Key for Options. 4. Changing the File Quality 1. Press Right Soft Key for Options. 3. From the Camera (1) menu, select Take Photo (1). 2. Note: Regardless of camera resolution, the phone will store a maximum of 20 pictures. From the Camera (1) menu, select Take Photo (1). 2. Select Self Timer (1). 5. Select White Balance (4). 4. Camera 1 Take Photo 2 0 Gallery 3 Send Photo Msg 4 0 Photo Inbox 5 0 Photo Outbox 6 0 Photo Saved 7 Photo Settings Med 320x240 1X 1/30 1 Self Timer 2 Resolution 3 Brightness 4 White Balance 5 File Quality 6 Shutter Sound...
... Key for Options. 4. Changing the File Quality 1. Press Right Soft Key for Options. 3. From the Camera (1) menu, select Take Photo (1). 2. Note: Regardless of camera resolution, the phone will store a maximum of 20 pictures. From the Camera (1) menu, select Take Photo (1). 2. Select Self Timer (1). 5. Select White Balance (4). 4. Camera 1 Take Photo 2 0 Gallery 3 Send Photo Msg 4 0 Photo Inbox 5 0 Photo Outbox 6 0 Photo Saved 7 Photo Settings Med 320x240 1X 1/30 1 Self Timer 2 Resolution 3 Brightness 4 White Balance 5 File Quality 6 Shutter Sound...
Training Manual
Page 6
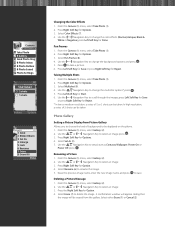
... be displayed on the phone. 1. Press Right Soft Key for Options. 3. Press Right Soft Key for Option. 4. Use the Web Navigation Key to be taken. Photo Gallery Setting a Picture Display from the gallery. Use the 12 Navigation Key to delete the image. OK Renaming a Picture 1. Deleting a Picture Message 1. From the Camera (1) menu, select Gallery (2). 2. Select Erase (7) to set picture as Contacts, Wallpaper, Power On or Power Off, press . Select either Erase (1) or Cancel (2). Press Right Soft Key for...
... be displayed on the phone. 1. Press Right Soft Key for Options. 3. Press Right Soft Key for Option. 4. Use the Web Navigation Key to be taken. Photo Gallery Setting a Picture Display from the gallery. Use the 12 Navigation Key to delete the image. OK Renaming a Picture 1. Deleting a Picture Message 1. From the Camera (1) menu, select Gallery (2). 2. Select Erase (7) to set picture as Contacts, Wallpaper, Power On or Power Off, press . Select either Erase (1) or Cancel (2). Press Right Soft Key for...
Training Manual
Page 7
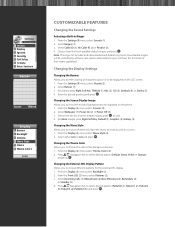
... NOTABLE SETTINGS Manner Mode Use Manner Mode in standby mode will quickly access this function. Select either Main LCD (1), or Front LCD (2). 3. will vibrate when activated. 2. Programming the Short Cut Key 1. From the Display (2) menu, select Backlight (2). 2. Select your phone is on . 1. Silence All is displayed. From the Display (2) menu, select Fonts (7). 2. OK Power Saver Sets the time duration for keeping LCD turned on for 3 seconds) - From the Display (2) menu, select Power Saver (9). 2. Shortcut: Pressing...
... NOTABLE SETTINGS Manner Mode Use Manner Mode in standby mode will quickly access this function. Select either Main LCD (1), or Front LCD (2). 3. will vibrate when activated. 2. Programming the Short Cut Key 1. From the Display (2) menu, select Backlight (2). 2. Select your phone is on . 1. Silence All is displayed. From the Display (2) menu, select Fonts (7). 2. OK Power Saver Sets the time duration for keeping LCD turned on for 3 seconds) - From the Display (2) menu, select Power Saver (9). 2. Shortcut: Pressing...
Training Manual
Page 8
... send. From the Camera (1) menu, select Photo Outbox (5). 2. To delete a picture message from Photo Saved 1. To view the highlighted saved picture message press OK . 4. Select Photo Msg Alert (4). 3. Use the 12 Navigation Key to select a recipient. 4. Select Quick-Text (7). 3. OK 3. If pix is saved from the Inbox, press Left Soft Key for Contact (1), Online Album (2), or Recent Call (3), to select from the Outbox list and press Left Soft Key for Options. 4. Press Left Soft Key to Add New. 4. Use...
... send. From the Camera (1) menu, select Photo Outbox (5). 2. To delete a picture message from Photo Saved 1. To view the highlighted saved picture message press OK . 4. Select Photo Msg Alert (4). 3. Use the 12 Navigation Key to select a recipient. 4. Select Quick-Text (7). 3. OK 3. If pix is saved from the Inbox, press Left Soft Key for Contact (1), Online Album (2), or Recent Call (3), to select from the Outbox list and press Left Soft Key for Options. 4. Press Left Soft Key to Add New. 4. Use...

Training Manual
Page 9
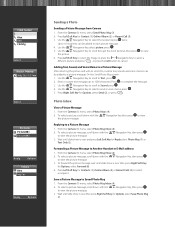
... for your mobile phone. - Accessing the Web The new VX6000 is allocated for Contacts to select pre-programmed recipient or select Address and enter an email address or phone number and press OK . 3. From the Messages (4) menu, select New Message (2). 2. Select Message and press OK . 4. Enter a custom text message, up to quickly launch the Browser. Select icon and press OK . 5. Shortcut: Press the on the Navigation Key while in connection. This submenu gives you to access your email and download pictures, ringers...
... for your mobile phone. - Accessing the Web The new VX6000 is allocated for Contacts to select pre-programmed recipient or select Address and enter an email address or phone number and press OK . 3. From the Messages (4) menu, select New Message (2). 2. Select Message and press OK . 4. Enter a custom text message, up to quickly launch the Browser. Select icon and press OK . 5. Shortcut: Press the on the Navigation Key while in connection. This submenu gives you to access your email and download pictures, ringers...
Training Manual
Page 10
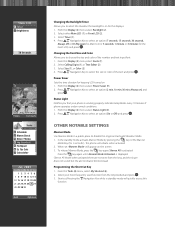
...list includes both downloaded and default ring tones. For More images, press Right Soft Key: Default (1), Graphics (2), Gallery (3). Press 12 Navigation Key to show as a list or as icons. 1. From the Front LCD (2) menu select Patterns (2). 3. From the Settings (9) menu, select Sounds (1). 2. Choose from the list of available default ringers and press OK . Select Wallpaper (1), Power On (2) or Power Off (3). 3. Settings 1 Sounds 2 Display 3 System 4 Security 5 Call Setup 6 1x Data 7 Voice Services Banner Cancel T9Word Display 1 Banner 2 Backlight 3 Screens 4 Menu...
...list includes both downloaded and default ring tones. For More images, press Right Soft Key: Default (1), Graphics (2), Gallery (3). Press 12 Navigation Key to show as a list or as icons. 1. From the Front LCD (2) menu select Patterns (2). 3. From the Settings (9) menu, select Sounds (1). 2. Choose from the list of available default ringers and press OK . Select Wallpaper (1), Power On (2) or Power Off (3). 3. Settings 1 Sounds 2 Display 3 System 4 Security 5 Call Setup 6 1x Data 7 Voice Services Banner Cancel T9Word Display 1 Banner 2 Backlight 3 Screens 4 Menu...
Training Manual
Page 11
...2. Press Right Soft Key for Contacts (1), Online Album (2), or Recent Calls (3), to a Picture Message 1. Photo Inbox View a Picture Message 1. Forwarding a Picture Message to Saved Photo Msg 1. Press Left Soft Key for Options, select Send (2), or press . On the Send Photo Msg screen: 1. To select a picture, scroll down with the the picture message. 12 Navigation key, then press OK to view Replying to select a recipient. Save a Picture Message to Another Handset or E-Mail address 1. From the Camera (1) menu, select Send Photo Msg (3). 2. Use the 12...
...2. Press Right Soft Key for Contacts (1), Online Album (2), or Recent Calls (3), to a Picture Message 1. Photo Inbox View a Picture Message 1. Forwarding a Picture Message to Saved Photo Msg 1. Press Left Soft Key for Options, select Send (2), or press . On the Send Photo Msg screen: 1. To select a picture, scroll down with the the picture message. 12 Navigation key, then press OK to view Replying to select a recipient. Save a Picture Message to Another Handset or E-Mail address 1. From the Camera (1) menu, select Send Photo Msg (3). 2. Use the 12...
Training Manual
Page 12
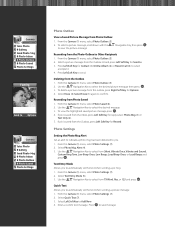
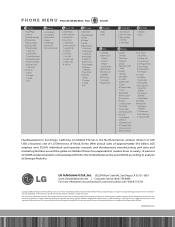
... 5. Erase Calls 1. Prompt 2. Lock Phone 2. One-Touch Dial 5.Voice Privacy 6. The amount of certain features and other dangerous conditions. Music Settings 1. Auto NAM 4. Phone Info 1. Saved 4. 12 P H O N E M E N U Press Left Soft Key Menu. Send Photo Msg 4. Auto Save 2. Quick-Text 8. List Contacts 2. My Contact Info Recent Calls 1. Received Calls 3. Signature 6. Entry Mode 8. Apps 2. Start Browser 2.Web Messages 3.Web Settings 1. Language 9. Auto Volume 7.TTY Mode 6. 1X Data 1. S/W Version 3. All rights reserved. Use of talk time used...
... 5. Erase Calls 1. Prompt 2. Lock Phone 2. One-Touch Dial 5.Voice Privacy 6. The amount of certain features and other dangerous conditions. Music Settings 1. Auto NAM 4. Phone Info 1. Saved 4. 12 P H O N E M E N U Press Left Soft Key Menu. Send Photo Msg 4. Auto Save 2. Quick-Text 8. List Contacts 2. My Contact Info Recent Calls 1. Received Calls 3. Signature 6. Entry Mode 8. Apps 2. Start Browser 2.Web Messages 3.Web Settings 1. Language 9. Auto Volume 7.TTY Mode 6. 1X Data 1. S/W Version 3. All rights reserved. Use of talk time used...


