
Owner's Manual
Page 2
... type of power supply you leave the room for a replacement. Never leave the display ON when leaving the house. Keep children from a power source indicated in your home, consult with the unit. In the presence of thunder and lightning, never touch the power cord and signal cable because it can be left unattended for its installation, use another power cord, make sure that have in the specifications of...
... type of power supply you leave the room for a replacement. Never leave the display ON when leaving the house. Keep children from a power source indicated in your home, consult with the unit. In the presence of thunder and lightning, never touch the power cord and signal cable because it can be left unattended for its installation, use another power cord, make sure that have in the specifications of...

Owner's Manual
Page 3
...-up heat can cause electric shock or fire. If possible, use the recommended resolution to use this display near or over the power cord, and do not place the display where the power cord is subject to allow anything hard as Red, Green or Blue spots on the screen. Otherwise, it with ventilation openings in a wet basement, or near a swimming pool. A2 Therefore, NEVER...
...-up heat can cause electric shock or fire. If possible, use the recommended resolution to use this display near or over the power cord, and do not place the display where the power cord is subject to allow anything hard as Red, Green or Blue spots on the screen. Otherwise, it with ventilation openings in a wet basement, or near a swimming pool. A2 Therefore, NEVER...
Owner's Manual
Page 5
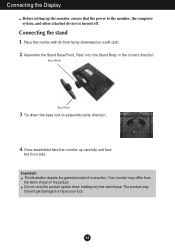
Assemble the Stand Base(Front, Rear) into the Stand Body in the picture. Once assembled take the monitor up the monitor, ensure that the power to perpendicularity direction. 4. Do not carry the product upside down the base lock to the monitor, the computer system, and other attached devices is turned off. The product may differ from the items shown in the correct direction. Place...
Assemble the Stand Base(Front, Rear) into the Stand Body in the picture. Once assembled take the monitor up the monitor, ensure that the power to perpendicularity direction. 4. Do not carry the product upside down the base lock to the monitor, the computer system, and other attached devices is turned off. The product may differ from the items shown in the correct direction. Place...
Owner's Manual
Page 7
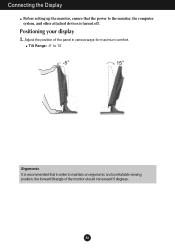
Connecting the Display Before setting up the monitor, ensure that the power to the monitor, the computer system, and other attached devices is recommended that in order to 15˚ Ergonomic It is turned off. Adjust the position of the monitor should not exceed 5 degrees. A6 Positioning your display 1. Tilt Range: -5˚ to maintain an ergonomic and comfortable viewing position, the forward tilt angle of the panel in various ways for maximum comfort.
Connecting the Display Before setting up the monitor, ensure that the power to the monitor, the computer system, and other attached devices is recommended that in order to 15˚ Ergonomic It is turned off. Adjust the position of the monitor should not exceed 5 degrees. A6 Positioning your display 1. Tilt Range: -5˚ to maintain an ergonomic and comfortable viewing position, the forward tilt angle of the panel in various ways for maximum comfort.
Owner's Manual
Page 8
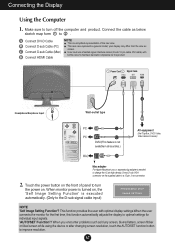
..., Video, Video Game Console) Mac adapter For Apple Macintosh use shielded signal interface cables (D-sub 15 pin cable, DVI cable) with optimal display settings.When the user connects the monitor for the first time, this function automatically adjusts the display to 2 . C Connect D-sub Cable (Mac) User must use , a separate plug adapter is needed to change the 15 pin high density (3 row) D-sub VGA connector on , the 'Self Image Setting Function' is executed automatically. (Only to the D-sub signal cable input) NOTE 'Self Image Setting Function'? When monitor power...
..., Video, Video Game Console) Mac adapter For Apple Macintosh use shielded signal interface cables (D-sub 15 pin cable, DVI cable) with optimal display settings.When the user connects the monitor for the first time, this function automatically adjusts the display to 2 . C Connect D-sub Cable (Mac) User must use , a separate plug adapter is needed to change the 15 pin high density (3 row) D-sub VGA connector on , the 'Self Image Setting Function' is executed automatically. (Only to the D-sub signal cable input) NOTE 'Self Image Setting Function'? When monitor power...

Owner's Manual
Page 10
.... HDMI input,use this button to enter 4:3 IN WIDE, PHOTO EFFECT,VOLUME items. For more information,refer to page A17. To lock the OSD settings, press and hold the MENU button for several seconds. OSD LOCKED/UNLOCKED This function allows you to enter or exit from the On Screen Display. The message "OSD LOCKED" appears. MENU Button Use this button to lock the current control settings, so that these settings are not inadvertently changed. The message "OSD UNLOCKED" appears. Control Panel...
.... HDMI input,use this button to enter 4:3 IN WIDE, PHOTO EFFECT,VOLUME items. For more information,refer to page A17. To lock the OSD settings, press and hold the MENU button for several seconds. OSD LOCKED/UNLOCKED This function allows you to enter or exit from the On Screen Display. The message "OSD LOCKED" appears. MENU Button Use this button to lock the current control settings, so that these settings are not inadvertently changed. The message "OSD UNLOCKED" appears. Control Panel...

Owner's Manual
Page 11
... x 1080 W2353VP : 1920 x 1080 Use this button to the display. A10 The default setting is operating normally(On Mode). The best display mode is used when two computers are connected to turn the display on or off. Control Panel Functions Control Buttons Button ( ) Function Use these buttons to select an icon in the On Screen Display. Use this button to select or adjust functions in Sleep Mode (Energy Saving), this button to make either D-Sub,DVI or HDMI connector active. AUTO IMAGE ADJUSTMENT When adjusting your display image to page...
... x 1080 W2353VP : 1920 x 1080 Use this button to the display. A10 The default setting is operating normally(On Mode). The best display mode is used when two computers are connected to turn the display on or off. Control Panel Functions Control Buttons Button ( ) Function Use these buttons to select an icon in the On Screen Display. Use this button to select or adjust functions in Sleep Mode (Energy Saving), this button to make either D-Sub,DVI or HDMI connector active. AUTO IMAGE ADJUSTMENT When adjusting your display image to page...

Owner's Manual
Page 13
... screen color mode VOLUME PICTURE MONOCHROME BRIGHTNESS CONTRAST GAMMA To adjust the volume To adjust the brightness, contrast and gamma of the screen **BLACK LEVEL To set offset level PRESET sRGB 6500K COLOR RED 9300K To costomize the color of the screen GREEN BLUE TRACKING HORIZONTAL VERTICAL CLOCK PHASE SHARPNESS LANGUAGE To adjust the position of the screen To improve the clarity and stability of the screen SETUP OSD HORIZONTAL POSITION VERTICAL *WHITE BALANCE **OVERSCAN To costomize the screen status for a user's operating environment POWER INDICATOR FACTORY RESET...
... screen color mode VOLUME PICTURE MONOCHROME BRIGHTNESS CONTRAST GAMMA To adjust the volume To adjust the brightness, contrast and gamma of the screen **BLACK LEVEL To set offset level PRESET sRGB 6500K COLOR RED 9300K To costomize the color of the screen GREEN BLUE TRACKING HORIZONTAL VERTICAL CLOCK PHASE SHARPNESS LANGUAGE To adjust the position of the screen To improve the clarity and stability of the screen SETUP OSD HORIZONTAL POSITION VERTICAL *WHITE BALANCE **OVERSCAN To costomize the screen status for a user's operating environment POWER INDICATOR FACTORY RESET...
Owner's Manual
Page 14
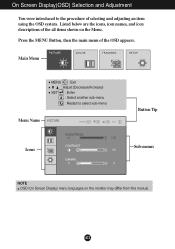
Listed below are the icons, icon names, and icon descriptions of the all items shown on the monitor may differ from the manual. Main Menu MENU : Exit : Adjust (Decrease/Increase) SET : Enter : Select another sub-menu : Restart to the procedure of the OSD appears. Press the MENU Button, then the main menu of selecting and adjusting an item using the OSD system. On Screen Display(OSD) Selection and Adjustment You were introduced to select sub-menu Menu Name Button Tip Icons Sub-menus NOTE OSD (On Screen Display) menu languages on the Menu. A13
Listed below are the icons, icon names, and icon descriptions of the all items shown on the monitor may differ from the manual. Main Menu MENU : Exit : Adjust (Decrease/Increase) SET : Enter : Select another sub-menu : Restart to the procedure of the OSD appears. Press the MENU Button, then the main menu of selecting and adjusting an item using the OSD system. On Screen Display(OSD) Selection and Adjustment You were introduced to select sub-menu Menu Name Button Tip Icons Sub-menus NOTE OSD (On Screen Display) menu languages on the Menu. A13
Owner's Manual
Page 15
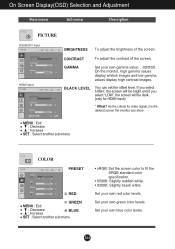
... values display high contrast images. If you select 'HIGH', the screen will be bright and if you select 'LOW', the screen will be dark. (only for video signal, it is the darkest screen the monitor can set the offset level. On Screen Display(OSD) Selection and Adjustment Main menu Sub menu Description PICTURE PICTURE DSUB/DVI input HDMI input BRIGHTNESS To adjust the brightness of the screen. BLACK LEVEL You can show. Set your own red color levels. Set your own green color levels...
... values display high contrast images. If you select 'HIGH', the screen will be bright and if you select 'LOW', the screen will be dark. (only for video signal, it is the darkest screen the monitor can set the offset level. On Screen Display(OSD) Selection and Adjustment Main menu Sub menu Description PICTURE PICTURE DSUB/DVI input HDMI input BRIGHTNESS To adjust the brightness of the screen. BLACK LEVEL You can show. Set your own red color levels. Set your own green color levels...

Owner's Manual
Page 16
On Screen Display(OSD) Selection and Adjustment Main menu Sub menu Description TRACKING TRACKING HORIZONTAL To move image up and down. The horizontal screen size will also change. This item allows you to remove any vertical bars or stripes visible on the screen background. To adjust the focus of the screen. CLOCK PHASE MENU : Exit : Decrease : Increase SHARPNESS SET : Select another sub-menu To minimize any horizontal noise and clear or sharpen the image of characters. A15 VERTICAL To move image left and right. To adjust the clearness of the display.
On Screen Display(OSD) Selection and Adjustment Main menu Sub menu Description TRACKING TRACKING HORIZONTAL To move image up and down. The horizontal screen size will also change. This item allows you to remove any vertical bars or stripes visible on the screen background. To adjust the focus of the screen. CLOCK PHASE MENU : Exit : Decrease : Increase SHARPNESS SET : Select another sub-menu To minimize any horizontal noise and clear or sharpen the image of characters. A15 VERTICAL To move image left and right. To adjust the clearness of the display.
Owner's Manual
Page 17
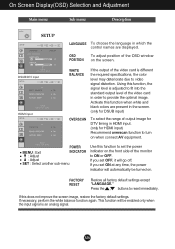
... video card is an analog signal. Using this function when white and black colors are displayed. FACTORY RESET Restore all factory default settings except "LANGUAGE." If necessary, perform the white balance function again. On Screen Display(OSD) Selection and Adjustment Main menu Sub menu Description SETUP SETUP LANGUAGE To choose the language in which the control names are present in the screen. (only for DSUB input) OVERSCAN To select the range of the OSD window POSITION on when connect AV equipment. OSD To adjust position of output image...
... video card is an analog signal. Using this function when white and black colors are displayed. FACTORY RESET Restore all factory default settings except "LANGUAGE." If necessary, perform the white balance function again. On Screen Display(OSD) Selection and Adjustment Main menu Sub menu Description SETUP SETUP LANGUAGE To choose the language in which the control names are present in the screen. (only for DSUB input) OVERSCAN To select the range of the OSD window POSITION on when connect AV equipment. OSD To adjust position of output image...
Owner's Manual
Page 18
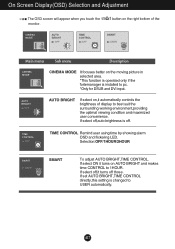
... and DVI input. On Screen Display(OSD) Selection and Adjustment The OSD screen will appear when you touch the monitor. If set AUTO BRIGHT,TIME CONTROL directly,this setting is off. If select off those. If select ON it turns on the moving picture in selected area. *This function is operated only if the fortemanager is installed to best suit the surrounding working environment,providing the optimal viewing condition and maximized user convenience...
... and DVI input. On Screen Display(OSD) Selection and Adjustment The OSD screen will appear when you touch the monitor. If set AUTO BRIGHT,TIME CONTROL directly,this setting is off. If select off those. If select ON it turns on the moving picture in selected area. *This function is operated only if the fortemanager is installed to best suit the surrounding working environment,providing the optimal viewing condition and maximized user convenience...
Owner's Manual
Page 19
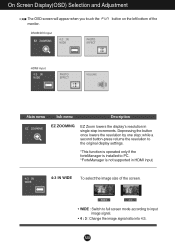
...; 4 : 3 : Change the image signal ratio into 4:3. On Screen Display(OSD) Selection and Adjustment The OSD screen will appear when you touch the monitor. WIDE 4:3 • WIDE : Switch to full screen mode according to PC. *ForteManager is not supported in single-step increments. Depressing the button once lowers the resolution by one step; A18 DSUB/DVI input button on the left bottom of the HDMI input Main menu Sub menu Description EZ ZOOMING EZ Zoom lowers the display's resolution...
...; 4 : 3 : Change the image signal ratio into 4:3. On Screen Display(OSD) Selection and Adjustment The OSD screen will appear when you touch the monitor. WIDE 4:3 • WIDE : Switch to full screen mode according to PC. *ForteManager is not supported in single-step increments. Depressing the button once lowers the resolution by one step; A18 DSUB/DVI input button on the left bottom of the HDMI input Main menu Sub menu Description EZ ZOOMING EZ Zoom lowers the display's resolution...

Owner's Manual
Page 22
... save or restore the adjusted value even when using a different environment. ... MENU : Exit : Decrease : Increase AUTO/SET : Select another sub-menu A21 To adjust the USER sub-menu function,press the AUTO/SET Button. Strong clarity and luminosity contrast. ...RCM(Real Color Management) : Selects the color mode. On Screen Display(OSD) Selection and Adjustment Main menu DSUB/DVI input HDMI input Sub menu Description DEMO This is used for HDMI input). DSUB/DVI input HDMI input USER You can manually adjust ACE or RCM (only for DSUB/DVI input...
... save or restore the adjusted value even when using a different environment. ... MENU : Exit : Decrease : Increase AUTO/SET : Select another sub-menu A21 To adjust the USER sub-menu function,press the AUTO/SET Button. Strong clarity and luminosity contrast. ...RCM(Real Color Management) : Selects the color mode. On Screen Display(OSD) Selection and Adjustment Main menu DSUB/DVI input HDMI input Sub menu Description DEMO This is used for HDMI input). DSUB/DVI input HDMI input USER You can manually adjust ACE or RCM (only for DSUB/DVI input...

Owner's Manual
Page 23
... horizontal or vertical the screen? Do you push MENU button? • You can unlock the OSD controls at any key on the screen? • This message appears when the signal cable between your PC and your display again. G Do you see if the power cord is connected display connected? properly to turn on ? frequency range of this manual and configure your display is in power saving mode, try again. See the 'Specifications' section of the display. Check the signal cable...
... horizontal or vertical the screen? Do you push MENU button? • You can unlock the OSD controls at any key on the screen? • This message appears when the signal cable between your PC and your display again. G Do you see if the power cord is connected display connected? properly to turn on ? frequency range of this manual and configure your display is in power saving mode, try again. See the 'Specifications' section of the display. Check the signal cable...

Owner's Manual
Page 24
... icon in the on screen display. G Any horizontal noise appearing in the on screen display. • Check Control Panel --> Display --> Settings and adjust the display to the recommended resolution or adjust the display image to the ideal setting. If the recommended resolution (optimal resolution) is incorrect. • Press the AUTO/SET button to automatically adjust your display image to the ideal setting. Important Check Control Panel --> Display --> Settings and see if the frequency or the resolution were changed. G On the screen background, vertical bars or stripes are...
... icon in the on screen display. G Any horizontal noise appearing in the on screen display. • Check Control Panel --> Display --> Settings and adjust the display to the recommended resolution or adjust the display image to the ideal setting. If the recommended resolution (optimal resolution) is incorrect. • Press the AUTO/SET button to automatically adjust your display image to the ideal setting. Important Check Control Panel --> Display --> Settings and see if the frequency or the resolution were changed. G On the screen background, vertical bars or stripes are...

Owner's Manual
Page 25
... display driver? Troubleshooting Display image is incorrect G The screen color is mono or abnormal. • Check if the signal cable is properly connected and use a screwdriver to fasten if necessary. • Make sure the video card is set to interlace mode and if yes, change it to the recommend resolution. A24 Have you installed the display driver? • Be sure to check if the video card supports Plug&Play function. G Do you can also download the driver from the display driver...
... display driver? Troubleshooting Display image is incorrect G The screen color is mono or abnormal. • Check if the signal cable is properly connected and use a screwdriver to fasten if necessary. • Make sure the video card is set to interlace mode and if yes, change it to the recommend resolution. A24 Have you installed the display driver? • Be sure to check if the video card supports Plug&Play function. G Do you can also download the driver from the display driver...

Owner's Manual
Page 26
... Display Sync Input Video Input Resolution Plug&Play Power Consumption Dimensions &Weight Tilt Range Power Input Environmental Conditions Stand Base Power cord 54.6 cm (21.5 inch) Flat Panel Active matrix-TFT LCD Anti-Glare coating Visible diagonal size: 54.6 cm 0.248*0.248 mm pixel pitch Horizontal Freq. Input Form 30 kHz to 83 kHz (Automatic) Analog,Digital : 56 Hz to 75 Hz (Automatic) HDMI : 56 Hz to change without notice. A25 Vertical Freq. D connector (Digital) 19 pin HDMI Connector Analog (0.7 Vp-p / 75 ohm), Digital, HDMI Max Recommend Analog : VESA...
... Display Sync Input Video Input Resolution Plug&Play Power Consumption Dimensions &Weight Tilt Range Power Input Environmental Conditions Stand Base Power cord 54.6 cm (21.5 inch) Flat Panel Active matrix-TFT LCD Anti-Glare coating Visible diagonal size: 54.6 cm 0.248*0.248 mm pixel pitch Horizontal Freq. Input Form 30 kHz to 83 kHz (Automatic) Analog,Digital : 56 Hz to 75 Hz (Automatic) HDMI : 56 Hz to change without notice. A25 Vertical Freq. D connector (Digital) 19 pin HDMI Connector Analog (0.7 Vp-p / 75 ohm), Digital, HDMI Max Recommend Analog : VESA...
Owner's Manual
Page 27
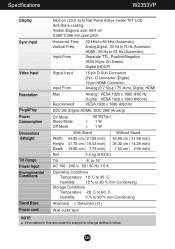
... % non-Condensing Attached( ), Detached ( O ) Wall-outlet type NOTE Information in this document is subject to 61 Hz (Automatic) Separate TTL, Positive/Negative SOG (Sync On Green) Digital (HDCP) Signal Input Input Form 15 pin D-Sub Connector DVI - Specifications W2353VP Display Sync Input Video Input Resolution Plug&Play Power Consumption Dimensions &Weight Tilt Range Power Input Environmental Conditions Stand Base Power cord 58.4 cm (23.0 inch) Flat Panel Active matrix-TFT LCD Anti-Glare coating Visible diagonal size: 58.4 cm 0.266*0.266 mm pixel pitch Horizontal Freq.
... % non-Condensing Attached( ), Detached ( O ) Wall-outlet type NOTE Information in this document is subject to 61 Hz (Automatic) Separate TTL, Positive/Negative SOG (Sync On Green) Digital (HDCP) Signal Input Input Form 15 pin D-Sub Connector DVI - Specifications W2353VP Display Sync Input Video Input Resolution Plug&Play Power Consumption Dimensions &Weight Tilt Range Power Input Environmental Conditions Stand Base Power cord 58.4 cm (23.0 inch) Flat Panel Active matrix-TFT LCD Anti-Glare coating Visible diagonal size: 58.4 cm 0.266*0.266 mm pixel pitch Horizontal Freq.


