Owner's Manual
Page 2
... frayed power cords and broken plugs. Do not Open the Display: There are not sure what type of thunder and lightning, never touch the power cord and signal cable because it can cause electric shock. 1 Do not throw any way, please contact the manufacturer or the nearest authorized repair service provider for more than a short period of all safeguards incorporated in the specifications...
... frayed power cords and broken plugs. Do not Open the Display: There are not sure what type of thunder and lightning, never touch the power cord and signal cable because it can cause electric shock. 1 Do not throw any way, please contact the manufacturer or the nearest authorized repair service provider for more than a short period of all safeguards incorporated in the specifications...
Owner's Manual
Page 3
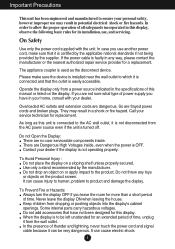
... the power cord, and do not place the display where the power cord is subject to obtain the best image quality for your finger for a long time as near a swimming pool. Do not use a screen saver on the screen for repair. Do not press the LCD screen with ventilation openings in a fire hazard. If used under any mode except the recommended resolution, some afterimages. Make sure the panel faces...
... the power cord, and do not place the display where the power cord is subject to obtain the best image quality for your finger for a long time as near a swimming pool. Do not use a screen saver on the screen for repair. Do not press the LCD screen with ventilation openings in a fire hazard. If used under any mode except the recommended resolution, some afterimages. Make sure the panel faces...

Owner's Manual
Page 5
... Free Disk Space 100 MB After using the monitor for an hour, for 3D (3 Dimensional) imagery 1. OWNER'S MANUAL/Cards Power Cord (Depending on the country) DVI-D Signal Cable (Dual) Audio Cable IMPORTANT This accessories may look different from those shown here. Please make sure the following items are missing, contact your monitor. User must use shielded signal interface cables (DVI-D cable) with your dealer. Requirements for protecting eyes, take a rest of supported cards...
... Free Disk Space 100 MB After using the monitor for an hour, for 3D (3 Dimensional) imagery 1. OWNER'S MANUAL/Cards Power Cord (Depending on the country) DVI-D Signal Cable (Dual) Audio Cable IMPORTANT This accessories may look different from those shown here. Please make sure the following items are missing, contact your monitor. User must use shielded signal interface cables (DVI-D cable) with your dealer. Requirements for protecting eyes, take a rest of supported cards...

Owner's Manual
Page 6
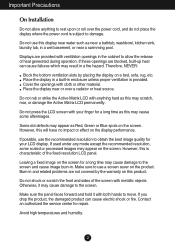
Connecting and Disassembling the stand 1. Make sure you push the Stand Base until the end. Stand Body Stand Base Good Connection The Stand Base may fall and get damaged or cause injury. Connecting the Display Before setting up the monitor, ensure that the power to the monitor, the computer system, and other attached devices is turned off. Assemble the Stand Base into the Stand Body in the correct direction. Bad Connection 5 Place the monitor face down on the soft cloth. 2.
Connecting and Disassembling the stand 1. Make sure you push the Stand Base until the end. Stand Body Stand Base Good Connection The Stand Base may fall and get damaged or cause injury. Connecting the Display Before setting up the monitor, ensure that the power to the monitor, the computer system, and other attached devices is turned off. Assemble the Stand Base into the Stand Body in the correct direction. Bad Connection 5 Place the monitor face down on the soft cloth. 2.
Owner's Manual
Page 7
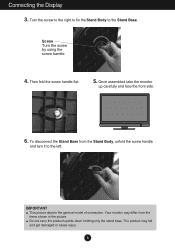
... Stand Base. To disconnect the Stand Base from the items shown in the picture. Screw Turn the screw by using the screw handle. 4. IMPORTANT This picture depicts the general model of connection. Once assembled take the monitor up carefully and face the front side. 6. Turn the screw to the right to fix the Stand Body to the left. Do not carry the product upside down holding only the stand base. Connecting the Display...
... Stand Base. To disconnect the Stand Base from the items shown in the picture. Screw Turn the screw by using the screw handle. 4. IMPORTANT This picture depicts the general model of connection. Once assembled take the monitor up carefully and face the front side. 6. Turn the screw to the right to fix the Stand Body to the left. Do not carry the product upside down holding only the stand base. Connecting the Display...
Owner's Manual
Page 8
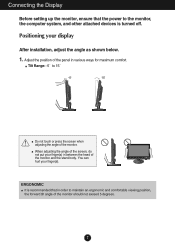
... installation, adjust the angle as shown below. 1. Connecting the Display Before setting up the monitor, ensure that the power to the monitor, the computer system, and other attached devices is recommended that in order to 15˚ -5 15 Do not touch or press the screen when adjusting the angle of the monitor and the stand body. ERGONOMIC It is turned off. Adjust the position of the panel...
... installation, adjust the angle as shown below. 1. Connecting the Display Before setting up the monitor, ensure that the power to the monitor, the computer system, and other attached devices is recommended that in order to 15˚ -5 15 Do not touch or press the screen when adjusting the angle of the monitor and the stand body. ERGONOMIC It is turned off. Adjust the position of the panel...
Owner's Manual
Page 9
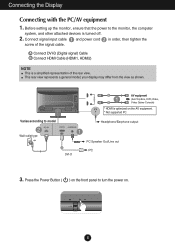
.... A Connect DVI-D (Digital signal) Cable B Connect HDMI Cable (HDMI1, HDMI2) NOTE This is optimized on . 8 Varies according to the monitor, the computer system, and other attached devices is turned off. 2. Before setting up the monitor, ensure that the power to model Wall-outlet type DVI-D AV equipment (Set-Top Box, DVD,Video, Video Game Console) * HDMI is a simplified representation of the signal cable. Connect signal input cable 1 and power cord 2 in order, then tighten the screw of the rear view. Connecting the Display Connecting...
.... A Connect DVI-D (Digital signal) Cable B Connect HDMI Cable (HDMI1, HDMI2) NOTE This is optimized on . 8 Varies according to the monitor, the computer system, and other attached devices is turned off. 2. Before setting up the monitor, ensure that the power to model Wall-outlet type DVI-D AV equipment (Set-Top Box, DVD,Video, Video Game Console) * HDMI is a simplified representation of the signal cable. Connect signal input cable 1 and power cord 2 in order, then tighten the screw of the rear view. Connecting the Display Connecting...

Owner's Manual
Page 10
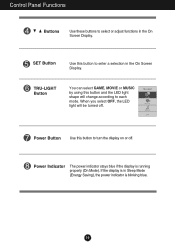
... input signal (DVI-D/HDMI1/HDMI2) you to 14. MENU Button Use this button to enter THRU MODE, SRS TRUSURROUND HD, ARC or AUTO BRIGHT menus. For more information, refer to page 13 to lock the current control settings, so that they cannot be inadvertently changed. SOURCE Button When two input signals are connected, you can unlock the OSD controls at any time by pushing the MENU button for several seconds. When only one signal is connected...
... input signal (DVI-D/HDMI1/HDMI2) you to 14. MENU Button Use this button to enter THRU MODE, SRS TRUSURROUND HD, ARC or AUTO BRIGHT menus. For more information, refer to page 13 to lock the current control settings, so that they cannot be inadvertently changed. SOURCE Button When two input signals are connected, you can unlock the OSD controls at any time by pushing the MENU button for several seconds. When only one signal is connected...
Owner's Manual
Page 11
... On Screen Display. TRU-LIGHT GAME MOVIE MUSIC OFF Power Button Use this button to enter a selection in Sleep Mode (Energy Saving), the power indicator is running properly (On Mode). Power Indicator The power indicator stays blue if the display is blinking blue. 10 TRU-LIGHT Button You can select GAME, MOVIE or MUSIC by using this button to turn the display on or off . SET Button Use this button and the LED light shape will be turned off . Control Panel Functions Buttons Use these buttons...
... On Screen Display. TRU-LIGHT GAME MOVIE MUSIC OFF Power Button Use this button to enter a selection in Sleep Mode (Energy Saving), the power indicator is running properly (On Mode). Power Indicator The power indicator stays blue if the display is blinking blue. 10 TRU-LIGHT Button You can select GAME, MOVIE or MUSIC by using this button to turn the display on or off . SET Button Use this button and the LED light shape will be turned off . Control Panel Functions Buttons Use these buttons...
Owner's Manual
Page 12
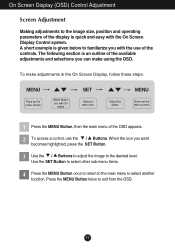
... you can make adjustments in the On Screen Display, follow these steps: Pops up the menu screen Move where you want to adjust Select a menu icon Adjust the status Exit from the OSD. 11 The following section is quick and easy with the use the / Buttons. Use the SET Button to select other sub-menu items. 4 Press the MENU Button once to return to the main menu to the image size, position and...
... you can make adjustments in the On Screen Display, follow these steps: Pops up the menu screen Move where you want to adjust Select a menu icon Adjust the status Exit from the OSD. 11 The following section is quick and easy with the use the / Buttons. Use the SET Button to select other sub-menu items. 4 Press the MENU Button once to return to the main menu to the image size, position and...
Owner's Manual
Page 13
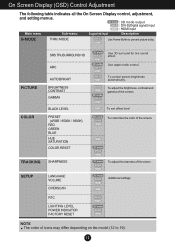
PICTURE COLOR TRACKING SETUP SRS TRUSURROUND HD ARC AUTO BRIGHT BRIGHTNESS CONTRAST GAMMA BLACK LEVEL PRESET (sRGB / 6500K / 9300K) RED GREEN BLUE HUE SATURATION COLOR RESET SHARPNESS LANGUAGE VOLUME OVERSCAN RTC LIGHTING LEVEL POWER INDICATOR FACTORY RESET 3D mode DVI-D HDMI 3D mode DVI-D HDMI DVI-D HDMI Use 3D surround for live sound effect. To control screen brightness automatically. DVI-D HDMI 3D mode DVI-D HDMI To adjust the brightness, contrast and gamma of the screen. Use aspect ratio control. HDMI 3D mode DVI-D HDMI 3D mode DVI-D HDMI To adjust the clearness of the ...
PICTURE COLOR TRACKING SETUP SRS TRUSURROUND HD ARC AUTO BRIGHT BRIGHTNESS CONTRAST GAMMA BLACK LEVEL PRESET (sRGB / 6500K / 9300K) RED GREEN BLUE HUE SATURATION COLOR RESET SHARPNESS LANGUAGE VOLUME OVERSCAN RTC LIGHTING LEVEL POWER INDICATOR FACTORY RESET 3D mode DVI-D HDMI 3D mode DVI-D HDMI DVI-D HDMI Use 3D surround for live sound effect. To control screen brightness automatically. DVI-D HDMI 3D mode DVI-D HDMI To adjust the brightness, contrast and gamma of the screen. Use aspect ratio control. HDMI 3D mode DVI-D HDMI 3D mode DVI-D HDMI To adjust the clearness of the ...
Owner's Manual
Page 14
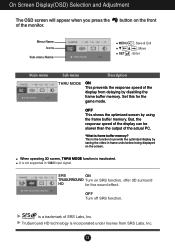
... input signal. Set this for live sound effect. On Screen Display(OSD) Selection and Adjustment The OSD screen will appear when you press the of the display from SRS Labs, Inc. 13 OFF Turn off SRS function. OFF This shows the optimized screen by disabling the frame buffer memory. G-MODE SRS TRUSURROUND HD ON SRS ON TRUSURROUND Turn on the front Menu Name Icons Sub-menu Name G-MODE THRU MODE ON MENU : Save...
... input signal. Set this for live sound effect. On Screen Display(OSD) Selection and Adjustment The OSD screen will appear when you press the of the display from SRS Labs, Inc. 13 OFF Turn off SRS function. OFF This shows the optimized screen by disabling the frame buffer memory. G-MODE SRS TRUSURROUND HD ON SRS ON TRUSURROUND Turn on the front Menu Name Icons Sub-menu Name G-MODE THRU MODE ON MENU : Save...

Owner's Manual
Page 15
... screen, AUTO BRIGHT function is turned OFF. If 640 x 480 resolution input, the picture will be displayed with input resolution ratio scaling. ORIGINAL The picture will be displayed depends on Input resolution.No Scaling. On Screen Display(OSD) Selection and Adjustment Main menu Sub menu Description G-MODE ARC ARC FULL 1:1 The picture will be displayed with Full size. When set to ON, this adjusts the screen brightness automatically to the display data level to provide the optimal play condition. G-MODE AUTO BRIGHT ON AUTO BRIGHT...
... screen, AUTO BRIGHT function is turned OFF. If 640 x 480 resolution input, the picture will be displayed with input resolution ratio scaling. ORIGINAL The picture will be displayed depends on Input resolution.No Scaling. On Screen Display(OSD) Selection and Adjustment Main menu Sub menu Description G-MODE ARC ARC FULL 1:1 The picture will be displayed with Full size. When set to ON, this adjusts the screen brightness automatically to the display data level to provide the optimal play condition. G-MODE AUTO BRIGHT ON AUTO BRIGHT...

Owner's Manual
Page 18
... not be supported for some input signal settings. 17 HUE Set your own saturation levels. SATURATION Set your own hue levels. Set your own red color levels. RED GREEN BLUE Set your own blue color levels. Set your own green color levels. On Screen Display(OSD) Selection and Adjustment Main menu Sub menu Description COLOR DVI-D input HDMI input PRESET • sRGB: Set the screen color to fit the sRGB standard color specification. • 6500K: Slightly reddish white. • 9300K: Slightly bluish white. COLOR RESET Prestore "PICTURE" and "COLOR" default settings.
... not be supported for some input signal settings. 17 HUE Set your own saturation levels. SATURATION Set your own hue levels. Set your own red color levels. RED GREEN BLUE Set your own blue color levels. Set your own green color levels. On Screen Display(OSD) Selection and Adjustment Main menu Sub menu Description COLOR DVI-D input HDMI input PRESET • sRGB: Set the screen color to fit the sRGB standard color specification. • 6500K: Slightly reddish white. • 9300K: Slightly bluish white. COLOR RESET Prestore "PICTURE" and "COLOR" default settings.

Owner's Manual
Page 20
On Screen Display(OSD) Selection and Adjustment Main menu Sub menu Description SETUP DVI-D input LANGUAGE To choose the language in which the control names are displayed. OVERSCAN Removes noise that may occur at any time, the power indicator will go off. LIGHTING LEVEL LED would not response. 1920 x 1080 POWER Use this does not improve the screen image, restore the factory default settings. 19 If you set ON at the edges of the sound input signal(sound). If this...
On Screen Display(OSD) Selection and Adjustment Main menu Sub menu Description SETUP DVI-D input LANGUAGE To choose the language in which the control names are displayed. OVERSCAN Removes noise that may occur at any time, the power indicator will go off. LIGHTING LEVEL LED would not response. 1920 x 1080 POWER Use this does not improve the screen image, restore the factory default settings. 19 If you set ON at the edges of the sound input signal(sound). If this...

Owner's Manual
Page 21
... secure the current control settings, so that they cannot be inadvertently changed. No image appears G Is the power cord of horizontal or vertical the screen? frequency range of this manual and configure your display is out of the • Check and see a "OSD LOCKED" message on ? G Do you see "OSD LOCKED" when you see if the power cord is in power saving mode, try again. G Is the power indicator • Press the Power button. Troubleshooting Check the following...
... secure the current control settings, so that they cannot be inadvertently changed. No image appears G Is the power cord of horizontal or vertical the screen? frequency range of this manual and configure your display is out of the • Check and see a "OSD LOCKED" message on ? G Do you see "OSD LOCKED" when you see if the power cord is in power saving mode, try again. G Is the power indicator • Press the Power button. Troubleshooting Check the following...
Owner's Manual
Page 22
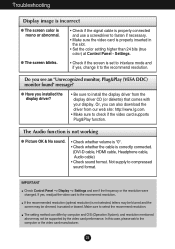
... the video card manufacturer. 21 If yes, readjust the video card to the recommend resolution. If the recommended resolution (optimal resolution) is correctly connected. (DVI-D cable, HDMI cable, Headphone cable, Audio cable) • Check sound format. G The screen blinks. • Check if the screen is set to interlace mode and if yes, change it to the recommend resolution. G Have you installed the display driver? • Be sure to compressed sound format. Not supply to install the display driver from our web site: http://www.lg...
... the video card manufacturer. 21 If yes, readjust the video card to the recommend resolution. If the recommended resolution (optimal resolution) is correctly connected. (DVI-D cable, HDMI cable, Headphone cable, Audio cable) • Check sound format. G The screen blinks. • Check if the screen is set to interlace mode and if yes, change it to the recommend resolution. G Have you installed the display driver? • Be sure to compressed sound format. Not supply to install the display driver from our web site: http://www.lg...
Owner's Manual
Page 23
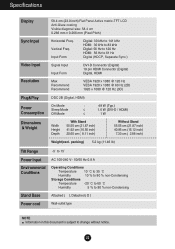
... (Digital, HDMI) On Mode Sleep Mode Off Mode : 49 W (Typ.) ≤ 1.6 W (DVI-D / HDMI) ≤ 1 W Width Height Depth With Stand 55.55 cm (21.87 inch) 41.92 cm (16.50 inch) 20.60 cm ( 8.11 inch) Without Stand 55.55 cm (21.87 inch) 40.95 cm (16.12 inch) 7.33 cm ( 2.88 inch) Weight(excl. Vertical Freq. Specifications Display Sync Input Video Input Resolution Plug&Play Power Consumption Dimensions & Weight 58.4 cm (23.0 inch) Flat Panel Active matrix-TFT LCD Anti...
... (Digital, HDMI) On Mode Sleep Mode Off Mode : 49 W (Typ.) ≤ 1.6 W (DVI-D / HDMI) ≤ 1 W Width Height Depth With Stand 55.55 cm (21.87 inch) 41.92 cm (16.50 inch) 20.60 cm ( 8.11 inch) Without Stand 55.55 cm (21.87 inch) 40.95 cm (16.12 inch) 7.33 cm ( 2.88 inch) Weight(excl. Vertical Freq. Specifications Display Sync Input Video Input Resolution Plug&Play Power Consumption Dimensions & Weight 58.4 cm (23.0 inch) Flat Panel Active matrix-TFT LCD Anti...

Owner's Manual
Page 24
Specifications Preset Modes (Resolution) - DVI-D(Digital) INPUT Display Modes (Resolution) 1 640 x 350 2 720 x 400 3 640 x 480 4 640 x 480 5 800 x 600 6 800 x 600 7 1024 x 768 8 1024 x 768 9 1152 x 864 10 1280 x 1024 11 1280 x 1024 12 1680 x 1050 13 1680 x 1050 *14 1920 x 1080 **15 1920 x 1080 **16 1920 x 1080 **17 1920 x 1080 HDMI Vedio INPUT Display Modes (Resolution) 1 480P 2 576P 3 720P 4 720P 5 1080i 6 1080i 7 1080P...
Specifications Preset Modes (Resolution) - DVI-D(Digital) INPUT Display Modes (Resolution) 1 640 x 350 2 720 x 400 3 640 x 480 4 640 x 480 5 800 x 600 6 800 x 600 7 1024 x 768 8 1024 x 768 9 1152 x 864 10 1280 x 1024 11 1280 x 1024 12 1680 x 1050 13 1680 x 1050 *14 1920 x 1080 **15 1920 x 1080 **16 1920 x 1080 **17 1920 x 1080 HDMI Vedio INPUT Display Modes (Resolution) 1 480P 2 576P 3 720P 4 720P 5 1080i 6 1080i 7 1080P...
Owner's Manual
Page 26
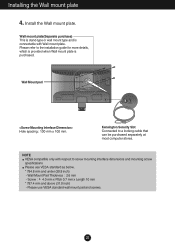
.... Kensington Security Slot Connected to a locking cable that can be purchased separately at most computer stores. Screw : 4.0 mm x Pitch 0.7 mm x Length 10 mm * 787.4 mm and above (31.0 inch) - Please use VESA standard as below. * 784.8 mm and under (30.9 inch) - Wall mount plate(Separate purchase) This is stand-type or wall mount type and is connectable with respect to the installation guide for more details...
.... Kensington Security Slot Connected to a locking cable that can be purchased separately at most computer stores. Screw : 4.0 mm x Pitch 0.7 mm x Length 10 mm * 787.4 mm and above (31.0 inch) - Please use VESA standard as below. * 784.8 mm and under (30.9 inch) - Wall mount plate(Separate purchase) This is stand-type or wall mount type and is connectable with respect to the installation guide for more details...


