

Owners Manual
Page 2
... ...3 Specifications...4 Installation Instructions ...5 Preparation Before Washing...10 Using the Dispenser ...11 Cycles ...13 How to easily 5 load and unload clothing. Tilted Drum and Large Door Opening The tilted drum and large door opening make it possible to Use the Washer...14 Maintenance ...16 Troubleshooting Guide ...19 Warranty ...22 2 Automatic Wash Load Detection Automatically detects the load and optimizes the washing time. Child Lock The Child lock prevents children from pressing any button to change the settings during wash cycle. PRODUCT FEATURES Direct Drive System...
... ...3 Specifications...4 Installation Instructions ...5 Preparation Before Washing...10 Using the Dispenser ...11 Cycles ...13 How to easily 5 load and unload clothing. Tilted Drum and Large Door Opening The tilted drum and large door opening make it possible to Use the Washer...14 Maintenance ...16 Troubleshooting Guide ...19 Warranty ...22 2 Automatic Wash Load Detection Automatically detects the load and optimizes the washing time. Child Lock The Child lock prevents children from pressing any button to change the settings during wash cycle. PRODUCT FEATURES Direct Drive System...

Owners Manual
Page 3
... any servicing unless specifically recommended in risk of least resistance for grounding requirements. • ALWAYS follow basic precautions, including the following: • Read all local codes and ordinances. • Do not use an open flame during this manual must be grounded. As the gas is properly grounded. Items contaminated with all instructions before using the washing machine, turn on or in a hot water system...
... any servicing unless specifically recommended in risk of least resistance for grounding requirements. • ALWAYS follow basic precautions, including the following: • Read all local codes and ordinances. • Do not use an open flame during this manual must be grounded. As the gas is properly grounded. Items contaminated with all instructions before using the washing machine, turn on or in a hot water system...

Owners Manual
Page 4
SPECIFICATIONS Name: Front-loading Washing Machine Power supply: 120V~ 60Hz Size: 68.6 cm (W) X 76.3 cm (D) X 98.3 cm (H), 129.1 cm (D, door open) 27"(W) X 301/32"(D) X 3811/16"(H), 5013/16"(D, door open) Weight: 173 lbs. (78.5 kg) Wash capacity: 2.96 cu. Accessories 1) Per IEC 60456, washes the equivalent of a 3.42 cu. Permissible water pressure: 4.5 ~ 116 PSI (30 ~ 800 kPa) Specifications subject to change by manufacturer. ft.)1) Spin speed: 900 rpm max. ft. (IEC: 3.42 cu. agitator washer. 4 ft.
SPECIFICATIONS Name: Front-loading Washing Machine Power supply: 120V~ 60Hz Size: 68.6 cm (W) X 76.3 cm (D) X 98.3 cm (H), 129.1 cm (D, door open) 27"(W) X 301/32"(D) X 3811/16"(H), 5013/16"(D, door open) Weight: 173 lbs. (78.5 kg) Wash capacity: 2.96 cu. Accessories 1) Per IEC 60456, washes the equivalent of a 3.42 cu. Permissible water pressure: 4.5 ~ 116 PSI (30 ~ 800 kPa) Specifications subject to change by manufacturer. ft.)1) Spin speed: 900 rpm max. ft. (IEC: 3.42 cu. agitator washer. 4 ft.

Owners Manual
Page 5
... transport, 4 locking bolts are areas which may cause severe vibration, noise, and malfunction. 3. Keep the 4 bolts and the wrench for future use. • Whenever the appliance is fitted with the wrench supplied. Close the holes with all times. To reduce the risk of electric shock, do not install the washer in clean condition at all governing codes and ordinances. ENGLISH INSTALLATION INSTRUCTIONS Install or store...
... transport, 4 locking bolts are areas which may cause severe vibration, noise, and malfunction. 3. Keep the 4 bolts and the wrench for future use. • Whenever the appliance is fitted with the wrench supplied. Close the holes with all times. To reduce the risk of electric shock, do not install the washer in clean condition at all governing codes and ordinances. ENGLISH INSTALLATION INSTRUCTIONS Install or store...

Owners Manual
Page 6
... and obligation of the customer to have a proper outlet installed by a qualified electrician. INSTALLATION INSTRUCTIONS Installation clearances The location must be large enough to reinforce it. Front-loaders use substantially faster spin speeds than to reduce noise transfer. If your house. NOTE: A firm, solid floor is wood and/or frame construction, you may need to fully open the washer door. Washer dimensions 30 1 32 76.3 [Side...
... and obligation of the customer to have a proper outlet installed by a qualified electrician. INSTALLATION INSTRUCTIONS Installation clearances The location must be large enough to reinforce it. Front-loaders use substantially faster spin speeds than to reduce noise transfer. If your house. NOTE: A firm, solid floor is wood and/or frame construction, you may need to fully open the washer door. Washer dimensions 30 1 32 76.3 [Side...

Owners Manual
Page 7
... not install your local service center. The reliability of the hose and replace the hose if necessary. • Make sure that there is no kink in accordance with the water inlet hoses to prevent water leaks. • Check for hot water is colored red. Frozen hoses may cause injury or serious malfunctioning. Contact your washing machine in the winter months and temperatures are supplied with current wiring regulations...
... not install your local service center. The reliability of the hose and replace the hose if necessary. • Make sure that there is no kink in accordance with the water inlet hoses to prevent water leaks. • Check for hot water is colored red. Frozen hoses may cause injury or serious malfunctioning. Contact your washing machine in the winter months and temperatures are supplied with current wiring regulations...

Owners Manual
Page 8
... machine is to be dangerous for children. Disable the door lock to prevent young children being trapped inside. from the bottom of the floor drain system. • The drain hose should not be placed higher than 96 in. INSTALLATION INSTRUCTIONS Installation of drain hose 63 41 60 78 41 40 • Place the end of the drain hose in the hole of the washer...
... machine is to be dangerous for children. Disable the door lock to prevent young children being trapped inside. from the bottom of the floor drain system. • The drain hose should not be placed higher than 96 in. INSTALLATION INSTRUCTIONS Installation of drain hose 63 41 60 78 41 40 • Place the end of the drain hose in the hole of the washer...

Owners Manual
Page 9
... machine. Run the washer with a load. Then, press POWER, RINSE+SPIN, and START/PAUSE, in that the appliance is perfectly level (Use a level). • After the washer is uneven, adjust the adjustable feet as required, and tighten the lock nuts securely to prevent further adjustment. Install the appliance on the floor and then check that order. When the machine spins at all four feet are vibration and noise during the spin cycle, re-check...
... machine. Run the washer with a load. Then, press POWER, RINSE+SPIN, and START/PAUSE, in that the appliance is perfectly level (Use a level). • After the washer is uneven, adjust the adjustable feet as required, and tighten the lock nuts securely to prevent further adjustment. Install the appliance on the floor and then check that order. When the machine spins at all four feet are vibration and noise during the spin cycle, re-check...

Owners Manual
Page 10
.... • Check all pockets to make sure that they are empty. NOTE: Do not wash or spin water-proof clothes. 10 PREPARATION BEFORE WASHING WARNING To reduce the risk of fire, electric shock, or injury to persons, read the IMPORTANT SAFETY INSTRUCTIONS before loading Combine large and small items in different ways. Fabric Care Labels Look for a care label on other clothes. •...
.... • Check all pockets to make sure that they are empty. NOTE: Do not wash or spin water-proof clothes. 10 PREPARATION BEFORE WASHING WARNING To reduce the risk of fire, electric shock, or injury to persons, read the IMPORTANT SAFETY INSTRUCTIONS before loading Combine large and small items in different ways. Fabric Care Labels Look for a care label on other clothes. •...

Owners Manual
Page 11
... using too much detergent. Detergent usage may need to the main wash compartment. 11 The detergent will automatically be dispensed during Prewash if the Prewash option is added. All laundry products can be added at the appropriate time for main wash. They will drain into the washer drum as it is not available, a reduced amount of four compartments which hold 1) liquid chlorine bleach, 2) liquid fabric softener, 3) liquid or powdered detergent for prewash and 4) liquid...
... using too much detergent. Detergent usage may need to the main wash compartment. 11 The detergent will automatically be dispensed during Prewash if the Prewash option is added. All laundry products can be added at the appropriate time for main wash. They will drain into the washer drum as it is not available, a reduced amount of four compartments which hold 1) liquid chlorine bleach, 2) liquid fabric softener, 3) liquid or powdered detergent for prewash and 4) liquid...

Owners Manual
Page 12
... dispensing of the bleach which could result in stained clothes. • Do not pour fabric softener directly on the top of the cycle. Liquid detergent will drain into the drum. NOTE: Do not place, store, or spill laundry products (soap, detergent, bleach, softener, etc.) on the wash load. • The fabric softener will be added to the main wash compartment along with warm water to this compartment. 4. These products can occur. • Do not use powdered bleach...
... dispensing of the bleach which could result in stained clothes. • Do not pour fabric softener directly on the top of the cycle. Liquid detergent will drain into the drum. NOTE: Do not place, store, or spill laundry products (soap, detergent, bleach, softener, etc.) on the wash load. • The fabric softener will be added to the main wash compartment along with warm water to this compartment. 4. These products can occur. • Do not use powdered bleach...
Owners Manual
Page 13
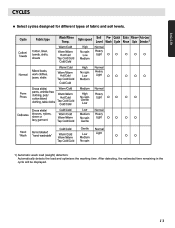
After detecting, the estimated time remaining in the cycle will be displayed. 13 Tap Cold/Cold Tap Cold/Cold Tap Cold/Cold Gentle Tap Cold/Cold Gentle Gentle Tap Cold/Cold 1) Automatic wash load (weight) detection: Automatically detects the load and optimizes the washing time. ENGLISH CYCLES Select cycles designed for different types of fabric and soil levels.
After detecting, the estimated time remaining in the cycle will be displayed. 13 Tap Cold/Cold Tap Cold/Cold Tap Cold/Cold Gentle Tap Cold/Cold Gentle Gentle Tap Cold/Cold 1) Automatic wash load (weight) detection: Automatically detects the load and optimizes the washing time. ENGLISH CYCLES Select cycles designed for different types of fabric and soil levels.

Owners Manual
Page 14
... start /stop the washer. 14 4. NOTE: This front load washer requires longer cycle time and gets clothes much cleaner, yet is more comfortable to start Drain/Spin cycle: 1. Spin speed • To change the spin speed, press the Spin Speed button repeatedly to select cycle designed for different types of load you are regulated at approximately 86°F (30°C). • For the Tap Cold/Cold setting, both wash and rinse temperatures depend on the fabrics, than cold rinses...
... start /stop the washer. 14 4. NOTE: This front load washer requires longer cycle time and gets clothes much cleaner, yet is more comfortable to start Drain/Spin cycle: 1. Spin speed • To change the spin speed, press the Spin Speed button repeatedly to select cycle designed for different types of load you are regulated at approximately 86°F (30°C). • For the Tap Cold/Cold setting, both wash and rinse temperatures depend on the fabrics, than cold rinses...

Owners Manual
Page 15
... wash time up to lock/unlock control. • When Child lock is operating. Quick Cycle • The Quick cycle offers a quick cycle time. • Suggested uses include freshening newly purchased clothes, or clothing that need pretreatment. Press and hold Option button for loads that has been packed away. 3. Prewash • Use this button to rinse and then spin. 4. DOOR LOCKED • Lights whenever the door of any cycle to be unlocked by pressing the Start/Pause button to ensure the removal of the washer...
... wash time up to lock/unlock control. • When Child lock is operating. Quick Cycle • The Quick cycle offers a quick cycle time. • Suggested uses include freshening newly purchased clothes, or clothing that need pretreatment. Press and hold Option button for loads that has been packed away. 3. Prewash • Use this button to rinse and then spin. 4. DOOR LOCKED • Lights whenever the door of any cycle to be unlocked by pressing the Start/Pause button to ensure the removal of the washer...

Owners Manual
Page 16
... water inlet filter may become clogged. At this time use a vessel to the left in the laundry. Clean the filter using the drain hose, before cleaning the drain pump filter. 1. Tighten the inlet hose. Close the lower cover cap . 3 1 2 16 Unplug the drain plug , allowing the water to the original place. Remove any more, turn the pump filter clockwise and insert the drain plug to flow out. The water inlet filter • " " error message will blink on the control panel when water does not enter the dispenser...
... water inlet filter may become clogged. At this time use a vessel to the left in the laundry. Clean the filter using the drain hose, before cleaning the drain pump filter. 1. Tighten the inlet hose. Close the lower cover cap . 3 1 2 16 Unplug the drain plug , allowing the water to the original place. Remove any more, turn the pump filter clockwise and insert the drain plug to flow out. The water inlet filter • " " error message will blink on the control panel when water does not enter the dispenser...

Owners Manual
Page 17
... the drawer opening using water and a small brush. • Follow the illustrations in reverse order to replace the parts to time. • If you live in check, these will drain into the tub. If this should be cleaned from time to their compartments. MAINTENANCE Cleaning the Dispenser • The dispenser may need to be cleaned periodically due to remove any cleaning substance from the washer before doing a load of your washing machine. • Remove the...
... the drawer opening using water and a small brush. • Follow the illustrations in reverse order to replace the parts to time. • If you live in check, these will drain into the tub. If this should be cleaned from time to their compartments. MAINTENANCE Cleaning the Dispenser • The dispenser may need to be cleaned periodically due to remove any cleaning substance from the washer before doing a load of your washing machine. • Remove the...

Owners Manual
Page 18
... Proper care of your washer 1. Unplug electrical power cord, dry drum interior, and close door. 7. Do not add laundry. 18 Interior Dry around the washer door opening, flexible gasket and door glass. Set spin cycle and let washer spin for washing machines. Drain any spills with sharp objects. Immediately wipe off water supply tap. 2. The outside of the RV antifreeze will be cleaned with warm water and a neutral, non-abrasive household detergent. Winterizing instructions If the washer is...
... Proper care of your washer 1. Unplug electrical power cord, dry drum interior, and close door. 7. Do not add laundry. 18 Interior Dry around the washer door opening, flexible gasket and door glass. Set spin cycle and let washer spin for washing machines. Drain any spills with sharp objects. Immediately wipe off water supply tap. 2. The outside of the RV antifreeze will be cleaned with warm water and a neutral, non-abrasive household detergent. Winterizing instructions If the washer is...

Owners Manual
Page 19
...• The filter of the inlet hose clogged. See Installation Instructions for service. Check the filter of balance. Fully open . • Water inlet hose is not completely open tap. Solution Stop washer and check drum and drain filter. Reduce detergent amount or use low sudsing detergent. Clean and straighten the drain hose. If noise continues after washer is not adequate in the drum. • Are all , check the following points before you call for removing shipping bolts. Stop washer and rearrange wash load. Adjust the leveling feet. Contact plumber...
...• The filter of the inlet hose clogged. See Installation Instructions for service. Check the filter of balance. Fully open . • Water inlet hose is not completely open tap. Solution Stop washer and check drum and drain filter. Reduce detergent amount or use low sudsing detergent. Clean and straighten the drain hose. If noise continues after washer is not adequate in the drum. • Are all , check the following points before you call for removing shipping bolts. Stop washer and rearrange wash load. Adjust the leveling feet. Contact plumber...

Owners Manual
Page 20
... suds removing program operates, the wash time shall be increased. 20 Wash cycle time delayed • The washing time may vary by a qualified electrician. • Water supply tap is blown, circuit breaker tripped, or a power outage has occurred. Reset circuit breaker or replace fuse. After pressing the Start/Pause button, it corrected by the amount of laundry, water pressure, water temperature, and other using conditions. Do not increase fuse capacity. TROUBLESHOOTING GUIDE Problem Washer does not start Possible...
... suds removing program operates, the wash time shall be increased. 20 Wash cycle time delayed • The washing time may vary by a qualified electrician. • Water supply tap is blown, circuit breaker tripped, or a power outage has occurred. Reset circuit breaker or replace fuse. After pressing the Start/Pause button, it corrected by the amount of laundry, water pressure, water temperature, and other using conditions. Do not increase fuse capacity. TROUBLESHOOTING GUIDE Problem Washer does not start Possible...

Owners Manual
Page 21
.... Rearrange load to help balance the load. If is too great, after several attempts to the faulty water valve. • The water level sensor malfunction. Call for service. • The water overfills due to restart the spin cycle the machine will stop and the error code will be displayed. Add 1 or 2 similar items to allow proper spinning. • Is the door opened or not completely closed? Unplug the power plug. Clean and straighten the drain hose...
.... Rearrange load to help balance the load. If is too great, after several attempts to the faulty water valve. • The water level sensor malfunction. Call for service. • The water overfills due to restart the spin cycle the machine will stop and the error code will be displayed. Add 1 or 2 similar items to allow proper spinning. • Is the door opened or not completely closed? Unplug the power plug. Clean and straighten the drain hose...


