
Operation Guide
Page 5
...Connections to Recorder 17 Connecting a Digital Camcorder 17 Initial Setup Wizard 18 Using the Home Menu 19 Initial Settings 19 General Settings 20-21 Language Settings 21 Audio Settings 21-22 Lock (Parental Control) Settings 22 Recording Settings 23 Disc Settings 23-24 General Explanation of On-Screen Display .25 Displaying Information While Watching TV . .25 Displaying Disc Information on-screen . . . . .25 PLAYBACK Playing a Tape 26 Playing a DVD 26 VCR Playback Features 27 DVD Playback Features 28-29 Special Playback Options 30 Playing a DivX Movie File 31 Playing an Audio...
...Connections to Recorder 17 Connecting a Digital Camcorder 17 Initial Setup Wizard 18 Using the Home Menu 19 Initial Settings 19 General Settings 20-21 Language Settings 21 Audio Settings 21-22 Lock (Parental Control) Settings 22 Recording Settings 23 Disc Settings 23-24 General Explanation of On-Screen Display .25 Displaying Information While Watching TV . .25 Displaying Disc Information on-screen . . . . .25 PLAYBACK Playing a Tape 26 Playing a DVD 26 VCR Playback Features 27 DVD Playback Features 28-29 Special Playback Options 30 Playing a DivX Movie File 31 Playing an Audio...
Operation Guide
Page 9
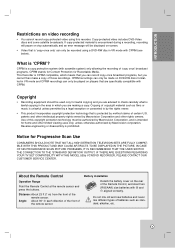
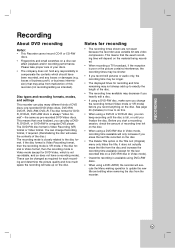
... displayed on the rear of the Remote Control, and insert two (R03/AAA) size batteries with 3 and # aligned correctly. Battery installation Detach the battery cover on -screen. • Video that is encountered during a recording, recording will pause or stop automatically and an error message will be used only for Recordable Media. This Recorder is lawful copying in the area in VR mode with CPRM (see below). Copying of 'copy once' broadcast programs...
... displayed on the rear of the Remote Control, and insert two (R03/AAA) size batteries with 3 and # aligned correctly. Battery installation Detach the battery cover on -screen. • Video that is encountered during a recording, recording will pause or stop automatically and an error message will be used only for Recordable Media. This Recorder is lawful copying in the area in VR mode with CPRM (see below). Copying of 'copy once' broadcast programs...
Operation Guide
Page 10
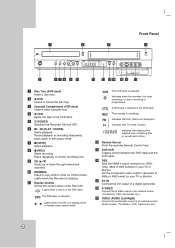
...) Connect the audio/video output of the Recorder. c Cassette Compartment (VCR deck) Insert a video cassette here. Pause playback or recording temporarily, press again to DVD). Lights when recorder is in timer recording or a timer recording is in playing mode or flashes when search mode. l Remote Sensor Point the recorder Remote Control here. h z (REC) Starts recording. b Z DVD Opens or closes the disc tray. e 1 POWER Switches the Recorder ON and OFF. f N / X (PLAY / PAUSE) Starts playback. Press repeatedly to 480p or 480i format for your TV or Monitor. k Display window...
...) Connect the audio/video output of the Recorder. c Cassette Compartment (VCR deck) Insert a video cassette here. Pause playback or recording temporarily, press again to DVD). Lights when recorder is in timer recording or a timer recording is in playing mode or flashes when search mode. l Remote Sensor Point the recorder Remote Control here. h z (REC) Starts recording. b Z DVD Opens or closes the disc tray. e 1 POWER Switches the Recorder ON and OFF. f N / X (PLAY / PAUSE) Starts playback. Press repeatedly to 480p or 480i format for your TV or Monitor. k Display window...
Operation Guide
Page 11
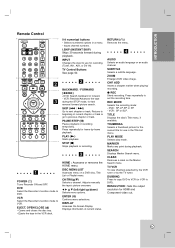
...the TV tuner. VCR Select the Recorder's function mode to set the recording time. Press repeatedly for recording (Tuner, AV1, AV2, or DV IN). c HOME : Accesses or removes the HOME menu. DISPLAY Accesses On-Screen Display. EJECT, OPEN/CLOSE (Z) - PLAY (N) Starts playback. b B v V (left/right/up/down) Selects menu options. Displays information of current chapter or track or go to use in the Title List menu. Opens and closes the disc tray. - Returns to DVD). ZOOM Enlarges DVD video image. Adjusts manually the tape's picture onscreen. SUBTITLE Selects a subtitle...
...the TV tuner. VCR Select the Recorder's function mode to set the recording time. Press repeatedly for recording (Tuner, AV1, AV2, or DV IN). c HOME : Accesses or removes the HOME menu. DISPLAY Accesses On-Screen Display. EJECT, OPEN/CLOSE (Z) - PLAY (N) Starts playback. b B v V (left/right/up/down) Selects menu options. Displays information of current chapter or track or go to use in the Title List menu. Opens and closes the disc tray. - Returns to DVD). ZOOM Enlarges DVD video image. Adjusts manually the tape's picture onscreen. SUBTITLE Selects a subtitle...
Operation Guide
Page 13
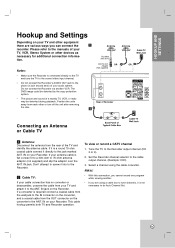
... the IN connector on the converter, and a coaxial cable from your Recorder. The DVD image could be distorted during playback. IN jack on the Recorder. IN jack. Select a channel using a cable box to tune channels, it directly to the manuals of your TV, VCR, Stereo System or other or turn off the unit after removing the disc. To view or record a CATV channel 1. Please refer to the jack marked ANT.
... the IN connector on the converter, and a coaxial cable from your Recorder. The DVD image could be distorted during playback. IN jack on the Recorder. IN jack. Select a channel using a cable box to tune channels, it directly to the manuals of your TV, VCR, Stereo System or other or turn off the unit after removing the disc. To view or record a CATV channel 1. Please refer to the jack marked ANT.
Operation Guide
Page 15
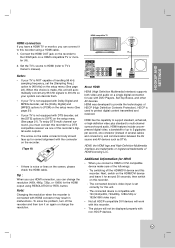
... handling 96 kHz sampling frequency, set the [Dolby Digital] and [MPEG] options to [PCM] on this recorder. Note: Changing the resolution when the recorder is noise or lines on again or change the resolution (480i, 480p, 720p, or 1080i) for this recorder using RESOLUTION or RES. Try switching off the recorder and then turn off the HDMI/DVI device and this recorder. - The connected device's video input is NOT capable of this unit...
... handling 96 kHz sampling frequency, set the [Dolby Digital] and [MPEG] options to [PCM] on this recorder. Note: Changing the resolution when the recorder is noise or lines on again or change the resolution (480i, 480p, 720p, or 1080i) for this recorder using RESOLUTION or RES. Try switching off the recorder and then turn off the HDMI/DVI device and this recorder. - The connected device's video input is NOT capable of this unit...

Operation Guide
Page 16
... the Recorder 's digital output. (See [Audio Settings] on page 21). Use an optional digital (OPTICAL O, COAXIAL X) audio cable. 2. For this Recorder's digital audio outputs. To enjoy DTS multi channel surround, you need to the DTS Licensing agreement, the digital output will produce a strong, distorted sound or no sound at all. • Six Channel Digital Surround Sound via one of Dolby Laboratories. Rear of the receiver. Connection to an Amplifier Connecting to an amplifier equipped with two channel analog stereo or Dolby Pro...
... the Recorder 's digital output. (See [Audio Settings] on page 21). Use an optional digital (OPTICAL O, COAXIAL X) audio cable. 2. For this Recorder's digital audio outputs. To enjoy DTS multi channel surround, you need to the DTS Licensing agreement, the digital output will produce a strong, distorted sound or no sound at all. • Six Channel Digital Surround Sound via one of Dolby Laboratories. Rear of the receiver. Connection to an Amplifier Connecting to an amplifier equipped with two channel analog stereo or Dolby Pro...
Operation Guide
Page 20
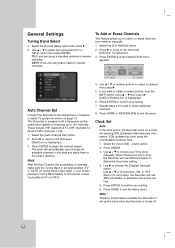
... setting. 4. When Timezone is set up to determine the proper setting. 5. Note : The Auto Clock Feature enables the Recorder to set to choose the correct Tuning Band (TV or CATV). 4. Use v / V to add or erase additional channels. 8. TV: If you are using the Coordinated Universal Time. 1. Auto Channel Set Connect the Recorder to the desired type of receiving up the clock when the Recorder is highlighted. 3. Use v / V or number buttons to exit the menu. Select the [Clock Set] > [Auto...
... setting. 4. When Timezone is set up to determine the proper setting. 5. Note : The Auto Clock Feature enables the Recorder to set to choose the correct Tuning Band (TV or CATV). 4. Use v / V to add or erase additional channels. 8. TV: If you are using the Coordinated Universal Time. 1. Auto Channel Set Connect the Recorder to the desired type of receiving up the clock when the Recorder is highlighted. 3. Use v / V or number buttons to exit the menu. Select the [Clock Set] > [Auto...
Operation Guide
Page 21
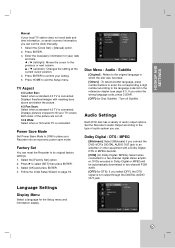
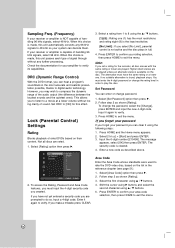
... DTS signal is connected. If you enter the wrong language code, press CLEAR. [OFF] (for the Setup menu and information display. 21 Language Settings Display Menu Select a language for Disc Subtitle) : Turn off . 16:9 Wide: Select when a 16:9 wide TV is connected. Power Save Mode Set Power Save Mode to [ON] to place your setting. 5. Audio Settings Each DVD disc has a variety of audio system you use. DVDs encoded in which the disc was recorded. [Others] : To select another language, press number buttons to enter the corresponding 4-digit number...
... DTS signal is connected. If you enter the wrong language code, press CLEAR. [OFF] (for the Setup menu and information display. 21 Language Settings Display Menu Select a language for Disc Subtitle) : Turn off . 16:9 Wide: Select when a 16:9 wide TV is connected. Power Save Mode Set Power Save Mode to [ON] to place your setting. 5. Audio Settings Each DVD disc has a variety of audio system you use. DVDs encoded in which the disc was recorded. [Others] : To select another language, press number buttons to enter the corresponding 4-digit number...
Operation Guide
Page 22
... rating selection, then press HOME to exit the menu. 22 If your receiver or amplifier is cleared. 4. Lock (Parental Control) Settings Rating Blocks playback of the audio output (the difference between the loudest sounds and the quietest ones). Press ENTER to confirm your area code selection, then press HOME to exit the menu. Higher rated scenes are rated. 1. To change password. 1. If you forget your password If you are played...
... rating selection, then press HOME to exit the menu. 22 If your receiver or amplifier is cleared. 4. Lock (Parental Control) Settings Rating Blocks playback of the audio output (the difference between the loudest sounds and the quietest ones). Press ENTER to confirm your area code selection, then press HOME to exit the menu. Higher rated scenes are rated. 1. To change password. 1. If you forget your password If you are played...
Operation Guide
Page 23
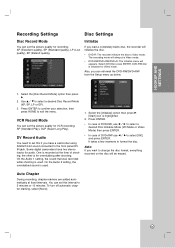
... SETTINGS Recording Settings Disc Settings Disc Record Mode You can set the picture quality for VCR recording; The recording mode will appears. Also, you want to the front panel DV IN jack. Some digital camcorders have a camcorder using 32kHz/12-bit sound connected to change the disc format, everything recorded on the disc will be Video mode. • DVD-RW/DVD+RW/DVD+R: The Initialize menu will always be erased. Auto Chapter During recording, chapter markers are added automatically at the time of DVD...
... SETTINGS Recording Settings Disc Settings Disc Record Mode You can set the picture quality for VCR recording; The recording mode will appears. Also, you want to the front panel DV IN jack. Some digital camcorders have a camcorder using 32kHz/12-bit sound connected to change the disc format, everything recorded on the disc will be Video mode. • DVD-RW/DVD+RW/DVD+R: The Initialize menu will always be erased. Auto Chapter During recording, chapter markers are added automatically at the time of DVD...
Operation Guide
Page 24
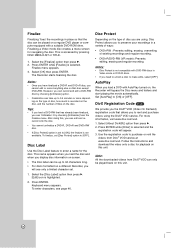
...) registration code that allows you to rent and purchase videos using , Disc Protect allows you to preserve your recordings in Video mode or DVD-R discs. • If you need to unlock a disc to make edits, select [OFF]. Finalizing a Video mode disc creates a menu screen for the disc. Finalize menu appears. 3. The Recorder starts finalizing the disc. Select [About DivX(R)] option then press B. 2. Finalize Finalizing 'fixes' the recordings in place so that the disc can be played on a regular DVD player or...
...) registration code that allows you to rent and purchase videos using , Disc Protect allows you to preserve your recordings in Video mode or DVD-R discs. • If you need to unlock a disc to make edits, select [OFF]. Finalizing a Video mode disc creates a menu screen for the disc. Finalize menu appears. 3. The Recorder starts finalizing the disc. Select [About DivX(R)] option then press B. 2. Finalize Finalizing 'fixes' the recordings in place so that the disc can be played on a regular DVD player or...
Operation Guide
Page 25
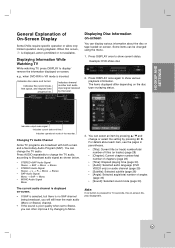
... display/ remove the information displayed on -screen. • If SAP is selected, but there is no button is poor quality when set to Mono. 3. Indicates channel number and audio input signal received by changing to Stereo, you can select an item by pressing v / V and change or select the setting by pressing b / B. Some items can change the TV audio, according to change the TV audio. HOOKUP AND SETTINGS Indicates output audio signal. You can be changed using the menu. 1. Press AUDIO repeatedly...
... display/ remove the information displayed on -screen. • If SAP is selected, but there is no button is poor quality when set to Mono. 3. Indicates channel number and audio input signal received by changing to Stereo, you can select an item by pressing v / V and change or select the setting by pressing b / B. Some items can change the TV audio, according to change the TV audio. HOOKUP AND SETTINGS Indicates output audio signal. You can be changed using the menu. 1. Press AUDIO repeatedly...
Operation Guide
Page 26
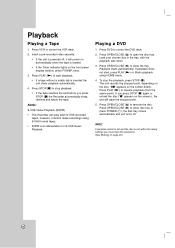
... ejects the tape. Load your chosen disc in the tray, with the playback side down. 3. The unit records the stopped point, depending on the screen briefly. Playback Playing a Tape 1. Press VCR to remove the disc. Press PLAY (N) to close disc tray or press POWER (1), the disc tray closes automatically and unit turns off , it cannot make recordings using HOME menu. 4. Notes: S-VHS Quasi Playback (SQPB) • This Recorder can play back S-VHS recorded tapes, however, it will clear the stopped point. 5. Playing a DVD 1. Press OPEN/CLOSE (Z) to close the tray...
... ejects the tape. Load your chosen disc in the tray, with the playback side down. 3. The unit records the stopped point, depending on the screen briefly. Playback Playing a Tape 1. Press VCR to remove the disc. Press PLAY (N) to close disc tray or press POWER (1), the disc tray closes automatically and unit turns off , it cannot make recordings using HOME menu. 4. Notes: S-VHS Quasi Playback (SQPB) • This Recorder can play back S-VHS recorded tapes, however, it will clear the stopped point. 5. Playing a DVD 1. Press OPEN/CLOSE (Z) to close the tray...
Operation Guide
Page 35
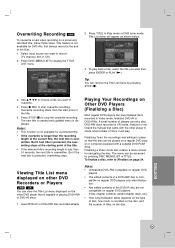
... DVD player. The disc format for DVDR, DVD+R, DVD+RW discs is available using DVD+RW discs. • When using a DVD-RW disc in Video mode). • Overwrite recording is always "Video format"-the same as required for each recording and determine the picture quality and how much space the recording will take proper care of the disc. • The recording time available may decrease if you heavily edit a disc. • If using a DVD-RW disc, make sure you change Recording format...
... DVD player. The disc format for DVDR, DVD+R, DVD+RW discs is available using DVD+RW discs. • When using a DVD-RW disc in Video mode). • Overwrite recording is always "Video format"-the same as required for each recording and determine the picture quality and how much space the recording will take proper care of the disc. • The recording time available may decrease if you heavily edit a disc. • If using a DVD-RW disc, make sure you change Recording format...

Operation Guide
Page 40
...: Audio/Video Input mounted on front panel. • DV: DV Input mounted on front panel. 3. DVD: XP, SP, LP or EP. Press INPUT repeatedly to select the external input to any of time, see [Instant Timer Recording] on page 36. See Copyright on page 9 for a fixed length of the Recorder's external inputs. 1. Recording from External Components You can record from an external component, such as a camcorder or VCR, connected to record from is copy-protected using...
...: Audio/Video Input mounted on front panel. • DV: DV Input mounted on front panel. 3. DVD: XP, SP, LP or EP. Press INPUT repeatedly to select the external input to any of time, see [Instant Timer Recording] on page 36. See Copyright on page 9 for a fixed length of the Recorder's external inputs. 1. Recording from External Components You can record from an external component, such as a camcorder or VCR, connected to record from is copy-protected using...
Operation Guide
Page 49
... disc, and the number of playing DVD+RW or DVD+R discs. 1. Use v V b B to choose a title you want to record (TV channel, AV1-2, DV). 2. Overwrite recording starts from the start overwrite recording. To finalize a disc, refer to start point of the title. • If the selected title's recording length is less than the recording length of players can be accessed by pressing STOP (x). 3. Finalizing a Video mode disc creates a menu screen for DVD+Rs, that always record...
... disc, and the number of playing DVD+RW or DVD+R discs. 1. Use v V b B to choose a title you want to record (TV channel, AV1-2, DV). 2. Overwrite recording starts from the start overwrite recording. To finalize a disc, refer to start point of the title. • If the selected title's recording length is less than the recording length of players can be accessed by pressing STOP (x). 3. Finalizing a Video mode disc creates a menu screen for DVD+Rs, that always record...
Operation Guide
Page 52
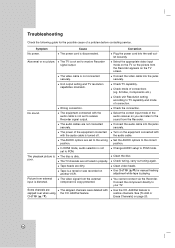
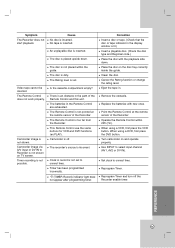
... TV resolution capabilites mismatch. The AUDIO options are set to the sound from external input is distorted. Some channels are not tuned in properly. Change AUDIO setup to restore channels. Use CH/TRK (v/V) for the possible cause of the audio receiver so you can listen to receive Recorder signal output. Troubleshooting Check the following guide for manual tracking adjustment while tape is playing. Abnormal or no picture. Select the correct input mode of a problem before contacting service. The video signal...
... TV resolution capabilites mismatch. The AUDIO options are set to the sound from external input is distorted. Some channels are not tuned in properly. Change AUDIO setup to restore channels. Use CH/TRK (v/V) for the possible cause of the audio receiver so you can listen to receive Recorder signal output. Troubleshooting Check the following guide for manual tracking adjustment while tape is playing. Abnormal or no picture. Select the correct input mode of a problem before contacting service. The video signal...
Operation Guide
Page 53
... VCR button. Use INPUT to Recorder is not shown on TV screen. Reprogram Timer and turn off . The disc is not placed within 23ft (7m). The disc is inserted. This Remote Control use the same buttons for VCR and DVD functions (ex.PLAY). Cause No disc is dirty. The Remote Control does not work properly. Correction Insert a disc or tape. (Check that the disc or tape indicator in the Remote Control are exhausted. Remove the obstacle. When using a DVD...
... VCR button. Use INPUT to Recorder is not shown on TV screen. Reprogram Timer and turn off . The disc is not placed within 23ft (7m). The disc is inserted. This Remote Control use the same buttons for VCR and DVD functions (ex.PLAY). Cause No disc is dirty. The Remote Control does not work properly. Correction Insert a disc or tape. (Check that the disc or tape indicator in the Remote Control are exhausted. Remove the obstacle. When using a DVD...
Operation Guide
Page 54
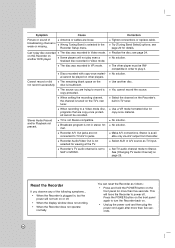
... in the Recorder Setup menu. Broadcast program is selected in stereo format. Correction Tighten connections or replace cable. Select the channel on the Recorder's built-in order to turn on . • Unplug the power cord and then plug the power cord again after more than five seconds. 54 Use a VR mode formatted disc for viewing at the TV. When setting the recording channel, the channel is available only via A/V output from Recorder. See [Changing TV Audio Channel] on another disc. Cause Antenna...
... in the Recorder Setup menu. Broadcast program is selected in stereo format. Correction Tighten connections or replace cable. Select the channel on the Recorder's built-in order to turn on . • Unplug the power cord and then plug the power cord again after more than five seconds. 54 Use a VR mode formatted disc for viewing at the TV. When setting the recording channel, the channel is available only via A/V output from Recorder. See [Changing TV Audio Channel] on another disc. Cause Antenna...


