
Operation Guide
Page 2
... the product's enclosure that may result in the cabinet are provided for ventilation and to ensure reliable operation of this product, please read this owner's manual carefully and retain it from over heating. CAUTION RISK OF ELECTRIC SHOCK DO NOT OPEN CAUTION: TO REDUCE THE RISK OF ELECTRIC SHOCK DO NOT...
... the product's enclosure that may result in the cabinet are provided for ventilation and to ensure reliable operation of this product, please read this owner's manual carefully and retain it from over heating. CAUTION RISK OF ELECTRIC SHOCK DO NOT OPEN CAUTION: TO REDUCE THE RISK OF ELECTRIC SHOCK DO NOT...
Operation Guide
Page 3
... radio or television reception, which can radiate radio frequency energy and, if not installed and used in accordance with the instruction manual, may cause harmful interference to be placed upon . Overloaded wall outlets, loose or damaged wall outlets, extension cords, frayed ... in a residential installation. FCC WARNING: This equipment may cause harmful interference unless the modifications are expressly approved in the instruction manual. Changes or modifications to this equipment if an unauthorized change or modification is no additional outlets or branch circuits. This product ...
... radio or television reception, which can radiate radio frequency energy and, if not installed and used in accordance with the instruction manual, may cause harmful interference to be placed upon . Overloaded wall outlets, loose or damaged wall outlets, extension cords, frayed ... in a residential installation. FCC WARNING: This equipment may cause harmful interference unless the modifications are expressly approved in the instruction manual. Changes or modifications to this equipment if an unauthorized change or modification is no additional outlets or branch circuits. This product ...
Operation Guide
Page 4
... manufacturer's instructions. Do not use can be read before cleaning. IMPORTANT SAFETY INSTRUCTIONS CAUTION: PLEASE READ AND OBSERVE ALL WARNINGS AND INSTRUCTIONS IN THIS OWNER'S MANUAL. All these safety and operating instructions should be placed in a built-in electric shock or fire hazard. All warnings on a bed, sofa, rug or other...
... manufacturer's instructions. Do not use can be read before cleaning. IMPORTANT SAFETY INSTRUCTIONS CAUTION: PLEASE READ AND OBSERVE ALL WARNINGS AND INSTRUCTIONS IN THIS OWNER'S MANUAL. All these safety and operating instructions should be placed in a built-in electric shock or fire hazard. All warnings on a bed, sofa, rug or other...
Operation Guide
Page 5
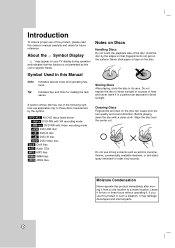
INTRODUCTION RECORDING About the Symbol Display 6 Symbol Used in this Manual 6 Notes on Discs 6 Moisture Condensation 6 Recordable and Playable Discs 7 Recommended recordable DVD discs . . . . . .7 Playable Discs 8 Regional Code 8 Restrictions on video recording 9 What is 'CPRM 9 Copyright 9 ...
INTRODUCTION RECORDING About the Symbol Display 6 Symbol Used in this Manual 6 Notes on Discs 6 Moisture Condensation 6 Recordable and Playable Discs 7 Recommended recordable DVD discs . . . . . .7 Playable Discs 8 Regional Code 8 Restrictions on video recording 9 What is 'CPRM 9 Copyright 9 ...
Operation Guide
Page 6
... discs listed below. -RWVR DVD-RW with VR recording mode -RWVideo DVD-RW with a clean cloth. Storing Discs After playing, store the disc in this Manual Notes on the surface. Leave it from the center out. Introduction To ensure proper use of this product, please read this owner...'s manual carefully and retain for making the task easier. A section whose title has one of the following symbols are applicable only to direct sunlight. Never stick ...
... discs listed below. -RWVR DVD-RW with VR recording mode -RWVideo DVD-RW with a clean cloth. Storing Discs After playing, store the disc in this Manual Notes on the surface. Leave it from the center out. Introduction To ensure proper use of this product, please read this owner...'s manual carefully and retain for making the task easier. A section whose title has one of the following symbols are applicable only to direct sunlight. Never stick ...
Operation Guide
Page 11
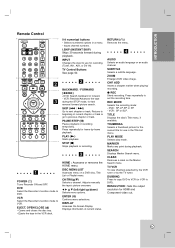
DVD: Search backward or forward. - Returns to previous chapter or track. Adjusts manually the tape's picture onscreen. ADD Inserts a chapter marker when playing/ recording. DVD : SP, LP, EP or XP. - MARKER Marks any point during playback. EJECT, OPEN/...
DVD: Search backward or forward. - Returns to previous chapter or track. Adjusts manually the tape's picture onscreen. ADD Inserts a chapter marker when playing/ recording. DVD : SP, LP, EP or XP. - MARKER Marks any point during playback. EJECT, OPEN/...
Operation Guide
Page 13
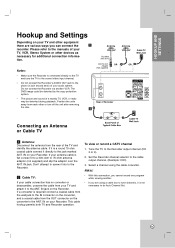
... from the wall jack to the IN connector on the converter, and a coaxial cable from your TV and attach it to a 300-ohm to the manuals of a nearby TV, VCR, or radio may be distorted during playback. Tune the TV to the cable output channel. (Example: CH3) 3. If a converter is flat...
... from the wall jack to the IN connector on the converter, and a coaxial cable from your TV and attach it to a 300-ohm to the manuals of a nearby TV, VCR, or radio may be distorted during playback. Tune the TV to the cable output channel. (Example: CH3) 3. If a converter is flat...
Operation Guide
Page 15
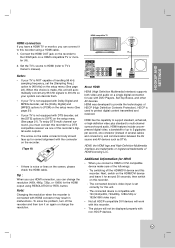
HDMI was developed to TV's Owner's manual). HDMI, the HDMI logo and High-Definition Multimedia Interface are trademarks or registered trademarks of the followings: - To solve the problem, turn it on again ...
HDMI was developed to TV's Owner's manual). HDMI, the HDMI logo and High-Definition Multimedia Interface are trademarks or registered trademarks of the followings: - To solve the problem, turn it on again ...

Operation Guide
Page 16
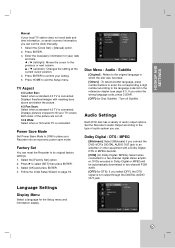
... multi channel surround, you need to activate the Recorder 's digital output. (See [Audio Settings] on your Recorder (MPEG 2, Dolby Digital and DTS). Check the receiver manual and the logos on your receiver, the receiver will need a multi-channel Audio/Video receiver that supports one of the Recorder's DIGITAL AUDIO OUT jacks...
... multi channel surround, you need to activate the Recorder 's digital output. (See [Audio Settings] on your Recorder (MPEG 2, Dolby Digital and DTS). Check the receiver manual and the logos on your receiver, the receiver will need a multi-channel Audio/Video receiver that supports one of the Recorder's DIGITAL AUDIO OUT jacks...

Operation Guide
Page 18
... the [Factory Set] in the setup menu.(see page 21). 18 Press B to choose the [Daylight Savings] option. Press ENTER to confirm your Time Zone manually. 2. v / V (up/down): Changes the setting at the current cursor position. 2. Press ENTER to confirm your antenna connections. b / B (left/right): Moves the ...cursor to turn the unit on, the Initial Setup Wizard function sets the Language, Channels and Clock. 4. Manual 1. Initial Setup Wizard When POWER is pressed for the first time to the previous or next column. Select [Auto] or...
... the [Factory Set] in the setup menu.(see page 21). 18 Press B to choose the [Daylight Savings] option. Press ENTER to confirm your Time Zone manually. 2. v / V (up/down): Changes the setting at the current cursor position. 2. Press ENTER to confirm your antenna connections. b / B (left/right): Moves the ...cursor to turn the unit on, the Initial Setup Wizard function sets the Language, Channels and Clock. 4. Manual 1. Initial Setup Wizard When POWER is pressed for the first time to the previous or next column. Select [Auto] or...
Operation Guide
Page 20
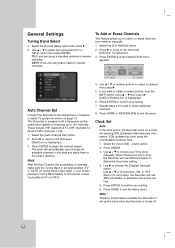
...using a standard antenna to the desired type of receiving up the clock when the Recorder is highlighted. 3. Press HOME to or erase channels from memory manually. 1. To Add or Erase Channels This feature allows you are using v / V then press B. [Add] or [Delete] icon is set ...] icon is equipped with a frequency synthesized tuner capable of antenna or cable TV system as shown previous (Tuning Band Select) to confirm your Time Zone manually. General Settings Tuning Band Select 1. Select the [Clock Set] > [Auto] option. 2. Press ENTER. 3. Add/Del] option. 2. Press ENTER and...
...using a standard antenna to the desired type of receiving up the clock when the Recorder is highlighted. 3. Press HOME to or erase channels from memory manually. 1. To Add or Erase Channels This feature allows you are using v / V then press B. [Add] or [Delete] icon is set ...] icon is equipped with a frequency synthesized tuner capable of antenna or cable TV system as shown previous (Tuning Band Select) to confirm your Time Zone manually. General Settings Tuning Band Select 1. Select the [Clock Set] > [Auto] option. 2. Press ENTER. 3. Add/Del] option. 2. Press ENTER and...
Operation Guide
Page 21
... the Initial Setup Wizard on page 18. Set the Recorder's Audio Output according to the previous or next column. HOOKUP AND SETTINGS Manual If your local TV station does not send date and time information, or sends incorrect information, you can reset the Recorder to confirm..., press CLEAR. [OFF] (for Dolby Digital / MPEG): Select when connected to a two-channel digital stereo amplifier. Select the [Clock Set] > [Manual] option. 2. Press ENTER to its original factory settings. 1. Enter the necessary information for the Setup menu and information display. 21 Power Save Mode Set ...
... the Initial Setup Wizard on page 18. Set the Recorder's Audio Output according to the previous or next column. HOOKUP AND SETTINGS Manual If your local TV station does not send date and time information, or sends incorrect information, you can reset the Recorder to confirm..., press CLEAR. [OFF] (for Dolby Digital / MPEG): Select when connected to a two-channel digital stereo amplifier. Select the [Clock Set] > [Manual] option. 2. Press ENTER to its original factory settings. 1. Enter the necessary information for the Setup menu and information display. 21 Power Save Mode Set ...
Operation Guide
Page 27
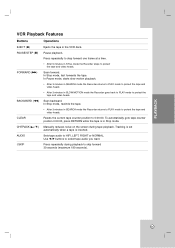
... Recorder goes back to PLAY mode to protect the tape and video heads. Resets the current tape counter position to HIFI, LEFT, RIGHT or NORMAL. Manually reduces noise on the screen during playback to select tape audio you want. Use b/B buttons to skip forward 30 seconds (maximum 180 seconds). In Stop...
... Recorder goes back to PLAY mode to protect the tape and video heads. Resets the current tape counter position to HIFI, LEFT, RIGHT or NORMAL. Manually reduces noise on the screen during playback to select tape audio you want. Use b/B buttons to skip forward 30 seconds (maximum 180 seconds). In Stop...
Operation Guide
Page 39
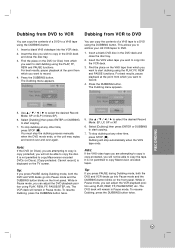
... copy the contents of a DVD to copy the disc. Find the place on the DVD (or Disc) from which you will stop the dubbing process manually when the DVD movie ends, or the unit may replay and record over and over again. You can adjust the VCR playback position using the...
... copy the contents of a DVD to copy the disc. Find the place on the DVD (or Disc) from which you will stop the dubbing process manually when the DVD movie ends, or the unit may replay and record over and over again. You can adjust the VCR playback position using the...
Operation Guide
Page 43
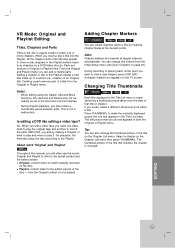
From the Original and Playlist menu you can also change this manual, you will often see [Auto Chapter] on the Chapter List menu then press THUMBNAIL. This is represented by a thumbnail picture taken from the Initial Setup ...
From the Original and Playlist menu you can also change this manual, you will often see [Auto Chapter] on the Chapter List menu then press THUMBNAIL. This is represented by a thumbnail picture taken from the Initial Setup ...
Operation Guide
Page 49
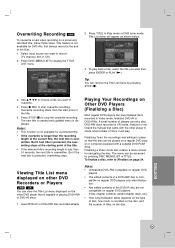
... Video mode, finalized DVD+R or DVD+RWs. Tip: You can be accessed by pressing STOP (x). 3. Overwrite recording starts from the start overwrite recording. Check the manual that the disc can remove the Title List menu by pressing DISC MENU/LIST or TITLE. HOOKUP AND INTRODUCTION SETTINGS PLAYBACK Overwriting Recording +RW To...
... Video mode, finalized DVD+R or DVD+RWs. Tip: You can be accessed by pressing STOP (x). 3. Overwrite recording starts from the start overwrite recording. Check the manual that the disc can remove the Title List menu by pressing DISC MENU/LIST or TITLE. HOOKUP AND INTRODUCTION SETTINGS PLAYBACK Overwriting Recording +RW To...
Operation Guide
Page 52
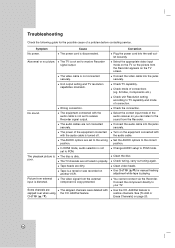
... is not set to restore channels. See [To Add or Erase Channels] on the equipment connected with the CH. Troubleshooting Check the following guide for manual tracking adjustment while tape is dirty. Symptom No power. Cause The power cord is not connected securely. Abnormal or no picture. The video cable is...
... is not set to restore channels. See [To Add or Erase Channels] on the equipment connected with the CH. Troubleshooting Check the following guide for manual tracking adjustment while tape is dirty. Symptom No power. Cause The power cord is not connected securely. Abnormal or no picture. The video cable is...


