
Operation Guide
Page 2
... a risk of important operating and maintenance (servicing) instructions in a particular installation. Protect the power cord from that the plug is : LG Electronics U.S.A., Inc.,1000 Sylvan Avenue, Englewood Cliffs, NJ. However, there is , a single outlet circuit which powers only that appliance and has no guarantee that may generate or use of the following measures Reorient or relocate the receiving antenna. Increase...
... a risk of important operating and maintenance (servicing) instructions in a particular installation. Protect the power cord from that the plug is : LG Electronics U.S.A., Inc.,1000 Sylvan Avenue, Englewood Cliffs, NJ. However, there is , a single outlet circuit which powers only that appliance and has no guarantee that may generate or use of the following measures Reorient or relocate the receiving antenna. Increase...
Operation Guide
Page 3
... INSTRUCTIONS CAUTION: PLEASE READ AND OBSERVE ALL WARNINGS AND INSTRUCTIONS IN THIS OWNER'S MANUAL. Improper use attachments/accessories specified by the user. All these safety and operating instructions should be read before cleaning. All warnings on or pinched particularly at plugs, convenience receptacles, and the point where they exit from the product. 11. Follow all warnings. - Do not install near any parts...
... INSTRUCTIONS CAUTION: PLEASE READ AND OBSERVE ALL WARNINGS AND INSTRUCTIONS IN THIS OWNER'S MANUAL. Improper use attachments/accessories specified by the user. All these safety and operating instructions should be read before cleaning. All warnings on or pinched particularly at plugs, convenience receptacles, and the point where they exit from the product. 11. Follow all warnings. - Do not install near any parts...

Operation Guide
Page 4
... ...22 S-VHS Quasi Playback (SQPB) ...22 General Playback Features - VCR ...12 General Operation ...12 CLOCK ...12 PROGRAM ...12 SETUP ...13 Displaying Disc Information on Copyrights ...Front Panel ...Remote Control ...About the Remote Control . . DVD ...23 Additional Features ...24 Playing an Audio CD or MP3/WMA file ...25 Programmed Playback ...25 Repeat Programmed Tracks ...25 Erasing a Track from DVD to an Amplifier ...11 Initial Settings - Rear Panel ...5 ...5 ...6 ...6 ...6 ...7 ...8 ...8 ...9 Operation ...18 VCR Tape Playback ...18 Basic Instructions ...18 Auto Tracking ...18 Manual...
... ...22 S-VHS Quasi Playback (SQPB) ...22 General Playback Features - VCR ...12 General Operation ...12 CLOCK ...12 PROGRAM ...12 SETUP ...13 Displaying Disc Information on Copyrights ...Front Panel ...Remote Control ...About the Remote Control . . DVD ...23 Additional Features ...24 Playing an Audio CD or MP3/WMA file ...25 Programmed Playback ...25 Repeat Programmed Tracks ...25 Erasing a Track from DVD to an Amplifier ...11 Initial Settings - Rear Panel ...5 ...5 ...6 ...6 ...6 ...7 ...8 ...8 ...9 Operation ...18 VCR Tape Playback ...18 Basic Instructions ...18 Auto Tracking ...18 Manual...
Operation Guide
Page 6
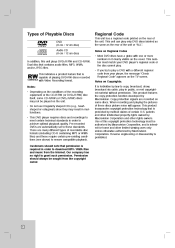
... Macrovision Corporation. When recording and playing the pictures of the unit. Use of this unit plays DVD±R/RW and CD-R/RW, Dual disc that is capable of playing DVD-RW discs recorded with Video Recording format. Regional Code This unit has a regional code printed on the rear of these require certain pre-existing conditions (see above) to copy, broadcast, show, broadcast via cable, play in order to play only DVD discs labeled as the...
... Macrovision Corporation. When recording and playing the pictures of the unit. Use of this unit plays DVD±R/RW and CD-R/RW, Dual disc that is capable of playing DVD-RW discs recorded with Video Recording format. Regional Code This unit has a regional code printed on the rear of these require certain pre-existing conditions (see above) to copy, broadcast, show, broadcast via cable, play in order to play only DVD discs labeled as the...
Operation Guide
Page 7
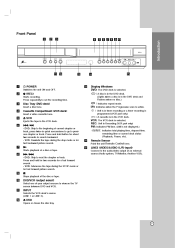
... Flashes when no disc.) c d e f Disc Tray (DVD deck) Insert a disc here. VCR: Advances the tape during the stop mode or for fast forward picture search. LINE2 (VIDEO/AUDIO (L/R) input) Connect to set the recording time. Display Windows DVD: The DVD deck is selected. : A disc is in quick successions to go to next the chapter or track. i j x Stops playback of a disc or tape. Press repeatedly to the audio/video output of an external source (Audio system, TV/Monitor, Another VCR). DVD: Skip to the...
... Flashes when no disc.) c d e f Disc Tray (DVD deck) Insert a disc here. VCR: Advances the tape during the stop mode or for fast forward picture search. LINE2 (VIDEO/AUDIO (L/R) input) Connect to set the recording time. Display Windows DVD: The DVD deck is selected. : A disc is in quick successions to go to next the chapter or track. i j x Stops playback of a disc or tape. Press repeatedly to the audio/video output of an external source (Audio system, TV/Monitor, Another VCR). DVD: Skip to the...

Operation Guide
Page 8
.... AAA AAA 8 SETUP/MENU : Accesses or removes DVD Setup menu and VCR menu. Press repeatedly for fast backward/forward picture search. c AUDIO : Selects an audio language (DVD). ANGLE : Selects a DVD camera angle, if available. z (REC/ITR) : Starts recording. RANDOM : Plays tracks in a menu. Z (OPEN/CLOSE) : Opens and closes the disc tray. Do not mix old and new batteries and never mix different types of the remote sensor. Angle: About 30° in each direction of the front of recording. Displays functions on the rear of current chapter...
.... AAA AAA 8 SETUP/MENU : Accesses or removes DVD Setup menu and VCR menu. Press repeatedly for fast backward/forward picture search. c AUDIO : Selects an audio language (DVD). ANGLE : Selects a DVD camera angle, if available. z (REC/ITR) : Starts recording. RANDOM : Plays tracks in a menu. Z (OPEN/CLOSE) : Opens and closes the disc tray. Do not mix old and new batteries and never mix different types of the remote sensor. Angle: About 30° in each direction of the front of recording. Displays functions on the rear of current chapter...

Operation Guide
Page 10
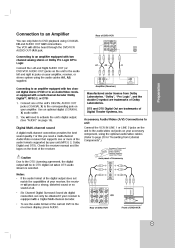
... copy protection system. L R Component Video / Progressive Scan connection If your TV, VCR, stereo system or other or turn off the unit after removing the disc. Connect the COMPONENT/PROGRESSIVE SCAN VIDEO OUT jacks on the unit to the manuals of the unit's progressive scan output for additional connection information. Pr Pb Y R L COMPONENT/PROGRESSIVE SCAN VIDEO INPUT AUDIO INPUT Rear of a nearby TV, VCR, or radio may be displayed unstably on the TV using the video cable supplied (V). 2. The DVD image could be distorted during playback...
... copy protection system. L R Component Video / Progressive Scan connection If your TV, VCR, stereo system or other or turn off the unit after removing the disc. Connect the COMPONENT/PROGRESSIVE SCAN VIDEO OUT jacks on the unit to the manuals of the unit's progressive scan output for additional connection information. Pr Pb Y R L COMPONENT/PROGRESSIVE SCAN VIDEO INPUT AUDIO INPUT Rear of a nearby TV, VCR, or radio may be displayed unstably on the TV using the video cable supplied (V). 2. The DVD image could be distorted during playback...
Operation Guide
Page 11
... of DVD+VCR A1 A2 X L R COAXIAL Amplifier (Receiver) Manufactured under license from External Components".) Digital Multi-channel sound A digital multi-channel connection provides the best sound quality. Six Channel Digital Surround Sound via digital connection can only listen to DVD playback using the optional audio/video cables. (Refer to page 20 for "Recording from Dolby Laboratories. Check the receiver manual and the logos on your amplifier, receiver, or stereo system using the audio cables (A1, A2) supplied. To see the audio format of the audio formats supported by...
... of DVD+VCR A1 A2 X L R COAXIAL Amplifier (Receiver) Manufactured under license from External Components".) Digital Multi-channel sound A digital multi-channel connection provides the best sound quality. Six Channel Digital Surround Sound via digital connection can only listen to DVD playback using the optional audio/video cables. (Refer to page 20 for "Recording from Dolby Laboratories. Check the receiver manual and the logos on your amplifier, receiver, or stereo system using the audio cables (A1, A2) supplied. To see the audio format of the audio formats supported by...
Operation Guide
Page 12
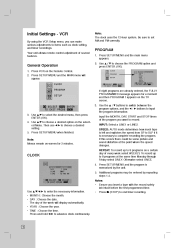
... allows remote control adjustment of the week will appear. Then use b/B to 8 programs at the point where the speed changes. INPUT: Select a LINE1 or LINE2. VCR By using the VCR Setup menu, you insert a tape with the record safety tab intact before the first programmed time. PROGRAM 1. Note: Menus remain on the Remote Control. 2. Press SETUP/MENU and the main menu appears. 2. Use v/V to set AM and PM correctly. Additional programs may be some picture and sound...
... allows remote control adjustment of the week will appear. Then use b/B to 8 programs at the point where the speed changes. INPUT: Select a LINE1 or LINE2. VCR By using the VCR Setup menu, you insert a tape with the record safety tab intact before the first programmed time. PROGRAM 1. Note: Menus remain on the Remote Control. 2. Press SETUP/MENU and the main menu appears. 2. Use v/V to set AM and PM correctly. Additional programs may be some picture and sound...
Operation Guide
Page 13
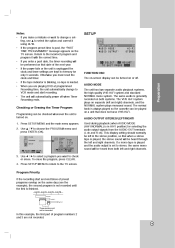
... not have VHS Hi-Fi. To erase the program, press CLEAR. 4. SETUP • • • FUNCTION OSD The on-screen display can be heard from the AUDIO OUT terminals (L ch and R ch). The same audio is played, the stereo sound will automatically power off . Press SETUP/MENU and the main menu appears. 2. Notes: • If you are playing DVD at programmed Recording time, the unit automatically change a setting, use v to select the option...
... not have VHS Hi-Fi. To erase the program, press CLEAR. 4. SETUP • • • FUNCTION OSD The on-screen display can be heard from the AUDIO OUT terminals (L ch and R ch). The same audio is played, the stereo sound will automatically power off . Press SETUP/MENU and the main menu appears. 2. Notes: • If you are playing DVD at programmed Recording time, the unit automatically change a setting, use v to select the option...
Operation Guide
Page 15
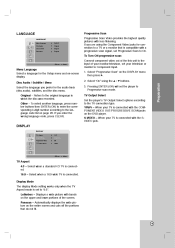
...language code, press CLEAR. Original - Other - If you are using the v / V buttons. 3. Pressing ENTER (OK) will set the player to the original language in which the disc was recorded. TV Output Select Set the player's TV Output Select options according to Component Input. 1. DISPLAY DISPLAY TV Aspect Display Mode Progressive Scan TV Output select 16:9 Widescree Off YPbPr Move Select TV Aspect 4:3 - YPbPr - When your television or monitor to the TV connection type. LANGUAGE LANGUAGE Menu Language Disc Audio Disc Subtitle Disc Menu English Original Original Original Progressive Scan...
...language code, press CLEAR. Original - Other - If you are using the v / V buttons. 3. Pressing ENTER (OK) will set the player to the original language in which the disc was recorded. TV Output Select Set the player's TV Output Select options according to Component Input. 1. DISPLAY DISPLAY TV Aspect Display Mode Progressive Scan TV Output select 16:9 Widescree Off YPbPr Move Select TV Aspect 4:3 - YPbPr - When your television or monitor to the TV connection type. LANGUAGE LANGUAGE Menu Language Disc Audio Disc Subtitle Disc Menu English Original Original Original Progressive Scan...
Operation Guide
Page 16
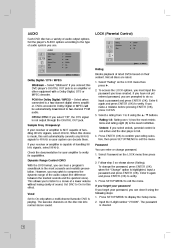
...): If you are rated. 1. DRC Vocal Bitstream Bitstream PCM 48 kHz LOCK (Parental Control) LOCK Rating Password Area Unlock New US Move On Off Select Rating Move Select Blocks playback of audio output options. Enter it again and press ENTER (OK) to two-channel PCM audio. Select a rating from 1 to 48 kHz so your receiver or amplifier is cleared. To change password. 1. Dolby Digital / DTS / MPEG Bitstream - DVDs encoded in full. 4. However, you...
...): If you are rated. 1. DRC Vocal Bitstream Bitstream PCM 48 kHz LOCK (Parental Control) LOCK Rating Password Area Unlock New US Move On Off Select Rating Move Select Blocks playback of audio output options. Enter it again and press ENTER (OK) to two-channel PCM audio. Select a rating from 1 to 48 kHz so your receiver or amplifier is cleared. To change password. 1. Dolby Digital / DTS / MPEG Bitstream - DVDs encoded in full. 4. However, you...

Operation Guide
Page 18
... power cord is automatically selected by -Frame Playback 1. Note: After 5 minutes in STILL mode the unit stops to be observed during playback. VCR Tape Playback Press the VCR button to select the device to protect the tape and video heads. 18 Turn on automatically. 4. During the high-speed picture search modes, the audio is played for more than 3 seconds. To return to scratches on the Remote Control. 3. Tracking is automatically reset to remove...
... power cord is automatically selected by -Frame Playback 1. Note: After 5 minutes in STILL mode the unit stops to be observed during playback. VCR Tape Playback Press the VCR button to select the device to protect the tape and video heads. 18 Turn on automatically. 4. During the high-speed picture search modes, the audio is played for more than 3 seconds. To return to scratches on the Remote Control. 3. Tracking is automatically reset to remove...
Operation Guide
Page 20
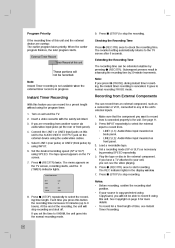
... recording mode. • 20 Extending the Recording Time Timer Record of the unit's external inputs. 1. Make sure that the component you press X (PAUSE) during instant timer recording, the instant timer recording is connected properly to the unit. If your unit, you are overlap: The earlier program takes priority. Press x (STOP) repeatedly to stop the recording. Turn on back panel. INSTANT TIMER RECORD Recording from another source via audio/video input jacks (at the rear or front panel). 4. Press INPUT repeatedly to select...
... recording mode. • 20 Extending the Recording Time Timer Record of the unit's external inputs. 1. Make sure that the component you press X (PAUSE) during instant timer recording, the instant timer recording is connected properly to the unit. If your unit, you are overlap: The earlier program takes priority. Press x (STOP) repeatedly to stop the recording. Turn on back panel. INSTANT TIMER RECORD Recording from another source via audio/video input jacks (at the rear or front panel). 4. Press INPUT repeatedly to select...
Operation Guide
Page 21
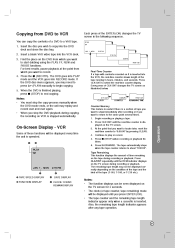
... tape operation. 21 Operation On-Screen Display - At the point that you stop the copy process manually when the DVD movie ends, or the unit may need to press H (PLAY) manually to begin copying. 5. The remaining tape length may not be displayed correctly depending on it is stopped automatically. Insert a blank VHS video tape into RECORD mode. Every press of tape you want to locate later, reset the real-time...
... tape operation. 21 Operation On-Screen Display - At the point that you stop the copy process manually when the DVD movie ends, or the unit may need to press H (PLAY) manually to begin copying. 5. The remaining tape length may not be displayed correctly depending on it is stopped automatically. Insert a blank VHS video tape into RECORD mode. Every press of tape you want to locate later, reset the real-time...
Operation Guide
Page 24
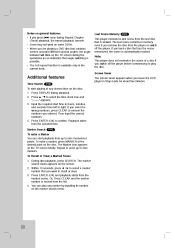
... b / B to select a marker number that you remove the disc from the player or switch off the player before commencing to right. Press DISPLAY during playback. 2. Marker Search DVD To enter a Marker You can play the disc. The last scene remains in memory even if you want to remove the numbers you leave the DVD player in Stop mode for about five minutes. Screen Saver Additional features Time Search DVD The screen saver...
... b / B to select a marker number that you remove the disc from the player or switch off the player before commencing to right. Press DISPLAY during playback. 2. Marker Search DVD To enter a Marker You can play the disc. The last scene remains in memory even if you want to remove the numbers you leave the DVD player in Stop mode for about five minutes. Screen Saver Additional features Time Search DVD The screen saver...
Operation Guide
Page 25
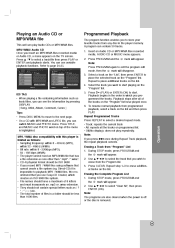
...(No display): does not play Audio CDs or MP3/WMA files. Playback stops after all the tracks on the "Program" list. Repeat Programmed Tracks Press REPEAT to select a track/file then press PLAY or ENTER and playback starts. Erasing a Track from the Program list. 3. Use v V b B to erase from "Program" List 1. MP3 / WMA disc compatibility with MP3/WMA and JPEG file, you can contain 30 tracks. 1. We recommend that you use variable playback functions. Press v / V to select a desired repeat mode...
...(No display): does not play Audio CDs or MP3/WMA files. Playback stops after all the tracks on the "Program" list. Repeat Programmed Tracks Press REPEAT to select a track/file then press PLAY or ENTER and playback starts. Erasing a Track from the Program list. 3. Use v V b B to erase from "Program" List 1. MP3 / WMA disc compatibility with MP3/WMA and JPEG file, you can contain 30 tracks. 1. We recommend that you use variable playback functions. Press v / V to select a desired repeat mode...
Operation Guide
Page 26
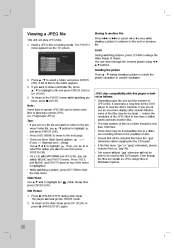
... be read the disc's contents. Use v V b B to enlarge the video image (3 steps). To return to the slide show . Rotating the picture Press v / V during slide show , press H (PLAY) or press X (PAUSE/STEP) again. (Slide Show) then JPEG disc compatibility with MP3/WMA and JPEG file, you can switch MUSIC and PHOTO menu. Press v / V to the PHOTO menu while watching pictures, press x (STOP). To return to select...
... be read the disc's contents. Use v V b B to enlarge the video image (3 steps). To return to the slide show . Rotating the picture Press v / V during slide show , press H (PLAY) or press X (PAUSE/STEP) again. (Slide Show) then JPEG disc compatibility with MP3/WMA and JPEG file, you can switch MUSIC and PHOTO menu. Press v / V to the PHOTO menu while watching pictures, press x (STOP). To return to select...
Operation Guide
Page 27
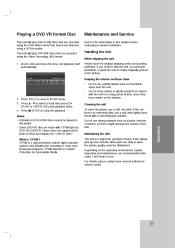
... to move to stop the playback. Press x (STOP) to the list menu. 3. Maintaining the Unit The unit is 'CPRM'? Cleaning the unit To clean the player, use volatile liquids such as it was originally packed at the factory. If the surfaces are extremely dirty, use . If the optical pick-up lens and disc drive parts are recorded using the DVD-Video format that are recorded using a DVD-recorder. since they leave...
... to move to stop the playback. Press x (STOP) to the list menu. 3. Maintaining the Unit The unit is 'CPRM'? Cleaning the unit To clean the player, use volatile liquids such as it was originally packed at the factory. If the surfaces are extremely dirty, use . If the optical pick-up lens and disc drive parts are recorded using the DVD-Video format that are recorded using a DVD-recorder. since they leave...
Operation Guide
Page 29
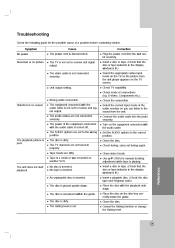
The video cable is not placed within the guide. The power of the audio receiver so you can listen to the sound from the unit player appears on the disc tray correctly inside the guide. The unit does not start playback. The disc is not connected securely. Select the correct input mode of the equipment connected with the playback side down . Set the AUDIO options to receive unit signal output. Cancel the Rating function or change the...
The video cable is not placed within the guide. The power of the audio receiver so you can listen to the sound from the unit player appears on the disc tray correctly inside the guide. The unit does not start playback. The disc is not connected securely. Select the correct input mode of the equipment connected with the playback side down . Set the AUDIO options to receive unit signal output. Cancel the Rating function or change the...


