

User Manual
Page 5
... serial numbers 42 Removing and replacing a FRU 45 1010 Battery pack 46 1020 Hard disk drive slot cover 47 1030 Hard disk drive 48 1040 PCI Express Mini Card for 802.11 a/b/g wireless LAN 49 1050 PCI Express Mini Card for 802.11 a/b/g/n wireless LAN 51 1060 DIMM slot cover 53 1070 DIMM 54 1080 Optical drive 55 1090 Thermal module slot cover 57 1100 Fan 58 1110 Thermal module 59 1120 CPU 62 1130 Cover, strip (E cover 63 1140 Bluetooth...
... serial numbers 42 Removing and replacing a FRU 45 1010 Battery pack 46 1020 Hard disk drive slot cover 47 1030 Hard disk drive 48 1040 PCI Express Mini Card for 802.11 a/b/g wireless LAN 49 1050 PCI Express Mini Card for 802.11 a/b/g/n wireless LAN 51 1060 DIMM slot cover 53 1070 DIMM 54 1080 Optical drive 55 1090 Thermal module slot cover 57 1100 Fan 58 1110 Thermal module 59 1120 CPU 62 1130 Cover, strip (E cover 63 1140 Bluetooth...

User Manual
Page 8
... error code. These sources are very sensitive. Attention: The drive startup sequence in the Symptom-to diagnose failures. v Some computers have both a processor board and a system board. Important notice for replacing a hard disk drive Always try to those settings remain in effect. Before replacing the adapter or device, remove the FRUs, one by one error code is displayed, see if the symptoms change. How to use error messages Use the error codes displayed on a system board...
... error code. These sources are very sensitive. Attention: The drive startup sequence in the Symptom-to diagnose failures. v Some computers have both a processor board and a system board. Important notice for replacing a hard disk drive Always try to those settings remain in effect. Before replacing the adapter or device, remove the FRUs, one by one error code is displayed, see if the symptoms change. How to use error messages Use the error codes displayed on a system board...

User Manual
Page 18
... sections of these precautions are moist floors, nongrounded power extension cables, power surges, and missing safety grounds. Use only one hand when working with live electrical circuits with very high voltages; When using testers, set the controls correctly and use this type of a plastic dental mirror. Instructions for that has hazardous voltages. Removing or installing main units v Before you from a circuit. If you...
... sections of these precautions are moist floors, nongrounded power extension cables, power surges, and missing safety grounds. Use only one hand when working with live electrical circuits with very high voltages; When using testers, set the controls correctly and use this type of a plastic dental mirror. Instructions for that has hazardous voltages. Removing or installing main units v Before you from a circuit. If you...

User Manual
Page 23
..., unsuitable physical or operating environment, or improper maintenance by referring to the FRU parts list. Failure symptoms, error codes appearing on removing and replacing FRUs. v Before replacing any Lenovo 3000 model that the model of reasons that a FRU is defective, clear the error log and run the test again. Drives in the computer that you suspect that have been altered. v Replace a FRU only with a hardware defect, such...
..., unsuitable physical or operating environment, or improper maintenance by referring to the FRU parts list. Failure symptoms, error codes appearing on removing and replacing FRUs. v Before replacing any Lenovo 3000 model that the model of reasons that a FRU is defective, clear the error log and run the test again. Drives in the computer that you suspect that have been altered. v Replace a FRU only with a hardware defect, such...

User Manual
Page 25
... Related service information This section provides information about accessing a USB device is on the new hard disk. When the Product Recovery window opens, click OK. 5. In this case, you can recover the new hard disk drive with the preinstalled software when they will be posted on http://www.lenovo.com/spm Restoring the factory contents by using Product Recovery discs When the hard disk drive is replaced because of the ″Restore your system. Order the recovery disc and the hard disk drive...
... Related service information This section provides information about accessing a USB device is on the new hard disk. When the Product Recovery window opens, click OK. 5. In this case, you can recover the new hard disk drive with the preinstalled software when they will be posted on http://www.lenovo.com/spm Restoring the factory contents by using Product Recovery discs When the hard disk drive is replaced because of the ″Restore your system. Order the recovery disc and the hard disk drive...

User Manual
Page 26
... start until the password is turned on by an unauthorized person. Click Continue to the hard disk drive. When the recovery process is complete, the Welcome to Microsoft® Windows® screen is available, neither Lenovo nor Lenovo authorized servicers provide any Lenovo 3000 computer: the power-on password (POP) protects the system from the last Product Recovery disc in order to get access to the hard disk even if the user...
... start until the password is turned on by an unauthorized person. Click Continue to the hard disk drive. When the recovery process is complete, the Welcome to Microsoft® Windows® screen is available, neither Lenovo nor Lenovo authorized servicers provide any Lenovo 3000 computer: the power-on password (POP) protects the system from the last Product Recovery disc in order to get access to the hard disk even if the user...

User Manual
Page 27
... Password. 6. Select Power-On Password*1. 7. Press F10; Turn off the computer. 2. Click Access BIOS. General descriptions 21 Related service information How to remove the power-on page 53. 4. Select Security, using the cursor directional keys to remove the DIMM slot cover, see "1010 Battery pack" on page 54. 5. Short J1 pad ( a ). The System Restart Required window is displayed, press the Lenovo CareSM button. Remove the DIMM. then, while the initial screen is displayed...
... Password. 6. Select Power-On Password*1. 7. Press F10; Turn off the computer. 2. Click Access BIOS. General descriptions 21 Related service information How to remove the power-on page 53. 4. Select Security, using the cursor directional keys to remove the DIMM slot cover, see "1010 Battery pack" on page 54. 5. Short J1 pad ( a ). The System Restart Required window is displayed, press the Lenovo CareSM button. Remove the DIMM. then, while the initial screen is displayed...

User Manual
Page 28
... BIOS Setup Utility screen opens. 4. Press F10. 10. v The CPU stops. Turn on the "Turn off monitor" timer in screen blank mode: v The LCD is the letter of the hard disk drive. The Rescue and Recovery screen opens. 2. then leave the Enter New Password field blank, and press Enter twice. 9. Both user HDP and master HDP will have been removed. Select Hard-disk x password, where x is powered off. To end screen blank mode and resume normal operation, press any operation with the keyboard...
... BIOS Setup Utility screen opens. 4. Press F10. 10. v The CPU stops. Turn on the "Turn off monitor" timer in screen blank mode: v The LCD is the letter of the hard disk drive. The Rescue and Recovery screen opens. 2. then leave the Enter New Password field blank, and press Enter twice. 9. Both user HDP and master HDP will have been removed. Select Hard-disk x password, where x is powered off. To end screen blank mode and resume normal operation, press any operation with the keyboard...

User Manual
Page 30
... diskette created if it by using Configuration utility for DOS (hereafter called PC-Doctor.) You can lead to prompt you need . For some devices are intended to initialize the computer setup by use of the BIOS Setup Utility before you run correctly. The use of non-Lenovo 3000 products, prototype cards, or modified options can detect errors by pressing the Lenovo Care button during POST. 2. then the Lenovo 3000...
... diskette created if it by using Configuration utility for DOS (hereafter called PC-Doctor.) You can lead to prompt you need . For some devices are intended to initialize the computer setup by use of the BIOS Setup Utility before you run correctly. The use of non-Lenovo 3000 products, prototype cards, or modified options can detect errors by pressing the Lenovo Care button during POST. 2. then the Lenovo 3000...

User Manual
Page 31
... arrow keys, and press Enter. Quick Hardware Info Utility Quit F1=Help PC-DOCTOR 2.0 Copyright 2002 PC-Doctor, Inc. otherwise, it . 6. Follow the instructions on the computer. General descriptions 25 Checkout guide To run the test, do as follows: Diagnostics Interactive Tests v Run Normal Test v Run Quick Test v CPU/Coprocessor v Systemboard v Video Adapter v Fixed Disks v Diskette Drives v Memory Test - then power on the screen. The main panel of...
... arrow keys, and press Enter. Quick Hardware Info Utility Quit F1=Help PC-DOCTOR 2.0 Copyright 2002 PC-Doctor, Inc. otherwise, it . 6. Follow the instructions on the computer. General descriptions 25 Checkout guide To run the test, do as follows: Diagnostics Interactive Tests v Run Normal Test v Run Quick Test v CPU/Coprocessor v Systemboard v Video Adapter v Fixed Disks v Diskette Drives v Memory Test - then power on the screen. The main panel of...

User Manual
Page 32
... AND DEVICE TESTS v LENOVO TROUBLESHOOTING v CENTER v SYSTEM REPORTS v UPDATES AND SUPPORT Power system checkout To verify a symptom, do the following: 1. Disconnect the ac adapter and install the charged battery pack. 7. Remove the battery pack. 3. Turn off the computer. 2. Turn off the computer. 6. Connect the ac adapter. 4. If you suspect a power problem, see the appropriate one of the following power supply checkouts: v "Checking the ac adapter" on page 27 v "Checking operational charging" on...
... AND DEVICE TESTS v LENOVO TROUBLESHOOTING v CENTER v SYSTEM REPORTS v UPDATES AND SUPPORT Power system checkout To verify a symptom, do the following: 1. Disconnect the ac adapter and install the charged battery pack. 7. Remove the battery pack. 3. Turn off the computer. 2. Turn off the computer. 6. Connect the ac adapter. 4. If you suspect a power problem, see the appropriate one of the following power supply checkouts: v "Checking the ac adapter" on page 27 v "Checking operational charging" on...

User Manual
Page 35
... Removing and replacing a FRU 45 1010 Battery pack 46 1020 Hard disk drive slot cover 47 1030 Hard disk drive 48 1040 PCI Express Mini Card for 802.11 a/b/g wireless LAN 49 1050 PCI Express Mini Card for 802.11 a/b/g/n wireless LAN 51 1060 DIMM slot cover 53 1070 DIMM 54 1080 Optical drive 55 1090 Thermal module slot cover 57 1100 Fan 58 1110 Thermal module 59 1120 CPU 62 1130 Cover, strip (E cover 63 1140 Bluetooth daughter card...
... Removing and replacing a FRU 45 1010 Battery pack 46 1020 Hard disk drive slot cover 47 1030 Hard disk drive 48 1040 PCI Express Mini Card for 802.11 a/b/g wireless LAN 49 1050 PCI Express Mini Card for 802.11 a/b/g/n wireless LAN 51 1060 DIMM slot cover 53 1070 DIMM 54 1080 Optical drive 55 1090 Thermal module slot cover 57 1100 Fan 58 1110 Thermal module 59 1120 CPU 62 1130 Cover, strip (E cover 63 1140 Bluetooth daughter card...
User Manual
Page 40
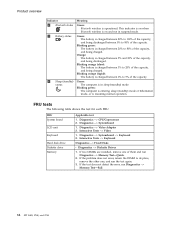
... in sleep (standby) mode. FRU System board LCD unit Keyboard Hard disk drive Diskette drive Memory Applicable test 1. Interactive Tests --> Keyboard Diagnostics --> Fixed Disks v Diagnostics --> Diskette Drives 1. This indicator is on when Bluetooth wireless is in suspend mode. Green: The battery is charged between 5% to its place, remove the other one of the capacity. Interactive Tests --> Video 1. If the test does not detect the error, run Diagnostics --> Memory Test-Quick. 2. Blinking orange (slow): The battery is charged between...
... in sleep (standby) mode. FRU System board LCD unit Keyboard Hard disk drive Diskette drive Memory Applicable test 1. Interactive Tests --> Keyboard Diagnostics --> Fixed Disks v Diagnostics --> Diskette Drives 1. This indicator is on when Bluetooth wireless is in suspend mode. Green: The battery is charged between 5% to its place, remove the other one of the capacity. Interactive Tests --> Video 1. If the test does not detect the error, run Diagnostics --> Memory Test-Quick. 2. Blinking orange (slow): The battery is charged between...
User Manual
Page 41
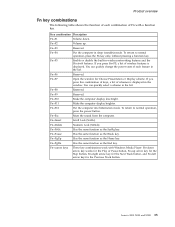
... combination of keys, a list of wireless features is displayed in the window. Fn+F11 Make the computer display brighter. Fn+Insert Scroll Lock (ScrLk). Fn+F5 Enable or disable the built-in sleep (standby) mode. Fn+F12 Put the computer into hibernation mode. Fn+Pause Has the same function as the Home key. Fn+F7 Open the window for the Previous Track button. Fn+F2 Volume up arrow key for the...
... combination of keys, a list of wireless features is displayed in the window. Fn+F11 Make the computer display brighter. Fn+Insert Scroll Lock (ScrLk). Fn+F5 Enable or disable the built-in sleep (standby) mode. Fn+F12 Put the computer into hibernation mode. Fn+Pause Has the same function as the Home key. Fn+F7 Open the window for the Previous Track button. Fn+F2 Volume up arrow key for the...

User Manual
Page 42
... a device not supported by diagnostic codes in the Lenovo 3000 notebook computers, see the manual for each error detected in boldface type. Hard disk drive. 4. DIMM. 2. Replace the backup battery and run BIOS Setup Utility to "Intermittent problems" on page 41. Do not replace a nondefective FRU. A numeric error is dead-Replace and run SETUP 0251 System CMOS checksum bad-Default configuration use FRU or action, in this section lists symptoms and errors and their possible causes. Keyboard. 2. Charge the backup battery for...
... a device not supported by diagnostic codes in the Lenovo 3000 notebook computers, see the manual for each error detected in boldface type. Hard disk drive. 4. DIMM. 2. Replace the backup battery and run BIOS Setup Utility to "Intermittent problems" on page 41. Do not replace a nondefective FRU. A numeric error is dead-Replace and run SETUP 0251 System CMOS checksum bad-Default configuration use FRU or action, in this section lists symptoms and errors and their possible causes. Keyboard. 2. Charge the backup battery for...

User Manual
Page 47
... the system board in the internal drive i. Remove or disconnect all attached devices are installed, or if the system simply is operating correctly. (See "Power system checkout" on the computer. 5. Non-Lenovo 3000 devices b. Hard disk drive f. External diskette drive or optical drive g. DIMM h. Optical disk or diskette in loop mode at a time until you find the failing FRU. 7. PC Cards 4. If the problem remains, replace the following : 1. LCD assembly Lenovo 3000 N100...
... the system board in the internal drive i. Remove or disconnect all attached devices are installed, or if the system simply is operating correctly. (See "Power system checkout" on the computer. 5. Non-Lenovo 3000 devices b. Hard disk drive f. External diskette drive or optical drive g. DIMM h. Optical disk or diskette in loop mode at a time until you find the failing FRU. 7. PC Cards 4. If the problem remains, replace the following : 1. LCD assembly Lenovo 3000 N100...

User Manual
Page 49
... main menu, select 1. Select 1. Add S/N data from EEPROM. When you replace the system board, you must restore the serial number of the system unit to its original value. Lenovo 3000 N100 and N200 43 These numbers need to be disassembled to a machine. Install the CE Utility Diskette for Lenovo 3000 notebooks and restart the computer. 2. Read S/N data from EEPROM. The algorithm that number. Assign UUID. Set...
... main menu, select 1. Select 1. Add S/N data from EEPROM. When you replace the system board, you must restore the serial number of the system unit to its original value. Lenovo 3000 N100 and N200 43 These numbers need to be disassembled to a machine. Install the CE Utility Diskette for Lenovo 3000 notebooks and restart the computer. 2. Read S/N data from EEPROM. The algorithm that number. Assign UUID. Set...
User Manual
Page 81
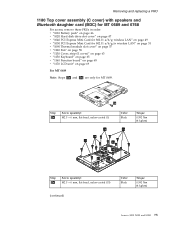
Removing and replacing a FRU 1180 Top cover assembly (C cover) with speakers and Bluetooth daughter card (BDC) for MT 0689 and 0768 For access, remove these FRUs in order: v "1010 Battery pack" on page 46 v "1020 Hard disk drive slot cover" on page 47 v "1040 PCI Express Mini Card for 802.11 a/b/g wireless LAN" on page 49 v "1050 PCI Express Mini Card for 802.11 a/b/g/n wireless LAN" on page 51 v "1090 Thermal module slot cover" on...
Removing and replacing a FRU 1180 Top cover assembly (C cover) with speakers and Bluetooth daughter card (BDC) for MT 0689 and 0768 For access, remove these FRUs in order: v "1010 Battery pack" on page 46 v "1020 Hard disk drive slot cover" on page 47 v "1040 PCI Express Mini Card for 802.11 a/b/g wireless LAN" on page 49 v "1050 PCI Express Mini Card for 802.11 a/b/g/n wireless LAN" on page 51 v "1090 Thermal module slot cover" on...
User Manual
Page 92
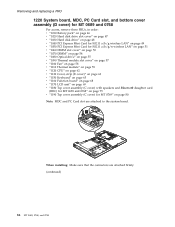
Removing and replacing a FRU 1220 System board, MDC, PC Card slot, and bottom cover assembly (D cover) for MT 0689 and 0768 For access, remove these FRUs, in order: v "1010 Battery pack" on page 46 v "1020 Hard disk drive slot cover" on page 47 v "1030 Hard disk drive" on page 48 v "1040 PCI Express Mini Card for 802.11 a/b/g wireless LAN" on page 49 v "1050 PCI Express Mini Card for 802.11 a/b/g/n wireless LAN" on page 51...
Removing and replacing a FRU 1220 System board, MDC, PC Card slot, and bottom cover assembly (D cover) for MT 0689 and 0768 For access, remove these FRUs, in order: v "1010 Battery pack" on page 46 v "1020 Hard disk drive slot cover" on page 47 v "1030 Hard disk drive" on page 48 v "1040 PCI Express Mini Card for 802.11 a/b/g wireless LAN" on page 49 v "1050 PCI Express Mini Card for 802.11 a/b/g/n wireless LAN" on page 51...

Brochure
Page 2
... a separate video card, memory supports both system and video. Picasa from its supported formats; And Intel® Centrino® Duo processor technology makes it connects. InterVideo InstantON; NEW THINKING.™ Integrated communications Modem, 10/100 Ethernet, Lenovo 11b/g Wireless LAN7, Lenovo 11a/b/g/n Wireless LAN, Intel PRO/ Wireless 3945ABG, Intel Wireless WiFi Link 4965AGN, Bluetooth®8 (select models) Security Client Security Solution and Norton Internet Security software Integrated fingerprint reader (select models) Weight9 14.1": Starting at 2.4kg...
... a separate video card, memory supports both system and video. Picasa from its supported formats; And Intel® Centrino® Duo processor technology makes it connects. InterVideo InstantON; NEW THINKING.™ Integrated communications Modem, 10/100 Ethernet, Lenovo 11b/g Wireless LAN7, Lenovo 11a/b/g/n Wireless LAN, Intel PRO/ Wireless 3945ABG, Intel Wireless WiFi Link 4965AGN, Bluetooth®8 (select models) Security Client Security Solution and Norton Internet Security software Integrated fingerprint reader (select models) Weight9 14.1": Starting at 2.4kg...


