
User Manual
Page 4
... 3010 ThinkPad Dock II PCI cover. . . . . . 182 3020 ThinkPad Dock II top cover 183 Locations 186 Front view 186 Rear view 188 Bottom view 189 Parts list 190 Overall 191 iv T40/T40p, T41/T41p, T42/T42p LCD models) . . 91 1120 Mini PCI adapter 97 1130 Fan assembly 101 1140 Backup...
... 3010 ThinkPad Dock II PCI cover. . . . . . 182 3020 ThinkPad Dock II top cover 183 Locations 186 Front view 186 Rear view 188 Bottom view 189 Parts list 190 Overall 191 iv T40/T40p, T41/T41p, T42/T42p LCD models) . . 91 1120 Mini PCI adapter 97 1130 Fan assembly 101 1140 Backup...

User Manual
Page 7
...: v The common sections provide general information, guidelines, and safety information required in servicing computers. v The product-specific section includes service, reference, and product-specific parts information. About this manual along with the advanced diagnostic tests to troubleshoot problems. The manual is intended for ThinkPad® T40/T40p, T41/T41p, T42...review the safety information under "Safety notices: multilingual translations" on page 4, "Safety information" on page 16, and "Laser compliance statement" on page 22. © Lenovo 2006. Portions © IBM Corp. 2006. 1
...: v The common sections provide general information, guidelines, and safety information required in servicing computers. v The product-specific section includes service, reference, and product-specific parts information. About this manual along with the advanced diagnostic tests to troubleshoot problems. The manual is intended for ThinkPad® T40/T40p, T41/T41p, T42...review the safety information under "Safety notices: multilingual translations" on page 4, "Safety information" on page 16, and "Laser compliance statement" on page 22. © Lenovo 2006. Portions © IBM Corp. 2006. 1

User Manual
Page 9
... board, and then replace the other one. Strategy for replacing FRUs Before replacing parts Make sure that changed the symptoms. Attention: The setup configuration on the customer support site http://www.lenovo.com/support Advise customers to see if the symptoms change. Customers in obtaining or... installing any FRUs listed in effect. © Lenovo 2006. Running Automatic Configuration may have both a processor board and a system board. Introduction Important service information Important BIOS and...
... board, and then replace the other one. Strategy for replacing FRUs Before replacing parts Make sure that changed the symptoms. Attention: The setup configuration on the customer support site http://www.lenovo.com/support Advise customers to see if the symptoms change. Customers in obtaining or... installing any FRUs listed in effect. © Lenovo 2006. Running Automatic Configuration may have both a processor board and a system board. Introduction Important service information Important BIOS and...
User Manual
Page 22
...electrical conductors. Use a slow lifting force. Do not attempt to lift any other service representatives and the customer's personnel are not in the moving parts of the object equally between your leg muscles; v Before you can be trapped in a hazardous position. If your back. Make sure that ...your eyes. 16 T40/T40p, T41/T41p, T42/T42p v Keep your necktie or scarf inside clothing or fasten it . Make sure that other parts in the area of your toolcase away from all personnel, while you service a ThinkPad computer. General safety Follow these rules to ensure general safety:...
...electrical conductors. Use a slow lifting force. Do not attempt to lift any other service representatives and the customer's personnel are not in the moving parts of the object equally between your leg muscles; v Before you can be trapped in a hazardous position. If your back. Make sure that ...your eyes. 16 T40/T40p, T41/T41p, T42/T42p v Keep your necktie or scarf inside clothing or fasten it . Make sure that other parts in the area of your toolcase away from all personnel, while you service a ThinkPad computer. General safety Follow these rules to ensure general safety:...

User Manual
Page 24
... broken tools and testers. Use extreme care when measuring high voltages. First, check that tester. - Examples of a plastic dental mirror. v Do not service the following parts with the power-off . Ensure that power has been disconnected from their normal operating places in your pocket or behind your work with the reflective...
... broken tools and testers. Use extreme care when measuring high voltages. First, check that tester. - Examples of a plastic dental mirror. v Do not service the following parts with the power-off . Ensure that power has been disconnected from their normal operating places in your pocket or behind your work with the reflective...

User Manual
Page 25
If any unsafe conditions are any non-ThinkPad alterations. 6. Checklist: 1. A third-wire ground connector in the parts list. c. Introduction 19 Check exterior covers for : a. Power off , and the power cord disconnected. Remove the cover. 5. Disconnect the power cord. 3. Use good judgment as ...
If any unsafe conditions are any non-ThinkPad alterations. 6. Checklist: 1. A third-wire ground connector in the parts list. c. Introduction 19 Check exterior covers for : a. Power off , and the power cord disconnected. Remove the cover. 5. Disconnect the power cord. 3. Use good judgment as ...

User Manual
Page 26
... braid, or green-wire ground. - Attach the ESD ground clip to provide a static-free work mat, and the person handling the part are inserted into the product. Most clothing is a difference in protective packages until they exceed the requirements noted here. 2. Make sure that... are wearing a wrist strap. v Prevent the part from touching your body. Check that meets the specific service requirement. Use product-specific ESD procedures when they are all at the same charge...
... braid, or green-wire ground. - Attach the ESD ground clip to provide a static-free work mat, and the person handling the part are inserted into the product. Most clothing is a difference in protective packages until they exceed the requirements noted here. 2. Make sure that... are wearing a wrist strap. v Prevent the part from touching your body. Check that meets the specific service requirement. Use product-specific ESD procedures when they are all at the same charge...

User Manual
Page 31
v Before replacing any ThinkPad model that the model of the machine and the FRU part number are servicing sequence might have nothing to do with another FRU of a single, unreproducible failure.... model. If the error does not recur, do return a FRU, you must include the following information in the parts exchange form or parts return form that you select an incorrect drive, data or programs might not apply to it: __ 1. v Be... FRUs, use new nylon-coated screws. Some descriptions might be sure to the FRU parts list. Single failures can occur for a variety of servicer ©...
v Before replacing any ThinkPad model that the model of the machine and the FRU part number are servicing sequence might have nothing to do with another FRU of a single, unreproducible failure.... model. If the error does not recur, do return a FRU, you must include the following information in the parts exchange form or parts return form that you select an incorrect drive, data or programs might not apply to it: __ 1. v Be... FRUs, use new nylon-coated screws. Some descriptions might be sure to the FRU parts list. Single failures can occur for a variety of servicer ©...
User Manual
Page 32
... by attachment of a nonsupported device v Forgotten computer password (making the computer unusable) v Sticky keys caused by nonwarranted activities: v Missing parts might indicate damage caused by spilling a liquid onto the keyboard The following are not covered under warranty: v LCD panel cracked from the ... caused by liquid spilled into the system v Damage caused by the improper insertion of a PC Card or the installation of the cosmetic parts v Plastic parts, latches, pins, or connectors that the system was detected __ 7. Date on the display, and beep symptoms __ 6. Date of...
... by attachment of a nonsupported device v Forgotten computer password (making the computer unusable) v Sticky keys caused by nonwarranted activities: v Missing parts might indicate damage caused by spilling a liquid onto the keyboard The following are not covered under warranty: v LCD panel cracked from the ... caused by liquid spilled into the system v Damage caused by the improper insertion of a PC Card or the installation of the cosmetic parts v Plastic parts, latches, pins, or connectors that the system was detected __ 7. Date on the display, and beep symptoms __ 6. Date of...
User Manual
Page 50
... II PCI cover. . . . . . 182 3020 ThinkPad Dock II top cover 183 Locations 186 Front view 186 Rear view 188 Bottom view 189 Parts list 190 Overall 191 14.1-in . LCD models 131 1250 VGA and Ultrabay Slim device eject button cable 134 1260 System board and base cover... for 15.0-in . LCD models 145 2010 LCD front bezel for T42/T42p series 242 Miscellaneous parts 243 AC adapters 246 Optional FRUs 247 Common parts list 248 Tools 248 Power cords (system 248 Power cords (ThinkPad Dock II) . . . . . 249 Notices 250 Trademarks 252...
... II PCI cover. . . . . . 182 3020 ThinkPad Dock II top cover 183 Locations 186 Front view 186 Rear view 188 Bottom view 189 Parts list 190 Overall 191 14.1-in . LCD models 131 1250 VGA and Ultrabay Slim device eject button cable 134 1260 System board and base cover... for 15.0-in . LCD models 145 2010 LCD front bezel for T42/T42p series 242 Miscellaneous parts 243 AC adapters 246 Optional FRUs 247 Common parts list 248 Tools 248 Power cords (system 248 Power cords (ThinkPad Dock II) . . . . . 249 Notices 250 Trademarks 252...

User Manual
Page 64
... in POST or system operation. System board 0182 Bad CRC2. Run BIOS Setup Utility. If replacing a FRU does not solve the problem, put the original part back in the EEPROM is not correct. Run BIOS Setup Utility, and save the current setting by pressing F10. 2. This index can be replaced next...
... in POST or system operation. System board 0182 Bad CRC2. Run BIOS Setup Utility. If replacing a FRU does not solve the problem, put the original part back in the EEPROM is not correct. Run BIOS Setup Utility, and save the current setting by pressing F10. 2. This index can be replaced next...

User Manual
Page 72
...: v Plastic to plastic Turn an additional 90 degrees after the screw head touches the surface of the plastic part: 90 degrees more (Cross-section) v Logic card to the "Torque" column for the P/N, see "Miscellaneous parts" on page 243) in your tool bag. v Always use new screws. In the ThinkPad computer, this problem... tighten. Read this machine: v Keep the screw kit (for each step. 66 T40/T40p, T41/T41p, T42/T42p v They are harder to removing and replacing parts. v Each one .
...: v Plastic to plastic Turn an additional 90 degrees after the screw head touches the surface of the plastic part: 90 degrees more (Cross-section) v Logic card to the "Torque" column for the P/N, see "Miscellaneous parts" on page 243) in your tool bag. v Always use new screws. In the ThinkPad computer, this problem... tighten. Read this machine: v Keep the screw kit (for each step. 66 T40/T40p, T41/T41p, T42/T42p v They are harder to removing and replacing parts. v Each one .
User Manual
Page 76
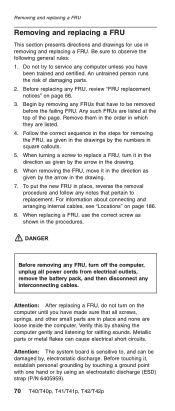
... discharge. When removing the FRU, move it in the direction as shown in place and none are listed at the top of damaging parts. 2. For information about connecting and arranging internal cables, see "Locations" on page 66. 3. DANGER Before removing any interconnecting cables. Metallic...cords from electrical outlets, remove the battery pack, and then disconnect any FRU, turn off the computer, unplug all screws, springs, and other small parts are listed. 4. Any such FRUs are loose inside the computer. To put the new FRU in place, reverse the removal procedure and follow any...
... discharge. When removing the FRU, move it in the direction as shown in place and none are listed at the top of damaging parts. 2. For information about connecting and arranging internal cables, see "Locations" on page 66. 3. DANGER Before removing any interconnecting cables. Metallic...cords from electrical outlets, remove the battery pack, and then disconnect any FRU, turn off the computer, unplug all screws, springs, and other small parts are listed. 4. Any such FRUs are loose inside the computer. To put the new FRU in place, reverse the removal procedure and follow any...
User Manual
Page 77
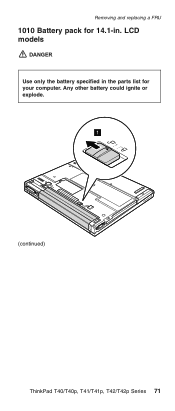
LCD models DANGER Use only the battery specified in . Any other battery could ignite or explode. 1 (continued) ThinkPad T40/T40p, T41/T41p, T42/T42p Series 71 Removing and replacing a FRU 1010 Battery pack for 14.1-in the parts list for your computer.
LCD models DANGER Use only the battery specified in . Any other battery could ignite or explode. 1 (continued) ThinkPad T40/T40p, T41/T41p, T42/T42p Series 71 Removing and replacing a FRU 1010 Battery pack for 14.1-in the parts list for your computer.
User Manual
Page 79
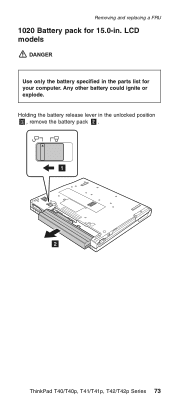
Holding the battery release lever in . Removing and replacing a FRU 1020 Battery pack for your computer. LCD models DANGER Use only the battery specified in the parts list for 15.0-in the unlocked position 1 , remove the battery pack 2 . 1 2 ThinkPad T40/T40p, T41/T41p, T42/T42p Series 73 Any other battery could ignite or explode.
Holding the battery release lever in . Removing and replacing a FRU 1020 Battery pack for your computer. LCD models DANGER Use only the battery specified in the parts list for 15.0-in the unlocked position 1 , remove the battery pack 2 . 1 2 ThinkPad T40/T40p, T41/T41p, T42/T42p Series 73 Any other battery could ignite or explode.
User Manual
Page 86
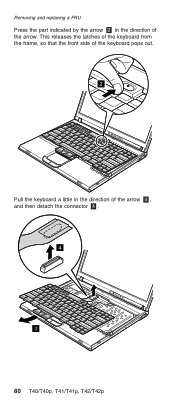
Removing and replacing a FRU Press the part indicated by the arrow 2 in the direction of the arrow. This releases the latches of the keyboard from the frame, so that the front side of the keyboard pops out. 2 Pull the keyboard a little in the direction of the arrow 3 , and then detach the connector 4 . 4 3 80 T40/T40p, T41/T41p, T42/T42p
Removing and replacing a FRU Press the part indicated by the arrow 2 in the direction of the arrow. This releases the latches of the keyboard from the frame, so that the front side of the keyboard pops out. 2 Pull the keyboard a little in the direction of the arrow 3 , and then detach the connector 4 . 4 3 80 T40/T40p, T41/T41p, T42/T42p
User Manual
Page 94
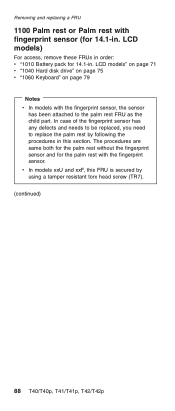
... section. In case of the fingerprint sensor has any defects and needs to be replaced, you need to the palm rest FRU as the child part. LCD models) For access, remove these FRUs in order: v "1010 Battery pack for 14.1-in. Removing and replacing a FRU 1100 Palm rest or Palm rest...
... section. In case of the fingerprint sensor has any defects and needs to be replaced, you need to the palm rest FRU as the child part. LCD models) For access, remove these FRUs in order: v "1010 Battery pack for 14.1-in. Removing and replacing a FRU 1100 Palm rest or Palm rest...

User Manual
Page 97
... 91 In case of the fingerprint sensor has any defects and needs to be replaced, you need to the keyboard bezel FRU as the child part. Removing and replacing a FRU 1110 Keyboard bezel or Keyboard bezel with fingerprint sensor (for 15.0-in this section.
... 91 In case of the fingerprint sensor has any defects and needs to be replaced, you need to the keyboard bezel FRU as the child part. Removing and replacing a FRU 1110 Keyboard bezel or Keyboard bezel with fingerprint sensor (for 15.0-in this section.

User Manual
Page 111
Fan assembly, short Only in the case of Fan assembly, long, you need to peel the plastic sheet b off on the thermal rubber before you place it on the part marked a as in the following figures. a b Figure 2. Removing and replacing a FRU When installing: Apply thermal grease on the system board. Fan assembly, long a Figure 3. Fan assembly, long M10 DOES NOT have the plastic sheet. a Figure 1. Fan assembly, long M10 ThinkPad T40/T40p, T41/T41p, T42/T42p Series 105
Fan assembly, short Only in the case of Fan assembly, long, you need to peel the plastic sheet b off on the thermal rubber before you place it on the part marked a as in the following figures. a b Figure 2. Removing and replacing a FRU When installing: Apply thermal grease on the system board. Fan assembly, long a Figure 3. Fan assembly, long M10 DOES NOT have the plastic sheet. a Figure 1. Fan assembly, long M10 ThinkPad T40/T40p, T41/T41p, T42/T42p Series 105
User Manual
Page 112
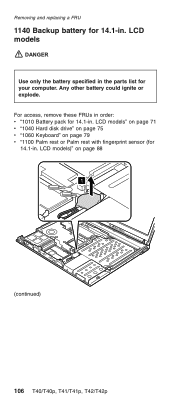
LCD models" on page 71 v "1040 Hard disk drive" on page 75 v "1060 Keyboard" on page 88 1 (continued) 106 T40/T40p, T41/T41p, T42/T42p LCD models DANGER Use only the battery specified in . For access, remove these FRUs in order: v "1010 Battery pack for 14.1-in . LCD models)" on page 79 v "1100 Palm rest or Palm rest with fingerprint sensor (for 14.1-in the parts list for your computer. Any other battery could ignite or explode. Removing and replacing a FRU 1140 Backup battery for 14.1-in .
LCD models" on page 71 v "1040 Hard disk drive" on page 75 v "1060 Keyboard" on page 88 1 (continued) 106 T40/T40p, T41/T41p, T42/T42p LCD models DANGER Use only the battery specified in . For access, remove these FRUs in order: v "1010 Battery pack for 14.1-in . LCD models)" on page 79 v "1100 Palm rest or Palm rest with fingerprint sensor (for 14.1-in the parts list for your computer. Any other battery could ignite or explode. Removing and replacing a FRU 1140 Backup battery for 14.1-in .


