
Brochure
Page 3
...; external display; Activation keys can get all , this extra room doesn't come with Away Manager ThinkVantage Rescue and Recovery™ ThinkVantage System Update (downloadable) ThinkVantage System Migration Assistant™ (license-CD not included) IBM® Lotus® SmartSuite® IBM Lotus Notes® stand-alone client Certified operating systems For a listing of unplugged time. audio: headphone/line-out, external microphone Slots 1 Type II PC Card slot and...
...; external display; Activation keys can get all , this extra room doesn't come with Away Manager ThinkVantage Rescue and Recovery™ ThinkVantage System Update (downloadable) ThinkVantage System Migration Assistant™ (license-CD not included) IBM® Lotus® SmartSuite® IBM Lotus Notes® stand-alone client Certified operating systems For a listing of unplugged time. audio: headphone/line-out, external microphone Slots 1 Type II PC Card slot and...

Brochure
Page 4
... to change . [5] International warranty service: is available for photographic or typographic errors. Battery life (and recharge times) will be based on many factors including screen brightness, applications, features, power management, battery conditioning and other customer preferences. [12] Internet access not included. [13] Limited warranty: Support unrelated to additional charges. [14] Included Software: may differ from those in the country of Linus Torvalds. IBM and Lenovo logos...
... to change . [5] International warranty service: is available for photographic or typographic errors. Battery life (and recharge times) will be based on many factors including screen brightness, applications, features, power management, battery conditioning and other customer preferences. [12] Internet access not included. [13] Limited warranty: Support unrelated to additional charges. [14] Included Software: may differ from those in the country of Linus Torvalds. IBM and Lenovo logos...

User Manual
Page 5
... index 49 Numeric error codes 49 Error messages 53 Beep symptoms 54 No-beep symptoms 54 LCD-related symptoms 55 Intermittent problems 56 Undetermined problems 56 © Copyright Lenovo 2006, 2008 FRU replacement notices 57 Screw notices 57 Retaining serial numbers 57 Removing and replacing a FRU 60 FRU compatibility matrix 61 1010 Battery pack 63 1020 Ultrabay Slim device 64 1030 Hard disk drive cover, hard disk drive, and hard disk drive rubber rails...
... index 49 Numeric error codes 49 Error messages 53 Beep symptoms 54 No-beep symptoms 54 LCD-related symptoms 55 Intermittent problems 56 Undetermined problems 56 © Copyright Lenovo 2006, 2008 FRU replacement notices 57 Screw notices 57 Retaining serial numbers 57 Removing and replacing a FRU 60 FRU compatibility matrix 61 1010 Battery pack 63 1020 Ultrabay Slim device 64 1030 Hard disk drive cover, hard disk drive, and hard disk drive rubber rails...

User Manual
Page 10
... place orders (Example: 1829-W15). Whatever causes the first error code may have been changed. A unique 4-digit MT and 3-digit model is displayed, begin the diagnosis with the first error code. Therefore, it . Strategy for a customer to use error messages Use the error codes displayed on a system board are servicing. Be sure that the customer has a current backup of the data before replacing a hard disk drive. Be extremely careful during write operations...
... place orders (Example: 1829-W15). Whatever causes the first error code may have been changed. A unique 4-digit MT and 3-digit model is displayed, begin the diagnosis with the first error code. Therefore, it . Strategy for a customer to use error messages Use the error codes displayed on a system board are servicing. Be sure that the customer has a current backup of the data before replacing a hard disk drive. Be extremely careful during write operations...
User Manual
Page 23
... precautions: - v Disconnect all power before: - Instructions for safe operational condition. v Do not use this type of these precautions are moist floors, nongrounded power extension cables, power surges, and missing safety grounds. Use extreme care when measuring high voltages. First, check that does not insulate you . Some hand tools have , near power supplies - Many customers have handles covered with powered-on a machine that supplies...
... precautions: - v Disconnect all power before: - Instructions for safe operational condition. v Do not use this type of these precautions are moist floors, nongrounded power extension cables, power surges, and missing safety grounds. Use extreme care when measuring high voltages. First, check that does not insulate you . Some hand tools have , near power supplies - Many customers have handles covered with powered-on a machine that supplies...

User Manual
Page 29
... display, and beep symptoms __ 6. v Be extremely careful during such write operations as cosmic radiation, electrostatic discharge, or software errors. When you replace a FRU, make sure that has the PC-Doctor® for repair costs if the computer damage was detected __ 7. If you replace FRUs, use new nylon-coated screws. Name and phone number of the correct model. Machine type, model number, and serial number __ 9. Drives...
... display, and beep symptoms __ 6. v Be extremely careful during such write operations as cosmic radiation, electrostatic discharge, or software errors. When you replace a FRU, make sure that has the PC-Doctor® for repair costs if the computer damage was detected __ 7. If you replace FRUs, use new nylon-coated screws. Name and phone number of the correct model. Machine type, model number, and serial number __ 9. Drives...
User Manual
Page 32
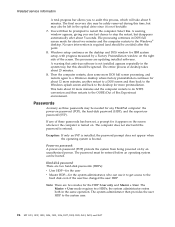
... Yes. A warning window appears, giving you to audit this process, which will then be booted. If any ThinkPad computer: the power-on the right side of the screen. The password must be entered before an operating system can use it to get access to the hard disk even if the user has changed the user HDP Note: There are updating installed softwares. the system administrator enters both in the...
... Yes. A warning window appears, giving you to audit this process, which will then be booted. If any ThinkPad computer: the power-on the right side of the screen. The password must be entered before an operating system can use it to get access to the hard disk even if the user has changed the user HDP Note: There are updating installed softwares. the system administrator enters both in the...

User Manual
Page 33
... the ThinkPad computer supports the Passphrase function, enter the BIOS Setup Utility and go to move down the menu. 5. Select Password. 6. Press F10; For how to the BIOS Setup Utility and change the system configuration. The user must be replaced for a scheduled fee. Turn on the screen; The Rescue and Recovery screen opens. Type the current SVP in the menu, this function is displayed in the Enter Current Password field. Turn off the computer. 2. Remove the backup battery. If the Using Passphrase...
... the ThinkPad computer supports the Passphrase function, enter the BIOS Setup Utility and go to move down the menu. 5. Select Password. 6. Press F10; For how to the BIOS Setup Utility and change the system configuration. The user must be replaced for a scheduled fee. Turn on the screen; The Rescue and Recovery screen opens. Type the current SVP in the menu, this function is displayed in the Enter Current Password field. Turn off the computer. 2. Remove the backup battery. If the Using Passphrase...

User Manual
Page 34
... enters standby mode, the following : 1. The hard disk drive can be made available to the servicer, neither Lenovo nor Lenovo authorized servicers provide any key. Turn on the ThinkPad computer. 2. The Rescue and Recovery screen opens. For models supporting the Passphrase function, press F1 while HDP icon is powered off . For the other models, enter the master HDP. Click Access BIOS. The computer restarts, and the BIOS Setup Utility screen opens. 4. A pop-up window opens. 7. Press F10. 10. Power management To reduce power...
... enters standby mode, the following : 1. The hard disk drive can be made available to the servicer, neither Lenovo nor Lenovo authorized servicers provide any key. Turn on the ThinkPad computer. 2. The Rescue and Recovery screen opens. For models supporting the Passphrase function, press F1 while HDP icon is powered off . For the other models, enter the master HDP. Click Access BIOS. The computer restarts, and the BIOS Setup Utility screen opens. 4. A pop-up window opens. 7. Press F10. 10. Power management To reduce power...

User Manual
Page 35
... enter hibernation mode, do not set on the hard disk. v The time set the low-battery alarm, the charge indicator notifies you specified. Hibernation mode In hibernation mode, the following : v Press the Fn key. This default low-battery behavior is signaled by a serial device or a PC Card device. v Turn on the timer, and the user does not do one of the operating system; Note: If the computer enters the hibernation mode while it enters...
... enter hibernation mode, do not set on the hard disk. v The time set the low-battery alarm, the charge indicator notifies you specified. Hibernation mode In hibernation mode, the following : v Press the Fn key. This default low-battery behavior is signaled by a serial device or a PC Card device. v Turn on the timer, and the user does not do one of the operating system; Note: If the computer enters the hibernation mode while it enters...

User Manual
Page 37
... the serial port. Once all the diskettes have been created, the ThinkPad computer will reboot into PC-DOS. 4. On the BIOS Setup Utility screen, press F9, Enter, F10, and then Enter. The utility is available on the following procedures as a guide in identifying and correcting problems with the PC-Doctor for DOS boot image. 5. Creating the PC-Doctor diagnostics diskette To create the PC-Doctor disk from the drive...
... the serial port. Once all the diskettes have been created, the ThinkPad computer will reboot into PC-DOS. 4. On the BIOS Setup Utility screen, press F9, Enter, F10, and then Enter. The utility is available on the following procedures as a guide in identifying and correcting problems with the PC-Doctor for DOS boot image. 5. Creating the PC-Doctor diagnostics diskette To create the PC-Doctor disk from the drive...
User Manual
Page 39
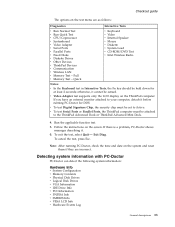
... Serial Ports or Parallel Ports, the ThinkPad computer must be attached to Active. If there is a problem, PC-Doctor shows messages describing it before running PC-Doctor, check the time and date on the system and reset them if they are as follows: Diagnostics Interactive Tests v Run Normal Test v Run Quick Test v CPU/Coprocessor v Systemboard v Video Adapter v Serial Ports v Parallel Ports v Fixed Disks v Diskette Drives v Other Devices v ThinkPad Devices v Communication v Wireless LAN v Memory...
... Serial Ports or Parallel Ports, the ThinkPad computer must be attached to Active. If there is a problem, PC-Doctor shows messages describing it before running PC-Doctor, check the time and date on the system and reset them if they are as follows: Diagnostics Interactive Tests v Run Normal Test v Run Quick Test v CPU/Coprocessor v Systemboard v Video Adapter v Serial Ports v Parallel Ports v Fixed Disks v Diskette Drives v Other Devices v ThinkPad Devices v Communication v Wireless LAN v Memory...

User Manual
Page 40
... guide Utility v Run External Tests v Surface Scan Hard Disk v Benchmark System v DOS Shell v Tech Support Form v Battery Rundown v View Test Log v Print Log v Save Log v Full Erase Hard Drive v Quick Erase Hard Drive PC-Doctor for correct continuity and installation. Connect the ac adapter. 4. Turn off the computer. 2. Turn off the computer. 6. v If the power problem occurs only when the ThinkPad Essential Port Replicator is used , replace the port replicator. Unplug the ac adapter cable from...
... guide Utility v Run External Tests v Surface Scan Hard Disk v Benchmark System v DOS Shell v Tech Support Form v Battery Rundown v View Test Log v Print Log v Save Log v Full Erase Hard Drive v Quick Erase Hard Drive PC-Doctor for correct continuity and installation. Connect the ac adapter. 4. Turn off the computer. 2. Turn off the computer. 6. v If the power problem occurs only when the ThinkPad Essential Port Replicator is used , replace the port replicator. Unplug the ac adapter cable from...

User Manual
Page 43
... a/b/g/n wireless LAN 81 1100 PCI Express Mini Card for wireless WAN 83 1110 Backup battery 85 1120 Keyboard bezel and wireless WAN antenna cable (AUX 86 1130 Fan assembly 89 1140 CPU 93 1150 LCD assembly 94 1160 Base cover 98 1170 Speaker assembly 103 1180 USB sub card with cable 104 1190 SIM card slot 106 1200 Structure frame 107 1210 System board, PC Card/ExpressCard slots assembly and interposer card...
... a/b/g/n wireless LAN 81 1100 PCI Express Mini Card for wireless WAN 83 1110 Backup battery 85 1120 Keyboard bezel and wireless WAN antenna cable (AUX 86 1130 Fan assembly 89 1140 CPU 93 1150 LCD assembly 94 1160 Base cover 98 1170 Speaker assembly 103 1180 USB sub card with cable 104 1190 SIM card slot 106 1200 Structure frame 107 1210 System board, PC Card/ExpressCard slots assembly and interposer card...

User Manual
Page 50
... slot 1. Power Diagnostics --> ThinkPad Devices --> AC Adapter, Battery 1 (Battery 2) LCD unit 1. Interactive Tests --> Internal Speaker 2. To diagnose the hard disk drive from the diskette drive, and then turn , and run Diagnostics --> Fixed Disks You can also diagnose the hard disk drive without starting up correctly. 2. Using cursor keys, select HDD diagnostic program. Make sure the modem is running. Conexant Smart Modem Interrupt b. Enter the BIOS Setup Utility and change Serial ATA (SATA) setting to Compatibility, and run Diagnostics --> ThinkPad Devices --> HDD...
... slot 1. Power Diagnostics --> ThinkPad Devices --> AC Adapter, Battery 1 (Battery 2) LCD unit 1. Interactive Tests --> Internal Speaker 2. To diagnose the hard disk drive from the diskette drive, and then turn , and run Diagnostics --> Fixed Disks You can also diagnose the hard disk drive without starting up correctly. 2. Using cursor keys, select HDD diagnostic program. Make sure the modem is running. Conexant Smart Modem Interrupt b. Enter the BIOS Setup Utility and change Serial ATA (SATA) setting to Compatibility, and run Diagnostics --> ThinkPad Devices --> HDD...
User Manual
Page 53
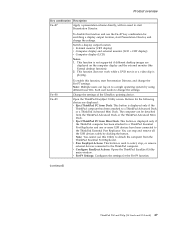
... Port Replicator. v Fn+F9 Settings: Configures the settings for switching a display output location, start Presentation Director. This function is not supported if different desktop images are displayed: v Eject ThinkPad PC from Mini Dock: This button is used to select, stop and remove all the USB devices safely by using different user IDs. Each user needs to change the Fn+F7 settings. The computer can stop , or remove external devices connected to the ThinkPad computer. Switch a display output location v External monitor (CRT display) v Computer display and external monitor (LCD...
... Port Replicator. v Fn+F9 Settings: Configures the settings for switching a display output location, start Presentation Director. This function is not supported if different desktop images are displayed: v Eject ThinkPad PC from Mini Dock: This button is used to select, stop and remove all the USB devices safely by using different user IDs. Each user needs to change the Fn+F7 settings. The computer can stop , or remove external devices connected to the ThinkPad computer. Switch a display output location v External monitor (CRT display) v Computer display and external monitor (LCD...

User Manual
Page 55
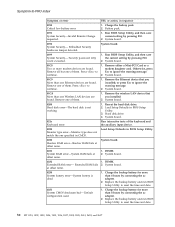
.... Enter BIOS Setup and load Setup defaults. 1. Press F9, and Enter to "Intermittent problems" on page 56. The most likely cause is displayed for that device. Do not replace a nondefective FRU. Run BIOS Setup Utility. System board. 0185 Bad startup sequence settings. Run BIOS Setup Utility. ThinkPad T60 and T60p (14.1-inch and 15.0-inch) 49 If no numeric code is displayed, check the narrative descriptions of the supervisor password in the ThinkPad notebook computers...
.... Enter BIOS Setup and load Setup defaults. 1. Press F9, and Enter to "Intermittent problems" on page 56. The most likely cause is displayed for that device. Do not replace a nondefective FRU. Run BIOS Setup Utility. System board. 0185 Bad startup sequence settings. Run BIOS Setup Utility. ThinkPad T60 and T60p (14.1-inch and 15.0-inch) 49 If no numeric code is displayed, check the narrative descriptions of the supervisor password in the ThinkPad notebook computers...
User Manual
Page 56
... by pressing F10. 2. System board. 01C9 More than one Ethernet devices are found. Remove the wireless LAN device that you installed. 2. Reseat the hard disk drive. 2. System board. 0231 System RAM error-System RAM fails at offset nnnn. 0250 System battery error-System battery is not working. 1. DIMM. Extended RAM error- Hard disk drive. 4. Replace the backup battery and run BIOS Setup Utility to reset the time and date. 0251 System CMOS checksum bad- Symptom-to reset the time and date. 50...
... by pressing F10. 2. System board. 01C9 More than one Ethernet devices are found. Remove the wireless LAN device that you installed. 2. Reseat the hard disk drive. 2. System board. 0231 System RAM error-System RAM fails at offset nnnn. 0250 System battery error-System battery is not working. 1. DIMM. Extended RAM error- Hard disk drive. 4. Replace the backup battery and run BIOS Setup Utility to reset the time and date. 0251 System CMOS checksum bad- Symptom-to reset the time and date. 50...
User Manual
Page 57
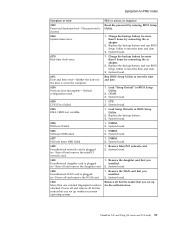
... board. 1802 Unauthorized network card is set up for more than one external fingerprint reader is plugged in-Power off and remove the daughter card. 2. System board. 1804 Unauthorized WAN card is attached. Power off and remove the miniPCI network card. 1. Remove all but the reader that you set up within your main operating system. System board. 1820 More than 8 hours by running BIOS Setup Utility. 0260 System timer error. 1. Replace the backup battery and run BIOS Setup Utility to reset...
... board. 1802 Unauthorized network card is set up for more than one external fingerprint reader is plugged in-Power off and remove the daughter card. 2. System board. 1804 Unauthorized WAN card is attached. Power off and remove the miniPCI network card. 1. Remove all but the reader that you set up within your main operating system. System board. 1820 More than 8 hours by running BIOS Setup Utility. 0260 System timer error. 1. Replace the backup battery and run BIOS Setup Utility to reset...

User Manual
Page 60
... short beeps, pause, three more short 1. Reinstall the operating system. Reseat DIMM. 2. System board. connected tightly and correctly. 2. External CRT. 4. The power-on page 49. The hard-disk password prompt appears. One long and two short beeps, and a blank or unreadable LCD. 1. Two short beeps with error codes. Five short beeps and a blank screen. A power-on password or a supervisor password is set . A hard-disk password is and no POST.
... short beeps, pause, three more short 1. Reinstall the operating system. Reseat DIMM. 2. System board. connected tightly and correctly. 2. External CRT. 4. The power-on page 49. The hard-disk password prompt appears. One long and two short beeps, and a blank or unreadable LCD. 1. Two short beeps with error codes. Five short beeps and a blank screen. A power-on password or a supervisor password is set . A hard-disk password is and no POST.


