User Manual
Page 5
... battery pack 52 Checking the backup battery 53 Related service information 55 Restoring the factory contents by using Product Recovery discs 55 Restoring the factory contents by using Recovery Disc Set 56 Passwords 57 Power-on password 57 Hard-disk password 57 Supervisor password 58 How to remove the power-on password . . . . 58 How to remove the hard-disk password . . . . 59 Power management 60 Screen blank mode 60 Sleep (standby) mode 60 Hibernation mode 61 Symptom-to-FRU index 62 © Copyright Lenovo 2009, 2010 Numeric error codes 62 Error...
... battery pack 52 Checking the backup battery 53 Related service information 55 Restoring the factory contents by using Product Recovery discs 55 Restoring the factory contents by using Recovery Disc Set 56 Passwords 57 Power-on password 57 Hard-disk password 57 Supervisor password 58 How to remove the power-on password . . . . 58 How to remove the hard-disk password . . . . 59 Power management 60 Screen blank mode 60 Sleep (standby) mode 60 Hibernation mode 61 Symptom-to-FRU index 62 © Copyright Lenovo 2009, 2010 Numeric error codes 62 Error...
User Manual
Page 11
... operate the switch or unplug the power cord quickly. When using testers, set the controls correctly and use the approved probe leads and accessories for these hazards are moist floors, nongrounded power extension cables, power surges...working with very high voltages; By observing the above rule, you . Instructions for that does not insulate you cannot unplug it has been powered off the wall box that power has been disconnected from passing through your back. Examples of maintenance information. v Do not use this type of mat to switch off (EPO) switch, disconnecting switch...
... operate the switch or unplug the power cord quickly. When using testers, set the controls correctly and use the approved probe leads and accessories for these hazards are moist floors, nongrounded power extension cables, power surges...working with very high voltages; By observing the above rule, you . Instructions for that does not insulate you cannot unplug it has been powered off the wall box that power has been disconnected from passing through your back. Examples of maintenance information. v Do not use this type of mat to switch off (EPO) switch, disconnecting switch...
User Manual
Page 51
... v "Checkout guide" on removing and replacing FRUs. "PC-Doctor for DOS" on page 48 - Before you suspect that the model of reasons that you replace FRUs, use new nylon-coated screws. v Before replacing any ThinkPad model that supports the PC-Doctor® for a variety of the machine and the FRU part number are servicing sequence might not apply to replace a nondefective FRU. © Copyright Lenovo 2009...
... v "Checkout guide" on removing and replacing FRUs. "PC-Doctor for DOS" on page 48 - Before you suspect that the model of reasons that you replace FRUs, use new nylon-coated screws. v Before replacing any ThinkPad model that supports the PC-Doctor® for a variety of the machine and the FRU part number are servicing sequence might not apply to replace a nondefective FRU. © Copyright Lenovo 2009...
User Manual
Page 53
... a USB device, connect it by using PC-Doctor for DOS The ThinkPad Notebook has a test program called PC-Doctor for DOS (hereafter called PC-Doctor.) You can lead to initialize the computer setup by repeating the operation. Note: The diagnostic tests are intended to enter the BIOS Setup Utility. To enter BIOS Setup Utility, do as the serial port. You can start the utility by the supervisor password. For some devices are...
... a USB device, connect it by using PC-Doctor for DOS The ThinkPad Notebook has a test program called PC-Doctor for DOS (hereafter called PC-Doctor.) You can lead to initialize the computer setup by repeating the operation. Note: The diagnostic tests are intended to enter the BIOS Setup Utility. To enter BIOS Setup Utility, do as the serial port. You can start the utility by the supervisor password. For some devices are...
User Manual
Page 54
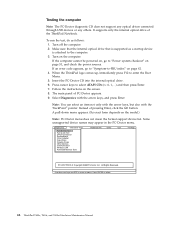
... not support any optical drives connected through USB devices or any others. To run the test, do as a startup device is supported as follows: 1. Follow the instructions on the computer. Diagnostics Interactive Tests Run Normal Test Run Quick Test CPU/Coprocessor Systemboard Video Adapter Fixed Disks Diskette Drives Other Devices Communication Wireless LAN Advanced Memory Tests Hardware Info Utility Quit F1=Help PC-DOCTOR 2.0 Copyright 2008 PC-Doctor, Inc. Press ENTER to enter the Boot Menu. 5. Turn...
... not support any optical drives connected through USB devices or any others. To run the test, do as a startup device is supported as follows: 1. Follow the instructions on the computer. Diagnostics Interactive Tests Run Normal Test Run Quick Test CPU/Coprocessor Systemboard Video Adapter Fixed Disks Diskette Drives Other Devices Communication Wireless LAN Advanced Memory Tests Hardware Info Utility Quit F1=Help PC-DOCTOR 2.0 Copyright 2008 PC-Doctor, Inc. Press ENTER to enter the Boot Menu. 5. Turn...
User Manual
Page 55
... Quick Test v CPU/Coprocessor v System board v Video Adapter v Fixed Disks v Diskette Drives v Other Devices v ThinkPad Devices v Communication v Wireless LAN v Advanced Memory Tests v Keyboard v Video v Internal Speaker v Mouse v Diskette v System Load v Optical Drive Test v Intel WLAN Radio Test Note: v In the Keyboard test in Interactive Tests, the Fn key should be held down for DOS. Detecting system information with PC-Doctor PC-Doctor can detect the following system information: Hardware Info v System Configuration v Memory Contents...
... Quick Test v CPU/Coprocessor v System board v Video Adapter v Fixed Disks v Diskette Drives v Other Devices v ThinkPad Devices v Communication v Wireless LAN v Advanced Memory Tests v Keyboard v Video v Internal Speaker v Mouse v Diskette v System Load v Optical Drive Test v Intel WLAN Radio Test Note: v In the Keyboard test in Interactive Tests, the Fn key should be held down for DOS. Detecting system information with PC-Doctor PC-Doctor can detect the following system information: Hardware Info v System Configuration v Memory Contents...
User Manual
Page 57
... System board Power LCD unit Audio Speaker Keyboard Hard disk drive or solid state drive Diskette drive Optical drive Memory Applicable test 1. Press Enter to enter the BIOS Setup Utility. 4. Interactive Tests --> Optical Drive Test 1. If two DIMMs are installed, remove one , and run Diagnostics --> ThinkPad Devices --> HDD Active Protection Test. Diagnostics --> Video Adapter 2. Interactive Tests --> Video Enter the BIOS Setup Utility and change Serial ATA (SATA) setting to Compatibility, and run Diagnostics --> Other Device --> Conexant Audio Interactive Tests --> Internal...
... System board Power LCD unit Audio Speaker Keyboard Hard disk drive or solid state drive Diskette drive Optical drive Memory Applicable test 1. Press Enter to enter the BIOS Setup Utility. 4. Interactive Tests --> Optical Drive Test 1. If two DIMMs are installed, remove one , and run Diagnostics --> ThinkPad Devices --> HDD Active Protection Test. Diagnostics --> Video Adapter 2. Interactive Tests --> Video Enter the BIOS Setup Utility and change Serial ATA (SATA) setting to Compatibility, and run Diagnostics --> Other Device --> Conexant Audio Interactive Tests --> Internal...
User Manual
Page 64
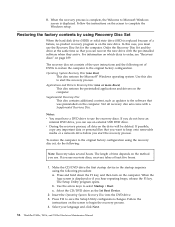
... the computer. To restore the computer to the original factory configuration using Recovery Disc Set When the hard disk drive (HDD) or solid state drive (SSD) is on the method you must have an internal DVD drive, you can recover the new drive with a Supplemental Recovery Disc. Select the CD/DVD drive as updates to the software that you want to Microsoft Windows screen is complete, the Welcome to keep onto removable media or a network drive before you hear repeating...
... the computer. To restore the computer to the original factory configuration using Recovery Disc Set When the hard disk drive (HDD) or solid state drive (SSD) is on the method you must have an internal DVD drive, you can recover the new drive with a Supplemental Recovery Disc. Select the CD/DVD drive as updates to the software that you want to Microsoft Windows screen is complete, the Welcome to keep onto removable media or a network drive before you hear repeating...
User Manual
Page 65
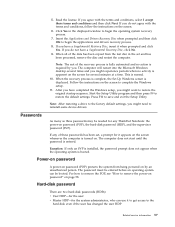
.... If any ThinkPad Notebook: the power-on password (POP), the hard-disk password (HDP), and the supervisor password (SVP). If you have completed the Windows setup, you agree with the terms and conditions, follow the instructions on the screen whenever the computer is booted. This is entered. Note: After restoring a drive to the factory default settings, you . Read the license. The computer does not start until the password is normal. 10...
.... If any ThinkPad Notebook: the power-on password (POP), the hard-disk password (HDP), and the supervisor password (SVP). If you have completed the Windows setup, you agree with the terms and conditions, follow the instructions on the screen whenever the computer is booted. This is entered. Note: After restoring a drive to the factory default settings, you . Read the license. The computer does not start until the password is normal. 10...
User Manual
Page 66
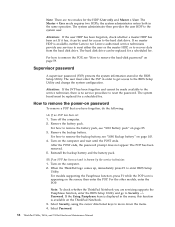
... order to get access to the BIOS Setup Utility and change the system configuration. The hard disk drive can be replaced for the HDP: User only and Master + User. The POP has been removed. 5. Select Security, using the cursor directional keys to the system user. The system administrator then provides the user HDP to move down the menu. 4. Remove the battery pack. Turn on page 103. 4. then enter the POP. For the other models, enter...
... order to get access to the BIOS Setup Utility and change the system configuration. The hard disk drive can be replaced for the HDP: User only and Master + User. The POP has been removed. 5. Select Security, using the cursor directional keys to the system user. The system administrator then provides the user HDP to move down the menu. 4. Remove the battery pack. Turn on page 103. 4. then enter the POP. For the other models, enter...
User Manual
Page 67
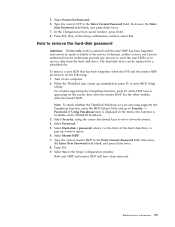
... any services to reset the user HDPs or to enter BIOS Setup Utility. Select Password. 5. A pop-up , immediately press F1 to recover data from the hard disk drive. then, in the Setup Configuration window. Select Master HDP. 7. Turn on the ThinkPad Notebook. 3. Type the current master HDP in the Enter Current Password field. Type the current SVP in the Enter Current Password field. then leave the Enter New Password field blank, and press Enter twice. 7. For the other models, enter...
... any services to reset the user HDPs or to enter BIOS Setup Utility. Select Password. 5. A pop-up , immediately press F1 to recover data from the hard disk drive. then, in the Setup Configuration window. Select Master HDP. 7. Turn on the ThinkPad Notebook. 3. Type the current master HDP in the Enter Current Password field. Type the current SVP in the Enter Current Password field. then leave the Enter New Password field blank, and press Enter twice. 7. For the other models, enter...
User Manual
Page 68
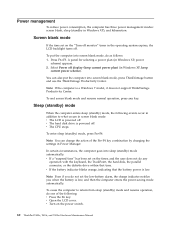
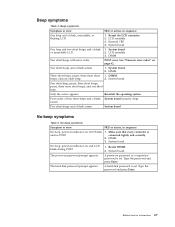
... sleep (standby) mode and resume operation, do any key. v Turn on the timer, and the user does not do one of the Fn+F4 key combination by changing the settings in Windows XP, keep current power scheme). In certain circumstances, the computer goes into screen blank mode, press ThinkVantage button and use the ThinkVantage Productivity Center. v If the battery indicator blinks orange, indicating that time. v The hard disk drive is low. v Open the LCD cover...
... sleep (standby) mode and resume operation, do any key. v Turn on the timer, and the user does not do one of the Fn+F4 key combination by changing the settings in Windows XP, keep current power scheme). In certain circumstances, the computer goes into screen blank mode, press ThinkVantage button and use the ThinkVantage Productivity Center. v If the battery indicator blinks orange, indicating that time. v The hard disk drive is low. v Open the LCD cover...

User Manual
Page 70
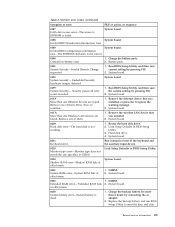
... not correct. Press F9, and Enter to load the default setting. Do not replace a nondefective FRU. Run BIOS Setup Utility, and save the current setting by diagnostic codes in the computer. Then defaults.-The checksum of the supervisor password in boldface type. Note: For a device not supported by pressing F10. Numeric error codes Table 2. System board. 0185 Bad startup sequence settings. Run BIOS Setup Utility. In the displays, n can also help you determine...
... not correct. Press F9, and Enter to load the default setting. Do not replace a nondefective FRU. Run BIOS Setup Utility, and save the current setting by diagnostic codes in the computer. Then defaults.-The checksum of the supervisor password in boldface type. Note: For a device not supported by pressing F10. Numeric error codes Table 2. System board. 0185 Bad startup sequence settings. Run BIOS Setup Utility. In the displays, n can also help you determine...
User Manual
Page 71
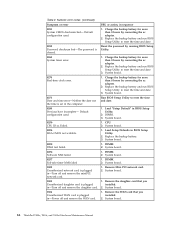
... input device. 0220 Monitor type error-Monitor type does not match the one of them . Remove the wireless LAN device that you installed. 2. Load Setup Defaults in BIOS Setup Utility. 0230 Shadow RAM error-Shadow RAM fails at offset nnnn. System board. Related service information 63 Run BIOS Setup Utility, and then save the current setting by pressing F10. 2. Remove one specified in sequence 0187 EAIA data access error-The access to continue. 1. Reseat the hard disk drive. 2. DIMM. 2. Invalid RFID Serialization Information...
... input device. 0220 Monitor type error-Monitor type does not match the one of them . Remove the wireless LAN device that you installed. 2. Load Setup Defaults in BIOS Setup Utility. 0230 Shadow RAM error-Shadow RAM fails at offset nnnn. System board. Related service information 63 Run BIOS Setup Utility, and then save the current setting by pressing F10. 2. Remove one specified in sequence 0187 EAIA data access error-The access to continue. 1. Reseat the hard disk drive. 2. DIMM. 2. Invalid RFID Serialization Information...
User Manual
Page 72
... is set in -Power off and remove the WAN card. 1. Load "Setup Default" in -Turn off and remove the miniPCI network card. 1. DIMM. 3. Replace the backup battery. 3. DIMM. 2. Remove Mini PCI network card. 2. in BIOS Setup Utility. 2. Replace the backup battery and run BIOS Setup Utility to reset the time and date. 3. System board. 1803 1. Load Setup Defaults in -Turn off and remove the daughter card. 2. System board. 64 ThinkPad T400s, T410s, and T410si Hardware Maintenance Manual System board. 1802 Unauthorized network card is plugged installed...
... is set in -Power off and remove the WAN card. 1. Load "Setup Default" in -Turn off and remove the miniPCI network card. 1. DIMM. 3. Replace the backup battery. 3. DIMM. 2. Remove Mini PCI network card. 2. in BIOS Setup Utility. 2. Replace the backup battery and run BIOS Setup Utility to reset the time and date. 3. System board. 1803 1. Load Setup Defaults in -Turn off and remove the daughter card. 2. System board. 64 ThinkPad T400s, T410s, and T410si Hardware Maintenance Manual System board. 1802 Unauthorized network card is plugged installed...
User Manual
Page 73
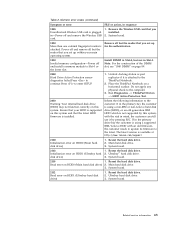
... --> ThinkPad Devices --> HDD Active Protection Test. 2010 Warning: Your internal hard disk drive (HDD) may not function correctly on HDD1 (Ultrabay hard 2. Table 2. System board. 1820 More than one external fingerprint reader is supported on page 89. 2000 Hard Drive Active Protection sensor diagnostics failed.Press to continue.Press to the computer. 3. Initialization error on this system and that you set up for the authentication. 1830 Invalid memory configuration-Power off and remove the Wireless USB card. 1.
... --> ThinkPad Devices --> HDD Active Protection Test. 2010 Warning: Your internal hard disk drive (HDD) may not function correctly on HDD1 (Ultrabay hard 2. Table 2. System board. 1820 More than one external fingerprint reader is supported on page 89. 2000 Hard Drive Active Protection sensor diagnostics failed.Press to continue.Press to the computer. 3. Initialization error on this system and that you set up for the authentication. 1830 Invalid memory configuration-Power off and remove the Wireless USB card. 1.
User Manual
Page 75
... set . Type the password and press Enter. A hard-disk password is and no POST. DIMM. Only the cursor appears. System board. The power-on page 62. POST error. beeps, and one short beep. connected tightly and correctly. 2. See "Numeric error codes" on password prompt appears. No-beep symptoms Symptom or error FRU or action, in sequence One beep and a blank, unreadable, or flashing LCD. 1. LCD assembly. 3. No beep, power...
... set . Type the password and press Enter. A hard-disk password is and no POST. DIMM. Only the cursor appears. System board. The power-on page 62. POST error. beeps, and one short beep. connected tightly and correctly. 2. See "Numeric error codes" on password prompt appears. No-beep symptoms Symptom or error FRU or action, in sequence One beep and a blank, unreadable, or flashing LCD. 1. LCD assembly. 3. No beep, power...
User Manual
Page 80
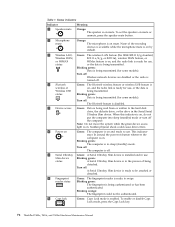
... some models). This indicator stays lit around the power-on button whenever the computer is on , do not put the computer into sleep (standby) mode or turn off : A Serial Ultrabay Slim device is ready to swipe. Slim device Blinking green: status A Serial Ultrabay Slim device is on . When this indicator is in sleep (standby) mode. Blinking orange: The fingerprint could cause drive errors. 6 Power on Green: The computer is installed and...
... some models). This indicator stays lit around the power-on button whenever the computer is on , do not put the computer into sleep (standby) mode or turn off : A Serial Ultrabay Slim device is ready to swipe. Slim device Blinking green: status A Serial Ultrabay Slim device is on . When this indicator is in sleep (standby) mode. Blinking orange: The fingerprint could cause drive errors. 6 Power on Green: The computer is installed and...

User Manual
Page 84
For Windows 7: Switch a display output location v Computer display only (LCD) v Computer display and external monitor (same image) v Computer display and external monitor (extended desktop) v External monitor only Note: To switch between the computer display and an external monitor, the Win+P key combination is playing. This function is supported only on the ThinkPad Notebooks that have the ThinkPad PM device driver installed on or off status of the UltraNav® pointing device. This function does not work while a DVD movie or a video clip is...
For Windows 7: Switch a display output location v Computer display only (LCD) v Computer display and external monitor (same image) v Computer display and external monitor (extended desktop) v External monitor only Note: To switch between the computer display and an external monitor, the Win+P key combination is playing. This function is supported only on the ThinkPad Notebooks that have the ThinkPad PM device driver installed on or off status of the UltraNav® pointing device. This function does not work while a DVD movie or a video clip is...
User Manual
Page 159
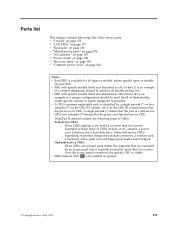
... parts" on page 184 v "AC adapters" on page 187 v "Power cords" on page 188 v "Recovery discs" on page 189 v "Common service tools" on product design may include a memory, a wireless card, a keyboard, and a palm rest with OP are specified. Other Self-service CRUs depending on page 204 Notes: v Each FRU is available for all models ending in U. v FRUs marked with finger print reader and touchpad...
... parts" on page 184 v "AC adapters" on page 187 v "Power cords" on page 188 v "Recovery discs" on page 189 v "Common service tools" on product design may include a memory, a wireless card, a keyboard, and a palm rest with OP are specified. Other Self-service CRUs depending on page 204 Notes: v Each FRU is available for all models ending in U. v FRUs marked with finger print reader and touchpad...


