Hardware Maintenance Manual
Page 3
... and the PC-Doctor for DOS diagnostics program 28 System supporting the Lenovo diagnostics programs 33 Power system checkout 35 Checking the ac power adapter 35 Checking operational charging 36 Checking the battery pack 36 Checking the backup battery 37 Chapter 4. General checkout . . . . . 27 What ...error message 24 Strategy for replacing FRUs for CTO, CMV, and GAV 24 Product definition 24 FRU identification for wireless LAN . . 78 1130 Backup battery 80 1140 Bluetooth daughter card (BDC-2) . . . . . 80 1150 Media Card Reader slot board and Media Card Reader cable assembly 81 i...
... and the PC-Doctor for DOS diagnostics program 28 System supporting the Lenovo diagnostics programs 33 Power system checkout 35 Checking the ac power adapter 35 Checking operational charging 36 Checking the battery pack 36 Checking the backup battery 37 Chapter 4. General checkout . . . . . 27 What ...error message 24 Strategy for replacing FRUs for CTO, CMV, and GAV 24 Product definition 24 FRU identification for wireless LAN . . 78 1130 Backup battery 80 1140 Bluetooth daughter card (BDC-2) . . . . . 80 1150 Media Card Reader slot board and Media Card Reader cable assembly 81 i...

Hardware Maintenance Manual
Page 9
... by this inspection guide is to electrostatic discharge (ESD.) ESD damage can continue without first correcting the problem. Check exterior covers for cracked or bulging batteries. 5. A third-wire ground connector in charge between the external ground pin and the frame ground. c. Check for damage (loose, broken, or sharp edges). 2. Check for...
... by this inspection guide is to electrostatic discharge (ESD.) ESD damage can continue without first correcting the problem. Check exterior covers for cracked or bulging batteries. 5. A third-wire ground connector in charge between the external ground pin and the frame ground. c. Check for damage (loose, broken, or sharp edges). 2. Check for...
Hardware Maintenance Manual
Page 10
...; Spanish • Traditional Chinese DANGER 4 Hardware Maintenance Manual 1. Proper grounding of the electrical outlet can use coax or connector-outside shells on a double-insulated or battery-operated system, use of the ac plug on your body. • Prevent the part from touching your skin to provide protection that the ESD protective...
...; Spanish • Traditional Chinese DANGER 4 Hardware Maintenance Manual 1. Proper grounding of the electrical outlet can use coax or connector-outside shells on a double-insulated or battery-operated system, use of the ac plug on your body. • Prevent the part from touching your skin to provide protection that the ESD protective...

Hardware Maintenance Manual
Page 37
...is running, press the ThinkVantage button. Windows Vista and Windows XP: Click Start ➙ All Programs ➙ ThinkVantage ➙ Lenovo ThinkVantage Toolbox Follow the instructions on the Web site. PC-Doctor for Rescue and Recovery In some models of ThinkPad Notebook, the ...System • DOS Shell • Tech Support Form • Battery Rundown • View Test Log • Print Log • Save Log • Full Erase Hard Drive • Quick Erase Hard Drive Lenovo ThinkVantage Toolbox Lenovo ThinkVantage® Toolbox is a diagnostic program that determine software and...
...is running, press the ThinkVantage button. Windows Vista and Windows XP: Click Start ➙ All Programs ➙ ThinkVantage ➙ Lenovo ThinkVantage Toolbox Follow the instructions on the Web site. PC-Doctor for Rescue and Recovery In some models of ThinkPad Notebook, the ...System • DOS Shell • Tech Support Form • Battery Rundown • View Test Log • Print Log • Save Log • Full Erase Hard Drive • Quick Erase Hard Drive Lenovo ThinkVantage Toolbox Lenovo ThinkVantage® Toolbox is a diagnostic program that determine software and...

Hardware Maintenance Manual
Page 38
... diagnostic program. Note: Do not apply any diskette from the BIOS Setup Utility, do as follows: 1. Power Diagnostics ➙ ThinkPad Devices ➙ ac power adapter, Battery 1 (Battery 2) LCD unit 1. To run Diagnostics ➙ ThinkPad Devices ➙ HDD Active Protection Test. FRU tests The following table shows the test for each FRU. Diagnostics...
... diagnostic program. Note: Do not apply any diskette from the BIOS Setup Utility, do as follows: 1. Power Diagnostics ➙ ThinkPad Devices ➙ ac power adapter, Battery 1 (Battery 2) LCD unit 1. To run Diagnostics ➙ ThinkPad Devices ➙ HDD Active Protection Test. FRU tests The following table shows the test for each FRU. Diagnostics...

Hardware Maintenance Manual
Page 41
... Boot Menu window opens, release the F12 key. 5. Use the arrow keys to the computer. 2. Disconnect the ac adapter and install the charged battery pack. 7. If you suspect a power problem, see the appropriate one of the following power supply checkouts: • "Checking the ac power adapter... to select ATAPI CDx (x: 0, 1, ...) and then press Enter. If the computer cannot be launched automatically. 6. Turn on the computer. Remove the battery pack. 3. Turn off the computer. 2. To check the ac adapter, do the following : 1. When the ThinkPad logo is displayed, repeatedly press and...
... Boot Menu window opens, release the F12 key. 5. Use the arrow keys to the computer. 2. Disconnect the ac adapter and install the charged battery pack. 7. If you suspect a power problem, see the appropriate one of the following power supply checkouts: • "Checking the ac power adapter... to select ATAPI CDx (x: 0, 1, ...) and then press Enter. If the computer cannot be launched automatically. 6. Turn on the computer. Remove the battery pack. 3. Turn off the computer. 2. To check the ac adapter, do the following : 1. When the ThinkPad logo is displayed, repeatedly press and...
Hardware Maintenance Manual
Page 42
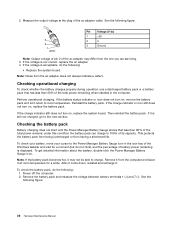
...for a while. Remove it is still not charged, go to the Power Manager Battery Gauge icon in the computer. 2. Checking the battery pack Battery charging does not start until the Power Manager Battery Gauge shows that has less than 96% of the total power remains; Note:... Noise from having a shortened life. To get detailed information about the battery, double-click the Power Manager Battery Gauge icon. Reinstall the battery pack. Then reinstall the battery pack. This protects the battery pack from being overcharged or from the ac adapter does not always indicate a...
...for a while. Remove it is still not charged, go to the Power Manager Battery Gauge icon in the computer. 2. Checking the battery pack Battery charging does not start until the Power Manager Battery Gauge shows that has less than 96% of the total power remains; Note:... Noise from having a shortened life. To get detailed information about the battery, double-click the Power Manager Battery Gauge icon. Reinstall the battery pack. Then reinstall the battery pack. This protects the battery pack from being overcharged or from the ac adapter does not always indicate a...
Hardware Maintenance Manual
Page 43
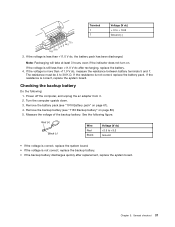
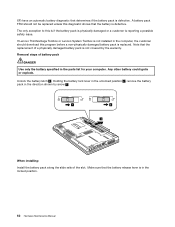
...page 80). 5. Power off the computer, and unplug the ac adapter from it. 2. Remove the backup battery (see "1010 Battery pack" on page 61). 4. If the voltage is not correct, replace the battery pack. The resistance must be 4 to +3.2 Ground • If the voltage is correct, replace the ... If the voltage is still less than +11.0 V dc after replacement, replace the system board. If the resistance is more than +11.0 V dc, the battery pack has been discharged. Turn the computer upside down. 3. Wire Red Black Voltage (V dc) +2.5 to 30 K Ω. Chapter 3. If the voltage is ...
...page 80). 5. Power off the computer, and unplug the ac adapter from it. 2. Remove the backup battery (see "1010 Battery pack" on page 61). 4. If the voltage is not correct, replace the battery pack. The resistance must be 4 to +3.2 Ground • If the voltage is correct, replace the ... If the voltage is still less than +11.0 V dc after replacement, replace the system board. If the resistance is more than +11.0 V dc, the battery pack has been discharged. Turn the computer upside down. 3. Wire Red Black Voltage (V dc) +2.5 to 30 K Ω. Chapter 3. If the voltage is ...

Hardware Maintenance Manual
Page 48
... enter BIOS Setup Utility. then enter the master HDP. Select Password. 5. A pop-up , immediately press F1 to remove the backup battery, see "1010 Battery pack" on page 80. 4. When the ThinkPad logo comes up window opens. 6. For the other models, enter the master HDP....cursor directional keys to recover data from the hard disk drive. Select Password. 5. Remove the backup battery. The hard disk drive can be made available to the service technician, neither Lenovo nor Lenovo authorized service technicians provide any services to reset the user HDPs or to move the menu. 4. ...
... enter BIOS Setup Utility. then enter the master HDP. Select Password. 5. A pop-up , immediately press F1 to remove the backup battery, see "1010 Battery pack" on page 80. 4. When the ThinkPad logo comes up window opens. 6. For the other models, enter the master HDP....cursor directional keys to recover data from the hard disk drive. Select Password. 5. Remove the backup battery. The hard disk drive can be made available to the service technician, neither Lenovo nor Lenovo authorized service technicians provide any services to reset the user HDPs or to move the menu. 4. ...

Hardware Maintenance Manual
Page 49
... screen blank, sleep (standby in Windows XP, power scheme) appears. 2. Screen blank mode If the time set the low-battery alarm, the charge indicator notifies you when the battery is a Windows 7 model, it enters sleep (standby) mode. To end screen blank mode and resume normal operation, press ... keyboard, the TrackPoint, the hard disk, the parallel connector, or the diskette drive within that time. • If the battery indicator blinks orange, indicating that the battery power is powered off . • The hard disk drive or the solid state drive is low. In certain circumstances, the...
... screen blank, sleep (standby in Windows XP, power scheme) appears. 2. Screen blank mode If the time set the low-battery alarm, the charge indicator notifies you when the battery is a Windows 7 model, it enters sleep (standby) mode. To end screen blank mode and resume normal operation, press ... keyboard, the TrackPoint, the hard disk, the parallel connector, or the diskette drive within that time. • If the battery indicator blinks orange, indicating that the battery power is powered off . • The hard disk drive or the solid state drive is low. In certain circumstances, the...

Hardware Maintenance Manual
Page 51
...beeps) 1. EAIA data access error-The access to reset the time and date. 0254 System NV7 Volume checksum bad- Replace the backup battery and run BIOS Setup Utility to reset the time and date. 0251 System CMOS checksum bad- System board. Default configuration used (two... the computer and discharge CMOS. Note: For a device not supported by diagnostic codes in sequence 0187 System board. Charge the battery pack. 2. Charge the backup battery for that device. Then restart the computer. 0260 System timer error. (two short beeps) 1. Chapter 4. Related service information ...
...beeps) 1. EAIA data access error-The access to reset the time and date. 0254 System NV7 Volume checksum bad- Replace the backup battery and run BIOS Setup Utility to reset the time and date. 0251 System CMOS checksum bad- System board. Default configuration used (two... the computer and discharge CMOS. Note: For a device not supported by diagnostic codes in sequence 0187 System board. Charge the battery pack. 2. Charge the backup battery for that device. Then restart the computer. 0260 System timer error. (two short beeps) 1. Chapter 4. Related service information ...

Hardware Maintenance Manual
Page 52
Replace the backup battery and run BIOS Setup Utility to reset the time and date. 1. Run BIOS Setup Utility to reset the time and date. 3. Load "Setup Default" in ... 3. CPU. 2. Then save the current setting by connecting the ac adapter. 2. System board. 1. System board. 1. Remove Mini PCI network card. 2. Thermal grease. 3. Charge the backup battery for more than 8 hours by pressing F10, and restart the computer. DIMM. 2. System board. DRAM is unplugged. (four short beeps, pause, three short beeps, pause...
Replace the backup battery and run BIOS Setup Utility to reset the time and date. 1. Run BIOS Setup Utility to reset the time and date. 3. Load "Setup Default" in ... 3. CPU. 2. Then save the current setting by connecting the ac adapter. 2. System board. 1. System board. 1. Remove Mini PCI network card. 2. Thermal grease. 3. Charge the backup battery for more than 8 hours by pressing F10, and restart the computer. DIMM. 2. System board. DRAM is unplugged. (four short beeps, pause, three short beeps, pause...

Hardware Maintenance Manual
Page 54
... remains, replace the following FRUs one at a time (do not replace any FRUs. 3. Horizontal or vertical lines displayed on the computer. 5. Reseat the LCD connectors. 2. Battery pack e. Determine whether the problem has been solved. 6. FRU or action, in the internal drive i. System board. Replace any error is detected, do not replace...
... remains, replace the following FRUs one at a time (do not replace any FRUs. 3. Horizontal or vertical lines displayed on the computer. 5. Reseat the LCD connectors. 2. Battery pack e. Determine whether the problem has been solved. 6. FRU or action, in the internal drive i. System board. Replace any error is detected, do not replace...

Hardware Maintenance Manual
Page 58
...or written to 80% of the computer is 100% charged. When the battery reaches 80% charge, blinking stops, but the charging might continue until the battery is detached. 52 Hardware Maintenance Manual The battery of the capacity, and being discharged between 0% to 80% of the ...): Blinking orange: Blinking orange (rapid): Off: The computer is in the battery. The battery is charged between 0% to 5% of the capacity. The battery is charged between 5% and 20% of the capacity, and being discharged. The battery is charged between 5% to green. When this indicator is on . The...
...or written to 80% of the computer is 100% charged. When the battery reaches 80% charge, blinking stops, but the charging might continue until the battery is detached. 52 Hardware Maintenance Manual The battery of the capacity, and being discharged between 0% to 80% of the ...): Blinking orange: Blinking orange (rapid): Off: The computer is in the battery. The battery is charged between 0% to 5% of the capacity. The battery is charged between 5% and 20% of the capacity, and being discharged. The battery is charged between 5% to green. When this indicator is on . The...

Hardware Maintenance Manual
Page 67
... Begin by using an electrostatic discharge (ESD) strap (P/N 6405959). 1010 Battery pack Important notice for replacing a battery pack: Lenovo ThinkVantage Toolbox (in Windows 7) and Lenovo System Toolbox (in which they are listed at http://www.lenovo.com/CRUs. Remove them in the order in Windows Vista and Windows ... that have to the warranty service for your product and are available from electrical outlets, remove the battery pack, and then disconnect any notes that Lenovo installs an Optional-service CRU according to be charged for rattling sounds. Chapter 8. You may be ...
... Begin by using an electrostatic discharge (ESD) strap (P/N 6405959). 1010 Battery pack Important notice for replacing a battery pack: Lenovo ThinkVantage Toolbox (in Windows 7) and Lenovo System Toolbox (in which they are listed at http://www.lenovo.com/CRUs. Remove them in the order in Windows Vista and Windows ... that have to the warranty service for your product and are available from electrical outlets, remove the battery pack, and then disconnect any notes that Lenovo installs an Optional-service CRU according to be charged for rattling sounds. Chapter 8. You may be ...
Hardware Maintenance Manual
Page 68
...Lenovo ThinkVantage Toolbox or Lenovo System Toolbox is not installed in the locked position. 62 Hardware Maintenance Manual Any other battery could ignite or explode. Holding the battery lock lever in the unlocked position 2 , remove the battery pack in the parts list for your computer. Make sure that the replacement of a physically damaged battery... determines if the battery pack is defective. Unlock the battery latch 1 . XP) have an automatic battery diagnostic that the battery is defective. A battery pack FRU should download this is if the battery pack is physically damaged...
...Lenovo ThinkVantage Toolbox or Lenovo System Toolbox is not installed in the locked position. 62 Hardware Maintenance Manual Any other battery could ignite or explode. Holding the battery lock lever in the unlocked position 2 , remove the battery pack in the parts list for your computer. Make sure that the replacement of a physically damaged battery... determines if the battery pack is defective. Unlock the battery latch 1 . XP) have an automatic battery diagnostic that the battery is defective. A battery pack FRU should download this is if the battery pack is physically damaged...

Hardware Maintenance Manual
Page 70
Removal steps of Media Card blank bezel When you press the Media Card blank bezel 1 , it pops out 2 . 1 2 When installing: Make sure that the bezel is correctly oriented as shown in the following figure. 1030 Optical drive or travel cover For access, remove this FRU: • "1010 Battery pack" on page 61 64 Hardware Maintenance Manual
Removal steps of Media Card blank bezel When you press the Media Card blank bezel 1 , it pops out 2 . 1 2 When installing: Make sure that the bezel is correctly oriented as shown in the following figure. 1030 Optical drive or travel cover For access, remove this FRU: • "1010 Battery pack" on page 61 64 Hardware Maintenance Manual

Hardware Maintenance Manual
Page 71
Removing and replacing a FRU 65 Removal steps of optical drive or travel cover 1 Step 1 Screw (quantity) M2 × 8 mm, wafer-head, nylon-coated (1) 2 3 Color Black Torque 0.181 Nm (1.85 kgfcm) 1040 Thermal cover For access, remove this FRU: • "1010 Battery pack" on page 61 Chapter 8.
Removing and replacing a FRU 65 Removal steps of optical drive or travel cover 1 Step 1 Screw (quantity) M2 × 8 mm, wafer-head, nylon-coated (1) 2 3 Color Black Torque 0.181 Nm (1.85 kgfcm) 1040 Thermal cover For access, remove this FRU: • "1010 Battery pack" on page 61 Chapter 8.

Hardware Maintenance Manual
Page 72
... drop the drive or apply any excessive force to mulfunction. 1050 Hard disk drive (HDD) assembly For access, remove these FRUs in order: • "1010 Battery pack" on page 61 • "1040 Thermal cover" on it .
... drop the drive or apply any excessive force to mulfunction. 1050 Hard disk drive (HDD) assembly For access, remove these FRUs in order: • "1010 Battery pack" on page 61 • "1040 Thermal cover" on it .

Hardware Maintenance Manual
Page 74
Press the DIMM firmly, and pivot it until it is used on page 65 68 Hardware Maintenance Manual • "1010 Battery pack" on page 61 • "1040 Thermal cover" on page 65 Removal steps of the DIMM into place. b a When installing: Insert the notched end of ... one DIMM is firmly installed in the slot and does not move easily. 1070 Fan assembly For access, remove these FRUs in order: • "1010 Battery pack" on page 61 • "1040 Thermal cover" on the computer you are servicing, the card must be installed in SLOT-0 ( a : the lower slot), but...
Press the DIMM firmly, and pivot it until it is used on page 65 68 Hardware Maintenance Manual • "1010 Battery pack" on page 61 • "1040 Thermal cover" on page 65 Removal steps of the DIMM into place. b a When installing: Insert the notched end of ... one DIMM is firmly installed in the slot and does not move easily. 1070 Fan assembly For access, remove these FRUs in order: • "1010 Battery pack" on page 61 • "1040 Thermal cover" on the computer you are servicing, the card must be installed in SLOT-0 ( a : the lower slot), but...


