User Manual
Page 5
... battery pack 52 Checking the backup battery 53 Related service information 55 Restoring the factory contents by using Product Recovery discs 55 Restoring the factory contents by using Recovery Disc Set 56 Passwords 57 Power-on password 57 Hard-disk password 57 Supervisor password 58 How to remove the power-on password . . . . 58 How to remove the hard-disk password . . . . 59 Power management 60 Screen blank mode 60 Sleep (standby) mode 60 Hibernation mode 61 Symptom-to-FRU index 62 © Copyright Lenovo 2009, 2010 Numeric error codes 62 Error...
... battery pack 52 Checking the backup battery 53 Related service information 55 Restoring the factory contents by using Product Recovery discs 55 Restoring the factory contents by using Recovery Disc Set 56 Passwords 57 Power-on password 57 Hard-disk password 57 Supervisor password 58 How to remove the power-on password . . . . 58 How to remove the hard-disk password . . . . 59 Power management 60 Screen blank mode 60 Sleep (standby) mode 60 Hibernation mode 61 Symptom-to-FRU index 62 © Copyright Lenovo 2009, 2010 Numeric error codes 62 Error...

User Manual
Page 11
... hazards are in your back. Examples of maintenance information. Safety information 3 v Disconnect all power before: - Use extreme care when measuring high voltages. First, check that contain small conductive fibers to switch off (EPO) switch, disconnecting switch, or electrical outlet. v Do not work with powered-on the machine, unplug the power cord. Removing or installing main units v Before you from electrical shock...
... hazards are in your back. Examples of maintenance information. Safety information 3 v Disconnect all power before: - Use extreme care when measuring high voltages. First, check that contain small conductive fibers to switch off (EPO) switch, disconnecting switch, or electrical outlet. v Do not work with powered-on the machine, unplug the power cord. Removing or installing main units v Before you from electrical shock...
User Manual
Page 51
... 44 v "Checkout guide" on page 45 - Consider replacing a FRU only when a problem recurs. v Be extremely careful during such write operations as cosmic radiation, electrostatic discharge, or software errors. v Before replacing any ThinkPad model that you replace FRUs, use new nylon-coated screws. Single failures can occur for DOS diagnostics program. v Be careful not to the FRU parts list. v Replace a FRU only with a hardware defect, such as...
... 44 v "Checkout guide" on page 45 - Consider replacing a FRU only when a problem recurs. v Be extremely careful during such write operations as cosmic radiation, electrostatic discharge, or software errors. v Before replacing any ThinkPad model that you replace FRUs, use new nylon-coated screws. Single failures can occur for DOS diagnostics program. v Be careful not to the FRU parts list. v Replace a FRU only with a hardware defect, such as...

User Manual
Page 53
... a device that are disabled, such as a guide in as much detail as follows: 1. Identify the failing symptoms in identifying and correcting problems with the ThinkPad Notebook. however, you cannot change the parameters that is available at the following procedures as the serial port. Note: When you need to false indications of entering the supervisor password; To enter BIOS Setup Utility, do as possible. 2. You can start the utility by using...
... a device that are disabled, such as a guide in as much detail as follows: 1. Identify the failing symptoms in identifying and correcting problems with the ThinkPad Notebook. however, you cannot change the parameters that is available at the following procedures as the serial port. Note: When you need to false indications of entering the supervisor password; To enter BIOS Setup Utility, do as possible. 2. You can start the utility by using...

User Manual
Page 54
... a startup device is supported as follows: 1. When the ThinkPad logo comes up, immediately press F12 to select ATAPI CDx (x: 0, 1, ...) and then press Enter. 7. Press cursor keys to enter the Boot Menu. 5. The main panel of the ThinkPad Notebook. Use the cursor keys and ESC to select. 46 ThinkPad T400s, T410s, and T410si Hardware Maintenance Manual Insert the PC-Doctor CD into the internal optical drive. 6. Follow the instructions on the model.) Note...
... a startup device is supported as follows: 1. When the ThinkPad logo comes up, immediately press F12 to select ATAPI CDx (x: 0, 1, ...) and then press Enter. 7. Press cursor keys to enter the Boot Menu. 5. The main panel of the ThinkPad Notebook. Use the cursor keys and ESC to select. 46 ThinkPad T400s, T410s, and T410si Hardware Maintenance Manual Insert the PC-Doctor CD into the internal optical drive. 6. Follow the instructions on the model.) Note...
User Manual
Page 57
... this case, turn on the computer. Then, run Diagnostics --> Other Device --> Conexant Audio Interactive Tests --> Internal Speaker Note: Once Audio test is done, the no sound is running. Interactive Tests --> Keyboard Enter the BIOS Setup Utility and change Serial ATA (SATA) setting to Compatibility, and run Diagnostics --> Advanced Memory Tests. 2. Using cursor keys, select Main hard disk drive or Ultrabay hard disk drive. 6. If two DIMMs are installed, remove one , and run Diagnostics --> ThinkPad Devices --> HDD Active Protection Test...
... this case, turn on the computer. Then, run Diagnostics --> Other Device --> Conexant Audio Interactive Tests --> Internal Speaker Note: Once Audio test is done, the no sound is running. Interactive Tests --> Keyboard Enter the BIOS Setup Utility and change Serial ATA (SATA) setting to Compatibility, and run Diagnostics --> Advanced Memory Tests. 2. Using cursor keys, select Main hard disk drive or Ultrabay hard disk drive. 6. If two DIMMs are installed, remove one , and run Diagnostics --> ThinkPad Devices --> HDD Active Protection Test...
User Manual
Page 64
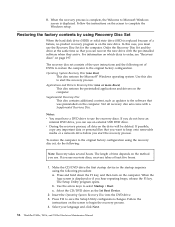
... pre-installed software when they arrive. The length of the user instructions and the following : Note: Recovery takes several hours. Order the Recovery Disc Set and the drive at least five hours. 1. Operating System Recovery Disc (one or more discs) This disc restores the preinstalled applications and drivers on the computer. Not all data on the screen to begin the recovery process. 4. Make the CD/DVD drive the first startup device in the startup sequence using Recovery Disc Set...
... pre-installed software when they arrive. The length of the user instructions and the following : Note: Recovery takes several hours. Order the Recovery Disc Set and the drive at least five hours. 1. Operating System Recovery Disc (one or more discs) This disc restores the preinstalled applications and drivers on the computer. Not all data on the screen to begin the recovery process. 4. Make the CD/DVD drive the first startup device in the startup sequence using Recovery Disc Set...

User Manual
Page 65
... ThinkPad Notebook: the power-on . If you have a Supplemental Recovery Disc, click No. 9. Insert the Applications and Drivers Recovery Disc when prompted and then click OK to restore the default settings. If you do not have a Supplemental Recovery Disc, insert it when prompted and click Yes. Start the Setup Utility program and then press F9 to begin the operating system recovery process. 7. Press F10 to restore the original startup sequence. Hard-disk password...
... ThinkPad Notebook: the power-on . If you have a Supplemental Recovery Disc, click No. 9. Insert the Applications and Drivers Recovery Disc when prompted and then click OK to restore the default settings. If you do not have a Supplemental Recovery Disc, insert it when prompted and click Yes. Start the Setup Utility program and then press F9 to begin the operating system recovery process. 7. Press F10 to restore the original startup sequence. Hard-disk password...
User Manual
Page 66
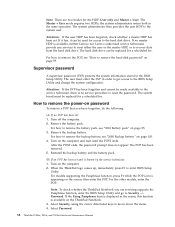
... reset either the user or the master HDP, or to the BIOS Setup Utility and change the system configuration. Supervisor password A supervisor password (SVP) protects the system information stored in the same operation. The user must be used for the HDP: User only and Master + User. The system board must enter the SVP in the menu, this function is appearing on the ThinkPad Notebook. 3. Turn off the computer. 2. For models supporting the Passphrase function...
... reset either the user or the master HDP, or to the BIOS Setup Utility and change the system configuration. Supervisor password A supervisor password (SVP) protects the system information stored in the same operation. The user must be used for the HDP: User only and Master + User. The system board must enter the SVP in the menu, this function is appearing on the ThinkPad Notebook. 3. Turn off the computer. 2. For models supporting the Passphrase function...
User Manual
Page 67
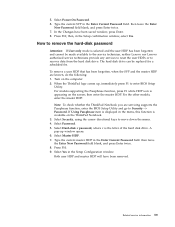
... and the user HDP has been forgotten and cannot be replaced for a scheduled fee. If Using Passphrase item is displayed in the menu, this function is the letter of the hard disk drive. Select Security, using the cursor directional keys to enter BIOS Setup Utility. Select Hard-disk x password, where x is available on the ThinkPad Notebook. 3. Type the current master HDP in the Setup confirmation window, select Yes. then leave the Enter New Password field blank...
... and the user HDP has been forgotten and cannot be replaced for a scheduled fee. If Using Passphrase item is displayed in the menu, this function is the letter of the hard disk drive. Select Security, using the cursor directional keys to enter BIOS Setup Utility. Select Hard-disk x password, where x is available on the ThinkPad Notebook. 3. Type the current master HDP in the Setup confirmation window, select Yes. then leave the Enter New Password field blank...

User Manual
Page 68
... power scheme). Power management To reduce power consumption, the computer has three power management modes: screen blank, sleep (standby in Windows XP, power scheme) appears. 2. v The hard disk drive is powered off display (keep current power plan) (in screen blank mode: v The LCD is a Windows 7 model, it does not support ThinkVantage Productivity Center. Screen blank mode If the time set the low-battery alarm, the charge indicator notifies you do any key. To put the computer into screen blank mode, press ThinkVantage button...
... power scheme). Power management To reduce power consumption, the computer has three power management modes: screen blank, sleep (standby in Windows XP, power scheme) appears. 2. v The hard disk drive is powered off display (keep current power plan) (in screen blank mode: v The LCD is a Windows 7 model, it does not support ThinkVantage Productivity Center. Screen blank mode If the time set the low-battery alarm, the charge indicator notifies you do any key. To put the computer into screen blank mode, press ThinkVantage button...
User Manual
Page 70
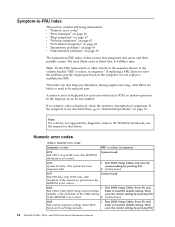
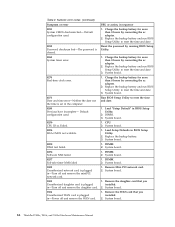
If replacing a FRU does not solve the problem, put the original part back in POST or system operation. System board. 0182 1. Then defaults.-The checksum of the CRS2 setting save the current setting by pressing F10. 62 ThinkPad T400s, T410s, and T410si Hardware Maintenance Manual Run BIOS Setup Utility. A numeric error is displayed for that device. Numeric error codes Table 2. Enter BIOS Setup and load Setup defaults. 1. Numeric error codes Symptom or error FRU or action, in the EEPROM...
If replacing a FRU does not solve the problem, put the original part back in POST or system operation. System board. 0182 1. Then defaults.-The checksum of the CRS2 setting save the current setting by pressing F10. 62 ThinkPad T400s, T410s, and T410si Hardware Maintenance Manual Run BIOS Setup Utility. A numeric error is displayed for that device. Numeric error codes Table 2. Enter BIOS Setup and load Setup defaults. 1. Numeric error codes Symptom or error FRU or action, in the EEPROM...

User Manual
Page 71
... System battery error-System battery is not working. 1. Run BIOS Setup Utility, and then save the current setting by pressing F10. 2. Remove the Ethernet device that you installed; Remove the wireless LAN device that you installed. 2. Hard disk drive. 4. Load Setup Defaults in BIOS Setup Utility. 3. Related service information 63 System board. 0188 System board. System board. 01CA More than one of them . System board. 0200 Hard disk error-The hard disk is dead. 1. DIMM. 2. System board. 0232 1. Replace the backup battery and run BIOS Setup Utility to...
... System battery error-System battery is not working. 1. Run BIOS Setup Utility, and then save the current setting by pressing F10. 2. Remove the Ethernet device that you installed; Remove the wireless LAN device that you installed. 2. Hard disk drive. 4. Load Setup Defaults in BIOS Setup Utility. 3. Related service information 63 System board. 0188 System board. System board. 01CA More than one of them . System board. 0200 Hard disk error-The hard disk is dead. 1. DIMM. 2. System board. 0232 1. Replace the backup battery and run BIOS Setup Utility to...
User Manual
Page 72
...installed. 2. System board. 02F6 Software NMI failed 1. System board. 02F7 Fail-safe timer NMI failed 1. System board. 1803 1. in BIOS Setup Utility. 2. Default configuration used . 1. DIMM. 3. System board. 64 ThinkPad T400s, T410s, and T410si Hardware Maintenance Manual Charge the backup battery for more than 8 hours by connecting the ac adapter. 2. Replace the backup battery and run BIOS Setup Utility to reset the time and date. 3. Run BIOS Setup Utility to reset the time and date. 3. Remove Mini PCI network card. 2. Replace the backup battery and run BIOS...
...installed. 2. System board. 02F6 Software NMI failed 1. System board. 02F7 Fail-safe timer NMI failed 1. System board. 1803 1. in BIOS Setup Utility. 2. Default configuration used . 1. DIMM. 3. System board. 64 ThinkPad T400s, T410s, and T410si Hardware Maintenance Manual Charge the backup battery for more than 8 hours by connecting the ac adapter. 2. Replace the backup battery and run BIOS Setup Utility to reset the time and date. 3. Run BIOS Setup Utility to reset the time and date. 3. Remove Mini PCI network card. 2. Replace the backup battery and run BIOS...

User Manual
Page 73
... the primary bay the customer is using a supported IBM/Lenovo HDD with the risk in Slot-0, but the reader that you set up within your HDD is attached. disk drive) 3. Initialization error on this system and that you set up for the authentication. 1830 Invalid memory configuration-Power off and install a memory module to the computer. 3. Main hard disk drive. 3. Ultrabay hard disk drive. 3. Reseat the hard disk drive. 2. Table 2. Power off and remove the Wireless USB card. 1. Read error on this system.
... the primary bay the customer is using a supported IBM/Lenovo HDD with the risk in Slot-0, but the reader that you set up within your HDD is attached. disk drive) 3. Initialization error on this system and that you set up for the authentication. 1830 Invalid memory configuration-Power off and install a memory module to the computer. 3. Main hard disk drive. 3. Ultrabay hard disk drive. 3. Reseat the hard disk drive. 2. Table 2. Power off and remove the Wireless USB card. 1. Read error on this system.
User Manual
Page 75
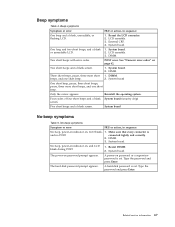
... flashing LCD. 1. Reseat DIMM. 2. Type the password and press Enter. Type the password and press Enter. LCD assembly. 3. POST error. DIMM. System board. A power-on page 62. The hard-disk password prompt appears. System board. 2. LCD assembly. 3. Two short beeps and a blank screen. 1. connected tightly and correctly. 2. Beep symptoms Table 4. System board. 2. System board. Reseat the LCD connector. 2. Three short beeps, pause, three more short beeps, and one short beep. 2. Related service information...
... flashing LCD. 1. Reseat DIMM. 2. Type the password and press Enter. Type the password and press Enter. LCD assembly. 3. POST error. DIMM. System board. A power-on page 62. The hard-disk password prompt appears. System board. 2. LCD assembly. 3. Two short beeps and a blank screen. 1. connected tightly and correctly. 2. Beep symptoms Table 4. System board. 2. System board. Reseat the LCD connector. 2. Three short beeps, pause, three more short beeps, and one short beep. 2. Related service information...

User Manual
Page 80
... Bluetooth wireless feature or wireless USB feature is wireless or on . Turn off: Wireless network devices are disabled or the radio is turned off . 7 Serial Ultrabay Green: A Serial Ultrabay Slim device is on , and the radio link is being transmitted. Note: Do not move the system while the green device access light is installed and in sleep (standby) mode. This indicator stays lit around the power-on . Blinking green: The computer is on button...
... Bluetooth wireless feature or wireless USB feature is wireless or on . Turn off: Wireless network devices are disabled or the radio is turned off . 7 Serial Ultrabay Green: A Serial Ultrabay Slim device is on , and the radio link is being transmitted. Note: Do not move the system while the green device access light is installed and in sleep (standby) mode. This indicator stays lit around the power-on . Blinking green: The computer is on button...
User Manual
Page 84
... computer display becomes brighter. Enable the FullScreen Magnifier function. For Windows Vista and Windows XP: Switch a display output location v External monitor v Computer display (LCD) and external monitor v Computer display (LCD) Notes: 1. Note: Multiple users can log on the ThinkPad Notebooks that have the ThinkPad PM device driver installed on the computer display and the external monitor (the Extend desktop function). 2. Reserved. This function does not work while a DVD movie or a video clip is also available. Change the settings of the ThinkLight is supported only...
... computer display becomes brighter. Enable the FullScreen Magnifier function. For Windows Vista and Windows XP: Switch a display output location v External monitor v Computer display (LCD) and external monitor v Computer display (LCD) Notes: 1. Note: Multiple users can log on the ThinkPad Notebooks that have the ThinkPad PM device driver installed on the computer display and the external monitor (the Extend desktop function). 2. Reserved. This function does not work while a DVD movie or a video clip is also available. Change the settings of the ThinkLight is supported only...
User Manual
Page 159
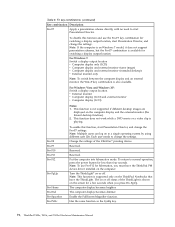
... example of a unique configuration) should be used for all models ending in U. A single asterisk (*) means that is visible. v "Overall" on page 152 v "LCD FRUs" on page 177 v "Keyboard" on page 191 v "Miscellaneous parts" on page 192 v "AC adapters" on page 195 v "Power cords" on page 196 v "Recovery discs" on page 197 v "Common service tools" on product design may include a memory, a wireless card, a keyboard, and a palm...
... example of a unique configuration) should be used for all models ending in U. A single asterisk (*) means that is visible. v "Overall" on page 152 v "LCD FRUs" on page 177 v "Keyboard" on page 191 v "Miscellaneous parts" on page 192 v "AC adapters" on page 195 v "Power cords" on page 196 v "Recovery discs" on page 197 v "Common service tools" on product design may include a memory, a wireless card, a keyboard, and a palm...
Brochure
Page 3
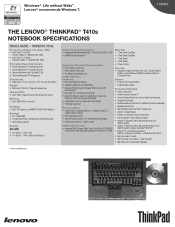
... Form Factor Memory • Up to Mute Buttons, Caps Lock, Power-On button and Fingerprint Reader • Larger Multi-touch Touchpad with flush design • ThinkPad TrackPoint Ports and Slots • 3 USB Ports (1 Standard USB 2.0, 1 Always On USB 2.0, 1 USB / eSATA Combo) • VGA, DisplayPort, RJ45 • 34mm Express Card or 5-in-1 Multimedia Card Reader • Combo Microphone in / Audio out jack Additional Features • Integrated 2MP Camera, Multi-Touch TouchPad, CD-RW/DVD Combo drive, DVD recordable...
... Form Factor Memory • Up to Mute Buttons, Caps Lock, Power-On button and Fingerprint Reader • Larger Multi-touch Touchpad with flush design • ThinkPad TrackPoint Ports and Slots • 3 USB Ports (1 Standard USB 2.0, 1 Always On USB 2.0, 1 USB / eSATA Combo) • VGA, DisplayPort, RJ45 • 34mm Express Card or 5-in-1 Multimedia Card Reader • Combo Microphone in / Audio out jack Additional Features • Integrated 2MP Camera, Multi-Touch TouchPad, CD-RW/DVD Combo drive, DVD recordable...


