Hardware Maintenance Manual
Page 3
... indicators . . . . . 53 Chapter 6. Removing and replacing a FRU 65 Before servicing ThinkPad T410 and T410i models 65 1010 Battery pack 66 1020 ExpressCard blank bezel 67 1030 Serial Ultrabay Slim device or travel bezel . . 68 1040 Hard disk drive (HDD) and solid-state drive (SSD 69 1050 DIMM slot cover 70 1060 DIMM (in the slot under the keyboard) . . . 78 1100 Backup battery 80 1110 PCI Express Mini Card for replacing a system board 24...
... indicators . . . . . 53 Chapter 6. Removing and replacing a FRU 65 Before servicing ThinkPad T410 and T410i models 65 1010 Battery pack 66 1020 ExpressCard blank bezel 67 1030 Serial Ultrabay Slim device or travel bezel . . 68 1040 Hard disk drive (HDD) and solid-state drive (SSD 69 1050 DIMM slot cover 70 1060 DIMM (in the slot under the keyboard) . . . 78 1100 Backup battery 80 1110 PCI Express Mini Card for replacing a system board 24...

Hardware Maintenance Manual
Page 8
... emergency power-off the power, if necessary. - Instructions for possible hazards in your work alone under hazardous conditions or near power supplies - Working near equipment that has hazardous voltages. • Disconnect all power before: - When using testers, set the controls correctly and use the approved probe leads and accessories for safe operational condition. • Do not use this type of mat to switch off (EPO) switch, disconnecting switch...
... emergency power-off the power, if necessary. - Instructions for possible hazards in your work alone under hazardous conditions or near power supplies - Working near equipment that has hazardous voltages. • Disconnect all power before: - When using testers, set the controls correctly and use the approved probe leads and accessories for safe operational condition. • Do not use this type of mat to switch off (EPO) switch, disconnecting switch...
Hardware Maintenance Manual
Page 29
... numbers for Lenovo Support are available at: http://www.lenovo.com/support/phone • System Disassembly/Reassembly videos that show the FRU removals or replacements for replacing FRUs Before replacing parts: Make sure that all machine types supported by one by this manual. Note the current configuration settings (using the View Configuration option); To download software fixes, drivers, and BIOS, go to use error message" on page 24 • "Strategy for replacing FRUs for replacing a system board" on page 25 - Important service...
... numbers for Lenovo Support are available at: http://www.lenovo.com/support/phone • System Disassembly/Reassembly videos that show the FRU removals or replacements for replacing FRUs Before replacing parts: Make sure that all machine types supported by one by this manual. Note the current configuration settings (using the View Configuration option); To download software fixes, drivers, and BIOS, go to use error message" on page 24 • "Strategy for replacing FRUs for replacing a system board" on page 25 - Important service...
Hardware Maintenance Manual
Page 33
... reasons that you are servicing sequence might indicate that the system was subjected to use . If you replace a FRU, make sure that are correct by referring to it is recommended to stress beyond normal use new nylon-coated screws. • Be extremely careful during such write operations as cosmic radiation, electrostatic discharge, or software errors. Machine type, model number, and serial number 9. Customer's name and...
... reasons that you are servicing sequence might indicate that the system was subjected to use . If you replace a FRU, make sure that are correct by referring to it is recommended to stress beyond normal use new nylon-coated screws. • Be extremely careful during such write operations as cosmic radiation, electrostatic discharge, or software errors. Machine type, model number, and serial number 9. Customer's name and...
Hardware Maintenance Manual
Page 35
... serial port. If an error code appears, go to testing of pressing Enter, click the left button. Chapter 3. It does not support test of entering the supervisor password; If the computer cannot be used to test a device that is installed to -FRU index" on page 36, and check the power sources. A pull-down menu appears. (Its exact form depends on ThinkPad computers. You can start the BIOS Setup Utility...
... serial port. If an error code appears, go to testing of pressing Enter, click the left button. Chapter 3. It does not support test of entering the supervisor password; If the computer cannot be used to test a device that is installed to -FRU index" on page 36, and check the power sources. A pull-down menu appears. (Its exact form depends on ThinkPad computers. You can start the BIOS Setup Utility...

Hardware Maintenance Manual
Page 36
... an external monitor attached to Active. 10. Follow the instructions on the ThinkPad Notebook. To cancel the test, press Esc. The options on the system and reset them if they are as follows: Diagnostics Interactive Tests • Run Normal Test • Run Quick Test • CPU/Coprocessor • Systemboard • Video Adapter • Fixed Disks • Diskette Drives • Other Devices • Communication • Wireless LAN • Advanced Memory...
... an external monitor attached to Active. 10. Follow the instructions on the ThinkPad Notebook. To cancel the test, press Esc. The options on the system and reset them if they are as follows: Diagnostics Interactive Tests • Run Normal Test • Run Quick Test • CPU/Coprocessor • Systemboard • Video Adapter • Fixed Disks • Diskette Drives • Other Devices • Communication • Wireless LAN • Advanced Memory...
Hardware Maintenance Manual
Page 39
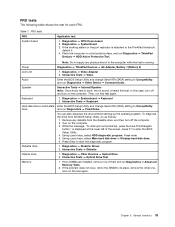
... are installed, remove one , and run Diagnostics ➙ Advanced Memory Tests. 2. FRU tests FRU System board Applicable test 1. Interactive Tests ➙ Video Audio Enter the BIOS Setup Utility and change Serial ATA (SATA) setting to Compatibility, drive and run Diagnostics ➙ Other Device ➙ Conexant Audio. Turn on the computer. Using cursor keys, select HDD diagnostic program. Using cursor keys, select Main hard disk drive or Ultrabay hard disk drive. 6. Chapter 3. Keyboard 1. Diagnostics ➙ Other Devices ➙ Optical Drive 2. If the problem...
... are installed, remove one , and run Diagnostics ➙ Advanced Memory Tests. 2. FRU tests FRU System board Applicable test 1. Interactive Tests ➙ Video Audio Enter the BIOS Setup Utility and change Serial ATA (SATA) setting to Compatibility, drive and run Diagnostics ➙ Other Device ➙ Conexant Audio. Turn on the computer. Using cursor keys, select HDD diagnostic program. Using cursor keys, select Main hard disk drive or Ultrabay hard disk drive. 6. Chapter 3. Keyboard 1. Diagnostics ➙ Other Devices ➙ Optical Drive 2. If the problem...
Hardware Maintenance Manual
Page 40
... the BIOS Setup Utility. System Health and Diagnostics, and then follow the instructions on the screen for maximum system performance. FRU tests (continued) FRU Applicable test TrackPoint or pointing device If the TrackPoint does not work , check the configuration as specified in the BIOS Setup Utility. Quick test programs Lenovo Hard Drive Quick Test and Lenovo Memory Quick Test are applicable to enable it . If the Touch Pad is available only on models...
... the BIOS Setup Utility. System Health and Diagnostics, and then follow the instructions on the screen for maximum system performance. FRU tests (continued) FRU Applicable test TrackPoint or pointing device If the TrackPoint does not work , check the configuration as specified in the BIOS Setup Utility. Quick test programs Lenovo Hard Drive Quick Test and Lenovo Memory Quick Test are applicable to enable it . If the Touch Pad is available only on models...

Hardware Maintenance Manual
Page 41
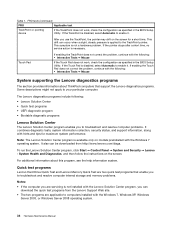
... download and install a quick test program, go to "Power system checkout" on page 36, and check the power sources. To create a bootable diagnostic medium, do one of the UEFI diagnostic program is preinstalled on the computer. Follow the instructions on the screen to the Application Menu window. 4. Turn on a USB device or CD. When the Boot Menu window opens, release the F12 key. 3. Press the Tab key to switch to use...
... download and install a quick test program, go to "Power system checkout" on page 36, and check the power sources. To create a bootable diagnostic medium, do one of the UEFI diagnostic program is preinstalled on the computer. Follow the instructions on the screen to the Application Menu window. 4. Turn on a USB device or CD. When the Boot Menu window opens, release the F12 key. 3. Press the Tab key to switch to use...
Hardware Maintenance Manual
Page 45
... recovery process, all recovery disc sets come with the pre-installed software when they will be deleted. If you can recover the new drive with a Supplemental Recovery Disc. The length of the user instructions and the following : Note: Recovery can use the Recovery Disc Set for the computer. The Setup Utility program opens. Select the CD/DVD drive as updates to the software that you want to start the recovery process. In this disc to keep onto removable media or a network drive...
... recovery process, all recovery disc sets come with the pre-installed software when they will be deleted. If you can recover the new drive with a Supplemental Recovery Disc. The length of the user instructions and the following : Note: Recovery can use the Recovery Disc Set for the computer. The Setup Utility program opens. Select the CD/DVD drive as updates to the software that you want to start the recovery process. In this disc to keep onto removable media or a network drive...

Hardware Maintenance Manual
Page 46
... some device drivers. The Master + User mode requires two HDPs; Read the license. Note: If only an SVP is installed, the password prompt does not appear when the operating system is displayed. the system administrator enters both in the displayed window to the hard disk drive. Select your language and click Next. 5. Note: After restoring a drive to the factory default settings, you have a Supplemental Recovery Disc, click No. 9. If any ThinkPad Notebook: the power...
... some device drivers. The Master + User mode requires two HDPs; Read the license. Note: If only an SVP is installed, the password prompt does not appear when the operating system is displayed. the system administrator enters both in the displayed window to the hard disk drive. Select your language and click Next. 5. Note: After restoring a drive to the factory default settings, you have a Supplemental Recovery Disc, click No. 9. If any ThinkPad Notebook: the power...

Hardware Maintenance Manual
Page 47
... Enter New Password field blank, and press Enter twice. 8. When the ThinkPad logo comes up, immediately press F1 to enter the ThinkPad Setup program. 4. The hard disk drive can be replaced for a scheduled fee. For how to remove the POP, see "How to recover data from the hard disk drive. The user must be displayed. How to the BIOS Setup Utility and change the system configuration. Turn off the computer. 2. Remove the battery pack. Connect the ac power adapter. Turn on password...
... Enter New Password field blank, and press Enter twice. 8. When the ThinkPad logo comes up, immediately press F1 to enter the ThinkPad Setup program. 4. The hard disk drive can be replaced for a scheduled fee. For how to remove the POP, see "How to recover data from the hard disk drive. The user must be displayed. How to the BIOS Setup Utility and change the system configuration. Turn off the computer. 2. Remove the battery pack. Connect the ac power adapter. Turn on password...
Hardware Maintenance Manual
Page 48
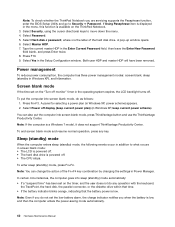
... servicing supports the Passphrase function, enter the BIOS Setup Utility and go to Security ➙ Password. Select Security, using the cursor directional keys to what occurs in screen blank mode: • The LCD is powered off. • The hard disk drive is powered off. • The CPU stops. Select Yes in the Enter Current Password field. Both user HDP and master HDP will have been removed. Screen blank mode If the time set on the ThinkPad Notebook. 3. Select Power...
... servicing supports the Passphrase function, enter the BIOS Setup Utility and go to Security ➙ Password. Select Security, using the cursor directional keys to what occurs in screen blank mode: • The LCD is powered off. • The hard disk drive is powered off. • The CPU stops. Select Yes in the Enter Current Password field. Both user HDP and master HDP will have been removed. Screen blank mode If the time set on the ThinkPad Notebook. 3. Select Power...

Hardware Maintenance Manual
Page 49
... do any operation with the keyboard, the TrackPoint, the hard disk drive, the parallel connector, or the diskette drive within that action. - Also, in either of the following conditions: • If a "hibernation time" has been set on the power switch. Note: The computer does not accept any of the following : • Press the Fn key. • Open the LCD cover. • Turn on the...
... do any operation with the keyboard, the TrackPoint, the hard disk drive, the parallel connector, or the diskette drive within that action. - Also, in either of the following conditions: • If a "hibernation time" has been set on the power switch. Note: The computer does not accept any of the following : • Press the Fn key. • Open the LCD cover. • Turn on the...

Hardware Maintenance Manual
Page 51
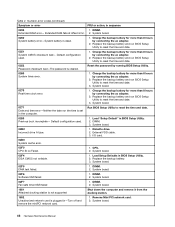
... error FRU or action, in BIOS Setup Utility. 3. Confirm the operation and try again. 0199 System Security- Remove all but one Wireless LAN devices are found . Hard disk drive. 4. System board. 01C8 Two or more Ethernet devices are found . Remove one of the keyboard and the auxiliary input device. 0220 Load Setup Defaults in CMOS. 0230 Shadow RAM error-Shadow RAM fails at offset nnnn. 1. Table 2. Enter BIOS Setup Utility by pressing F10. 2. System board. 0197 Invalid remote change...
... error FRU or action, in BIOS Setup Utility. 3. Confirm the operation and try again. 0199 System Security- Remove all but one Wireless LAN devices are found . Hard disk drive. 4. System board. 01C8 Two or more Ethernet devices are found . Remove one of the keyboard and the auxiliary input device. 0220 Load Setup Defaults in CMOS. 0230 Shadow RAM error-Shadow RAM fails at offset nnnn. 1. Table 2. Enter BIOS Setup Utility by pressing F10. 2. System board. 0197 Invalid remote change...
Hardware Maintenance Manual
Page 52
... "Setup Default" in BIOS Setup Utility. 2. System board. 02F6 Software NMI failed 1. Diskette drive. 2. DIMM. 2. System board. 0250 System battery error-System battery is cleared. Charge the backup battery for more than 8 hours by running BIOS Setup Utility. 0260 System timer error. 1. System board. 0271 Date and time error-Neither the date nor the time is plugged in sequence 0232 1. External FDD cable. 3. Default configuration used . 1. DIMM. Replace the backup battery and run BIOS Setup Utility to reset the time and date. 0280 Previous boot...
... "Setup Default" in BIOS Setup Utility. 2. System board. 02F6 Software NMI failed 1. Diskette drive. 2. DIMM. 2. System board. 0250 System battery error-System battery is cleared. Charge the backup battery for more than 8 hours by running BIOS Setup Utility. 0260 System timer error. 1. System board. 0271 Date and time error-Neither the date nor the time is plugged in sequence 0232 1. External FDD cable. 3. Default configuration used . 1. DIMM. Replace the backup battery and run BIOS Setup Utility to reset the time and date. 0280 Previous boot...
Hardware Maintenance Manual
Page 53
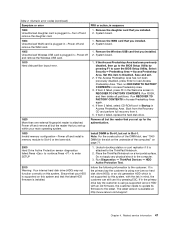
... (in -Power off and remove the WAN card. 1. System board. 1805 Unauthorized Wireless USB card is supported on this item to enter SETUP 1. If the Access Predesktop Area has been previously disabled, then go to the BIOS Setup Utility by pressing F1 to load Access Predesktop Area. Set this system. Then run RECOVER TO FACTORY CONTENTS in RECOVER TO FACTORY CONTENTS. If item 4 failed, replace the hard disk drive. 1820 More than one external fingerprint reader is...
... (in -Power off and remove the WAN card. 1. System board. 1805 Unauthorized Wireless USB card is supported on this item to enter SETUP 1. If the Access Predesktop Area has been previously disabled, then go to the BIOS Setup Utility by pressing F1 to load Access Predesktop Area. Set this system. Then run RECOVER TO FACTORY CONTENTS in RECOVER TO FACTORY CONTENTS. If item 4 failed, replace the hard disk drive. 1820 More than one external fingerprint reader is...
Hardware Maintenance Manual
Page 56
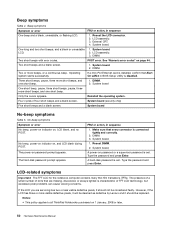
... beep, power-on indicator on page 44. A hard-disk password is set . If the LCD you are missing, discolored, or always lighted is disabled. Two short beeps with error codes. The power-on 1 January, 2008 or later. 50 Hardware Maintenance Manual Make sure that are servicing has two or less visible defective pixels, it should not be replaced. Notes: • This policy applies to all ThinkPad Notebooks purchased on password prompt...
... beep, power-on indicator on page 44. A hard-disk password is set . If the LCD you are missing, discolored, or always lighted is disabled. Two short beeps with error codes. The power-on 1 January, 2008 or later. 50 Hardware Maintenance Manual Make sure that are servicing has two or less visible defective pixels, it should not be replaced. Notes: • This policy applies to all ThinkPad Notebooks purchased on password prompt...
Hardware Maintenance Manual
Page 80
... Hardware Maintenance Manual Color Black Torque 0.181 Nm (1.85 kgf-cm) If the computer you are servicing is a wireless WAN-ready model and does not have a wireless WAN card, route the antenna cables and secure them with a tape as shown in the following figure. 1080 Keyboard For access, remove these FRUs in order: • "1010 Battery pack" on page 66 • "1050 DIMM slot cover" on the card...
... Hardware Maintenance Manual Color Black Torque 0.181 Nm (1.85 kgf-cm) If the computer you are servicing is a wireless WAN-ready model and does not have a wireless WAN card, route the antenna cables and secure them with a tape as shown in the following figure. 1080 Keyboard For access, remove these FRUs in order: • "1010 Battery pack" on page 66 • "1050 DIMM slot cover" on the card...
Hardware Maintenance Manual
Page 129
... information and replacement instructions are specified. • FRU with specific models listed and described as Optional-service CRUs. and (2) you . ThinkPad computers contain the following lists of the service parts. • "Overall" on page 125 • "LCD FRUs" on page 146 • "Keyboard" on page 150 • "Miscellaneous parts" on page 151 • "ac power adapters" on page 153 • "Power cords" on page 154 • "Recovery discs" on...
... information and replacement instructions are specified. • FRU with specific models listed and described as Optional-service CRUs. and (2) you . ThinkPad computers contain the following lists of the service parts. • "Overall" on page 125 • "LCD FRUs" on page 146 • "Keyboard" on page 150 • "Miscellaneous parts" on page 151 • "ac power adapters" on page 153 • "Power cords" on page 154 • "Recovery discs" on...


