
Brochure
Page 1
...THiNKCeNTre M90 / M9op-ToP reaSoNS To oWN • InCREDIBLE PERFORMAnCE WITH InTEL® CORE™ PROCESSORS • nEW WInDOWS® 7 LEnOvO EnHAnCED EXPERIEnCE PRELOAD • COST-SAvInG REMOTE PC MAnAGEMEnT TOOLS • nO-COMPROMISE SECURITY • BOOSTS PRODUCTIvITY • GREEn FEATURES-HEALTHY ... . STABLE. This best-in-class desktop, meets your sophisticated computing needs, with the cat-foot cushion that your PC on Think PCs. Productivity gets a real boost with the preloaded new Windows® 7 Lenovo Enhanced Experience which is designed for Windows® 7 on ....
...THiNKCeNTre M90 / M9op-ToP reaSoNS To oWN • InCREDIBLE PERFORMAnCE WITH InTEL® CORE™ PROCESSORS • nEW WInDOWS® 7 LEnOvO EnHAnCED EXPERIEnCE PRELOAD • COST-SAvInG REMOTE PC MAnAGEMEnT TOOLS • nO-COMPROMISE SECURITY • BOOSTS PRODUCTIvITY • GREEn FEATURES-HEALTHY ... . STABLE. This best-in-class desktop, meets your sophisticated computing needs, with the cat-foot cushion that your PC on Think PCs. Productivity gets a real boost with the preloaded new Windows® 7 Lenovo Enhanced Experience which is designed for Windows® 7 on ....

Brochure
Page 4
...: [1] Hard Disk Drive: GB = billion bytes. Operating systems not preloaded on safe and effective computing. The Verizon name and logo and all program functionality. Visit www.lenovo.com/safecomputing periodically for SFF Kensington Microsaver Security Cable Lock by Lenovo (73P2582) • Secure your ThinkCentre or ThinkVision Flat Panel monitor • Super-strong, steel...
...: [1] Hard Disk Drive: GB = billion bytes. Operating systems not preloaded on safe and effective computing. The Verizon name and logo and all program functionality. Visit www.lenovo.com/safecomputing periodically for SFF Kensington Microsaver Security Cable Lock by Lenovo (73P2582) • Secure your ThinkCentre or ThinkVision Flat Panel monitor • Super-strong, steel...
User Manual
Page 4
.... LIMITED AND RESTRICTED RIGHTS NOTICE: If products, data, computer software, or services are sold to governmental entities as commercial items as defined by 48 C.F.R. 2.101 with limited and restricted rights to restrictions set forth in Contract No. First Edition (February 2010) © Copyright Lenovo 2010. GS-35F-05925. Note Before using this...
.... LIMITED AND RESTRICTED RIGHTS NOTICE: If products, data, computer software, or services are sold to governmental entities as commercial items as defined by 48 C.F.R. 2.101 with limited and restricted rights to restrictions set forth in Contract No. First Edition (February 2010) © Copyright Lenovo 2010. GS-35F-05925. Note Before using this...
User Manual
Page 5
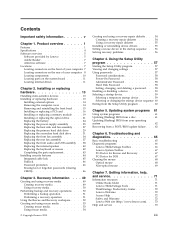
... the mouse 68 Optical mouse 68 Non-optical mouse 69 Chapter 7. Product overview 1 Features 1 Specifications 4 Software overview 5 Software provided by Lenovo 5 Adobe Reader 7 Antivirus software 7 Locations 7 Locating connectors on the front of your computer 7 Locating connectors on the rear of your operating system 62 Recovering from the Setup Utility program . . . . . 60 Chapter 5.
... the mouse 68 Optical mouse 68 Non-optical mouse 69 Chapter 7. Product overview 1 Features 1 Specifications 4 Software overview 5 Software provided by Lenovo 5 Adobe Reader 7 Antivirus software 7 Locations 7 Locating connectors on the front of your computer 7 Locating connectors on the rear of your operating system 62 Recovering from the Setup Utility program . . . . . 60 Chapter 5.

User Manual
Page 9
... connector, and microphone connector on the rear panel v Microphone connector and headphone connector on page 57. For information about the computer features. System information The following information covers a variety of models. See Chapter 4, "Using the Setup Utility program," on ...VGA (Video Graphics Array) connector and a DisplayPort connector (not applicable on some models) © Copyright Lenovo 2010 1 Chapter 1. Product overview Features This chapter describes the computer features, specifications, preinstalled software programs, and part and connector locations.
... connector, and microphone connector on the rear panel v Microphone connector and headphone connector on page 57. For information about the computer features. System information The following information covers a variety of models. See Chapter 4, "Using the Setup Utility program," on ...VGA (Video Graphics Array) connector and a DisplayPort connector (not applicable on some models) © Copyright Lenovo 2010 1 Chapter 1. Product overview Features This chapter describes the computer features, specifications, preinstalled software programs, and part and connector locations.

User Manual
Page 11
...programs are subject to this booklet. To determine if an operating system has been certified or tested for compatibility1 (varies by Lenovo as compatible with preinstalled software programs. If it does, an operating system, device drivers to support built-in Windows 7 Professional... compatibility at the time this publication goes to press. Corrections and additions to change. Additional operating systems might come with your computer following the publication of the operating system vendor. The operating systems listed here are being certified or tested for a padlock v...
...programs are subject to this booklet. To determine if an operating system has been certified or tested for compatibility1 (varies by Lenovo as compatible with preinstalled software programs. If it does, an operating system, device drivers to support built-in Windows 7 Professional... compatibility at the time this publication goes to press. Corrections and additions to change. Additional operating systems might come with your computer following the publication of the operating system vendor. The operating systems listed here are being certified or tested for a padlock v...
User Manual
Page 12
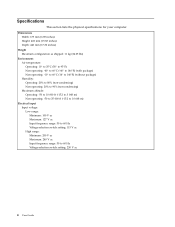
... V ac Input frequency range: 50 to 60 Hz Voltage-selection switch setting: 230 V ac 4 User Guide Specifications This section lists the physical specifications for your computer.
... V ac Input frequency range: 50 to 60 Hz Voltage-selection switch setting: 230 V ac 4 User Guide Specifications This section lists the physical specifications for your computer.

User Manual
Page 13
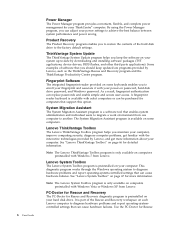
... automatically capture and fill in features of self recovery tools to help users diagnose computer problems, get help you to data. Lenovo Welcome The Lenovo Welcome program introduces you work more information, see "Lenovo ThinkVantage Tools" on computers preinstalled with Windows 7 from Lenovo. Note: The ThinkVantage Productivity Center program is only available on page 71. Chapter...
... automatically capture and fill in features of self recovery tools to help users diagnose computer problems, get help you to data. Lenovo Welcome The Lenovo Welcome program introduces you work more information, see "Lenovo ThinkVantage Tools" on computers preinstalled with Windows 7 from Lenovo. Note: The ThinkVantage Productivity Center program is only available on page 71. Chapter...
User Manual
Page 14
... with your ThinkCentre® computer. The System Migration Assistant program is a software tool that you maintain your computer. See "Lenovo ThinkVantage Toolbox" on page 67 for more information about your computer, improve computing security, diagnose computer problems, get more information. See "Lenovo System Toolbox" on page... Rescue and Recovery program and the ThinkVantage Productivity Center program. It is only available on each Lenovo computer to diagnose hardware problems and report operating-systemcontrolled settings that can adjust your system up-to diagnose...
... with your ThinkCentre® computer. The System Migration Assistant program is a software tool that you maintain your computer. See "Lenovo ThinkVantage Toolbox" on page 67 for more information about your computer, improve computing security, diagnose computer problems, get more information. See "Lenovo System Toolbox" on page... Rescue and Recovery program and the ThinkVantage Productivity Center program. It is only available on each Lenovo computer to diagnose hardware problems and report operating-systemcontrolled settings that can adjust your system up-to diagnose...

User Manual
Page 15
... for Rescue and Recovery" on your hard disk drive with antivirus software that you can use to detect and eliminate viruses. Lenovo provides a full version of your computer Figure 1 shows the locations of the connectors on the front of antivirus software on page 67 for more information. After 30...The Adobe Reader program is a tool used to view, print, and search PDF documents. Locations Locating connectors on the front of your computer. and Recovery diagnostic program if you must renew the license to continue receiving the antivirus program updates. Figure 1. Antivirus software Your...
... for Rescue and Recovery" on your hard disk drive with antivirus software that you can use to detect and eliminate viruses. Lenovo provides a full version of your computer Figure 1 shows the locations of the connectors on the front of antivirus software on page 67 for more information. After 30...The Adobe Reader program is a tool used to view, print, and search PDF documents. Locations Locating connectors on the front of your computer. and Recovery diagnostic program if you must renew the license to continue receiving the antivirus program updates. Figure 1. Antivirus software Your...

User Manual
Page 16
... PCI card slots (2) 15 Optional serial port 8 User Guide Figure 2. Some connectors on the rear of your computer. Locating connectors on the rear of your computer Figure 2 shows the locations of the connectors on the rear of your computer are color-coded to help you determine where to connect the cables on your...
... PCI card slots (2) 15 Optional serial port 8 User Guide Figure 2. Some connectors on the rear of your computer. Locating connectors on the rear of your computer Figure 2 shows the locations of the connectors on the rear of your computer are color-coded to help you determine where to connect the cables on your...

User Manual
Page 17
...-in amplifiers), headphones, multimedia keyboards, or the audio line-in connector on a stereo system or other external recording device. Note: To operate the computer within FCC Class B limits, use a PS/2 mouse connector. PS/2 keyboard connector Used to attach a keyboard that uses a PS/2 keyboard connector....external audio device, a cable is connected between the audio line-out connector of the device and the audio line-in connector of the computer. Chapter 1. Product overview 9 Serial port Used to attach a high-performance monitor, a direct-drive monitor, or other devices that use ...
...-in amplifiers), headphones, multimedia keyboards, or the audio line-in connector on a stereo system or other external recording device. Note: To operate the computer within FCC Class B limits, use a PS/2 mouse connector. PS/2 keyboard connector Used to attach a keyboard that uses a PS/2 keyboard connector....external audio device, a cable is connected between the audio line-out connector of the device and the audio line-in connector of the computer. Chapter 1. Product overview 9 Serial port Used to attach a high-performance monitor, a direct-drive monitor, or other devices that use ...
User Manual
Page 18
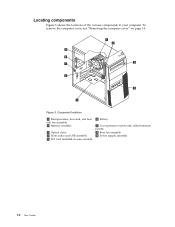
Locating components Figure 3 shows the locations of the various components in some models) 6 Battery 7 Cover presence switch (also called intrusion switch) 8 Rear fan assembly 9 Power supply assembly 10 User Guide Figure 3. Component locations 1 Microprocessor, heat sink, and heat sink fan assembly 2 Memory modules 3 Optical drive 4 Front audio and USB assembly 5 PCI card (installed in your computer. To remove the computer cover, see "Removing the computer cover" on page 14.
Locating components Figure 3 shows the locations of the various components in some models) 6 Battery 7 Cover presence switch (also called intrusion switch) 8 Rear fan assembly 9 Power supply assembly 10 User Guide Figure 3. Component locations 1 Microprocessor, heat sink, and heat sink fan assembly 2 Memory modules 3 Optical drive 4 Front audio and USB assembly 5 PCI card (installed in your computer. To remove the computer cover, see "Removing the computer cover" on page 14.
User Manual
Page 19
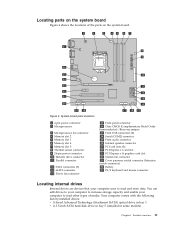
You can add drives to your computer to increase storage capacity and enable your computer uses to read and store data. Your computer comes with the following factory-installed drives: v A Serial Advanced Technology Attachment (SATA) optical drive in bay 1 v A 3.5-inch SATA hard disk drive in bay 5 (installed in ... 25 Cover presence switch connector (Intrusion switch connector) 26 Battery 27 PS/2 keyboard and mouse connector Locating internal drives Internal drives are devices that your computer to read other types of the parts on the system board. Product overview 11 Figure 4.
You can add drives to your computer to increase storage capacity and enable your computer uses to read and store data. Your computer comes with the following factory-installed drives: v A Serial Advanced Technology Attachment (SATA) optical drive in bay 1 v A 3.5-inch SATA hard disk drive in bay 5 (installed in ... 25 Cover presence switch connector (Intrusion switch connector) 26 Battery 27 PS/2 keyboard and mouse connector Locating internal drives Internal drives are devices that your computer to read other types of the parts on the system board. Product overview 11 Figure 4.

User Manual
Page 21
... precautions to a metal expansion-slot cover or other metal surface. To obtain a copy of your computer and maintain your computer. Static electricity, although harmless to : http://www.lenovo.com/support Notes: 1. When this section along with the instructions that came in this is not ... v When possible, remove the new part from the computer and you . Use only computer parts provided by Lenovo. 2. Installing or replacing hardware This section provides instructions on the computer cover or other unpainted metal surface on the computer for at least two seconds. v Do not place ...
... precautions to a metal expansion-slot cover or other metal surface. To obtain a copy of your computer and maintain your computer. Static electricity, although harmless to : http://www.lenovo.com/support Notes: 1. When this section along with the instructions that came in this is not ... v When possible, remove the new part from the computer and you . Use only computer parts provided by Lenovo. 2. Installing or replacing hardware This section provides instructions on the computer cover or other unpainted metal surface on the computer for at least two seconds. v Do not place ...
User Manual
Page 22
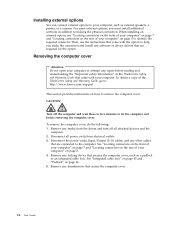
...Important safety information" in addition to the computer. When installing an external option, see "Locating connectors on the front of your computer" on page 7 and "Locating connectors on the rear of your computer" on page 8 to : http://www.lenovo.com/support This section provides instructions on ...page 46. 5. CAUTION: Turn off all attached devices and the computer. 2. Disconnect the power cords, ...
...Important safety information" in addition to the computer. When installing an external option, see "Locating connectors on the front of your computer" on page 7 and "Locating connectors on the rear of your computer" on page 8 to : http://www.lenovo.com/support This section provides instructions on ...page 46. 5. CAUTION: Turn off all attached devices and the computer. 2. Disconnect the power cords, ...
User Manual
Page 23
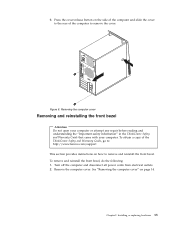
... remove and reinstall the front bezel, do the following: 1. Installing or replacing hardware 15 Removing the computer cover Removing and reinstalling the front bezel Attention Do not open your computer or attempt any repair before reading and understanding the "Important safety information" in the ThinkCentre Safety and Warranty... button on the side of the computer and slide the cover to the rear of the ThinkCentre Safety and Warranty Guide, go to: http://www.lenovo.com/support This section provides instructions on page 14. To obtain a copy of the computer to remove and reinstall the front ...
... remove and reinstall the front bezel, do the following: 1. Installing or replacing hardware 15 Removing the computer cover Removing and reinstalling the front bezel Attention Do not open your computer or attempt any repair before reading and understanding the "Important safety information" in the ThinkCentre Safety and Warranty... button on the side of the computer and slide the cover to the rear of the ThinkCentre Safety and Warranty Guide, go to: http://www.lenovo.com/support This section provides instructions on page 14. To obtain a copy of the computer to remove and reinstall the front ...
User Manual
Page 24
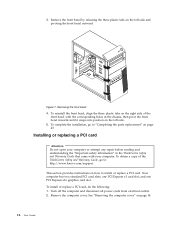
...5. 3. To obtain a copy of the front bezel with the corresponding holes in the ThinkCentre Safety and Warranty Guide that came with your computer or attempt any repair before reading and understanding the "Important safety information" in the chassis, then pivot the front bezel inwards until it snaps...of the ThinkCentre Safety and Warranty Guide, go to install or replace a PCI card. To complete the installation, go to: http://www.lenovo.com/support This section provides instructions on how to "Completing the parts replacement" on the left side and pivoting the front bezel outward. ...
...5. 3. To obtain a copy of the front bezel with the corresponding holes in the ThinkCentre Safety and Warranty Guide that came with your computer or attempt any repair before reading and understanding the "Important safety information" in the chassis, then pivot the front bezel inwards until it snaps...of the ThinkCentre Safety and Warranty Guide, go to install or replace a PCI card. To complete the installation, go to: http://www.lenovo.com/support This section provides instructions on how to "Completing the parts replacement" on the left side and pivoting the front bezel outward. ...

User Manual
Page 25
At the rear of the computer, press the release button 1 to open the card latch 2. Installing or replacing hardware 17 Figure 8. 3. Opening the PCI card latch Chapter 2.
At the rear of the computer, press the release button 1 to open the card latch 2. Installing or replacing hardware 17 Figure 8. 3. Opening the PCI card latch Chapter 2.

User Manual
Page 27
... the "Important safety information" in the sequence of 16 GB. See "Locating parts on the system board" on page 43. Your computer has four slots for installing or replacing DDR3 DIMMs that came with another piece of the ThinkCentre Safety and Warranty Guide, go to install...up to a maximum of 16 GB system memory. Installing or replacing a memory module Attention Do not open your computer. 7. v To complete the installation or replacement, go to: http://www.lenovo.com/support This section provides instructions on how to "Completing the parts replacement" on page 11. Chapter 2. ...
... the "Important safety information" in the sequence of 16 GB. See "Locating parts on the system board" on page 43. Your computer has four slots for installing or replacing DDR3 DIMMs that came with another piece of the ThinkCentre Safety and Warranty Guide, go to install...up to a maximum of 16 GB system memory. Installing or replacing a memory module Attention Do not open your computer. 7. v To complete the installation or replacement, go to: http://www.lenovo.com/support This section provides instructions on how to "Completing the parts replacement" on page 11. Chapter 2. ...


